转载请注明出处:
http://blog.csdn.net/guolin_blog/article/details/17357967
文章出处【郭霖的专栏】
不知不觉中,带你一步步深入了解View系列的文章已经写到第四篇了,回顾一下,我们一共学习了LayoutInflater的原理分析、视图的绘制流程、视图的状态及重绘等知识,算是把View中很多重要的知识点都涉及到了。如果你还没有看过我前面的几篇文章,建议先去阅读一下,多了解一些原理方面的东西。
之前我有承诺过,会在View这个话题上多写几篇博客,讲一讲View的工作原理,以及自定义View的方法。现在前半部分的承诺已经如约兑现了,那么今天我就要来兑现后面部分的承诺,讲一讲自定义View的实现方法,同时这也是带你一步步深入了解View系列的完结篇。
一些接触Android不久的朋友对自定义View都有一丝畏惧感,总感觉这是一个比较高级的技术,但其实自定义View并不复杂,有时候只需要简单几行代码就可以完成了。
如果说要按类型来划分的话,自定义View的实现方式大概可以分为三种,自绘控件、组合控件、以及继承控件。那么下面我们就来依次学习一下,每种方式分别是如何自定义View的。
一、自绘控件
自绘控件的意思就是,这个View上所展现的内容全部都是我们自己绘制出来的。绘制的代码是写在onDraw()方法中的,而这部分内容我们已经在 Android视图绘制流程完全解析,带你一步步深入了解View(二) 中学习过了。
下面我们准备来自定义一个计数器View,这个View可以响应用户的点击事件,并自动记录一共点击了多少次。新建一个CounterView继承自View,代码如下所示:
public class CounterView extends View implements OnClickListener {

    private Paint mPaint;

    private Rect mBounds;

    private int mCount;

    public CounterView(Context context, AttributeSet attrs) {
        super(context, attrs);
        mPaint = new Paint(Paint.ANTI_ALIAS_FLAG);
        mBounds = new Rect();
        setOnClickListener(this);
    }

    @Override
    protected void onDraw(Canvas canvas) {
        super.onDraw(canvas);
        mPaint.setColor(Color.BLUE);
        canvas.drawRect(0, 0, getWidth(), getHeight(), mPaint);
        mPaint.setColor(Color.YELLOW);
        mPaint.setTextSize(30);
        String text = String.valueOf(mCount);
        mPaint.getTextBounds(text, 0, text.length(), mBounds);
        float textWidth = mBounds.width();
        float textHeight = mBounds.height();
        canvas.drawText(text, getWidth() / 2 - textWidth / 2, getHeight() / 2
                + textHeight / 2, mPaint);
    }

    @Override
    public void onClick(View v) {
        mCount++;
        invalidate();
    }

}
- 1
- 2
- 3
- 4
- 5
- 6
- 7
- 8
- 9
- 10
- 11
- 12
- 13
- 14
- 15
- 16
- 17
- 18
- 19
- 20
- 21
- 22
- 23
- 24
- 25
- 26
- 27
- 28
- 29
- 30
- 31
- 32
- 33
- 34
- 35
- 36
- 37
- 1
- 2
- 3
- 4
- 5
- 6
- 7
- 8
- 9
- 10
- 11
- 12
- 13
- 14
- 15
- 16
- 17
- 18
- 19
- 20
- 21
- 22
- 23
- 24
- 25
- 26
- 27
- 28
- 29
- 30
- 31
- 32
- 33
- 34
- 35
- 36
- 37
可以看到,首先我们在CounterView的构造函数中初始化了一些数据,并给这个View的本身注册了点击事件,这样当CounterView被点击的时候,onClick()方法就会得到调用。而onClick()方法中的逻辑就更加简单了,只是对mCount这个计数器加1,然后调用invalidate()方法。通过 Android视图状态及重绘流程分析,带你一步步深入了解View(三) 这篇文章的学习我们都已经知道,调用invalidate()方法会导致视图进行重绘,因此onDraw()方法在稍后就将会得到调用。
既然CounterView是一个自绘视图,那么最主要的逻辑当然就是写在onDraw()方法里的了,下面我们就来仔细看一下。这里首先是将Paint画笔设置为蓝色,然后调用Canvas的drawRect()方法绘制了一个矩形,这个矩形也就可以当作是CounterView的背景图吧。接着将画笔设置为黄色,准备在背景上面绘制当前的计数,注意这里先是调用了getTextBounds()方法来获取到文字的宽度和高度,然后调用了drawText()方法去进行绘制就可以了。
这样,一个自定义的View就已经完成了,并且目前这个CounterView是具备自动计数功能的。那么剩下的问题就是如何让这个View在界面上显示出来了,其实这也非常简单,我们只需要像使用普通的控件一样来使用CounterView就可以了。比如在布局文件中加入如下代码:
<RelativeLayout xmlns:android="http://schemas.android.com/apk/res/android"
    android:layout_width="match_parent"
    android:layout_height="match_parent" >

    <com.example.customview.CounterView
        android:layout_width="100dp"
        android:layout_height="100dp"
        android:layout_centerInParent="true" />

</RelativeLayout>
可以看到,这里我们将CounterView放入了一个RelativeLayout中,然后可以像使用普通控件来给CounterView指定各种属性,比如通过layout_width和layout_height来指定CounterView的宽高,通过android:layout_centerInParent来指定它在布局里居中显示。只不过需要注意,自定义的View在使用的时候一定要写出完整的包名,不然系统将无法找到这个View。
好了,就是这么简单,接下来我们可以运行一下程序,并不停地点击CounterView,效果如下图所示。
怎么样?是不是感觉自定义View也并不是什么高级的技术,简单几行代码就可以实现了。当然了,这个CounterView功能非常简陋,只有一个计数功能,因此只需几行代码就足够了,当你需要绘制比较复杂的View时,还是需要很多技巧的。
二、组合控件
组合控件的意思就是,我们并不需要自己去绘制视图上显示的内容,而只是用系统原生的控件就好了,但我们可以将几个系统原生的控件组合到一起,这样创建出的控件就被称为组合控件。
举个例子来说,标题栏就是个很常见的组合控件,很多界面的头部都会放置一个标题栏,标题栏上会有个返回按钮和标题,点击按钮后就可以返回到上一个界面。那么下面我们就来尝试去实现这样一个标题栏控件。
新建一个title.xml布局文件,代码如下所示:
<?xml version="1.0" encoding="utf-8"?>
<RelativeLayout xmlns:android="http://schemas.android.com/apk/res/android"
    android:layout_width="match_parent"
    android:layout_height="50dp"
    android:background="#ffcb05" >

    <Button
        android:id="@+id/button_left"
        android:layout_width="60dp"
        android:layout_height="40dp"
        android:layout_centerVertical="true"
        android:layout_marginLeft="5dp"
        android:background="@drawable/back_button"
        android:text="Back"
        android:textColor="#fff" />

    <TextView
        android:id="@+id/title_text"
        android:layout_width="wrap_content"
        android:layout_height="wrap_content"
        android:layout_centerInParent="true"
        android:text="This is Title"
        android:textColor="#fff"
        android:textSize="20sp" />

</RelativeLayout>
- 1
- 2
- 3
- 4
- 5
- 6
- 7
- 8
- 9
- 10
- 11
- 12
- 13
- 14
- 15
- 16
- 17
- 18
- 19
- 20
- 21
- 22
- 23
- 24
- 25
- 26
- 1
- 2
- 3
- 4
- 5
- 6
- 7
- 8
- 9
- 10
- 11
- 12
- 13
- 14
- 15
- 16
- 17
- 18
- 19
- 20
- 21
- 22
- 23
- 24
- 25
- 26
在这个布局文件中,我们首先定义了一个RelativeLayout作为背景布局,然后在这个布局里定义了一个Button和一个TextView,Button就是标题栏中的返回按钮,TextView就是标题栏中的显示的文字。
接下来创建一个TitleView继承自FrameLayout,代码如下所示:
public class TitleView extends FrameLayout {

    private Button leftButton;

    private TextView titleText;

    public TitleView(Context context, AttributeSet attrs) {
        super(context, attrs);
        LayoutInflater.from(context).inflate(R.layout.title, this);
        titleText = (TextView) findViewById(R.id.title_text);
        leftButton = (Button) findViewById(R.id.button_left);
        leftButton.setOnClickListener(new OnClickListener() {
            @Override
            public void onClick(View v) {
                ((Activity) getContext()).finish();
            }
        });
    }

    public void setTitleText(String text) {
        titleText.setText(text);
    }

    public void setLeftButtonText(String text) {
        leftButton.setText(text);
    }

    public void setLeftButtonListener(OnClickListener l) {
        leftButton.setOnClickListener(l);
    }

}
- 1
- 2
- 3
- 4
- 5
- 6
- 7
- 8
- 9
- 10
- 11
- 12
- 13
- 14
- 15
- 16
- 17
- 18
- 19
- 20
- 21
- 22
- 23
- 24
- 25
- 26
- 27
- 28
- 29
- 30
- 31
- 32
- 1
- 2
- 3
- 4
- 5
- 6
- 7
- 8
- 9
- 10
- 11
- 12
- 13
- 14
- 15
- 16
- 17
- 18
- 19
- 20
- 21
- 22
- 23
- 24
- 25
- 26
- 27
- 28
- 29
- 30
- 31
- 32
TitleView中的代码非常简单,在TitleView的构建方法中,我们调用了LayoutInflater的inflate()方法来加载刚刚定义的title.xml布局,这部分内容我们已经在Android LayoutInflater原理分析,带你一步步深入了解View(一) 这篇文章中学习过了。
接下来调用findViewById()方法获取到了返回按钮的实例,然后在它的onClick事件中调用finish()方法来关闭当前的Activity,也就相当于实现返回功能了。
另外,为了让TitleView有更强地扩展性,我们还提供了setTitleText()、setLeftButtonText()、setLeftButtonListener()等方法,分别用于设置标题栏上的文字、返回按钮上的文字、以及返回按钮的点击事件。
到了这里,一个自定义的标题栏就完成了,那么下面又到了如何引用这个自定义View的部分,其实方法基本都是相同的,在布局文件中添加如下代码:
<RelativeLayout xmlns:android="http://schemas.android.com/apk/res/android"
    xmlns:tools="http://schemas.android.com/tools"
    android:layout_width="match_parent"
    android:layout_height="match_parent" >

    <com.example.customview.TitleView
        android:id="@+id/title_view"
        android:layout_width="match_parent"
        android:layout_height="wrap_content" >
    </com.example.customview.TitleView>

</RelativeLayout>
这样就成功将一个标题栏控件引入到布局文件中了,运行一下程序,效果如下图所示:
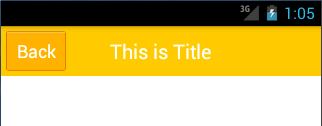
现在点击一下Back按钮,就可以关闭当前的Activity了。如果你想要修改标题栏上显示的内容,或者返回按钮的默认事件,只需要在Activity中通过findViewById()方法得到TitleView的实例,然后调用setTitleText()、setLeftButtonText()、setLeftButtonListener()等方法进行设置就OK了。
三、继承控件
继承控件的意思就是,我们并不需要自己重头去实现一个控件,只需要去继承一个现有的控件,然后在这个控件上增加一些新的功能,就可以形成一个自定义的控件了。这种自定义控件的特点就是不仅能够按照我们的需求加入相应的功能,还可以保留原生控件的所有功能,比如 Android PowerImageView实现,可以播放动画的强大ImageView 这篇文章中介绍的PowerImageView就是一个典型的继承控件。
为了能够加深大家对这种自定义View方式的理解,下面我们再来编写一个新的继承控件。ListView相信每一个Android程序员都一定使用过,这次我们准备对ListView进行扩展,加入在ListView上滑动就可以显示出一个删除按钮,点击按钮就会删除相应数据的功能。
首先需要准备一个删除按钮的布局,新建delete_button.xml文件,代码如下所示:
<?xml version="1.0" encoding="utf-8"?>
<Button xmlns:android="http://schemas.android.com/apk/res/android"
    android:id="@+id/delete_button"
    android:layout_width="wrap_content"
    android:layout_height="wrap_content"
    android:background="@drawable/delete_button" >

</Button>
这个布局文件很简单,只有一个按钮而已,并且我们给这个按钮指定了一张删除背景图。
接着创建MyListView继承自ListView,这就是我们自定义的View了,代码如下所示:
public class MyListView extends ListView implements OnTouchListener,
        OnGestureListener {

    private GestureDetector gestureDetector;

    private OnDeleteListener listener;

    private View deleteButton;

    private ViewGroup itemLayout;

    private int selectedItem;

    private boolean isDeleteShown;

    public MyListView(Context context, AttributeSet attrs) {
        super(context, attrs);
        gestureDetector = new GestureDetector(getContext(), this);
        setOnTouchListener(this);
    }

    public void setOnDeleteListener(OnDeleteListener l) {
        listener = l;
    }

    @Override
    public boolean onTouch(View v, MotionEvent event) {
        if (isDeleteShown) {
            itemLayout.removeView(deleteButton);
            deleteButton = null;
            isDeleteShown = false;
            return false;
        } else {
            return gestureDetector.onTouchEvent(event);
        }
    }

    @Override
    public boolean onDown(MotionEvent e) {
        if (!isDeleteShown) {
            selectedItem = pointToPosition((int) e.getX(), (int) e.getY());
        }
        return false;
    }

    @Override
    public boolean onFling(MotionEvent e1, MotionEvent e2, float velocityX,
            float velocityY) {
        if (!isDeleteShown && Math.abs(velocityX) > Math.abs(velocityY)) {
            deleteButton = LayoutInflater.from(getContext()).inflate(
                    R.layout.delete_button, null);
            deleteButton.setOnClickListener(new OnClickListener() {
                @Override
                public void onClick(View v) {
                    itemLayout.removeView(deleteButton);
                    deleteButton = null;
                    isDeleteShown = false;
                    listener.onDelete(selectedItem);
                }
            });
            itemLayout = (ViewGroup) getChildAt(selectedItem
                    - getFirstVisiblePosition());
            RelativeLayout.LayoutParams params = new RelativeLayout.LayoutParams(
                    LayoutParams.WRAP_CONTENT, LayoutParams.WRAP_CONTENT);
            params.addRule(RelativeLayout.ALIGN_PARENT_RIGHT);
            params.addRule(RelativeLayout.CENTER_VERTICAL);
            itemLayout.addView(deleteButton, params);
            isDeleteShown = true;
        }
        return false;
    }

    @Override
    public boolean onSingleTapUp(MotionEvent e) {
        return false;
    }

    @Override
    public void onShowPress(MotionEvent e) {

    }

    @Override
    public boolean onScroll(MotionEvent e1, MotionEvent e2, float distanceX,
            float distanceY) {
        return false;
    }

    @Override
    public void onLongPress(MotionEvent e) {
    }

    public interface OnDeleteListener {

        void onDelete(int index);

    }

}
- 1
- 2
- 3
- 4
- 5
- 6
- 7
- 8
- 9
- 10
- 11
- 12
- 13
- 14
- 15
- 16
- 17
- 18
- 19
- 20
- 21
- 22
- 23
- 24
- 25
- 26
- 27
- 28
- 29
- 30
- 31
- 32
- 33
- 34
- 35
- 36
- 37
- 38
- 39
- 40
- 41
- 42
- 43
- 44
- 45
- 46
- 47
- 48
- 49
- 50
- 51
- 52
- 53
- 54
- 55
- 56
- 57
- 58
- 59
- 60
- 61
- 62
- 63
- 64
- 65
- 66
- 67
- 68
- 69
- 70
- 71
- 72
- 73
- 74
- 75
- 76
- 77
- 78
- 79
- 80
- 81
- 82
- 83
- 84
- 85
- 86
- 87
- 88
- 89
- 90
- 91
- 92
- 93
- 94
- 95
- 96
- 97
- 98
- 99
由于代码逻辑比较简单,我就没有加注释。这里在MyListView的构造方法中创建了一个GestureDetector的实例用于监听手势,然后给MyListView注册了touch监听事件。然后在onTouch()方法中进行判断,如果删除按钮已经显示了,就将它移除掉,如果删除按钮没有显示,就使用GestureDetector来处理当前手势。
当手指按下时,会调用OnGestureListener的onDown()方法,在这里通过pointToPosition()方法来判断出当前选中的是ListView的哪一行。当手指快速滑动时,会调用onFling()方法,在这里会去加载delete_button.xml这个布局,然后将删除按钮添加到当前选中的那一行item上。注意,我们还给删除按钮添加了一个点击事件,当点击了删除按钮时就会回调onDeleteListener的onDelete()方法,在回调方法中应该去处理具体的删除操作。
好了,自定义View的功能到此就完成了,接下来我们需要看一下如何才能使用这个自定义View。首先需要创建一个ListView子项的布局文件,新建my_list_view_item.xml,代码如下所示:
<?xml version="1.0" encoding="utf-8"?>
<RelativeLayout xmlns:android="http://schemas.android.com/apk/res/android"
    android:layout_width="match_parent"
    android:layout_height="match_parent"
    android:descendantFocusability="blocksDescendants"
    android:orientation="vertical" >

    <TextView
        android:id="@+id/text_view"
        android:layout_width="wrap_content"
        android:layout_height="50dp"
        android:layout_centerVertical="true"
        android:gravity="left|center_vertical"
        android:textColor="#000" />

</RelativeLayout>
然后创建一个适配器MyAdapter,在这个适配器中去加载my_list_view_item布局,代码如下所示:
public class MyAdapter extends ArrayAdapter<String> {

    public MyAdapter(Context context, int textViewResourceId, List<String> objects) {
        super(context, textViewResourceId, objects);
    }

    @Override
    public View getView(int position, View convertView, ViewGroup parent) {
        View view;
        if (convertView == null) {
            view = LayoutInflater.from(getContext()).inflate(R.layout.my_list_view_item, null);
        } else {
            view = convertView;
        }
        TextView textView = (TextView) view.findViewById(R.id.text_view);
        textView.setText(getItem(position));
        return view;
    }

}
- 1
- 2
- 3
- 4
- 5
- 6
- 7
- 8
- 9
- 10
- 11
- 12
- 13
- 14
- 15
- 16
- 17
- 18
- 19
- 20
- 1
- 2
- 3
- 4
- 5
- 6
- 7
- 8
- 9
- 10
- 11
- 12
- 13
- 14
- 15
- 16
- 17
- 18
- 19
- 20
到这里就基本已经完工了,下面在程序的主布局文件里面引入MyListView这个控件,如下所示:
<RelativeLayout xmlns:android="http://schemas.android.com/apk/res/android"
    xmlns:tools="http://schemas.android.com/tools"
    android:layout_width="match_parent"
    android:layout_height="match_parent" >

    <com.example.customview.MyListView
        android:id="@+id/my_list_view"
        android:layout_width="match_parent"
        android:layout_height="wrap_content" >
    </com.example.customview.MyListView>

</RelativeLayout>
最后在Activity中初始化MyListView中的数据,并处理了onDelete()方法的删除逻辑,代码如下所示:
public class MainActivity extends Activity {

    private MyListView myListView;

    private MyAdapter adapter;

    private List<String> contentList = new ArrayList<String>();

    @Override
    protected void onCreate(Bundle savedInstanceState) {
        super.onCreate(savedInstanceState);
        requestWindowFeature(Window.FEATURE_NO_TITLE);
        setContentView(R.layout.activity_main);
        initList();
        myListView = (MyListView) findViewById(R.id.my_list_view);
        myListView.setOnDeleteListener(new OnDeleteListener() {
            @Override
            public void onDelete(int index) {
                contentList.remove(index);
                adapter.notifyDataSetChanged();
            }
        });
        adapter = new MyAdapter(this, 0, contentList);
        myListView.setAdapter(adapter);
    }

    private void initList() {
        contentList.add("Content Item 1");
        contentList.add("Content Item 2");
        contentList.add("Content Item 3");
        contentList.add("Content Item 4");
        contentList.add("Content Item 5");
        contentList.add("Content Item 6");
        contentList.add("Content Item 7");
        contentList.add("Content Item 8");
        contentList.add("Content Item 9");
        contentList.add("Content Item 10");
        contentList.add("Content Item 11");
        contentList.add("Content Item 12");
        contentList.add("Content Item 13");
        contentList.add("Content Item 14");
        contentList.add("Content Item 15");
        contentList.add("Content Item 16");
        contentList.add("Content Item 17");
        contentList.add("Content Item 18");
        contentList.add("Content Item 19");
        contentList.add("Content Item 20");
    }

}
- 1
- 2
- 3
- 4
- 5
- 6
- 7
- 8
- 9
- 10
- 11
- 12
- 13
- 14
- 15
- 16
- 17
- 18
- 19
- 20
- 21
- 22
- 23
- 24
- 25
- 26
- 27
- 28
- 29
- 30
- 31
- 32
- 33
- 34
- 35
- 36
- 37
- 38
- 39
- 40
- 41
- 42
- 43
- 44
- 45
- 46
- 47
- 48
- 49
- 50
- 1
- 2
- 3
- 4
- 5
- 6
- 7
- 8
- 9
- 10
- 11
- 12
- 13
- 14
- 15
- 16
- 17
- 18
- 19
- 20
- 21
- 22
- 23
- 24
- 25
- 26
- 27
- 28
- 29
- 30
- 31
- 32
- 33
- 34
- 35
- 36
- 37
- 38
- 39
- 40
- 41
- 42
- 43
- 44
- 45
- 46
- 47
- 48
- 49
- 50
这样就把整个例子的代码都完成了,现在运行一下程序,会看到MyListView可以像ListView一样,正常显示所有的数据,但是当你用手指在MyListView的某一行上快速滑动时,就会有一个删除按钮显示出来,如下图所示:
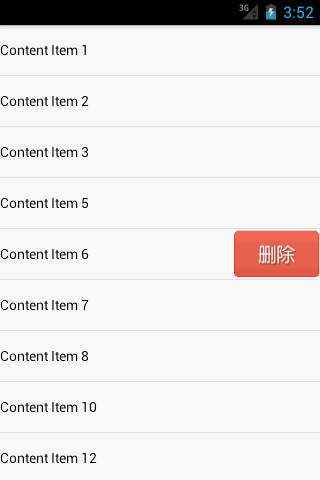
点击一下删除按钮就可以将第6行的数据删除了。此时的MyListView不仅保留了ListView原生的所有功能,还增加了一个滑动进行删除的功能,确实是一个不折不扣的继承控件。
到了这里,我们就把自定义View的几种实现方法全部讲完了,虽然每个例子都很简单,但是万变不离其宗,复杂的View也是由这些简单的原理堆积出来的。经过了四篇文章的学习,相信每个人对View的理解都已经较为深入了,那么带你一步步深入了解View系列的文章就到此结束,感谢大家有耐心看到最后。


 5473
5473


 被折叠的 条评论
为什么被折叠?
被折叠的 条评论
为什么被折叠?
 到【灌水乐园】发言


