


有时候我们需要这样的需求:在桌面模式下当画板用,在上面写写画画,添加一些批注等。
很自然我们会想到用GDI绘制,可是用GDI,免不了要有一块“板”绘制,也就是免不了窗体,既然要在桌面模式下,那现在的问题就转到如何把窗体设置成全透明模式。透明,很容易想到窗体的Opacity属性,可是若把这个设成全透明,那完全没效果,根本找不到窗体在哪,运行就跟没运行一样,更不用说获得窗体焦点了,可见这条路是行不通的。
难道就没办法了吗?好在除了Opacity属性,窗体还有一个属性叫TransparencyKey,只要把该属性和窗体背景色(BackColor)设成一样的颜色,运行后的窗体也是全透明的,可是好不容易找到这条路,却发现还有另一重大问题,即运行后的窗体死活都得不到焦点,更别想在窗体上绘制任何东西,似乎又到了另一个“死胡同”,如何解决??
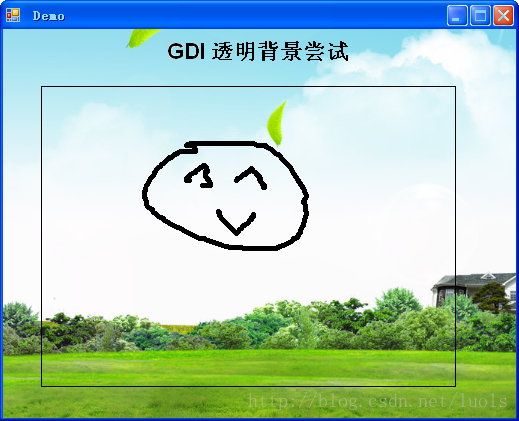
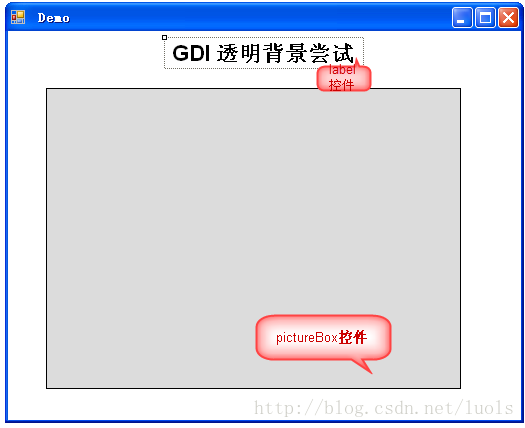
此时我想起之前写过一篇简易画板,按照原先的操作重复尝试了下,没想到意外的重大收获来得这么快!~就是不要直接在窗体上绘制,在窗体加一个PictureBox控件,在PictureBox上绘制就完全达到了所要的效果,先睹为快先!~
下面这是设计窗体
附上测试源码
        Bitmap originImg;
        Image finishImg;
        Graphics g;
        Pen p = new Pen(Color.Black, 5);
        bool startDraw;
        List<Point> lstPoint = new List<Point>();

        public Form1()
        {
            InitializeComponent();
            //设置双缓冲,避免闪烁
            this.SetStyle(ControlStyles.OptimizedDoubleBuffer | ControlStyles.AllPaintingInWmPaint | ControlStyles.UserPaint, true);
            this.UpdateStyles();

            //设置笔的属性,避免出现“毛刺”
            p.StartCap = LineCap.Round;
            p.EndCap = LineCap.Round;
            p.LineJoin = LineJoin.Round;
        }

        protected override void OnLoad(EventArgs e)
        {
            base.OnLoad(e);

            originImg = new Bitmap(pictureBox1.Width, pictureBox1.Height);
            g = Graphics.FromImage(originImg);
            //画布背景初始化为白底
            g.Clear(Color.White);

            pictureBox1.Image = originImg;
            finishImg = (Image)originImg.Clone();
        }

        private void pictureBox1_MouseDown(object sender, MouseEventArgs e)
        {
            if (e.Button == MouseButtons.Left)
            {
                startDraw = true;

                lstPoint.Clear();
                lstPoint.Add(e.Location);
                finishImg = (Image)originImg.Clone();
            }
        }

        private void pictureBox1_MouseMove(object sender, MouseEventArgs e)
        {
            if (startDraw)
            {
                g = Graphics.FromImage(finishImg);
                g.SmoothingMode = SmoothingMode.AntiAlias; //抗锯齿

                lstPoint.Add(e.Location);
                g = Graphics.FromImage(finishImg);
                g.DrawCurve(p, lstPoint.ToArray());

                reDraw();
            }
        }

        private void pictureBox1_MouseUp(object sender, MouseEventArgs e)
        {
            startDraw = false;
            originImg = (Bitmap)finishImg;

            pictureBox1.Image = originImg;
        }
        /// <summary>
        /// 重绘绘图区(二次缓冲技术)
        /// </summary>
        private void reDraw()
        {
            using (Graphics graphics = pictureBox1.CreateGraphics())
            {
                graphics.DrawImage(finishImg, new Point(0, 0));
            }
        }
总结:其实就是之前那篇简易画板加个透明窗体背景而已
特别说明:本文所提供的方案仅限XP系统下使用


 5649
5649


 被折叠的 条评论
为什么被折叠?
被折叠的 条评论
为什么被折叠?
 到【灌水乐园】发言


