


一、WPF中的两棵树
WPF中每个控件的Template都是由ControlTemplate构成,ControlTemplate包含了构成该控件的各种子控件,这些子控件就构成了VisualTree;而在我们可见的界面,所有搭建出整个程序UI的控件构成了LoginTree。VisualTree和LoginTree相互独立,互相不可访问,每中树都有各自的方法来查找自己的子控件。
二、寻找ControlTemplate中的控件
首先,我们在资源中新建一个包含三个TextBox的ControlTemplate,把它赋值给一个UserControl对象;然后我们再在程序界面添加一个TextBox,在资源中引用之前把TextBox改成圆角风格的Style:
<Window x:Class="_11_221.MainWindow"
xmlns="http://schemas.microsoft.com/winfx/2006/xaml/presentation"
xmlns:x="http://schemas.microsoft.com/winfx/2006/xaml"
Title="MainWindow" Height="350" Width="525">
<Window.Resources>
<ControlTemplate x:Key="cTmp">
<StackPanel Background="Orange">
<TextBox x:Name="textBox1" Margin="6"/>
<TextBox x:Name="textBox2" Margin="6,0"/>
<TextBox x:Name="textBox3" Margin="6"/>
</StackPanel>
</ControlTemplate>
<Style BasedOn="{x:Null}" TargetType="{x:Type TextBox}" x:Key="tbstyle">
<Setter Property="Foreground" Value="{DynamicResource {x:Static SystemColors.ControlTextBrushKey}}"/>
<Setter Property="Background" Value="{DynamicResource {x:Static SystemColors.WindowBrushKey}}"/>
<Setter Property="BorderThickness" Value="1"/>
<Setter Property="Padding" Value="1"/>
<Setter Property="AllowDrop" Value="true"/>
<Setter Property="FocusVisualStyle" Value="{x:Null}"/>
<Setter Property="ScrollViewer.PanningMode" Value="VerticalFirst"/>
<Setter Property="Stylus.IsFlicksEnabled" Value="False"/>
<Setter Property="Template">
<Setter.Value>
<ControlTemplate TargetType="{x:Type TextBox}">
<Border x:Name="Bd" BorderBrush="{TemplateBinding BorderBrush}" BorderThickness="{TemplateBinding BorderThickness}" Background="{TemplateBinding Background}" SnapsToDevicePixels="true"
CornerRadius="10">
<TextBlock x:Name="textblck1" SnapsToDevicePixels="{TemplateBinding SnapsToDevicePixels}"/>
</Border>
<ControlTemplate.Triggers>
<Trigger Property="IsEnabled" Value="false">
<Setter Property="Background" TargetName="Bd" Value="{DynamicResource {x:Static SystemColors.ControlBrushKey}}"/>
<Setter Property="Foreground" Value="{DynamicResource {x:Static SystemColors.GrayTextBrushKey}}"/>
</Trigger>
</ControlTemplate.Triggers>
</ControlTemplate>
</Setter.Value>
</Setter>
</Style>
</Window.Resources>
<Grid>
<StackPanel Background="Yellow">
<UserControl x:Name="uc" Template="{StaticResource cTmp}" Margin="5"/>
<TextBox x:Name="tb" Style="{StaticResource tbstyle}"/>
<Button Content="find" Width="120" Height="30" Click="Button_Click"/>
</StackPanel>
</Grid>
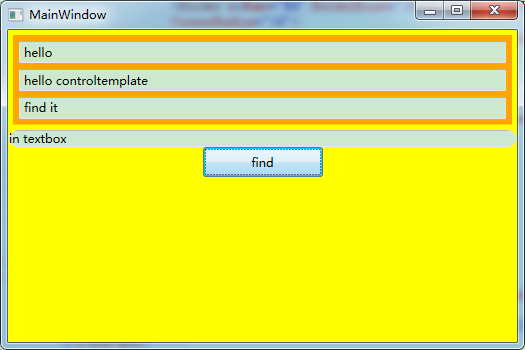
</Window>我们实现的效果是,点击按钮,分别从UserControl和TextBox中找到构成他们的ControlTemplate,然后找到子控件并进行相关操作:
后台代码:
private void Button_Click(object sender, RoutedEventArgs e)
        {
            TextBox t = this.uc.Template.FindName("textBox1", this.uc) as TextBox;
            t.Text = "hello";
            StackPanel sp = t.Parent as StackPanel;
            (sp.Children[1] as TextBox).Text = "hello controltemplate";
            (sp.Children[2] as TextBox).Text = "find it";

            TextBlock tbl = this.tb.Template.FindName("textblck1", this.tb) as TextBlock;
            tbl.Text = "in textbox";
        }
ControlTemplate和DateTemplate都属于Template,都可以给Template进行赋值,Template中提供了一个叫做FindName的接口,可以用来寻找模板中的控件。
三、寻找DataTemplate中的控件
首先,先定义一个用于使用DataTemplate的类Student:
public class Student
    {
        public int Id { get; set; }
        public string Name { get; set; }
        public string Skill { get; set; }
        public bool HasJob { get; set; }
    }
XMAL代码如下:
<Window x:Class="_11_222.MainWindow"
xmlns="http://schemas.microsoft.com/winfx/2006/xaml/presentation"
xmlns:x="http://schemas.microsoft.com/winfx/2006/xaml"
xmlns:local="clr-namespace:_11_222"
Title="MainWindow" Height="350" Width="525">
<Window.Resources>
<local:Student x:Key="stu" Id="1" Name="Hyman" Skill="Linux" HasJob="True"/>
<DataTemplate x:Key="stuDT">
<StackPanel Orientation="Horizontal">
<TextBox Name="textbox1" Text="{Binding Id}"/>
<TextBox Name="textbox2" Text="{Binding Name}"/>
<TextBox Name="textbox3" Text="{Binding Skill}"/>
</StackPanel>
</DataTemplate>
</Window.Resources>
<Grid>
<StackPanel>
<ContentPresenter x:Name="cp" Content="{StaticResource stu}" ContentTemplate="{StaticResource stuDT}" />
<Button x:Name="button" Width="120" Height="30" Click="button_Click" Content="find"/>
</StackPanel>
</Grid>
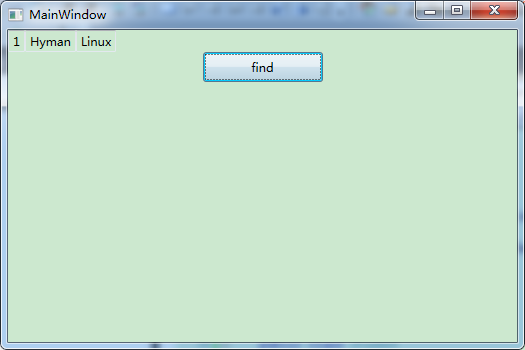
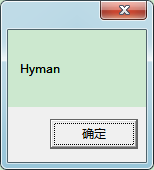
</Window>实现find按钮的处理函数,将找到的TextBox中的内容用MessageBox弹出:
private void button_Click(object sender, RoutedEventArgs e)
        {
            TextBox tb = this.cp.ContentTemplate.FindName("textbox2", this.cp) as TextBox;
            MessageBox.Show(tb.Text);
        }
界面效果如下:


 210
210


 被折叠的 条评论
为什么被折叠?
被折叠的 条评论
为什么被折叠?
 到【灌水乐园】发言


