


(一)概述
(二)常用属性与基础实例
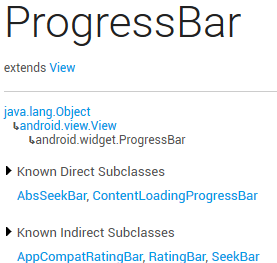
从官方的API我们可以看到这样一个类的关系图:

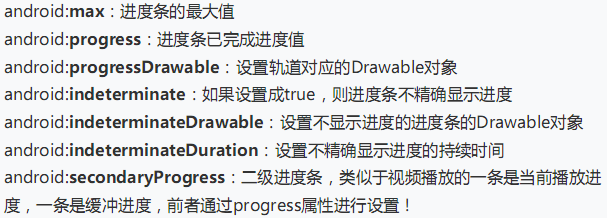
常用属性详解 :
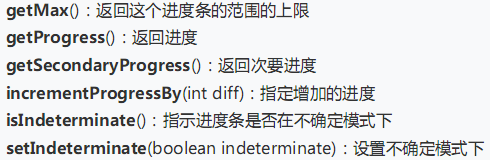
对应在java我们可以调用下述方法:
先看看系统给我们提供的进度条吧
运行效果如下:
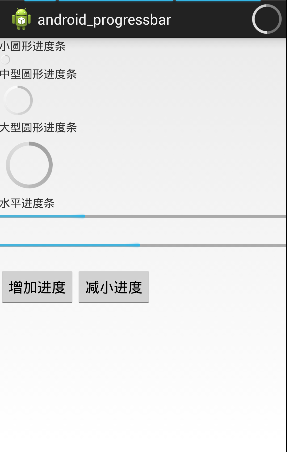
实现代码:
xml文件
<LinearLayout xmlns:android="http://schemas.android.com/apk/res/android"
    xmlns:tools="http://schemas.android.com/tools"
    android:layout_width="match_parent"
    android:layout_height="match_parent"
    android:orientation="vertical"
    tools:context="com.example.android_progressbar.MainActivity" >

    <TextView
        android:layout_width="wrap_content"
        android:layout_height="wrap_content"
        android:text="小圆形进度条" />

    <ProgressBar
        style="?android:attr/progressBarStyleSmallTitle"
        android:layout_width="wrap_content"
        android:layout_height="wrap_content" >
    </ProgressBar>

    <TextView
        android:layout_width="wrap_content"
        android:layout_height="wrap_content"
        android:text="中型圆形进度条" />

    <ProgressBar
        android:layout_width="wrap_content"
        android:layout_height="wrap_content" >
    </ProgressBar>

    <TextView
        android:layout_width="wrap_content"
        android:layout_height="wrap_content"
        android:text="大型圆形进度条" />

    <ProgressBar
        style="?android:attr/progressBarStyleLarge"
        android:layout_width="wrap_content"
        android:layout_height="wrap_content" >
    </ProgressBar>

    <TextView
        android:layout_width="wrap_content"
        android:layout_height="wrap_content"
        android:text="水平进度条" />

    <ProgressBar
        style="?android:attr/progressBarStyleHorizontal"
        android:layout_width="fill_parent"
        android:layout_height="wrap_content"
        android:max="100"
        android:progress="30" >
    </ProgressBar>

    <ProgressBar
        android:id="@+id/progressbar"
        style="?android:attr/progressBarStyleHorizontal"
        android:layout_width="fill_parent"
        android:layout_height="wrap_content"
        android:layout_marginTop="20dp"
        android:max="100"
        android:progress="30"
        android:secondaryProgress="60" >
    </ProgressBar>

    <LinearLayout
        android:layout_width="fill_parent"
        android:layout_height="fill_parent"
        android:orientation="horizontal" >

        <Button
            android:id="@+id/button1"
            android:layout_width="wrap_content"
            android:layout_height="wrap_content"
            android:layout_marginTop="20dp"
            android:text="增加进度" >
        </Button>

        <Button
            android:id="@+id/button2"
            android:layout_width="wrap_content"
            android:layout_height="wrap_content"
            android:layout_marginTop="20dp"
            android:text="减小进度" >
        </Button>
    </LinearLayout>

</LinearLayout>
java文件
public class MainActivity extends Activity implements OnClickListener{

    private ProgressBar progressBar;
    private Button button1 ,button2;
    @Override
    protected void onCreate(Bundle savedInstanceState) {
        super.onCreate(savedInstanceState);
       //如何设置窗口有刻度的效果
        requestWindowFeature(Window.FEATURE_PROGRESS);//设置手机屏幕最上面的进度条
        requestWindowFeature(Window.FEATURE_INDETERMINATE_PROGRESS);//设置ActionBar中最右边的进度条

        setContentView(R.layout.activity_main);
        progressBar = (ProgressBar) findViewById(R.id.progressbar);
        setProgressBarVisibility(true); //激活进度条
        setProgressBarIndeterminate(true);//设置进度条为不确定模式下
        setProgress(3500);


        button1 = (Button) this.findViewById(R.id.button1);
        button2 = (Button) this.findViewById(R.id.button2);
        button1.setOnClickListener(this);
        button2.setOnClickListener(this);

    }
    @Override
    public void onClick(View v) {
        // TODO Auto-generated method stub
        switch (v.getId()) {
        case R.id.button1:
            progressBar.setProgress((int)(progressBar.getProgress() * 1.2));
            progressBar.setSecondaryProgress((int)(progressBar.getSecondaryProgress()*1.2));

            break;

        case R.id.button2:

            progressBar.setProgress((int)(progressBar.getProgress() * 0.8));
            progressBar.setSecondaryProgress((int)(progressBar.getSecondaryProgress()*0.8));
            break;
        }
    }
}
代码比较简单,已经加入注释了额 ,我们实际开发中使用的进度条都不会这么用,因为—丑!那么问题来了又没有好的办法呢?有!
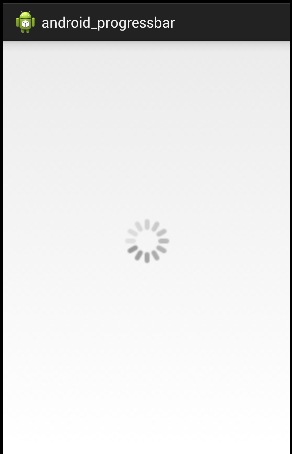
(三)使用动画来替代原始进度条

要写一个“菊花”进度条的话,首先,我们先定义一个AnimationDrawable文件:
图片资源戳这里:图片素材
运行效果图:
xml文件:
<LinearLayout xmlns:android="http://schemas.android.com/apk/res/android"
    xmlns:tools="http://schemas.android.com/tools"
    android:layout_width="match_parent"
    android:layout_height="match_parent"
    android:orientation="vertical"
    tools:context="com.example.android_progressbar.MainActivity" >

    <ImageView
        android:id="@+id/imageView1"
        android:layout_width="100dp"
        android:layout_height="100dp"
        android:layout_gravity="center"
        android:layout_marginTop="200dp"
        android:src="@drawable/anim_pgbar" />

</LinearLayout>
java代码:
public class MainActivity2 extends Activity {

    private ImageView img_pgbar;

    private AnimationDrawable ad;

    @Override
    protected void onCreate(Bundle savedInstanceState) {
        super.onCreate(savedInstanceState);

        setContentView(R.layout.activity_main2);
        img_pgbar = (ImageView) findViewById(R.id.imageView1);
        ad = (AnimationDrawable) img_pgbar.getDrawable();
        img_pgbar.postDelayed( new Runnable() {

            @Override
            public void run() {
                // TODO Auto-generated method stub
                ad.start();
            }
        }, 100);

    }

}
(四)自定义圆形进度条

其实,人家官方的api是这么说的:
 public class MyActivity extends Activity {
     private static final int PROGRESS = 0x1;

     private ProgressBar mProgress;
     private int mProgressStatus = 0;

     private Handler mHandler = new Handler();

     protected void onCreate(Bundle icicle) {
         super.onCreate(icicle);

         setContentView(R.layout.progressbar_activity);

         mProgress = (ProgressBar) findViewById(R.id.progress_bar);

         // Start lengthy operation in a background thread
         new Thread(new Runnable() {
             public void run() {
                 while (mProgressStatus < 100) {
                     mProgressStatus = doWork();

                     // Update the progress bar
                     mHandler.post(new Runnable() {
                         public void run() {
                             mProgress.setProgress(mProgressStatus);
                         }
                     });
                 }
             }
         }).start();
     }
 }
人家是建议你开一个线程,把耗时的pgBar丢进去后,然后使用handle机制来更行pgBar进度条的显示的~~~哇哈哈(偷懒ing)!
运行结果:
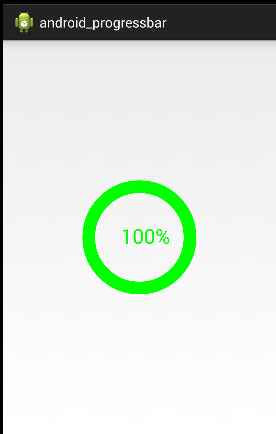
实现代码:
package com.example.android_progressbar;

import android.content.Context;
import android.graphics.Canvas;
import android.graphics.Color;
import android.graphics.Paint;
import android.graphics.Rect;
import android.graphics.RectF;
import android.util.AttributeSet;
import android.view.View;

public class CirclePgBar extends View {


    private Paint mBackPaint;
    private Paint mFrontPaint;
    private Paint mTextPaint;
    private float mStrokeWidth = 50;
    private float mHalfStrokeWidth = mStrokeWidth / 2;
    private float mRadius = 200;
    private RectF mRect;
    private int mProgress = 0;
    //目标值,想改多少就改多少
    private int mTargetProgress = 100;
    private int mMax = 100;
    private int mWidth;
    private int mHeight;


    public CirclePgBar(Context context) {
        super(context);
        init();
    }

    public CirclePgBar(Context context, AttributeSet attrs) {
        super(context, attrs);
        init();
    }

    public CirclePgBar(Context context, AttributeSet attrs, int defStyleAttr) {
        super(context, attrs, defStyleAttr);
        init();
    }


    //完成相关参数初始化
    private void init() {
        mBackPaint = new Paint();
        mBackPaint.setColor(Color.WHITE);
        mBackPaint.setAntiAlias(true);
        mBackPaint.setStyle(Paint.Style.STROKE);
        mBackPaint.setStrokeWidth(mStrokeWidth);

        mFrontPaint = new Paint();
        mFrontPaint.setColor(Color.GREEN);
        mFrontPaint.setAntiAlias(true);
        mFrontPaint.setStyle(Paint.Style.STROKE);
        mFrontPaint.setStrokeWidth(mStrokeWidth);


        mTextPaint = new Paint();
        mTextPaint.setColor(Color.GREEN);
        mTextPaint.setAntiAlias(true);
        mTextPaint.setTextSize(80);
        mTextPaint.setTextAlign(Paint.Align.CENTER);
    }


    //重写测量大小的onMeasure方法和绘制View的核心方法onDraw()
    @Override
    protected void onMeasure(int widthMeasureSpec, int heightMeasureSpec) {
        super.onMeasure(widthMeasureSpec, heightMeasureSpec);
        mWidth = getRealSize(widthMeasureSpec);
        mHeight = getRealSize(heightMeasureSpec);
        setMeasuredDimension(mWidth, mHeight);

    }


    @Override
    protected void onDraw(Canvas canvas) {
        initRect();
        float angle = mProgress / (float) mMax * 360;
        canvas.drawCircle(mWidth / 2, mHeight / 2, mRadius, mBackPaint);
        canvas.drawArc(mRect, -90, angle, false, mFrontPaint);
        canvas.drawText(mProgress + "%", mWidth / 2 + mHalfStrokeWidth, mHeight / 2 + mHalfStrokeWidth, mTextPaint);
        if (mProgress < mTargetProgress) {
            mProgress += 1;
            invalidate();
        }

    }

    public int getRealSize(int measureSpec) {
        int result = 1;
        int mode = MeasureSpec.getMode(measureSpec);
        int size = MeasureSpec.getSize(measureSpec);

        if (mode == MeasureSpec.AT_MOST || mode == MeasureSpec.UNSPECIFIED) {
            //自己计算
            result = (int) (mRadius * 2 + mStrokeWidth);
        } else {
            result = size;
        }

        return result;
    }

    private void initRect() {
        if (mRect == null) {
            mRect = new RectF();
            int viewSize = (int) (mRadius * 2);
            int left = (mWidth - viewSize) / 2;
            int top = (mHeight - viewSize) / 2;
            int right = left + viewSize;
            int bottom = top + viewSize;
            mRect.set(left, top, right, bottom);
        }
    }


}
其实,就是一个自定义View的实现;
xml代码:
<RelativeLayout xmlns:android="http://schemas.android.com/apk/res/android"
    xmlns:tools="http://schemas.android.com/tools"
    android:layout_width="match_parent"
    android:layout_height="match_parent"
    tools:context="com.example.android_progressbar.MainActivity" >

   <com.example.android_progressbar.CirclePgBar
       android:layout_width="match_parent"
       android:layout_height="match_parent"/>

</RelativeLayout>
喜欢就点个赞吧~~~O(∩_∩)O谢谢 ~<完>


 438
438


 被折叠的 条评论
为什么被折叠?
被折叠的 条评论
为什么被折叠?
 到【灌水乐园】发言


