


C#中DataGridView多層表頭的制作(1)
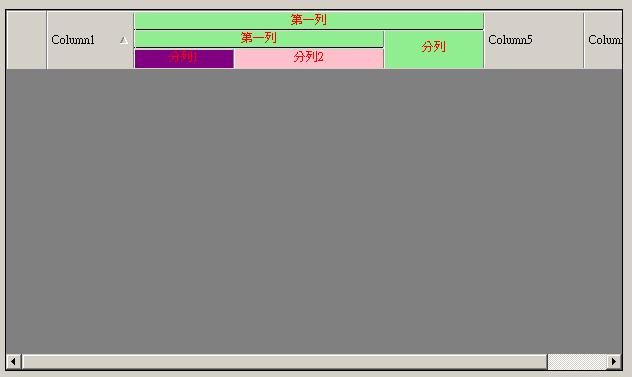
先看效果:
1.首先要調整表頭的高度,記得在DataGrid中是沒法調整表頭高度,但DataGridView是可以的.
設定ColumnHeadsHeightSizeMode為EnableResizing或DisableResizing.再設定ColumnHeadersHeight
2.要繪製自已的表頭,必須要得到表頭的寬(由開始列,結束列決定)和高(由總層次,第幾層決定),我用一個類對它做了封裝 :
public
class
HeaderCell
{
private int startColIndex;
private int endColIndex;
private int deepCount;
private int startDeepIndex;
private int endDeepIndex;
/// <summary>
///
/// </summary>
/// <param name="startColIndex"></param>
/// <param name="endColIndex"></param>
/// <param name="deepCount"></param>
/// <param name="deepIndex"> 從下往上數,序號從1開始. </param>
public HeaderCell( int startColIndex, int endColIndex, int startDeepIndex, int endDeepIndex, int deepCount)
{
this .startColIndex = startColIndex;
this .endColIndex = endColIndex;
this .deepCount = deepCount;
this .startDeepIndex = startDeepIndex;
this .endDeepIndex = endDeepIndex;
}
public int StartColIndex
{
get
{
return this .startColIndex;
}
set
{
this .startColIndex = value;
}
}
public int EndColIndex
{
get
{
return this .endColIndex;
}
set
{
this .endColIndex = value;
}
}
public int DeepCount
{
get
{
return this .deepCount;
}
set
{
this .deepCount = value;
}
}
public int StartDeepIndex
{
get
{
return this .startDeepIndex;
}
set
{
this .startDeepIndex = value;
}
}
public int EndDeepIndex
{
get
{
return this .endDeepIndex;
}
set
{
this .endDeepIndex = value;
}
}
}
{
private int startColIndex;
private int endColIndex;
private int deepCount;
private int startDeepIndex;
private int endDeepIndex;
/// <summary>
///
/// </summary>
/// <param name="startColIndex"></param>
/// <param name="endColIndex"></param>
/// <param name="deepCount"></param>
/// <param name="deepIndex"> 從下往上數,序號從1開始. </param>
public HeaderCell( int startColIndex, int endColIndex, int startDeepIndex, int endDeepIndex, int deepCount)
{
this .startColIndex = startColIndex;
this .endColIndex = endColIndex;
this .deepCount = deepCount;
this .startDeepIndex = startDeepIndex;
this .endDeepIndex = endDeepIndex;
}
public int StartColIndex
{
get
{
return this .startColIndex;
}
set
{
this .startColIndex = value;
}
}
public int EndColIndex
{
get
{
return this .endColIndex;
}
set
{
this .endColIndex = value;
}
}
public int DeepCount
{
get
{
return this .deepCount;
}
set
{
this .deepCount = value;
}
}
public int StartDeepIndex
{
get
{
return this .startDeepIndex;
}
set
{
this .startDeepIndex = value;
}
}
public int EndDeepIndex
{
get
{
return this .endDeepIndex;
}
set
{
this .endDeepIndex = value;
}
}
}
再做一個函數用來重畫表頭,在這里我還做了一個重載:
private
void
SetColTitle(DataGridView dgv, HeaderCell topColumn, PaintEventArgs e,
string
title)
{
SetColTitle(dgv, topColumn, e, title, dgv.ColumnHeadersDefaultCellStyle.BackColor, dgv.ColumnHeadersDefaultCellStyle.ForeColor);
}
private void SetColTitle(DataGridView dgv, HeaderCell topColumn, PaintEventArgs e, string title,Color backColor,Color foreColor)
{
int x = 2 ;
int width = 0 ;
int y = 4 ;
int height = (dgv.ColumnHeadersHeight - 4 ) * (topColumn.EndDeepIndex - topColumn.StartDeepIndex + 1 ) / topColumn.DeepCount;
if (dgv.RowHeadersVisible)
{
x += dgv.RowHeadersWidth;
}
for ( int i = 0 ; i < topColumn.StartColIndex; i ++ )
{
x += dgv.Columns[i].Width;
}
for ( int i = topColumn.StartColIndex; i <= topColumn.EndColIndex; i ++ )
{
width += dgv.Columns[i].Width;
}
width -= 2 ;
y += (dgv.ColumnHeadersHeight - 4 ) * (topColumn.DeepCount - topColumn.EndDeepIndex) / topColumn.DeepCount;
Rectangle rec = new Rectangle(x, y, width, height);
Color bkClr = dgv.ColumnHeadersDefaultCellStyle.BackColor;
if (backColor != null )
{
bkClr = backColor;
}
e.Graphics.FillRectangle( new SolidBrush(bkClr), rec);
if (topColumn.StartDeepIndex != 1 )
{
ControlPaint.DrawBorder(e.Graphics, new Rectangle(x - 1 , y + height - 2 , width + 2 , 2 ), SystemColors.ControlLight, ButtonBorderStyle.Inset);
}
StringFormat format1 = new StringFormat();
format1.Trimming = StringTrimming.EllipsisWord;
format1.Alignment = StringAlignment.Center;
format1.LineAlignment = StringAlignment.Center;
Color foClr = dgv.ColumnHeadersDefaultCellStyle.ForeColor;
if (foreColor != null )
{
foClr = foreColor;
}
e.Graphics.DrawString(title, dgv.ColumnHeadersDefaultCellStyle.Font, new SolidBrush(foClr), rec, format1);
}
{
SetColTitle(dgv, topColumn, e, title, dgv.ColumnHeadersDefaultCellStyle.BackColor, dgv.ColumnHeadersDefaultCellStyle.ForeColor);
}
private void SetColTitle(DataGridView dgv, HeaderCell topColumn, PaintEventArgs e, string title,Color backColor,Color foreColor)
{
int x = 2 ;
int width = 0 ;
int y = 4 ;
int height = (dgv.ColumnHeadersHeight - 4 ) * (topColumn.EndDeepIndex - topColumn.StartDeepIndex + 1 ) / topColumn.DeepCount;
if (dgv.RowHeadersVisible)
{
x += dgv.RowHeadersWidth;
}
for ( int i = 0 ; i < topColumn.StartColIndex; i ++ )
{
x += dgv.Columns[i].Width;
}
for ( int i = topColumn.StartColIndex; i <= topColumn.EndColIndex; i ++ )
{
width += dgv.Columns[i].Width;
}
width -= 2 ;
y += (dgv.ColumnHeadersHeight - 4 ) * (topColumn.DeepCount - topColumn.EndDeepIndex) / topColumn.DeepCount;
Rectangle rec = new Rectangle(x, y, width, height);
Color bkClr = dgv.ColumnHeadersDefaultCellStyle.BackColor;
if (backColor != null )
{
bkClr = backColor;
}
e.Graphics.FillRectangle( new SolidBrush(bkClr), rec);
if (topColumn.StartDeepIndex != 1 )
{
ControlPaint.DrawBorder(e.Graphics, new Rectangle(x - 1 , y + height - 2 , width + 2 , 2 ), SystemColors.ControlLight, ButtonBorderStyle.Inset);
}
StringFormat format1 = new StringFormat();
format1.Trimming = StringTrimming.EllipsisWord;
format1.Alignment = StringAlignment.Center;
format1.LineAlignment = StringAlignment.Center;
Color foClr = dgv.ColumnHeadersDefaultCellStyle.ForeColor;
if (foreColor != null )
{
foClr = foreColor;
}
e.Graphics.DrawString(title, dgv.ColumnHeadersDefaultCellStyle.Font, new SolidBrush(foClr), rec, format1);
}
3.添加DataGridView的Paint事件,並在事件中調用SetColTitle函數繪製表頭
this
.dataGridView1.Paint
+=
new
System.Windows.Forms.PaintEventHandler(
this
.dataGridView1_Paint);
private void dataGridView1_Paint( object sender, PaintEventArgs e)
{
HeaderCell h = new HeaderCell( 1 , 3 , 3 , 3 , 3 );
SetColTitle((DataGridView)sender, h, e, " 第一列 " , Color.LightGreen, Color.Red);
HeaderCell hc = new HeaderCell( 1 , 2 , 2 , 2 , 3 );
SetColTitle((DataGridView)sender, hc, e, " 第一列 " ,Color.LightGreen,Color.Red);
HeaderCell hc1 = new HeaderCell( 1 , 1 , 1 , 1 , 3 );
SetColTitle((DataGridView)sender, hc1, e, " 分列1 " , Color.Purple, Color.Red);
HeaderCell hc2 = new HeaderCell( 2 , 2 , 1 , 1 , 3 );
SetColTitle((DataGridView)sender, hc2, e, " 分列2 " , Color.Pink, Color.Red);
HeaderCell hc3 = new HeaderCell( 3 , 3 , 1 , 2 , 3 );
SetColTitle((DataGridView)sender, hc3, e, " 分列 " , Color.LightGreen, Color.Red);
}
4.說明:這個方法做出來的效果現在還是不能用,當調整表頭寬度時和出滾動條時刷新有問題.以後再試研究看.如果還是不行,那就用CellPainting事件做做看吧,再不行,就用Tree加DataGridView做成控件的形式試試.


 1427
1427


 被折叠的 条评论
为什么被折叠?
被折叠的 条评论
为什么被折叠?
 到【灌水乐园】发言


