


laravel给我们提供了多渠道的消息通知功能,包括邮件,短信,数据库,slack等通知方式。本文主要分析基于数据库的消息通知的底层实现。为了方便,本文将需要接受通知消息的模型称为接收者。
ps:阅读本文前,请不了解Eloquent关联关系的读者先点击eloquent relations了解相关内容
通过官方文档可以知道,当我们需要开启一个model接收消息通知的功能时,需要在模型中添加Illuminate\Notifications\Notifiable 这个trait。通过代码可以发现,这个trait实际上只是使用了HasDatabaseNotifications, RoutesNotifications; 这两个trait,接下来让我们一起看看具体是怎样通过这两个trait来实现消息通知的。
先来看看HasDatabaseNotifications。
  public function notifications()
 {
        return $this->morphMany(DatabaseNotification::class, 'notifiable')->orderBy('created_at', 'desc');
 }
  public function unreadNotifications()
 {
  return $this->morphMany(DatabaseNotification::class, 'notifiable')->whereNull('read_at')->orderBy('created_at', 'desc');
} 接收者可以接收多个渠道的通知,这是一种一对多的关联关系,所以这里通过HasDatabaseNotifications为接受者添加了两个多态关联关系到DatabaseNotification::class模型,让我们可以方便的获取到接收者对应的通知。
了解了发送消息模型和接收消息模型的关联关系后,再来看看这两个模型的具体定义。先分析一下DatabaseNotification::class。
class DatabaseNotification extends Model
{
     public $incrementing = false;
    /**
     * The guarded attributes on the model.
     *
     * @var array
     */
    protected $guarded = [];
    /**
     * The attributes that should be cast to native types.
     *
     * @var array
     */
    protected $casts = [
        'data' => 'array',
        'read_at' => 'datetime',
    ];
    protected $table = 'notifications';
    public function notifiable()
    {
        return $this->morphTo();
    }
    //标记已读,也就是赋值给read_at字段
    public function markAsRead()
    {
      if (is_null($this->read_at)){
        $this->forceFill(['read_at' => $this->freshTimestamp()])->save();
      }
    }
    public function newCollection(array $models = [])
    {
        return new DatabaseNotificationCollection($models);
    }
}
至此,已经建立好了接收者和通知之间的多态联系关系。
很多童鞋到这里可能就会纳闷了,那么如何将不同类型的通知关联到不同的模型呢?
还记得我们在创建消息通知时在app/notifications下创建的通知吗,现在再来看看laravel为我们生成的这个模型。
 class salePromotion extends Notification implements ShouldQueue
{
    use Queueable;
    public  $data;
    public function __construct($data)
    {
        $this->data=$data;
    }
    //设置通知的渠道是基于数据库
    public function via($notifiable)
    {
        return ['database'];
    }
    //设置在notifications表中的data字段对应格式
    public function toDatabase($notifiable)
    {
             return [
                 'data' => $this->data,
             ];
    }
}
可见,这个salePromotion是继承了我们刚才的DatabaseNotification模型的,也就是说它同时也继承了DatabaseNotification模型和接受者的关联关系,所以这多个通知类其实都是对应到了数据库里面的notifications表上,在发送通知时(由于是数据库通知,实际上是往notification表中写数据)写入具体的通知类的数据。
很自然地,这时候我们就会想知道那么是如何发送的呢?当接受者只有一个的时候,我们通常只需要调用$user->notify(new InvoicePaid($invoice)),而接受者是一个collection时,我们会比较经常用Notification::send($customers, new salePromotion($data));。
还记得前面我们说的另外一个trait吗,RoutesNotifications,开扒~
重点我们来看看notify这个方法:
  public function notify($instance)
    {
        app(Dispatcher::class)->send($this, $instance);
    }
app(Dispatcher::class)返回Illuminate\Notifications\ChannelManager对象,看看它的send方法是怎么定义的。
public function send($notifiables, $notification)
{
 //将$notifiables转换成集合或者数组的形式,返回collection或者数组
  $notifiables = $this->formatNotifiables($notifiables);
 //检测是否开启队列,队列我们就不分析了
 if ($notification instanceof ShouldQueue) {
  return $this->queueNotification($notifiables,$notification);
 }
  return $this->sendNow($notifiables, $notification);
}
看来真正在干活的是sendNow这个方法呀。
public function sendNow($notifiables, $notification, array $channels = null)
{
      $notifiables = $this->formatNotifiables($notifiables);
      //为了防止发送期间内通知类数据被改动,这里通过克隆来避免这个问题
      $original = clone $notification;
    foreach ($notifiables as $notifiable) {
    //为该条通知生产一个uuid
     $notificationId = Uuid::uuid4()->toString();
     //获取发送要采用的通道,可以采取多通道,此时取到的是数组
     $channels = $channels ?: $notification->via($notifiable);
     if (empty($channels)) {
           continue;
     }
     foreach ($channels as $channel) {
     //恢复上面克隆的通知对象
       $notification = clone $original;
      /**
      因为传入的通知对象可以在外部修改,所以这里才要加上检测,
      当用户没修改的时候才将id赋值为系统自动生成的,那么为什么
      不把前面生成uuid的语句放if里面??
      **/
       if (!$notification->id) {
            $notification->id = $notificationId;
       }
       //是否成功触发通知事件
       if (! $this->shouldSendNotification($notifiable, $notification, $channel)) {
                continue;
       }
        //终于要发了。。
         $response = $this->driver($channel)
         ->send($notifiable, $notification);
         //触发消息发送事件
         $this->app->make('events')
         ->fire(new Events\NotificationSent($notifiable, $notification, $channel, $response)
                );
            }
        }
    }
简单看看shouldSendNotification()
protected function shouldSendNotification($notifiable, $notification, $channel)
{
  /**如果已经返回一个非空的响应,则触发通知发送事件
   $this->app->make('events')返Illuminate\Events\Dispatcher对象**/
    return $this->app->make('events')->until(
     new Events\NotificationSending($notifiable,$notification, $channel)) !== false;
}
/**由于我们设置数据库通知的方式,$this->driver($channel)返回Illuminate\Notifications\Channels\DatabaseChannel**/
$this->driver($channel)->send($notifiable, $notification);逐渐逼近boss!DatabaseChannel的send方法~
public function send($notifiable,Notification $notification)
    {
        return $notifiable->routeNotificationFor('database')->create([
        'id' => $notification->id,
        'type' => get_class($notification),
        'data' => $this->getData($notifiable, $notification),
        'read_at' => null,
        ]);
    }
来看看$notifiable->routeNotificationFor(‘database’)返回了什么
public function routeNotificationFor($driver)
    {
        if (method_exists($this, $method = 'routeNotificationFor'.Str::studly($driver))) {
            return $this->{$method}();
        }
        switch ($driver) {
            case 'database':
                return $this->notifications();
            case 'mail':
                return $this->email;
            case 'nexmo':
                return $this->phone_number;
        }
    }
可见,routeNotificationFor方法返回的是通知的发送地址,由于本文分析的是数据库通知,所以该方法返回的是该model的关联notifications对象。
所以,没错,当我们调用接收者的notify方法时,最终是在关联的notifications表中将具体通知类对象的数据插入(驱动是database情况下)。
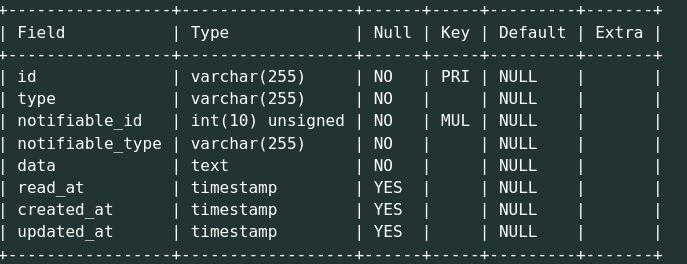
下面是notification表的结构(type字段是通知类的类名,notifiable_id是接收者的id,notifiable_type是接收者的类名):
插入数据后:

总结
可见,laravel的消息通知的主要流程是:
1.创建一个继承自DatabaseNotification的通知类
2.在接收者模型中添加Notifiable trait,其中通过HasDatabaseNotifications添加模型间的关联关系,通过RoutesNotifications添加发送通知的方法
3.发送通知:chanelManager只是提供了调用的接口,具体的发送是通过在chanelManager中的sendNow方法中利用获取到对应的驱动对象来完成发送,在本文中,可以看到数据库里面的send方法就是对notifications表执行写入操作。
笔者觉得最关键是要学到这种思想,把逻辑和功能分离,把逻辑放在上层,预留功能接口,通过驱动层来完成具体的动作和功能,这样驱动层就只需要专心于实现功能,逻辑层专注于实现业务逻辑。


 839
839

 被折叠的 条评论
为什么被折叠?
被折叠的 条评论
为什么被折叠?
 到【灌水乐园】发言


