


利用GDI+输出文字阴影效果有多种方法,最简单的就是第一次输出有偏移的灰色文字,第二次输出正常文字。下面是仿C#文字输出例子里的代码片断,输出了这种带阴影的文字:
// Load the fonts we want to use
titleFont : = TGpFont.Create(serifFontFamily, 60 );
// Load the image to be used for the textured text from the exe's resource fork
textImage : = TGpBitmap.Create( ' ....mediamarble.jpg ' );
textTextureBrush : = TGpTextureBrush.Create(textImage);
// Set up shadow brush - make it translucent
titleShadowBrush : = TGpSolidBrush.Create(ARGB( 70 , kcBlack));
// Draw a textured string
s : = ' Graphics Samples ' ;
g.DrawString(s, titleFont, titleShadowBrush, 15 , 25 );
g.DrawString(s, titleFont, textTextureBrush, 10 , 20 );
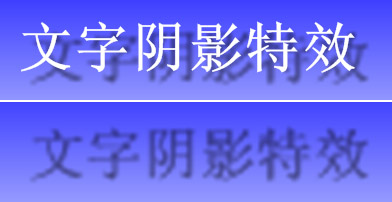
效果图如下(作了适当缩小):

显然,这种文字阴影效果不太令人满意,没有那种半阴影的效果。
网上介绍了一种“借助GDI+的反走样能力生成透明的阴影与半阴影”的文字阴影方法,其原理是将要输出的文字输出按一定比例缩小,以某种半灰调输出到一个按同样比例缩小的内存位图中,然后设置画布插值模式为高质量双三次插值法,再将位图放大到实际画布大小输出,因为双三次插值放大使文本的边缘产生Alpha模糊,这样就出现阴影与半影效果,下面是这种方法的Delphi代码:
var
brush: TGpLinearGradientBrush;
font: TGpFont;
fontFamily: TGpFontFamily;
r: TGpRect;
bmp: TGpBitmap;
bg: TGpGraphics;
m: TGpMatrix;
begin
fontFamily : = TGpFontFamily.Create( ' Times New Roman ' );
font : = TGpFont.Create(fontFamily, 50 , [fsBold], utPixel);
r : = GpRect(Form1.PaintBox1.ClientRect);
brush : = TGpLinearGradientBrush.Create(r, kcBlue, kcAliceBlue, 90 );
// 填充渐变背景
g.FillRectangle(brush, r);
// 建立内存位图,其大小是画布的1/4
bmp : = TGpBitmap.Create(r.Width shr 2 , r.Height shr 2 , g);
bg : = TGpGraphics.Create(bmp);
bg.TextRenderingHint : = thAntiAlias;
// 按1/4缩放输出阴影文字,并平移(3, 3)
m : = TGpMatrix.Create( 0.25 , 0 , 0 , 0.25 , 3 , 3 );
bg.SetTransform(m);
bg.DrawString( ' 文字阴影特效 ' , font, Brushs[ARGB( 128 , 0 , 0 , 0 )], 10 , r.Height / 3 );
// 设置插值模式为高质量双三次插值法
g.InterpolationMode : = imHighQualityBicubic;
g.TextRenderingHint : = thAntiAlias;
// 放大输出阴影位图到画布
g.DrawImage(bmp, r, 0 , 0 , bmp.Width, bmp.Height, utPixel);
// 输出正常文字
g.DrawString( ' 文字阴影特效 ' , font, Brushs.White, 10 , r.Height / 3 );
m.Free;
bg.Free;
bmp.Free;
brush.Free;
font.Free;
fontFamily.Free;
end;
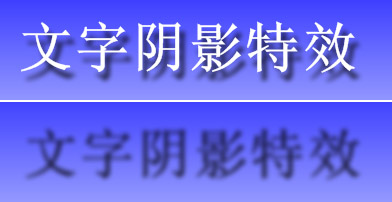
代码中已经作了注释,就不再详细讲解,下面是运行效果截图,图的上部分是带阴影的文字输出截图,下部分是单独的阴影输出截图:
从效果图,特别是从上半部分截图看,文字的阴影效果要比前面简单的文字阴影效果好,其阴影边缘有一定的半影效果;但是从下半部分单独的文字阴影输出图看,还是觉得不尽人意。首先是边缘模糊效果不太明显,其次是阴影半影部分,也就是边缘模糊部分有太强的放大痕迹,再次就是此方法无多大调节余地,想得到更明显的半影效果的办法就是进一步缩小阴影文字比例,但由此带来的锯齿状显然更突出。看来,想要得到好的文字阴影效果,如PhotoShop式样中的投影效果,得另辟途径。
经过研究,PhotoShop式样中的投影效果其实就是一种高斯模糊效果。一般的图像高斯模糊是对图像各像素的RGB用高斯卷积矩阵进行卷积处理(关于高斯模糊请看我的文章《GDI+ 在Delphi程序的应用 -- 图像卷积操作及高斯模糊》),而要处理文字阴影效果只需要建立一个透明的32位ARGB格式内存位图,将文字用一定的阴影色调输出到位图,然后用高斯模糊矩阵对位图的Alpha字节进行卷积处理,就可达到很好的效果。下面是函数代码:
// ConvolMatrix: 卷积矩阵; MatrixSize:矩阵大小, Nuclear: 卷积核(必须大于0)
procedure MakeShadow(Data: TBitmapData; Source: Pointer;
ConvolMatrix: array of Integer; MatrixSize, Nuclear: LongWord);
Radius, mSize, rSize: LongWord;
x, y: LongWord;
Width, Height: Integer;
Matrix: Pointer;
asm
push esi
push edi
push ebx
mov esi, edx // esi = Source + 3 (Alpha byte)
add esi, 3
mov edi, [eax + 16 ] // edi = Data.Scan0
mov Matrix, ecx // Matrix = ConvolMatrix
mov ecx, MatrixSize
mov edx, ecx
dec ecx
mov ebx, [eax]
sub ebx, ecx
mov Width, ebx // Width = Data.Width - (MatrixSize - 1)
mov ebx, [eax + 4 ]
sub ebx, ecx
mov Height, ebx // Height = Data.Height - (MatrixSize - 1)
shr ecx, 1
mov Radius, ecx // Radius = MatrixSize / 2
mov eax, [eax + 8 ]
mov mSize, eax
shl edx, 2
sub mSize, edx // mSize = Data.Stride - MatrixSize * 4
add eax, 4
imul eax, ecx
add edi, eax // edi = edi + (Data.Stride * Radius + Radius * 4)
add edi, 3 // edi += 3 (Alpha byte)
shl ecx, 3
mov rSize, ecx // rSize = Radius * 2 * 4
mov ebx, Nuclear // ebx = Nuclear
mov y, 0 // for (y = 0; y < Height; y ++)
@yLoop: // {
mov x, 0 // for (x = 0; x < Width; x ++)
@xLoop: // {
push esi // Save(esi)
push edi // Save(edi)
mov edi, Matrix // edi = Matrix
xor eax, eax // eax = 0
// 用卷积矩阵处理Alpha字节
mov ecx, MatrixSize // for (I = 0; I < MatrixSize; I ++)
@Loop3: // {
push ecx
mov ecx, MatrixSize // for (J = 0; J <= MatrixSize; J ++)
@Loop4: // {
movzx edx, [esi] // edx = *esi (Alpha byte)
imul edx, [edi]
add eax, edx // eax += edx * *edi
add esi, 4 // esi += 4
add edi, 4 // edi ++
loop @Loop4 // }
add esi, mSize // esi += mSize
pop ecx
loop @Loop3 // }
cdq
idiv ebx // eax /= ebx
pop edi // Result(edi)
mov [edi], al // *edi = al
add edi, 4 // edi += 4
pop esi // Reset(esi) esi += 4
add esi, 4
inc x
mov eax, x
cmp eax, Width
jl @xLoop // }
add esi, rSize
add edi, rSize
inc y
mov eax, y
cmp eax, Height
jl @yLoop // }
pop ebx
pop edi
pop esi
end;
procedure GdipShadow(Bmp: TGpBitmap; Radius: LongWord);
var
Data: TBitmapData;
Gauss: array of Integer;
Q: Double;
x, y, n, z: Integer;
p: PInteger;
Buf: Pointer;
begin
// 根据半径计算高斯模糊矩阵
Q : = Radius / 2 ;
if Q = 0 then Q : = 0.1 ;
n : = Radius shl 1 + 1 ;
SetLength(Gauss, n * n);
p : = @Gauss[ 0 ];
z : = 0 ;
for x : = - Radius to Radius do
for y : = - Radius to Radius do
begin
p ^ : = Round(Exp( - (x * x + y * y) / ( 2.0 * Q * Q)) / ( 2.0 * PI * Q * Q) * 1000.0 );
Inc(z, p ^ );
Inc(p);
end;
Data : = Bmp.LockBits(GpRect( 0 , 0 , Bmp.Width, Bmp.Height), [imRead, imWrite], pf32bppARGB);
GetMem(Buf, Data.Height * Data.Stride);
try
// 备份源数据
Move(Data.Scan0 ^ , Buf ^ , Data.Height * Data.Stride);
// 高斯卷积处理阴影效果
MakeShadow(Data, Buf, Gauss, n, z);
finally
FreeMem(Buf);
Bmp.UnlockBits(Data);
end;
end;
// 计算并输出文字阴影效果
// g: 文字输出的画布; str要输出的文字; font: 字体; layoutRect: 限定的文字输出范围
// ShadowSize: 阴影大小; Distance: 阴影距离;
// Angle: 阴影输出角度(左边平行处为0度。顺时针方向)
// ShadowAlpha: 阴影文字的不透明度; format: 文字输出格式
procedure DrawShadowString( const g: TGpGraphics; const str: WideString;
const font: TGpFont; const layoutRect: TGpRectF;
ShadowSize, Distance: LongWord; Angle: Single = 60 ;
ShadowAlpha: Byte = 192 ; const format: TGpStringFormat = nil); overload;
var
Bmp: TGpBitmap;
Bg: TGpGraphics;
dr, sr: TGpRectF;
begin
sr : = GpRect(ShadowSize shl 1 , ShadowSize shl 1 , layoutRect.Width, layoutRect.Height);
// 建立透明的32位ARGB阴影位图,其大小为layoutRect长、宽度 + ShadowSize * 4
Bmp : = TGpBitmap.Create(Round(sr.Width) + ShadowSize shl 2 ,
Round(sr.Height) + ShadowSize shl 2 , pf32bppARGB);
Bg : = TGpGraphics.Create(Bmp);
try
Bg.TextRenderingHint : = thAntiAlias;
// 以不透明度为ShadowAlpha的黑色画刷,
// 在2倍ShadowSize偏移处输出文字到位图画布,
Bg.DrawString(str, font, Brushs[ARGB(ShadowAlpha, kcBlack)], sr, format);
// 处理文字阴影效果
GdipShadow(Bmp, ShadowSize);
dr : = layoutRect;
// 根据角度计算阴影位图在目标画布的偏移量
Offset(dr, Cos(pi * Angle / 180 ) * Distance,
Sin(pi * Angle / 180 ) * Distance);
// 扩大源和目标矩形,以输出边缘半影部分
Inflate(dr, ShadowSize, ShadowSize);
Inflate(sr, ShadowSize, ShadowSize);
// 输出阴影位图到目标画布
g.DrawImage(Bmp, dr, sr.X, sr.Y, sr.Width, sr.Height, utPixel);
finally
Bg.Free;
Bmp.Free;
end;
end;
// 计算并输出文字阴影效果,除以输出点origin替代上面布局矩形外,其他参数同上
procedure DrawShadowString( const g: TGpGraphics; const str: WideString;
const font: TGpFont; const origin: TGpPointF;
ShadowSize, Distance: LongWord; Angle: Single = 60 ;
ShadowAlpha: Byte = 192 ; const format: TGpStringFormat = nil); overload;
begin
DrawShadowString(g, str, font, g.MeasureString(str, font, origin, format),
ShadowSize, Distance, Angle, ShadowAlpha, format);
end;
代码中已经含比较详细的注释,就不再讲解了,本文介绍的函数最大的特点就是阴影的大小、间隔距离、输出角度以及不透明度可根据需要调整;阴影效果也很好,边缘模糊均匀,线条圆润平滑,可与一般的PhotoShop文字阴影效果相媲美;由于核心函数MakeShadow代码采用BASM,且只处理了像素的Alpha字节,边界处理也省略了,因此处理速度还是较满意的。为了照顾需要pascal代码的朋友,下面给出该函数的pascal版本,速度比BASM版本慢很多,不过,通过其中的代码和注释可以加深了解该函数的原理:
// ConvolMatrix: 卷积矩阵; MatrixSize:矩阵大小, Nuclear: 卷积核(必须大于0)
procedure MakeShadow(Data: TBitmapData; Source: Pointer;
ConvolMatrix: array of Integer; MatrixSize, Nuclear: LongWord);
var
x, y, I, J: Integer;
Width, Height, mSize, rSize: Integer;
v, Radius, Count: Integer;
pd, ps, ps1: PByte;
begin
Radius : = MatrixSize shr 1 ;
Width : = Data.Width - Radius shl 1 ;
Height : = Data.Height - Radius shl 1 ;
mSize : = Data.Stride - MatrixSize shl 2 ;
rSize : = Radius shl 3 ;
Count : = MatrixSize * MatrixSize;
// pd 指向目标偏移地址为卷积半径后像素的Alpha字节
// 为简化过程,不处理以Radius为半径的边界像素
pd : = Data.Scan0;
Inc(pd, Radius * Data.Stride + Radius * 4 + 3 );
// ps 指向源首像素地址的Alpha字节,也就是目标首像素第一个卷积乘数的像素点
ps : = Source;
Inc(ps, 3 );
for y : = 1 to Height do
begin
for x : = 1 to Width do
begin
ps1 : = ps;
v : = 0 ;
for I : = 0 to count - 1 do
begin
if (I <> 0 ) and (I mod MatrixSize = 0 ) then
Inc(ps1, mSize);
Inc(v, ConvolMatrix[I] * ps1 ^ ); // Alpha字节卷积求和
Inc(ps1, 4 );
end;
v : = v div Nuclear; // 卷积和 / 卷积核
pd ^ : = v;
inc(pd, 4 );
Inc(ps, 4 );
end;
Inc(ps, rSize);
Inc(pd, rSize);
end;
end;
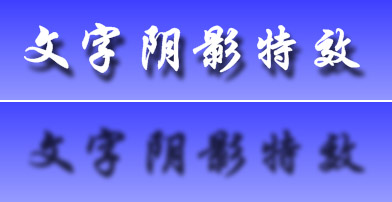
下面给出演示代码和效果图:
var
brush: TGpLinearGradientBrush;
font: TGpFont;
fontFamily: TGpFontFamily;
r: TGpRect;
begin
fontFamily : = TGpFontFamily.Create( ' Times New Roman ' { ' 华文行楷 ' });
font : = TGpFont.Create(fontFamily, 50 , [fsBold], utPixel);
r : = GpRect(Form1.PaintBox1.ClientRect);
brush : = TGpLinearGradientBrush.Create(r, kcBlue, kcAliceBlue, 90 );
g.FillRectangle(Brush, r);
DrawShadowString(g, ' 文字阴影特效 ' , font, GpPoint( 10 , r.Height / 3 ), 5 , 10 );
g.TextRenderingHint : = thAntiAlias;
g.DrawString( ' 文字阴影特效 ' , font, Brushs.White, 10 , r.Height / 3 );
brush.Free;
font.Free;
fontFamily.Free;
end;
效果图也和上面一样分上下两部分,以便效果比较,并给出了2种字体的文字输出,其中下图为华文行楷字体。
下面是华文彩云字体,五色渐变画刷文字:

由于本文代码没有做更多条件下的测试,可能存在BUG,而且算法也有待提出改进意见,请朋友们不吝指教,来信请寄maozefa@hotmail.com。
本例子中的GDI+版本系本人自己改写的,与网上流通的版本不完全兼容,如需使用本版本,请参照《GDI+ for VCL基础 -- GDI+ 与 VCL 》一文的下载地址,并请留意后面的修改说明。
后记1(2007.13.30):刚才发现函数中果然存在一点BUG,原因是把数据源备份地址通过GDI+的TBitmapData结构的保留字段作为参数传递给MakeShadow函数,原以为该保留字段可以使用的,没想到GDI+ DLL内部可能使用了该字段(看来,保留字段还是不要使用的好,呵呵),导致设置某些字体,或者字体大小,或者字体风格时随机出现阴影位图清零,而无文字阴影输出的BUG,现已经修改本文代码,请朋友们谅解并提出宝贵意见。


 1153
1153

 被折叠的 条评论
为什么被折叠?
被折叠的 条评论
为什么被折叠?
 到【灌水乐园】发言


