


在上一篇博文如何通过AIDL实现跨应用绑定Service的基础上,我们继续实现通过AIDL绑定外部Service后的通信问题.
需要实现的效果是,在另一个应用的App2Activity2中的EditText中动态的输入内容,然后点击提交后,把数据传递到目标服务AppService中打印.
步骤如下:
1.在上一篇博文的aidl接口文件的基础上,我们需要对其进行修改,加多一个方法用于接收一个String类型的参数.目的是用于建立通信后,发送数据用的.
// IAppServiceInterface.aidl
package com.example.mchenys.aidlservicedemo;

// Declare any non-default types here with import statements

interface IAppServiceInterface {
    /**
     * Demonstrates some basic types that you can use as parameters
     * and return values in AIDL.
     */
    void basicTypes(int anInt, long aLong, boolean aBoolean, float aFloat,
            double aDouble, String aString);

    void setData(String data);

}
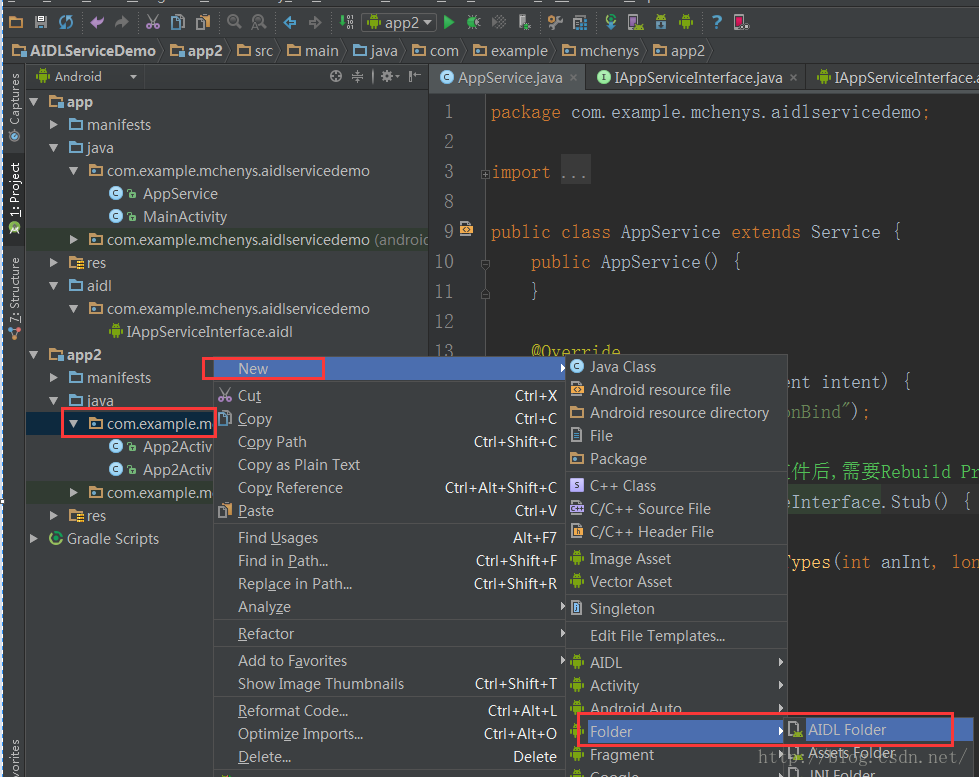
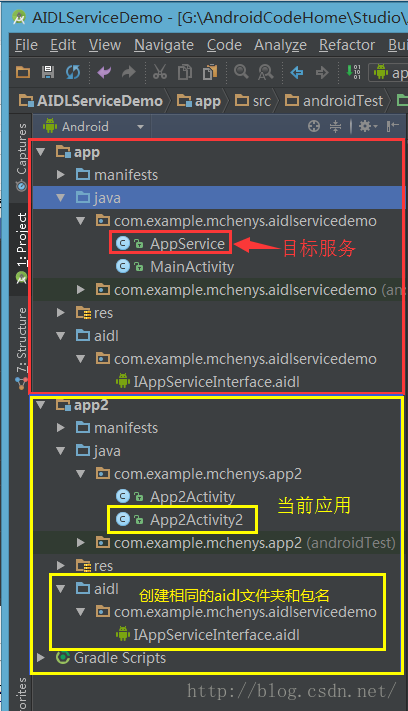
2.需要在App2Activity2所在的工程中,创建一个AIDL文件夹,可以通过Android Studio的向导来创建,然后在里面创建一个包名和目标应用的aidl文件相同的包.并将目标应用的aidl文件拷贝到刚刚创建的包内.
3.修改AppService类:
package com.example.mchenys.aidlservicedemo;

import android.app.Service;
import android.content.Intent;
import android.os.IBinder;
import android.os.RemoteException;
import android.os.SystemClock;
import android.util.Log;

public class AppService extends Service {
    private String data = "默认数据";
    private boolean isRunning = true;
    public AppService() {
    }

    @Override
    public IBinder onBind(Intent intent) {
        Log.i("AppService", "onBind");

        //通过向导生成了aidl文件后,需要Rebuild Project后,在onBind方法中就可以直接创建IAppServiceInterface.Stub对象了.
        return new IAppServiceInterface.Stub() {
            @Override
            public void basicTypes(int anInt, long aLong, boolean aBoolean, float aFloat, double aDouble, String aString) throws RemoteException {
            }

            @Override
            public void setData(String data) throws RemoteException {
                AppService.this.data = data;
            }
        };
    }

    @Override
    public void onCreate() {
        super.onCreate();
        Log.i("AppService", "onCreate");
        new Thread(new Runnable() {
            @Override
            public void run() {
                while (isRunning) {
                    SystemClock.sleep(1000);
                    Log.i("AppService", "接收到的数据是:" + data);
                }
            }
        }).start();
    }

    @Override
    public int onStartCommand(Intent intent, int flags, int startId) {
        if (null != intent) {
            Log.i("AppService", "onStartCommand接收到的数据是:" + intent.getStringExtra("data"));
        }
        return super.onStartCommand(intent, flags, startId);
    }

    @Override
    public void onDestroy() {
        super.onDestroy();
        Log.i("AppService", "onDestroy");
        isRunning = false;
    }
}
package com.example.mchenys.app2;

import android.app.Activity;
import android.content.ComponentName;
import android.content.Intent;
import android.content.ServiceConnection;
import android.os.Bundle;
import android.os.IBinder;
import android.os.RemoteException;
import android.util.Log;
import android.view.View;
import android.widget.EditText;

import com.example.mchenys.aidlservicedemo.IAppServiceInterface;

/**
 * Created by mChenys on 2015/11/1.
 */
public class App2Activity2 extends Activity {
    //创建aidl接口引用
    private IAppServiceInterface mIAppServiceInterface = null;
    //创建ServiceConnection接口的实现类对象,用于监听Service的链接和断开连接
    private MyServiceConnection conn = new MyServiceConnection();

    @Override
    protected void onCreate(Bundle savedInstanceState) {
        super.onCreate(savedInstanceState);
        setContentView(R.layout.activity2_app2);
        //创建绑定的目标AppService的显示意图
        final Intent intent = new Intent();
        intent.setComponent(new ComponentName("com.example.mchenys.aidlservicedemo", "com.example.mchenys.aidlservicedemo.AppService"));
        //绑定服务
        findViewById(R.id.id_btn_bind).setOnClickListener(new View.OnClickListener() {
            @Override
            public void onClick(View v) {
                bindService(intent, conn, BIND_AUTO_CREATE);
            }
        });
        //解绑服务
        findViewById(R.id.id_btn_unbind).setOnClickListener(new View.OnClickListener() {
            @Override
            public void onClick(View v) {
                unbindService(conn);
                mIAppServiceInterface = null;
            }
        });

        //提交数据
        findViewById(R.id.id_btn_submit).setOnClickListener(new View.OnClickListener() {
            @Override
            public void onClick(View v) {

                 //获取EditText中录入的文本
                EditText editText = (EditText) findViewById(R.id.id_edt_input);
                final String data = editText.getText().toString();

                if (null != mIAppServiceInterface) {
                    try {
                        //调用aidl接口新定义的方法,动态传递参数
                        mIAppServiceInterface.setData(data);
                    } catch (RemoteException e) {
                        e.printStackTrace();
                    }
                }
            }
        });
    }

    /**
     * 创建ServiceConnection接口的实现类
     */
    private class MyServiceConnection implements ServiceConnection {

        @Override
        public void onServiceConnected(ComponentName name, IBinder service) {
            /**
             * 当服务建立连接的时候,就可以在此方法中拿到aidl接口的实现类了,即参数service
             * 注意此时不能直接直接对service进行强制类型转换,因为虽然aidl接口的名字是相同,
             * 当时他们是存在2个不同的应用中的,我们可以通过Stub类的asInterface方法获取目标
             * 应用的aidl接口
             */
            mIAppServiceInterface = IAppServiceInterface.Stub.asInterface(service);
            Log.d("App2Activity2", "目标Service已连接");
        }

        @Override
        public void onServiceDisconnected(ComponentName name) {
            Log.d("App2Activity2", "目标Service已断开连接");

        }
    }

    @Override
    protected void onDestroy() {
        super.onDestroy();
        unbindService(conn);
        mIAppServiceInterface = null;
    }
}
然后,先运行服务端APP,之后在运行客户端APP,客户端界面如下:
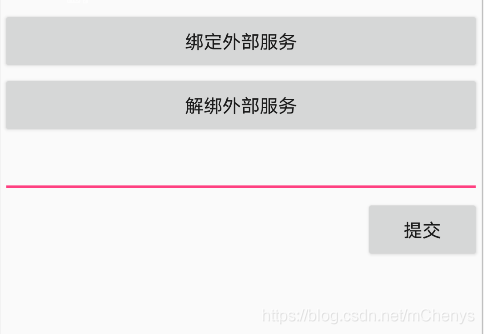
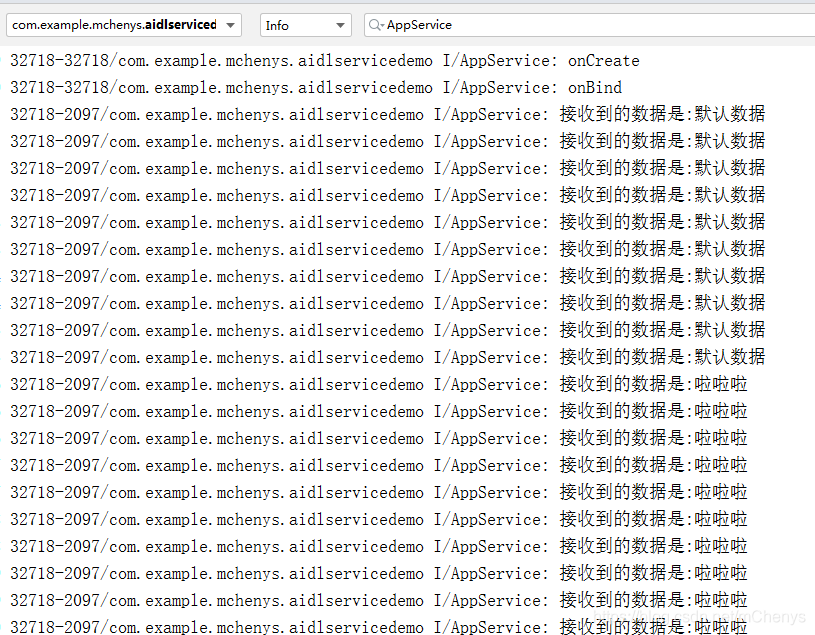
点击绑定外部服务按钮,然后EditText输入内容,点击提交,打印log如下所示:


 1607
1607


 被折叠的 条评论
为什么被折叠?
被折叠的 条评论
为什么被折叠?
 到【灌水乐园】发言


