


TextInputLayout是Google在2015 I/O大会上发布的Design Library包下的控件,使用比较简单,简单的用了下确实挺方便的。
先来看下效果图:
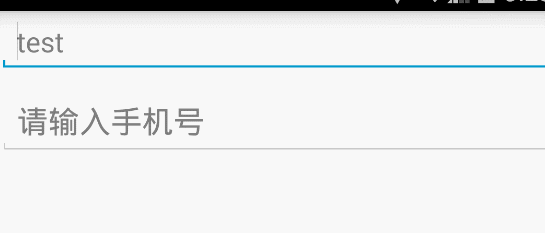
我们可以看 1、,当EditText获得焦点时候,TextInputLayout会在左上角默认的生成一个Label用来显示EditText中hint的内容,所以当用户输入时候hint内容会浮动到左上角,并且伴随动画。
2、当EditText中输入的内容不合法时,TextInputLayout便会在EditText的左下角用红色显示错误的提示信息。
下面看一下具体的代码实现,布局文件如下:
<?xml version="1.0" encoding="utf-8"?>
<LinearLayout xmlns:android="http://schemas.android.com/apk/res/android"
    android:orientation="vertical" android:layout_width="match_parent"
    android:layout_height="match_parent">

    <EditText
        android:layout_width="match_parent"
        android:layout_height="wrap_content"
        android:hint="test"/>

    <android.support.design.widget.TextInputLayout
        android:id="@+id/text_input_layout"
        android:layout_width="match_parent"
        android:layout_height="wrap_content">

        <EditText
            android:layout_width="match_parent"
            android:layout_height="wrap_content"
            android:textSize="20sp"
            android:textColor="#0F0"
            android:hint="请输入手机号"/>

    </android.support.design.widget.TextInputLayout>

</LinearLayout>
Activity中的调用代码如下:
 private TextInputLayout textInputLayout;

    @Override
    protected void onCreate(Bundle savedInstanceState) {
        super.onCreate(savedInstanceState);
        setContentView(R.layout.test_text_layout);

        textInputLayout = (TextInputLayout) findViewById(R.id.text_input_layout);
        EditText editText = textInputLayout.getEditText();

        editText.addTextChangedListener(textWatcher);
    }

    private TextWatcher textWatcher = new TextWatcher() {
        @Override
        public void beforeTextChanged(CharSequence s, int start, int count, int after) {

        }

        @Override
        public void onTextChanged(CharSequence s, int start, int before, int count) {

        }

        @Override
        public void afterTextChanged(Editable s) {
            String text = s.toString();
            if(text.length() < 3 && text.length() > 0){
                //setError 之后需要手动清除
                textInputLayout.setErrorEnabled(true);
                textInputLayout.setError("长度最小为3位");
            }else{
                textInputLayout.setErrorEnabled(false);
            }
        }
};可以看出代码量很少,用起来很方便,但是有几点需要注意:
1、TextInputLayout布局中只能包含一个EditText子View,不能包含多个EditText。
2、想获得TextInputLayout里面的EditText可以直接通过getEditText()方法获取,也有相对应的setEditText(EditText editText)方法。
3、如果要显示error提示,需要先进行setErrorEnabled为true,如果想关闭提示可以直接设置setErrorEnabled为false。
4、在设置hint的颜色时,如果对EditText设置android:textColorHint是不起作用的,需要对theme中的colorAccent进行设置,下面一张图能很好的说明colorAccent的作用
style的代码如下
<style name="AppTheme" parent="Theme.AppCompat.Light.DarkActionBar">
<!-- Customize your theme here. -->
<item name="colorPrimary">@color/colorPrimary</item>
<item name="colorAccent">#F123F9</item>
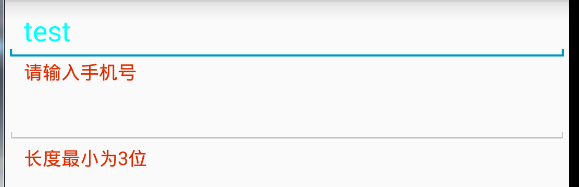
</style>5、即使当前焦点不在TextInputLayout了,但是如果还设置error呢,显示效果也相当于获取焦点,效果如下图,此时焦点在test上。
6、默认error的颜色为红色,如果红色不是我们的UI要求需要更改呢,我们可以通过设置TextInputLayout的errorTextAppearance属性,至于为什么我们先看下TextInputLayout的源码,当我们调用setError的时候其中有一段代码如下:
 public void setError(@Nullable CharSequence error) {
        if (!mErrorEnabled) {
            if (TextUtils.isEmpty(error)) {
                // If error isn't enabled, and the error is empty, just return
                return;
            }
            // Else, we'll assume that they want to enable the error functionality
            setErrorEnabled(true);
        }
        if (!TextUtils.isEmpty(error)) {
            ViewCompat.setAlpha(mErrorView, 0f);
            mErrorView.setText(error);
            ViewCompat.animate(mErrorView)
                    .alpha(1f)
                    .setDuration(ANIMATION_DURATION)
                    .setInterpolator(AnimationUtils.FAST_OUT_SLOW_IN_INTERPOLATOR)
                    .setListener(new ViewPropertyAnimatorListenerAdapter() {
                        @Override
                        public void onAnimationStart(View view) {
                            view.setVisibility(VISIBLE);
                        }
                    })
                    .start();
            // Set the EditText's background tint to the error color
            mErrorShown = true;
            updateEditTextBackground();
            updateLabelVisibility(true);
        } else {
           .........
           //省略内容自行查看
        }
    }
通过上述源码我们发现其实色setError就是调用 mErrorView.setText(error);这句代码,但是我们这里没有mErrorView的创建,因为我们调用setError之前需要先设置setErrorEnabled,所以我们再看下setErrorEnabled的源码:
public void setErrorEnabled(boolean enabled) {
        if (mErrorEnabled != enabled) {
            if (mErrorView != null) {
                ViewCompat.animate(mErrorView).cancel();
            }

            if (enabled) {
                mErrorView = new TextView(getContext());
                mErrorView.setTextAppearance(getContext(), mErrorTextAppearance);
                mErrorView.setVisibility(INVISIBLE);
                ViewCompat.setAccessibilityLiveRegion(mErrorView,
                        ViewCompat.ACCESSIBILITY_LIVE_REGION_POLITE);
                addIndicator(mErrorView, 0);
            } else {
                mErrorShown = false;
                updateEditTextBackground();
                removeIndicator(mErrorView);
                mErrorView = null;
            }
            mErrorEnabled = enabled;
        }
    }
我们可以发现mErrorView是在setErrorEnabled的时候创建的,并且创建的时候设置了mErrorTextAppearance,然后我们再查找mErrorTextAppearance的赋值发现在TextInputLayout的构造方法中有如下代码:
mErrorTextAppearance = a.getResourceId(R.styleable.TextInputLayout_errorTextAppearance, 0);到这里我们发现可以通过errorTextAppearance来设置TextInputLayout的error样式,进一步完善TextInputLayout的创建如下:
<android.support.design.widget.TextInputLayout
android:id="@+id/text_input_layout"
android:layout_width="match_parent"
app:errorTextAppearance="@style/error_style"
android:layout_height="wrap_content">
<EditText
android:layout_width="match_parent"
android:layout_height="wrap_content"
android:textSize="20sp"
android:textColor="#0F0"
android:hint="请输入手机号"/>
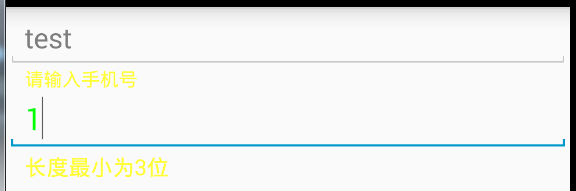
</android.support.design.widget.TextInputLayout>error_style的代码如下:
 <style name="erroe_style">
        <item name="android:textColor">#FFFF33</item>
    </style>
运行效果如下:
如有什么错误希望大家指出。


 5028
5028


 被折叠的 条评论
为什么被折叠?
被折叠的 条评论
为什么被折叠?
 到【灌水乐园】发言


