


12.3.1 概述
前边介绍的Bean定义全是基于XML方式定义配置元数据,且在【12.2注解实现Bean依赖注入】一节中介绍了通过注解来减少配置数量,但并没有完全消除在XML配置文件中的Bean定义,因此有没有方式完全消除XML配置Bean定义呢?
Spring提供通过扫描类路径中的特殊注解类来自动注册Bean定义。同注解驱动事务一样需要开启自动扫描并注册Bean定义支持,使用方式如下(resources/chapter12/ componentDefinitionWithAnnotation.xml):
<beans xmlns="http://www.springframework.org/schema/beans"
    xmlns:xsi="http://www.w3.org/2001/XMLSchema-instance"
    xmlns:aop="http://www.springframework.org/schema/aop"
    xmlns:context="http://www.springframework.org/schema/context"
    xsi:schemaLocation="
       http://www.springframework.org/schema/beans
       http://www.springframework.org/schema/beans/spring-beans-3.0.xsd
       http://www.springframework.org/schema/aop
       http://www.springframework.org/schema/aop/spring-aop-3.0.xsd
       http://www.springframework.org/schema/context
       http://www.springframework.org/schema/context/spring-context-3.0.xsd">

    <aop:aspectj-autoproxy />

    <context:component-scan base-package="cn.javass.spring.chapter12"/>

</beans>
使用<context:component-scan>标签来表示需要要自动注册Bean定义,而通过base-package属性指定扫描的类路径位置。
<context:component-scan>标签将自动开启“注解实现Bean依赖注入”支持。
此处我们还通过<aop:aspectj-autoproxy/>用于开启Spring对@AspectJ风格切面的支持。
Spring基于注解实现Bean定义支持如下三种注解:
- Spring自带的@Component注解及扩展@Repository、@Service、@Controller,如图12-1所示;
- JSR-250 1.1版本中中定义的@ManagedBean注解,是Java EE 6标准规范之一,不包括在JDK中,需要在应用服务器环境使用(如Jboss),如图12-2所示;
- JSR-330的@Named注解,如图12-3所示。
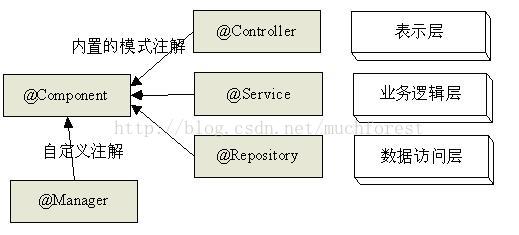
图12-1 Spring自带的@Component注解及扩展

图12-2 JSR-250中定义的@ManagedBean注解及自定义扩展
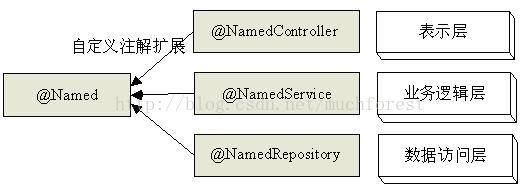
图12-3 JSR-330的@Named注解及自定义扩展
图12-2和图12-3中的自定义扩展部分是为了配合Spring自带的模式注解扩展自定义的,并不包含在Java EE 6规范中,在Java EE 6中相应的服务层、DAO层功能由EJB来完成。
在Java EE中有些注解运行放置在多个地方,如@Named允许放置在类型、字段、方法参数上等,因此一般情况下放置在类型上表示定义,放置在参数、方法等上边一般代表使用(如依赖注入等等)。
12.3.2 Spring自带的@Component注解及扩展
一、@Component:定义Spring管理Bean,使用方式如下:
@Component("标识符")
POJO类
在类上使用@Component注解,表示该类定义为Spring管理Bean,使用默认value(可选)属性表示Bean标识符。
1、定义测试Bean类:
package cn.javass.spring.chapter12;
import org.springframework.beans.factory.annotation.Autowired;
import org.springframework.context.ApplicationContext;
import org.springframework.stereotype.Component;
@Component("component")
public class TestCompoment {
    @Autowired
    private ApplicationContext ctx;
    public ApplicationContext getCtx() {
        return ctx;
    }
}
2、Spring配置文件使用chapter12/ componentDefinitionWithAnnotation.xml即可且无需修改;
3、定义测试类和测试方法:
package cn.javass.spring.chapter12;
//省略import
public class ComponentDefinitionWithAnnotationTest {
    private static String configLocation = "classpath:chapter12/componentDefinitionWithAnnotation.xml";
    private static ApplicationContext ctx = new ClassPathXmlApplicationContext(configLocation);
    @Test
    public void testComponent() {
        TestCompoment component = ctx.getBean("component", TestCompoment.class);
        Assert.assertNotNull(component.getCtx());
    }
}
测试成功说明被@Component注解的POJO类将自动被Spring识别并注册到Spring容器中,且自动支持自动装配。
@AspectJ风格的切面可以通过@Compenent注解标识其为Spring管理Bean,而@Aspect注解不能被Spring自动识别并注册为Bean,必须通过@Component注解来完成,示例如下:
package cn.javass.spring.chapter12.aop;
//省略import
@Component
@Aspect
public class TestAspect {
    @Pointcut(value="execution(* *(..))")
    private void pointcut() {}
    @Before(value="pointcut()")
    public void before() {
        System.out.println("=======before");
    }
}
通过@Component将切面定义为Spring管理Bean。
二、@Repository:@Component扩展,被@Repository注解的POJO类表示DAO层实现,从而见到该注解就想到DAO层实现,使用方式和@Component相同;
1、定义测试Bean类:
package cn.javass.spring.chapter12.dao.hibernate;
import org.springframework.stereotype.Repository;
@Repository("testHibernateDao")
public class TestHibernateDaoImpl {

}
2、Spring配置文件使用chapter12/ componentDefinitionWithAnnotation.xml即可且无需修改;
3、定义测试方法:
@Test
public void testDao() {
TestHibernateDaoImpl dao =
ctx.getBean("testHibernateDao", TestHibernateDaoImpl.class);
Assert.assertNotNull(dao);
}
测试成功说明被@Repository注解的POJO类将自动被Spring识别并注册到Spring容器中,且自动支持自动装配,并且被@Repository注解的类表示DAO层实现。
三、@Service:@Component扩展,被@Service注解的POJO类表示Service层实现,从而见到该注解就想到Service层实现,使用方式和@Component相同;
1、定义测试Bean类:
package cn.javass.spring.chapter12.service.impl;
import org.springframework.beans.factory.annotation.Autowired;
import org.springframework.beans.factory.annotation.Qualifier;
import org.springframework.stereotype.Service;
import cn.javass.spring.chapter12.dao.hibernate.TestHibernateDaoImpl;
@Service("testService")
public class TestServiceImpl {
    @Autowired
    @Qualifier("testHibernateDao")
    private TestHibernateDaoImpl dao;
    public TestHibernateDaoImpl getDao() {
        return dao;
    }
}
2、Spring配置文件使用chapter12/ componentDefinitionWithAnnotation.xml即可且无需修改;
3、定义测试方法:
@Test
public void testService() {
    TestServiceImpl service = ctx.getBean("testService", TestServiceImpl.class);
    Assert.assertNotNull(service.getDao());
}
测试成功说明被@Service注解的POJO类将自动被Spring识别并注册到Spring容器中,且自动支持自动装配,并且被@Service注解的类表示Service层实现。
四、@Controller:@Component扩展,被@Controller注解的类表示Web层实现,从而见到该注解就想到Web层实现,使用方式和@Component相同;
1、定义测试Bean类:
package cn.javass.spring.chapter12.action;
//省略import
@Controller
public class TestAction {
    @Autowired
    private TestServiceImpl testService;

    public void list() {
        //调用业务逻辑层方法
    }
}
2、Spring配置文件使用chapter12/ componentDefinitionWithAnnotation.xml即可且无需修改;
3、定义测试方法:
@Test
public void testWeb() {
    TestAction action = ctx.getBean("testAction", TestAction.class);
    Assert.assertNotNull(action);
}
测试成功说明被@Controller注解的类将自动被Spring识别并注册到Spring容器中,且自动支持自动装配,并且被@Controller注解的类表示Web层实现。
大家是否注意到@Controller中并没有定义Bean的标识符,那么默认Bean的名字将是以小写开头的类名(不包括包名),即如“TestAction”类的Bean标识符为“testAction”。
六、自定义扩展:Spring内置了三种通用的扩展注解@Repository、@Service、@Controller ,大多数情况下没必要定义自己的扩展,在此我们演示下如何扩展@Component注解来满足某些特殊规约的需要;
在此我们可能需要一个缓存层用于定义缓存Bean,因此我们需要自定义一个@Cache的注解来表示缓存类。
1、扩展@Component:
package cn.javass.spring.chapter12.stereotype;
//省略import
@Target({ElementType.TYPE})
@Retention(RetentionPolicy.RUNTIME)
@Documented
@Component
public @interface Cache{
       String value() default "";
}
扩展十分简单,只需要在扩展的注解上注解@Component即可,@Repository、@Service、@Controller也是通过该方式实现的,没什么特别之处
2、定义测试Bean类:
package cn.javass.spring.chapter12.cache;
@Cache("cache")
public class TestCache {

}
2、Spring配置文件使用chapter12/ componentDefinitionWithAnnotation.xml即可且无需修改;
3、定义测试方法:
@Test
public void testCache() {
    TestCache cache = ctx.getBean("cache", TestCache.class);
    Assert.assertNotNull(cache);
}
测试成功说明自定义的@Cache注解也能很好的工作,而且实现了我们的目的,使用@Cache来表示被注解的类是Cache层Bean。
12.3.3 JSR-250中定义的@ManagedBean注解
@javax.annotation.ManagedBean需要在实现Java EE 6规范的应用服务器上使用,虽然Spring3实现了,但@javax.annotation.ManagedBean只有在Java EE 6环境中才有定义,因此测试前需要我们定义ManagedBean类。
1、定义javax.annotation.ManagedBean注解类:
package javax.annotation;
import java.lang.annotation.ElementType;
import java.lang.annotation.Retention;
import java.lang.annotation.RetentionPolicy;
import java.lang.annotation.Target;
@Target(ElementType.TYPE)
@Retention(RetentionPolicy.RUNTIME)
public @interface ManagedBean {
     String value() default "";
}
其和@Component完全相同,唯一不同的就是名字和创建者(一个是Spring,一个是Java EE规范)。
2、定义测试Bean类:
package cn.javass.spring.chapter12;
import javax.annotation.Resource;
import org.springframework.context.ApplicationContext;
@javax.annotation.ManagedBean("managedBean")
public class TestManagedBean {
    @Resource
    private ApplicationContext ctx;
    public ApplicationContext getCtx() {
        return ctx;
    }
}
2、Spring配置文件使用chapter12/ componentDefinitionWithAnnotation.xml即可且无需修改;
3、定义测试方法:
@Test
public void testManagedBean() {
    TestManagedBean testManagedBean = ctx.getBean("managedBean", TestManagedBean.class);
    Assert.assertNotNull(testManagedBean.getCtx());
}
测试成功说明被@ManagedBean注解类也能正常工作。
自定义扩展就不介绍了,大家可以参考@Component来完成如图12-2所示的自定义扩展部分。
12.3.4 JSR-330的@Named注解
@Named不仅可以用于依赖注入来指定注入的Bean的标识符,还可以用于定义Bean。即注解在类型上表示定义Bean,注解在非类型上(如字段)表示指定依赖注入的Bean标识符。
1、定义测试Bean类:
package cn.javass.spring.chapter12;
//省略import
@Named("namedBean")
public class TestNamedBean {
    @Inject
    private ApplicationContext ctx;
    public ApplicationContext getCtx() {
        return ctx;
    }
}
2、Spring配置文件使用chapter12/ componentDefinitionWithAnnotation.xml即可且无需修改;
3、定义测试方法:
@Test
public void testNamedBean() {
TestNamedBean testNamedBean =
    ctx.getBean("namedBean", TestNamedBean.class);
    Assert.assertNotNull(testNamedBean.getCtx());
}
测试成功说明被@Named注解类也能正常工作。
自定义扩展就不介绍了,大家可以参考@Component来完成如图12-3所示的自定义扩展部分。
12.3.5 细粒度控制Bean定义扫描
在XML配置中完全消除了Bean定义,而是只有一个<context:component-scan>标签来支持注解Bean定义扫描。
前边的示例完全采用默认扫描设置,如果我们有几个组件不想被扫描并自动注册、我们想更改默认的Bean标识符生成策略该如何做呢?接下来让我们看一下如何细粒度的控制Bean定义扫描,具体定义如下:
<context:component-scan
        base-package=""
        resource-pattern="**/*.class"
        name-generator="org.springframework.context.annotation.AnnotationBeanNameGenerator"
        use-default-filters="true"
        annotation-config="true">
                <context:include-filter type="aspectj" expression=""/>
                <context:exclude-filter type="regex" expression=""/>
</context:component-scan> - base-package:表示扫描注解类的开始位置,即将在指定的包中扫描,其他包中的注解类将不被扫描,默认将扫描所有类路径;
- resource-pattern:表示扫描注解类的后缀匹配模式,即“base-package+resource-pattern”将组成匹配模式用于匹配类路径中的组件,默认后缀为“**/*.class”,即指定包下的所有以.class结尾的类文件;
- name-generator:默认情况下的Bean标识符生成策略,默认是AnnotationBeanNameGenerator,其将生成以小写开头的类名(不包括包名);可以自定义自己的标识符生成策略;
- use-default-filters:默认为true表示过滤@Component、@ManagedBean、@Named注解的类,如果改为false默认将不过滤这些默认的注解来定义Bean,即这些注解类不能被过滤到,即不能通过这些注解进行Bean定义;
- annotation-config:表示是否自动支持注解实现Bean依赖注入,默认支持,如果设置为false,将关闭支持注解的依赖注入,需要通过<context:annotation-config/>开启。
默认情况下将自动过滤@Component、@ManagedBean、@Named注解的类并将其注册为Spring管理Bean,可以通过在<context:component-scan>标签中指定自定义过滤器将过滤到匹配条件的类注册为Spring管理Bean,具体定义方式如下:
<context:include-filter type="aspectj" expression=""/>
<context:exclude-filter type="regex" expression=""/>- <context:include-filter>:表示过滤到的类将被注册为Spring管理Bean;
- <context:exclude-filter>:表示过滤到的类将不被注册为Spring管理Bean,它比<context:include-filter>具有更高优先级;
- type:表示过滤器类型,目前支持注解类型、类类型、正则表达式、aspectj表达式过滤器,当然也可以自定义自己的过滤器,实现org.springframework.core.type.filter.TypeFilter即可;
- expression:表示过滤器表达式。
一般情况下没必要进行自定义过滤,如果需要请参考如下示例:
1、cn.javass.spring.chapter12.TestBean14自动注册为Spring管理Bean:
<context:include-filter type="assignable" expression="cn.javass.spring.chapter12.TestBean14"/>
2、把所有注解为org.aspectj.lang.annotation.Aspect自动注册为Spring管理Bean:
<context:include-filter type="annotation"
expression="org.aspectj.lang.annotation.Aspect"/>
3、将把匹配到正则表达式“cn\.javass\.spring\.chapter12\.TestBean2*”排除,不注册为Spring管理Bean:
<context:exclude-filter type="regex" expression="cn\.javass\.spring\.chapter12\.TestBean2*"/>
4、将把匹配到aspectj表达式“cn.javass.spring.chapter12.TestBean3*”排除,不注册为Spring管理Bean:
<context:exclude-filter type="aspectj" expression="cn.javass.spring.chapter12.TestBean3*"/>
具体使用就要看项目需要了,如果以上都不满足需要请考虑使用自定义过滤器。
12.3.6 提供更多的配置元数据
1、@Lazy:定义Bean将延迟初始化,使用方式如下:
@Component("component")
@Lazy(true)
public class TestCompoment {
……
}
使用@Lazy注解指定Bean需要延迟初始化。
2、@DependsOn:定义Bean初始化及销毁时的顺序,使用方式如下:
@Component("component")
@DependsOn({"managedBean"})
public class TestCompoment {
……
}
3、@Scope:定义Bean作用域,默认单例,使用方式如下:
@Component("component")
@Scope("singleton")
public class TestCompoment {
……
}
4、@Qualifier:指定限定描述符,对应于基于XML配置中的<qualifier>标签,使用方式如下:
@Component("component")
@Qualifier("component")
public class TestCompoment {
……
}
可以使用复杂的扩展,如@Mysql等等。
5、@Primary:自动装配时当出现多个Bean候选者时,被注解为@Primary的Bean将作为首选者,否则将抛出异常,使用方式如下:
@Component("component")
@Primary
public class TestCompoment {
……
}


 306
306


 被折叠的 条评论
为什么被折叠?
被折叠的 条评论
为什么被折叠?
 到【灌水乐园】发言


