


本文档版权归NickTang所有,没有本人书面或电子邮件允许,不许转载,摘录,发表。多谢!
我们很难想像一个不包含动画的iOS应用程序,一个iOS游戏更是不可能没有动画,因此我从今天开始一个新的课题---如何写动画相关的代码。
这里的第一篇文章其实和iOS提供的动画API没有关系,只是使用定时器来形成一个动画,因为这是动画的最记本实现方式。所以这个例子也是顺便演示一下定时器如何使用。
1.新建一个view-based Application.(在iOS5中是Single View Application)
2.加入一个小的图片,比如1.png,长和宽都不要大于100.
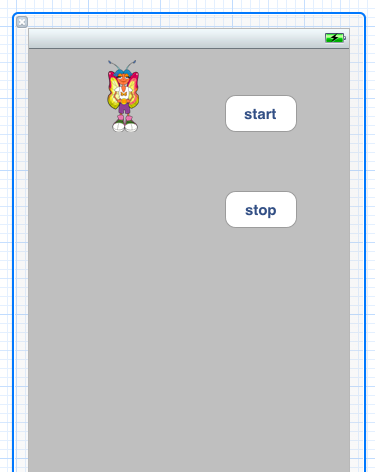
3.在viewcontroller.xib上面做如下布局
4.为它们增加相应的控制指针,并对两个button的touch up inside事件响应,最后形成的viewcontroller.h文件如下:
@interface tTimerAnimationViewController : UIViewController {
NSTimer *aniTimer;
IBOutlet UIImageView *myIV;
IBOutlet UIButton *startButton;
IBOutlet UIButton *stopButton;
int directionDelta;
}
- (IBAction)stop:(id)sender;
- (IBAction)start:(id)sender;
- (void)timerFunc;
@end
5.下面是viewcontroller.m文件,
@implementation tTimerAnimationViewController
- (void)dealloc
{
[myIV release];
[startButton release];
[stopButton release];
[aniTimer invalidate];
[super dealloc];
}
- (void)didReceiveMemoryWarning
{
// Releases the view if it doesn't have a superview.
[super didReceiveMemoryWarning];
// Release any cached data, images, etc that aren't in use.
}
#pragma mark - View lifecycle
// Implement viewDidLoad to do additional setup after loading the view, typically from a nib.
- (void)viewDidLoad
{
[super viewDidLoad];
stopButton.enabled = NO;
directionDelta = 2;
}
- (void)viewDidUnload
{
[myIV release];
myIV = nil;
[startButton release];
startButton = nil;
[stopButton release];
stopButton = nil;
[super viewDidUnload];
// Release any retained subviews of the main view.
// e.g. self.myOutlet = nil;
}
- (BOOL)shouldAutorotateToInterfaceOrientation:(UIInterfaceOrientation)interfaceOrientation
{
// Return YES for supported orientations
return (interfaceOrientation == UIInterfaceOrientationPortrait);
}
- (IBAction)stop:(id)sender {
startButton.enabled = YES;
stopButton.enabled = NO;
[aniTimer invalidate];
aniTimer = nil;
}
- (IBAction)start:(id)sender {
startButton.enabled = NO;
stopButton.enabled = YES;
aniTimer = [NSTimer scheduledTimerWithTimeInterval:0.01 target:self selector:@selector(timerFunc) userInfo:nil repeats:YES];
}
- (void)timerFunc
{
CGPoint center = myIV.center;
if(center.y >450)
directionDelta = -2;
if(center.y < 30)
directionDelta = 2;
center.y += directionDelta;
myIV.center = center;
}
@end
6.解释如下:
aniTimer = [NSTimer scheduledTimerWithTimeInterval:0.01 target:self selector:@selector(timerFunc) userInfo:nil repeats:YES];
上面的这句话启动一个定时器,每0.01秒调用一次,定时器触发的函数是self的timerFunc。userInfo是传入到timerFunc的参数,repeats是标识是否重复调用这个定时器。
相关代码在这里:
http://download.csdn.net/download/NickTang/3690782


 337
337

 被折叠的 条评论
为什么被折叠?
被折叠的 条评论
为什么被折叠?
 到【灌水乐园】发言


