


步骤:
1.在res下新建xml文件夹,在xml文件夹中新建.xml文件,用来实现软键盘的布局
2.标签Keyboard代表是软键盘,标签Row代表的是一行,Key代表的是一个按键
3.每一个按键都有一个codes值,在类中就是通过codes的值来监听每一个按钮。keylabel的值是键盘所要显示的文字
注:
Keyborad:说明是一个软键盘定义文件
Row:说明是一行按键的定义
Key:说明是一个按键的定义
Codes:代表按键对应的输出值
keyLabel:代表按键显示的文本内容
keyIcon:代表按键显示的图标内容,如果指定了该值则在显示的时候显示为图片不显示文本
keyWidth:代表按键的宽度,可以为精确值或者相对值,对于精确值支持多种单位,例如:像素、英寸等。相对值为百分比,以%或%p结尾,其中%p表示相对于父容器。
keyHeight:代表按键的高度,取值同上
horizontalGap:代表按键前的间隙(水平方向),取值同上
isSticky:指定按键是否为sticky。如Shift大小写切换按键,具有两种状态,按下状态和正常状态,取值为true或者false
isModifier:指定按键是否为功能键,如Alt或者Shift,取值为true或false
keyOutputText:指按键输出的文本内容,取值为字符串
isRepeatable:指按键是否可是否是可重复的,如故长按该键可以触发重复按键事件则为true,否则为false
keyEdgeFlags"指定按键的对齐指令,取值为left或right
加载布局
   this.keyboardView = keyboardView1;
        keyboardView.setOnKeyboardActionListener(listener);
        this.myImeService = myImeService1;
        k1 = new Keyboard(myImeService.getApplicationContext(), R.xml.chinese);
        keyboardView.setKeyboard(k1);
        keyboardView.setEnabled(true);
        keyboardView.setPreviewEnabled(true);
设置监听,并处理事件
 private OnKeyboardActionListener listener = new OnKeyboardActionListener() {

        @Override
        public void swipeUp() {
        }

        @Override
        public void swipeRight() {
        }

        @Override
        public void swipeLeft() {
        }

        @Override
        public void swipeDown() {
        }

        @Override
        public void onText(CharSequence text) {
        }

        @Override
        public void onRelease(int primaryCode) {
        }

        @Override
        public void onPress(int primaryCode) {
        }

        @Override
        public void onKey(int primaryCode, int[] keyCodes) {
            InputConnection ic = myImeService.getCurrentInputConnection();
            switch (primaryCode) {
                case Keyboard.KEYCODE_DELETE:
//				myImeService.deleteText();
                    ic.deleteSurroundingText(1, 0);
                    break;
                case Keyboard.KEYCODE_CANCEL:
//				myImeService.hideInputMethod();
                    break;
                case Keyboard.KEYCODE_DONE:
                    ic.sendKeyEvent(new KeyEvent(KeyEvent.ACTION_DOWN, KeyEvent.KEYCODE_NUMPAD_ENTER));
                    break;
                default:
//				myImeService.commitText(Character.toString((char) primaryCode));
                    ic.commitText(String.valueOf((char) primaryCode), 1);
                    break;
            }
        }
    };
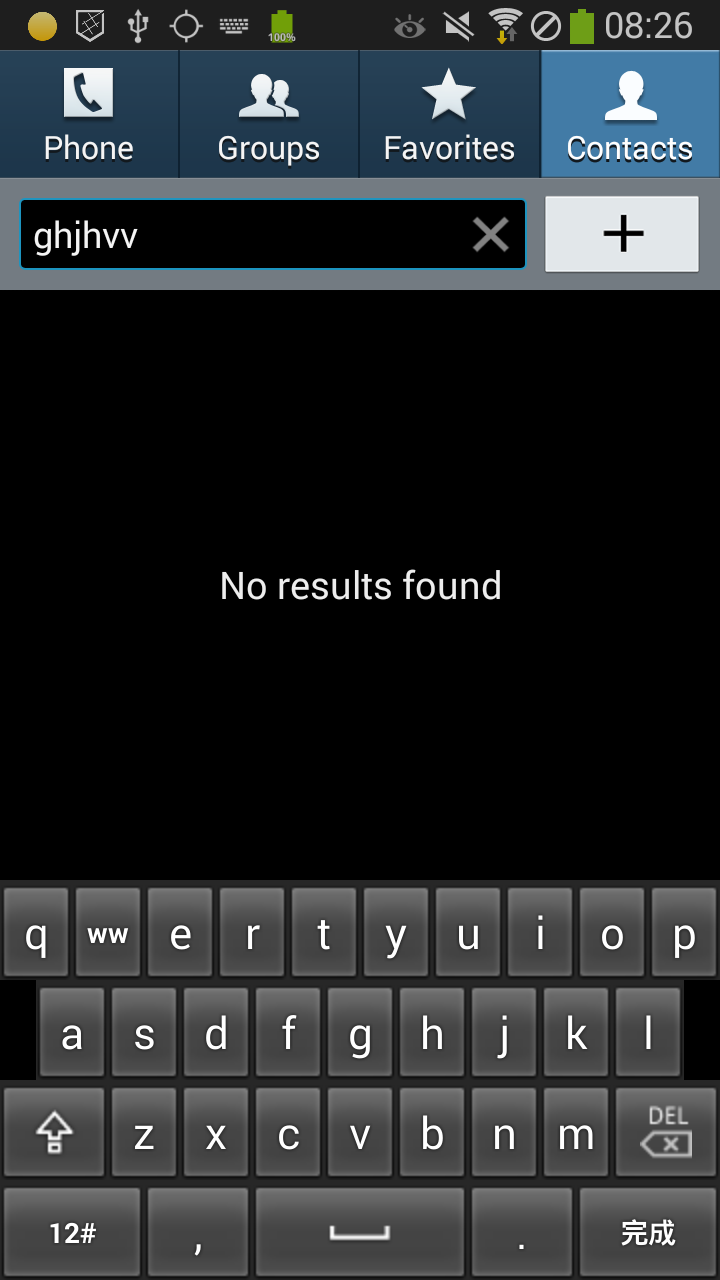
一、字母键盘
<?xml version="1.0" encoding="UTF-8"?>
<Keyboard android:keyWidth="10.000002%p"
	android:keyHeight="@dimen/key_height"
	android:horizontalGap="0.0px"
	android:verticalGap="0.0px"
	xmlns:android="http://schemas.android.com/apk/res/android">
	<Row>
		<Key android:codes="113" android:keyEdgeFlags="left"
			android:keyLabel="q" />
		<Key android:codes="119" android:keyLabel="ww" />
		<Key android:codes="101" android:keyLabel="e" />
		<Key android:codes="114" android:keyLabel="r" />
		<Key android:codes="116" android:keyLabel="t" />
		<Key android:codes="121" android:keyLabel="y" />
		<Key android:codes="117" android:keyLabel="u" />
		<Key android:codes="105" android:keyLabel="i" />
		<Key android:codes="111" android:keyLabel="o" />
		<Key android:codes="112" android:keyEdgeFlags="right"
			android:keyLabel="p" />
	</Row>
	<Row>
		<Key android:horizontalGap="4.999995%p" android:codes="97"
			android:keyEdgeFlags="left" android:keyLabel="a" />
		<Key android:codes="115" android:keyLabel="s" />
		<Key android:codes="100" android:keyLabel="d" />
		<Key android:codes="102" android:keyLabel="f" />
		<Key android:codes="103" android:keyLabel="g" />
		<Key android:codes="104" android:keyLabel="h" />
		<Key android:codes="106" android:keyLabel="j" />
		<Key android:codes="107" android:keyLabel="k" />
		<Key android:codes="108" android:keyEdgeFlags="right"
			android:keyLabel="l" />
	</Row>
	<Row>
		<Key android:keyWidth="14.999998%p" android:codes="-1"
			android:keyEdgeFlags="left" android:isModifier="true"
			android:isSticky="true" android:keyIcon="@drawable/sym_keyboard_shift" />
		<Key android:codes="122" android:keyLabel="z" />
		<Key android:codes="120" android:keyLabel="x" />
		<Key android:codes="99" android:keyLabel="c" />
		<Key android:codes="118" android:keyLabel="v" />
		<Key android:codes="98" android:keyLabel="b" />
		<Key android:codes="110" android:keyLabel="n" />
		<Key android:codes="109" android:keyLabel="m" />
		<Key android:keyWidth="14.999998%p" android:codes="-5"
			android:keyEdgeFlags="right" android:isRepeatable="true"
			android:keyIcon="@drawable/sym_keyboard_delete" />
	</Row>
	<Row android:rowEdgeFlags="bottom">
		<Key android:keyWidth="20.000004%p" android:codes="-2"
			android:keyLabel="12#" />
		<Key android:keyWidth="14.999998%p" android:codes="44"
			android:keyLabel="," />
		<Key android:keyWidth="29.999996%p" android:codes="32"
			android:isRepeatable="true" android:keyIcon="@drawable/sym_keyboard_space" />
		<Key android:keyWidth="14.999998%p" android:codes="46"
			android:keyLabel="." />
		<Key android:keyWidth="20.000004%p" android:codes="-3"
			android:keyEdgeFlags="right" android:keyLabel="完成" />
	</Row>
</Keyboard>
运行后的结果:
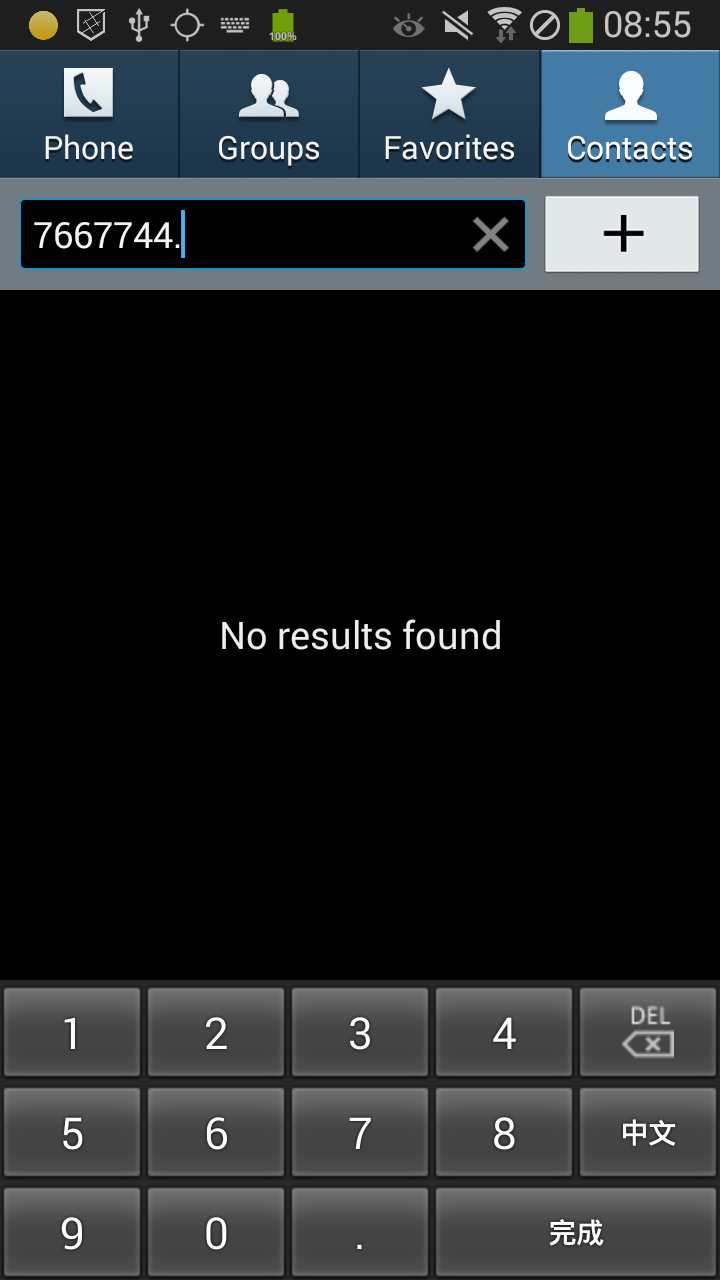
二、数字键盘
<?xml version="1.0" encoding="UTF-8"?>
<Keyboard android:keyWidth="20%p"
	android:keyHeight="@dimen/key_height"
	android:horizontalGap="0.0px"
	android:verticalGap="0.0px"
	xmlns:android="http://schemas.android.com/apk/res/android">
	<Row>
		<Key android:codes="49" android:keyLabel="1" />
		<Key android:codes="50" android:keyLabel="2" />
		<Key android:codes="51" android:keyLabel="3" />
		<Key android:codes="52" android:keyLabel="4" />
		<Key android:codes="-5" android:keyIcon="@drawable/sym_keyboard_delete" />
	</Row>

	<Row>
		<Key android:codes="53" android:keyLabel="5" />
		<Key android:codes="54" android:keyLabel="6" />
		<Key android:codes="55" android:keyLabel="7" />
		<Key android:codes="56" android:keyLabel="8" />
		<Key android:codes="-2" android:keyLabel="中文" />
	</Row>

	<Row>
		<Key android:codes="57" android:keyLabel="9" />
		<Key android:codes="48" android:keyLabel="0" />
		<Key android:codes="46" android:keyLabel="." />
		<Key android:codes="-3" android:keyLabel="完成"
			android:keyWidth="40%p" android:isRepeatable="true" />
	</Row>

</Keyboard>
运行后的结果:
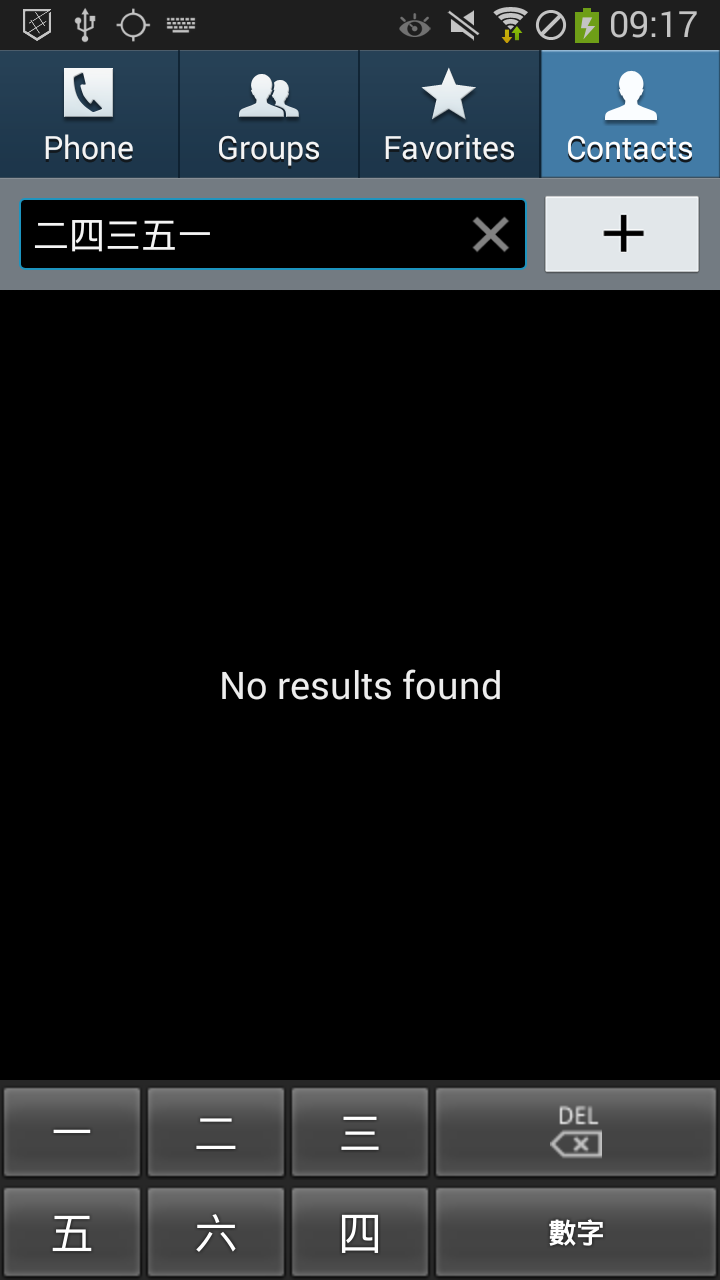
三、中文键盘
<?xml version="1.0" encoding="UTF-8"?>
<Keyboard android:keyWidth="20%p"
	android:keyHeight="@dimen/key_height"
	android:horizontalGap="0.0px"
	android:verticalGap="0.0px"
	xmlns:android="http://schemas.android.com/apk/res/android">
	<Row>
		<Key android:codes="19968" android:keyLabel="一" />
		<Key android:codes="20108" android:keyLabel="二" />
		<Key android:codes="19977" android:keyLabel="三" />
		<Key android:codes="-5" android:keyIcon="@drawable/sym_keyboard_delete"
			android:keyWidth="40%p" android:isRepeatable="true"/>
	</Row>

	<Row>
		<Key android:codes="20116" android:keyLabel="五" />
		<Key android:codes="20845" android:keyLabel="六" />
		<Key android:codes="22235" android:keyLabel="四" />
		<Key android:codes="-2" android:keyLabel="數字"
			android:keyWidth="40%p" android:isRepeatable="true"/>
	</Row>

</Keyboard>
运行后的结果:
注:参考资料:
http://www.jianshu.com/p/23fc9663358f
http://www.10tiao.com/html/169/201703/2650822379/1.html
http://blog.csdn.net/acrambler/article/details/13213181
http://blog.csdn.net/hfsu0419/article/details/7924673


 1438
1438


 被折叠的 条评论
为什么被折叠?
被折叠的 条评论
为什么被折叠?
 到【灌水乐园】发言


