


原来在Android2.3.5下能正常工作的TouchScreen功能,移植到Android 4.0就不能正常工作了。凭直觉,Android4.0肯定有鬼。真是不看不知道,一看吓一跳。在Android 4.0中,Event Input地位提高了,你看看,在Adroid2.3.5中,它在frameworks/base/libs/ui之下,在Android4.0中,它在frameworks/base/services/input之下,看到没有,它有了自己的地位,就像在Kernel中一样,有自己门户了。
再看看代码,变化也太大了,当然TouchScreen不能工作,首先自然会看接口部分代码。首先看它是如何打开设备的,查看函数EventHub::openDeviceLocked,看看其代码,大部分还是很熟悉的,但仔细一看多了一个下面的东东:
ioctl(fd, EVIOCGPROP(sizeof(device->propBitmask)), device->propBitmask);
由于升级到Android4.0时,Kernel还是2.6.35,并没有进行升级。既然需要EVIOCGPROP,就就看看evdev.c中的ioctl函数是否支持此功能。一看不支持,再看看Kernel3.0.8<这个Kernel版本与Android4.0是一伙的>,我的乖乖,它已经支持了此功能,详见evdev.c中函数evdev_do_ioctl,这个写得2.6.35中的友好多了,分别处理:固定长度命令、单个可变长度命令和多个可变长度命令。
对于为什么我的TouchScreen在Android4.0不工作,答案显而易见,我用的Kernel版本不对,当然移植到Android4.0对应的Kernel(Kernel3.0.8)时,TouchScreen驱动本身也需要修改,因为input_dev变化也比较大,比如增加了propbit字段,以供处理上面的ioctl时使用。
2. Android 4.0如何管理各种驱动设备
正是由于遇到上面的问题,才促使自己对Event Input进行深入了解。因为蜻蜓点水不是小弟的性格。
这个年代干啥都有什么经理,小弟之类的。比如去饭店吃饭,吃到小强了,总是会大吼一声,经理,过来看看,然后谈打折或赔偿的问题。可见经理是不可缺少的,要不然我们找谁来维权啊!
前面谈到的EventHub,这个一看就是一个做实事的,肯定不是领导,哪它的领导是谁呢? 哪我们就从以下几方面来分析此问题:
1)每个功能模块是怎么产生的?
2)读取设备输入流程?
3)事件分发流程?
3. 各个功能模块是怎么产生的?先介绍一下每个模块的工作职责:EventHub, InputReader, InputManager...
3.1 模块功能3.1.1 EventHub它是系统中所有事件的中央处理站。它管理所有系统中可以识别的输入设备的输入事件,此外,当设备增加或删除时,EventHub将产生相应的输入事件给系统。
EventHub通过getEvents函数,给系统提供一个输入事件流。它也支持查询输入设备当前的状态(如哪些键当前被按下)。而且EventHub还跟踪每个输入调入的能力,比如输入设备的类别,输入设备支持哪些按键。
3.1.2 InputReaderInputReader从EventHub中读取原始事件数据(RawEvent),并由各个InputMapper处理之后输入对应的input listener.
InputReader拥有一个InputMapper集合。它做的大部分工作在InputReader线程中完成,但是InputReader可以接受任意线程的查询。为了可管理性,InputReader使用一个简单的Mutex来保护它的状态。
InputReader拥有一个EventHub对象,但这个对象不是它创建的,而是在创建InputReader时作为参数传入的。
3.1.3 InputDispatcherInputDispatcher负责把事件分发给输入目标,其中的一些功能(如识别输入目标)由独立的policy对象控制。
3.1.4 InputManagerInputManager是系统事件处理的核心,它虽然不做具体的事,但管理工作还是要做的,比如接受我们客户的投诉和索赔要求,或者老板的出所筒。
InputManager使用两个线程:
1)InputReaderThread叫做"InputReader"线程,它负责读取并预处理RawEvent,applies policy并且把消息送入DispatcherThead管理的队列中。
2)InputDispatcherThread叫做"InputDispatcher"线程,它在队列上等待新的输入事件,并且异步地把这些事件分发给应用程序。
InputReaderThread类与InputDispatcherThread类不共享内部状态,所有的通信都是单向的,从InputReaderThread到InputDispatcherThread。两个类可以通过InputDispatchPolicy进行交互。
InputManager类从不与Java交互,而InputDispatchPolicy负责执行所有与系统的外部交互,包括调用DVM业务。
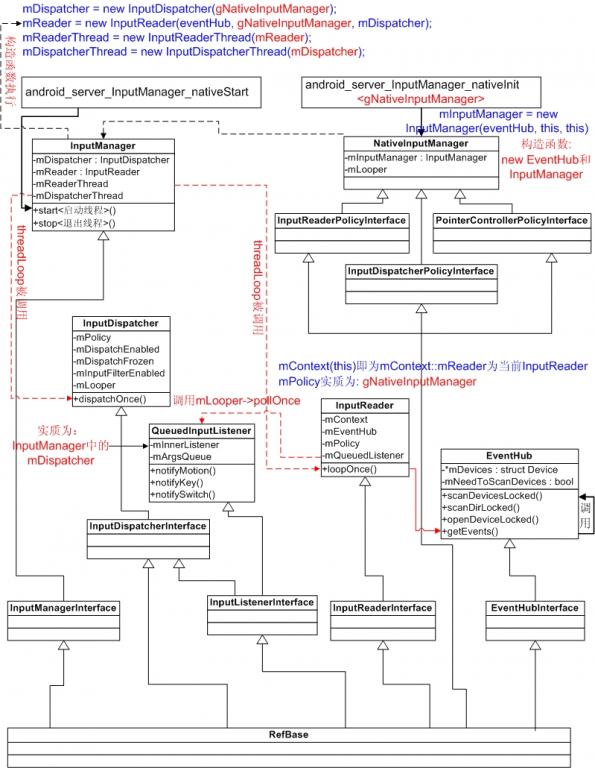
3.2 创建流程1)在android_server_InputManager_nativeInit中创建NativeInputManager对象,并保存到gNativeInputManager中;
2)在创建NativeInputManager对象时,它会创建EventHub对象<且创建是其成员mNeedToScanDevices的值为true>,然后把刚创建的EventHub对象作为参数创建InputManager对象;
3)在创建InputManager对象时,创建InputReader对象,然后把它作为参数创建InputReaderThread;创建InputDispatcher对象,然后把它作为参数创建InputDispatcherThread对象;(注:以上两个线程对象都有自己的threadLoop函数,它将在Thread::_threadLoop中被调用,这个Thread::_threadLoop是线程入口函数,线程在Thread::run中被真正地创建)
4.1)创建InputReader对象
4.1.1)把EventHub、readerPolicy<实质为NativeInputManager对象>和创建的InputDispatcher对象作为参数创建InputReader对象:mReader = new InputReader(eventHub, readerPolicy, mDispatcher);
4.1.2)在创建InputReader时, 保存EventHub对象到mEventHub中,并创建QueuedInputListener对象并保存在mQueuedListener中
4.2)创建InputDispatcher对象
4.2.1)把传入的参数dispatcherPolicy<实质为NativeInputManager对象>作为参数创建InputDispatcher对象:mDispatcher = new InputDispatcher(dispatcherPolicy);
4.2.1)在创建InputDispatcher时,创建了一个looper对象:mLooper = new Looper(false);
3.3 启动流程1)在android_server_InputManager_nativeStart中调用InputManager::start,代码如下:
result = gNativeInputManager->getInputManager()->start();
2)在InputManager::start中,调用mDispatcherThread->run和mReaderThread->run,代码如下:
result = mDispatcherThread->run("InputDispatcher", PRIORITY_URGENT_DISPLAY);
result = mReaderThread->run("InputReader", PRIORITY_URGENT_DISPLAY);
3)在上面的Thread::run中,调用createThreadEtc函数,并以Thread::_threadLoop作为入口函数,以上面的mDispatcherThread或mReaderThread作为userdata创建线程
4)至此InputReader线程和InputDispatcher线程都已经工作,详细信息见Thread::_threadLoop,在此函数中它将调用mDispatcherThread或mReaderThread的threadLoop函数来做真正的事
5.1)mReaderThread->threadLoop
bool InputReaderThread::threadLoop() {
mReader->loopOnce();
return true;
}
5.2)mDispatcherThread->threadLoop
bool InputDispatcherThread::threadLoop() {
mDispatcher->dispatchOnce();
return true;
}
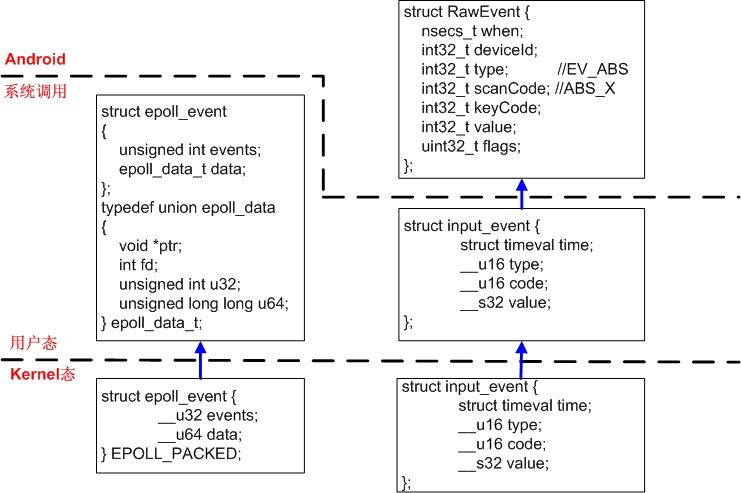
从EventHub::getEvents读取的事件数据结构如下:
- struct RawEvent {
- nsecs_t when; //事件发生的时间
- int32_t deviceId; //产生此事件的设备,比如发送FINISHED_DEVICE_SCAN,不需要填此项
- int32_t type; //事件类型(如:DEVICE_ADDED,DEVICE_REMOVED,FINISHED_DEVICE_SCAN)
- int32_t scanCode;
- int32_t keyCode;
- int32_t value;
- uint32_t flags;
- };
读取事件时的调用流程为:
Thread::_threadLoop->
InputReaderThread::threadLoop->
InputReader::loopOnce->
EventHub::getEvents->
4.1 打开设备在EventHub::getEvents中,当mNeedToScanDevices为true时<当创建EventHub对象时,它就为true>,它将从/dev/input目录下查找所有设备,并进行打开,获取其相关属性,最后加入mDevices列表中。
EventHub::scanDevicesLocked->
EventHub::scanDirLocked("/dev/input")->
EventHub::openDeviceLocked
4.1.1 打开事件输入设备打开事件输入设备,在用户态调用open,则在kernel态中调用evdev_open函数,evdev_open处理流程如下:
1)首先从参数inode中获取在evdev_table中的索引,从而获取对应的evdev对象
2)创建evdev_client对象,创建此对象时同时为其buffer成员分配对应的内存
3)把新创建evdev_client对象添加到client_list链表中
4)把client保存在file的private_data中
5)调用evdev_open_device->input_open_device->input_dev.open函数打开设备。
4.2 读取输入事件要说EventHub::getEvents如何获取输入事件,不得不先说说它的几个相关的成员变量:
1)mPendingEventCount:调用epoll_wait时的返回值,当然如果没有事件,则其值为0;
2)mPendingEventIndex:当前需要处理的事件索引
3)mEpollFd:epoll实例,在EventHub::EventHub中初始化此例,所有输入事件通过epoll_wait来获取,每一个事件的数据结构为:struct epoll_event,为了搞明白如何读取输入事件的原理,不得不对epoll相关的东东搞个清清楚楚,明明白白,见epoll kernel实现原理。注:epoll_event只表明某个设备上有事件,并不包含事件内容,具体事件内容需要通过read来读取。
struct epoll_event定义如下:
- typedef union epoll_data
- {
- void *ptr;
- int fd;
- unsigned int u32;
- unsigned long long u64;
- } epoll_data_t;
- struct epoll_event
- {
- unsigned int events;
- epoll_data_t data;
- };
每个设备被创建(在函数EventHub::openDeviceLocked中)时,都会向epoll注册,代码如下:
- // Register with epoll.
- struct epoll_event eventItem;
- memset(&eventItem, 0, sizeof(eventItem));
- eventItem.events = EPOLLIN;
- eventItem.data.u32 = deviceId;
- if (epoll_ctl(mEpollFd, EPOLL_CTL_ADD, fd, &eventItem)) {
- LOGE("Could not add device fd to epoll instance. errno=%d", errno);
- delete device;
- return -1;
- }
在调用epoll_wait(mEpollFd, mPendingEventItems, EPOLL_MAX_EVENTS, timeoutMillis)之后,读到的epoll_event事件保存在mPendingEventItems,总共的事件数保存在mPendingEventCount,当然,在调用epoll_event之前,mPendingEventIndex被清0,直正的事件处理在下面的代码中。
- // Grab the next input event.
- bool deviceChanged = false;
- while (mPendingEventIndex < mPendingEventCount) {
- const struct epoll_event& eventItem = mPendingEventItems[mPendingEventIndex++];
- if (eventItem.data.u32 == EPOLL_ID_INOTIFY) {
- if (eventItem.events & EPOLLIN) {
- mPendingINotify = true;
- } else {
- LOGW("Received unexpected epoll event 0x%08x for INotify.", eventItem.events);
- }
- continue;
- }
- if (eventItem.data.u32 == EPOLL_ID_WAKE) {
- if (eventItem.events & EPOLLIN) {
- LOGV("awoken after wake()");
- awoken = true;
- char buffer[16];
- ssize_t nRead;
- do {
- nRead = read(mWakeReadPipeFd, buffer, sizeof(buffer));
- } while ((nRead == -1 && errno == EINTR) || nRead == sizeof(buffer));
- } else {
- LOGW("Received unexpected epoll event 0x%08x for wake read pipe.",
- eventItem.events);
- }
- continue;
- }
- ssize_t deviceIndex = mDevices.indexOfKey(eventItem.data.u32);
- if (deviceIndex < 0) {
- LOGW("Received unexpected epoll event 0x%08x for unknown device id %d.",
- eventItem.events, eventItem.data.u32);
- continue;
- }
- Device* device = mDevices.valueAt(deviceIndex);
- if (eventItem.events & EPOLLIN) {
- int32_t readSize = read(device->fd, readBuffer,
- sizeof(struct input_event) * capacity);
- if (readSize == 0 || (readSize < 0 && errno == ENODEV)) {
- // Device was removed before INotify noticed.
- LOGW("could not get event, removed? (fd: %d size: %d bufferSize: %d capacity: %d errno: %d)\n",
- device->fd, readSize, bufferSize, capacity, errno);
- deviceChanged = true;
- closeDeviceLocked(device);
- } else if (readSize < 0) {
- if (errno != EAGAIN && errno != EINTR) {
- LOGW("could not get event (errno=%d)", errno);
- }
- } else if ((readSize % sizeof(struct input_event)) != 0) {
- LOGE("could not get event (wrong size: %d)", readSize);
- } else {
- int32_t deviceId = device->id == mBuiltInKeyboardId ? 0 : device->id;
- size_t count = size_t(readSize) / sizeof(struct input_event);
- for (size_t i = 0; i < count; i++) {
- const struct input_event& iev = readBuffer[i];
- LOGV("%s got: t0=%d, t1=%d, type=%d, code=%d, value=%d",
- device->path.string(),
- (int) iev.time.tv_sec, (int) iev.time.tv_usec,
- iev.type, iev.code, iev.value);
- #ifdef HAVE_POSIX_CLOCKS
- // Use the time specified in the event instead of the current time
- // so that downstream code can get more accurate estimates of
- // event dispatch latency from the time the event is enqueued onto
- // the evdev client buffer.
- //
- // The event's timestamp fortuitously uses the same monotonic clock
- // time base as the rest of Android. The kernel event device driver
- // (drivers/input/evdev.c) obtains timestamps using ktime_get_ts().
- // The systemTime(SYSTEM_TIME_MONOTONIC) function we use everywhere
- // calls clock_gettime(CLOCK_MONOTONIC) which is implemented as a
- // system call that also queries ktime_get_ts().
- event->when = nsecs_t(iev.time.tv_sec) * 1000000000LL
- + nsecs_t(iev.time.tv_usec) * 1000LL;
- LOGV("event time %lld, now %lld", event->when, now);
- #else
- event->when = now;
- #endif
- event->deviceId = deviceId;
- event->type = iev.type;
- event->scanCode = iev.code;
- event->value = iev.value;
- event->keyCode = AKEYCODE_UNKNOWN;
- event->flags = 0;
- if (iev.type == EV_KEY && device->keyMap.haveKeyLayout()) {
- status_t err = device->keyMap.keyLayoutMap->mapKey(iev.code,
- &event->keyCode, &event->flags);
- LOGV("iev.code=%d keyCode=%d flags=0x%08x err=%d\n",
- iev.code, event->keyCode, event->flags, err);
- }
- event += 1;
- }
- capacity -= count;
- if (capacity == 0) {
- // The result buffer is full. Reset the pending event index
- // so we will try to read the device again on the next iteration.
- mPendingEventIndex -= 1;
- break;
- }
- }
- } else {
- LOGW("Received unexpected epoll event 0x%08x for device %s.",
- eventItem.events, device->identifier.name.string());
- }
- }
epoll_wait只是告诉我们Device已经有事件了,让我们去读,真正读取设备输入事件的代码如上,其流程如下:
1)根据eventItem.data.u32获取设备索引,从而获取对应的Device
2)从device->fd中读取input_event事件。read(device->fd, readBuffer, sizeof(struct input_event) * capacity);这些input_event是由各个注册的input_device报告给input子系统的。具体读入流程参见Input Core和evdev基本知识 - Kernel3.0.8
至此,事件已经读取到用户态,哪我们就看看EventHub怎么处理这些事件了。 4.3 处理输入事件在4.2中,首先通过epoll_wait查看哪些设备有事件,然后通过read从有事件的设备中读取事件,现在事件已经读取到用户态,且数据结构为input_event,保存在EventHub::getEvents的readBuffer中。下面就看看这些事件下一步的东家是谁?
1)首先把input_event的信息填入RawEvent中,其相关代码如下:
- #ifdef HAVE_POSIX_CLOCKS
- // Use the time specified in the event instead of the current time
- // so that downstream code can get more accurate estimates of
- // event dispatch latency from the time the event is enqueued onto
- // the evdev client buffer.
- //
- // The event's timestamp fortuitously uses the same monotonic clock
- // time base as the rest of Android. The kernel event device driver
- // (drivers/input/evdev.c) obtains timestamps using ktime_get_ts().
- // The systemTime(SYSTEM_TIME_MONOTONIC) function we use everywhere
- // calls clock_gettime(CLOCK_MONOTONIC) which is implemented as a
- // system call that also queries ktime_get_ts().
- event->when = nsecs_t(iev.time.tv_sec) * 1000000000LL
- + nsecs_t(iev.time.tv_usec) * 1000LL;
- LOGV("event time %lld, now %lld", event->when, now);
- #else
- event->when = now;
- #endif
- event->deviceId = deviceId;
- event->type = iev.type;
- event->scanCode = iev.code;
- event->value = iev.value;
- event->keyCode = AKEYCODE_UNKNOWN;
- event->flags = 0;
- if (iev.type == EV_KEY && device->keyMap.haveKeyLayout()) {
- status_t err = device->keyMap.keyLayoutMap->mapKey(iev.code,
- &event->keyCode, &event->flags);
- LOGV("iev.code=%d keyCode=%d flags=0x%08x err=%d\n",
- iev.code, event->keyCode, event->flags, err);
- }
2)如果是input_event的类型为EV_KEY,则需要调用device->keyMap.keyLayoutMap->mapKey函数把iput_event.code映射为RawEvent.keyCode。相关数据结构关系如下图所示:
至此,EventHub::getEvents读取事件的任务已经完成,下面看看这些RawEvent的命运如何呢?
4.3.1 InputReader::loopOnce如何处理RawEvent?为此,先温习一下读取事件时的调用流程为:
Thread::_threadLoop->
InputReaderThread::threadLoop->
InputReader::loopOnce->
EventHub::getEvents->
在InputReader::loopOnce中,当调用EventHub->getEvents获取到RawEvent之后,调用InputReader::processEventsLocked来处理这些事件,然后调用mQueuedListener->flush()把这些队列中的事件发送到Listener。
4.3.1.1 InputReader::processEventsLocked在InputReader::processEventsLocked主要分两步处理:
1)处理来自于事件驱动设备的事件(processEventsForDeviceLocked)
2)处理设备增加、删除和修改事件
按照程序执行流程,应该是先有设备,然后才会有设备事件,所以先分析设备增加。 其代码如下:
- <span style="font-size:10px;">void InputReader::processEventsLocked(const RawEvent* rawEvents, size_t count)
- {
- for (const RawEvent* rawEvent = rawEvents; count;) {
- int32_t type = rawEvent->type;
- size_t batchSize = 1;
- //处理来自于事件驱动设备的事件
- if (type < EventHubInterface::FIRST_SYNTHETIC_EVENT) {
- int32_t deviceId = rawEvent->deviceId;
- while (batchSize < count) {
- if (rawEvent[batchSize].type >= EventHubInterface::FIRST_SYNTHETIC_EVENT
- || rawEvent[batchSize].deviceId != deviceId) {
- break;
- }
- batchSize += 1;
- }
- //处理来自于同一个事件驱动设备的1个或多个事件
- processEventsForDeviceLocked(deviceId, rawEvent, batchSize);
- }
- else
- {
- //处理增加或删除事件驱动设备的事件,在EventHub::getEvents中产生,
- //不是由事件驱动设备产生的。
- switch (rawEvent->type) {
- case EventHubInterface::DEVICE_ADDED:
- addDeviceLocked(rawEvent->when, rawEvent->deviceId);
- break;
- case EventHubInterface::DEVICE_REMOVED:
- removeDeviceLocked(rawEvent->when, rawEvent->deviceId);
- break;
- case EventHubInterface::FINISHED_DEVICE_SCAN:
- handleConfigurationChangedLocked(rawEvent->when);
- break;
- default:
- LOG_ASSERT(false); // can't happen
- break;
- }
- }
- count -= batchSize;
- rawEvent += batchSize;
- }
- }</span>
4.3.1.1.1 设备增加事件处理 addDeviceLocked
它处理其中的EventHubInterface::DEVICE_ADDED, EventHubInterface:: DEVICE_REMOVED和EventHubInterface::FINISHED_DEVICE_SCAN事件,即与Device相关的事件,这些事件是在EventHub::getEvents中产生的,并不是Kernel态的事件输入设备产生的。
下面分析它如何处理EventHubInterface::DEVICE_ADDED事件。查看其它代码,它是调用InputReader::addDeviceLocked(nsecs_t when, int32_t deviceId)来处理此事件。
在InputReader::addDeviceLocked中的调用流程:
1)先根据mContext, deviceId, name, classes创建一个InputDevice对象,它用于表示单个输入设备的状态。其中的classes为对应Device的classes成员,它用于表示设备类型,其定义如下:
- /*
- * Input device classes.
- */
- enum {
- /* The input device is a keyboard or has buttons. */
- INPUT_DEVICE_CLASS_KEYBOARD = 0x00000001,
- /* The input device is an alpha-numeric keyboard (not just a dial pad). */
- INPUT_DEVICE_CLASS_ALPHAKEY = 0x00000002,
- /* The input device is a touchscreen or a touchpad (either single-touch or multi-touch). */
- INPUT_DEVICE_CLASS_TOUCH = 0x00000004,
- /* The input device is a cursor device such as a trackball or mouse. */
- INPUT_DEVICE_CLASS_CURSOR = 0x00000008,
- /* The input device is a multi-touch touchscreen. */
- INPUT_DEVICE_CLASS_TOUCH_MT = 0x00000010,
- /* The input device is a directional pad (implies keyboard, has DPAD keys). */
- INPUT_DEVICE_CLASS_DPAD = 0x00000020,
- /* The input device is a gamepad (implies keyboard, has BUTTON keys). */
- INPUT_DEVICE_CLASS_GAMEPAD = 0x00000040,
- /* The input device has switches. */
- INPUT_DEVICE_CLASS_SWITCH = 0x00000080,
- /* The input device is a joystick (implies gamepad, has joystick absolute axes). */
- INPUT_DEVICE_CLASS_JOYSTICK = 0x00000100,
- /* The input device is external (not built-in). */
- INPUT_DEVICE_CLASS_EXTERNAL = 0x80000000,
- }
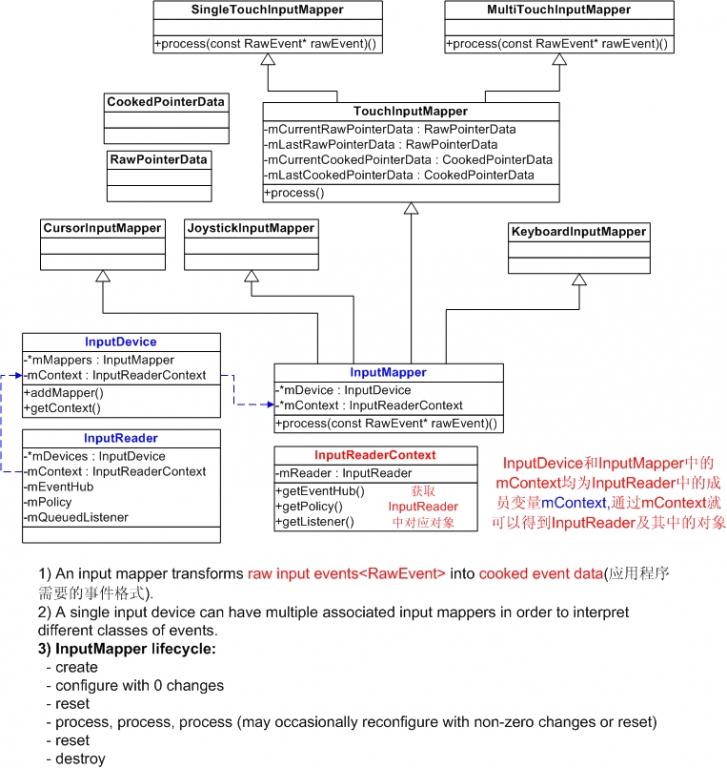
创建InputDevice对象之后, 对于多点触摸设备(class为INPUT_DEVICE_CLASS_TOUCH_MT),创建MultiTouchInputMapper对象并增加到InputDevice的mMappers向量列表中。
对于单点触摸设备(class为INPUT_DEVICE_CLASS_TOUCH),创建SingleTouchInputMapper对象并增加到InputDevice的mMappers向量列表中。相关代码如下:
- InputDevice* InputReader::createDeviceLocked(int32_t deviceId,
- const String8& name, uint32_t classes) {
- InputDevice* device = new InputDevice(&mContext, deviceId, name, classes);
- ....
- if (keyboardSource != 0) {
- device->addMapper(new KeyboardInputMapper(device, keyboardSource, keyboardType));
- }
- // Cursor-like devices.
- if (classes & INPUT_DEVICE_CLASS_CURSOR) {
- device->addMapper(new CursorInputMapper(device));
- }
- // Touchscreens and touchpad devices.
- if (classes & INPUT_DEVICE_CLASS_TOUCH_MT) {
- device->addMapper(new MultiTouchInputMapper(device));
- } else if (classes & INPUT_DEVICE_CLASS_TOUCH) {
- device->addMapper(new SingleTouchInputMapper(device));
- }
- // Joystick-like devices.
- if (classes & INPUT_DEVICE_CLASS_JOYSTICK) {
- device->addMapper(new JoystickInputMapper(device));
- }
- return device;
- }
总之,它调用createDeviceLocked创建一个InputDevice设备,并根据class类别创建对应的事件转换器(InputMapper),然后把这些新那建的InputMapper增加到InputDevice::mMappers中。InputMapper关系如下图所示:
2)调用InputDevice::configure配置此InputDevice
3)调用InputDevice::reset重置此InputDevice
4)把新建的InputDevice增加到InputReader::mDevices中。
InputReader::processEventsLocked设备增加、删除处理总结:
它负责处理Device 增加、删除事件。增加事件的流程为:为一个新增的Device创建一个InputDevice,并增加到InputReader::mDevices中;根据新增加设备的class类别,创建对应的消息转换器(InputMapper),然后此消息转换器加入InputDevice::mMappers中。消息转换器负责把读取的RawEvent转换成特定的事件,以供应用程序使用。
EventHub与InputReader各自管理功能:
1)EventHub管理一堆Device,每一个Device与Kernel中一个事件输入设备对应
2)InputReader管理一堆InputDevice,每一个InputDevice与EventHub中的Device对应
3)InputDevice管理一些与之相关的InputMapper,每一个InputMapper与一个特定的应用事件相对应,如:SingleTouchInputMapper。
4.3.1.1.2 事件驱动设备事件处理processEventsForDeviceLocked
下面的分析处理以单点触摸为例,对于单点触摸Touch Down时,它将报告以下事件:
代码:
input_report_abs(myInputDev, ABS_X, event->x);
input_report_abs(myInputDev, ABS_Y, event->y);
产生的事件:*type, code, value
EV_ABS,ABS_X,event->x
EV_ABS,ABS_Y,event->y
代码:
input_report_key(myInputDev, BTN_TOUCH, 1);
产生的事件:*type, code, value
EV_KEY, BTN_TOUCH, 1
代码:
input_sync(myInputDev);
它调用input_event(dev, EV_SYN, SYN_REPORT, 0);
产生的事件:*type, code, value
EV_SYN, SYN_REPORT, 0
它负责处理来自于同一个设备且在mEventBuffer中连续的多个事件,其函数原型如下:
- void InputReader::processEventsForDeviceLocked(int32_t deviceId,
- const RawEvent* rawEvents, size_t count) {
- ssize_t deviceIndex = mDevices.indexOfKey(deviceId);
- if (deviceIndex < 0) {
- LOGW("Discarding event for unknown deviceId %d.", deviceId);
- return;
- }
- InputDevice* device = mDevices.valueAt(deviceIndex);
- if (device->isIgnored()) {
- //LOGD("Discarding event for ignored deviceId %d.", deviceId);
- return;
- }
- device->process(rawEvents, count);
- }
它其实很简单,根据输入的deviceId找到对应的InputDevice,然后调用InputDevice::process以对设备输入事件进行处理。InputDevice::process主要源码如下:
- void InputDevice::process(const RawEvent* rawEvents, size_t count) {
- // Process all of the events in order for each mapper.
- // We cannot simply ask each mapper to process them in bulk because mappers may
- // have side-effects that must be interleaved. For example, joystick movement events and
- // gamepad button presses are handled by different mappers but they should be dispatched
- // in the order received.
- size_t numMappers = mMappers.size();
- for (const RawEvent* rawEvent = rawEvents; count--; rawEvent++)
- {
- for (size_t i = 0; i < numMappers; i++) {
- InputMapper* mapper = mMappers[i];
- mapper->process(rawEvent);
- }
- }
- }
从上面的代码中可以看出,在InputDevice::process中,对于传入的每一个RawEvent,依次调用InputDevice中的每一个InputMapper来进行处理。前面提到过,InputDevice包含一组处理对应设备事件InputMapper,现在这些InputMapper开始干活了。
下面以处理一个单点触摸事件设备的事件为例,进行分析,其它的处理流程类似。对于mapper->process需要查看InputReader::createDeviceLocked中创建的具体的InputMapper的process函数。下面就看看SingleTouchInputMapper的process是如何处理的,其代码如下:
- void SingleTouchInputMapper::process(const RawEvent* rawEvent) {
- TouchInputMapper::process(rawEvent);
- mSingleTouchMotionAccumulator.process(rawEvent);
- }
1)TouchInputMapper::process
由此可见,它将首先调用TouchInputMaaper::process处理此事件,其处理代码如下:
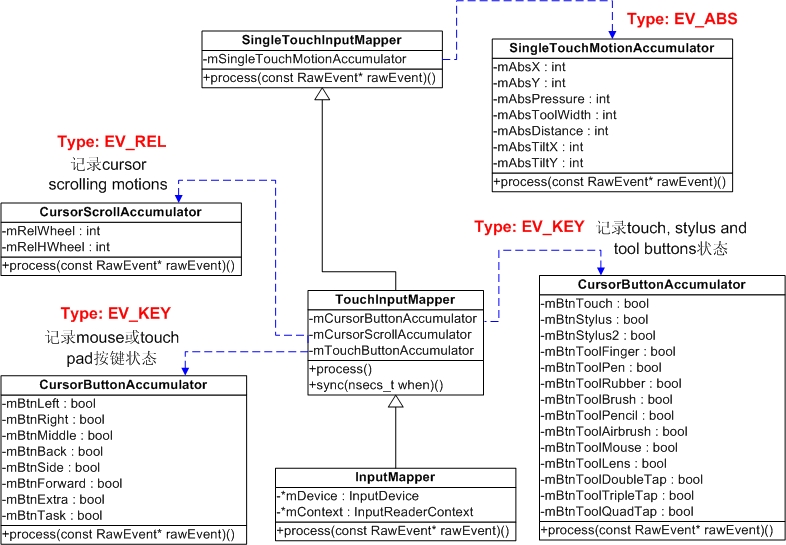
- void TouchInputMapper::process(const RawEvent* rawEvent) {
- mCursorButtonAccumulator.process(rawEvent);
- mCursorScrollAccumulator.process(rawEvent);
- mTouchButtonAccumulator.process(rawEvent);
- if (rawEvent->type == EV_SYN && rawEvent->scanCode == SYN_REPORT) {
- sync(rawEvent->when);
- }
- }
1.1) mCursorButtonAccumulator.process(rawEvent)
记录mouse或touch pad按键状态,记录rawEvent->type为EV_KEY,且rawEvent->scanCode为BTN_LEFT、BTN_RIGHT、BTN_MIDDLE、BTN_BACK、BTN_SIDE、BTN_FORWARD、BTN_EXTRA、BTN_TASK的事件。
1.2) mCursorScrollAccumulator.process(rawEvent)
记录cursor scrolling motions,记录rawEvent->type为EV_REL,且rawEvent->scanCode为REL_WHEEL、REL_HWHEEL的事件。
1.3) mTouchButtonAccumulator.process(rawEvent)
记录touch, stylus and tool buttons状态,记录rawEvent->type为EV_KEY,且rawEvent->scanCode为BTN_TOUCH、BTN_STYLUS、BTN_STYLUS2、BTN_TOOL_FINGER、BTN_TOOL_PEN、BTN_TOOL_RUBBER、BTN_TOOL_BRUSH、BTN_TOOL_PENCIL、BTN_TOOL_AIRBRUSH、BTN_TOOL_MOUSE、BTN_TOOL_LENS、BTN_TOOL_DOUBLETAP、BTN_TOOL_TRIPLETAP、BTN_TOOL_QUADTAP的事件。
看到了吧,我们的BTN_TOUCH在这儿被处理了,且其value被保存在mBtnTouch成员变量中。
1.4) sync(rawEvent->when)
处理EV_SYN:SYN_REPORT,我们的EV_SYN就在这儿被处理了,当然它是Touch Down时,所发事件的最后一个事件。这儿才是处理的重点。
TouchInputMapper::sync将调用SingleTouchInputMapper::syncTouch函数。
a)SingleTouchInputMapper::syncTouch
把mCurrentRawPointerData中的ABS_X和ABS_Y的值保存在TouchInputMapper::mCurrentRawPointerData->pointers中。
单点触摸的syncTouch一次处理一个RawEvent,在pointers中只有一个值;而多点触摸的syncTouch一次处理多个RawEvent,在pointers中有多个值,最多16个。
b)TouchInputMapper::cookPointerData
根据TouchInputMapper::mCurrentRawPointerData->pointers中的数据,通过计算,最后生成TouchInputMapper::mCurrentCookedPointerData.pointerCoords,mCurrentCookedPointerData.pointerProperties和mCurrentCookedPointerData.idToIndex的数据。把Raw进行cook,之后生成了cooked数据。
c)TouchInputMapper::dispatchHoverExit
d)TouchInputMapper::dispatchTouches
d.a)它调用dispatchMotion
d.b)在dispatchMotion中,根据cooked数据创建NotifyMotionArg对象,它描述了一个移动事件
d.c)调用TouchInputMapper::getListener()->notifyMotion(&args)
TouchInputMapper::getListener()调用mContext->getListener(),此mContext为InputReader::mContext,所以其getListener()返回的则为InputReader::mQueuedListener,则最后调用QueuedInputListener::notifyMotion
补充1) InputReader::mContext在构造时用自己的指针初始化了mContext,从而mContext::mReader则为此InputReader实例。
补充2) 在InputReader::createDeviceLocked中创建InputDevice时,把自己的mContext作为参数传入,从而把它保存在InputDevice::mContext中;在创建InputMapper时,以InputDevice作为参数,且InputMapper把它保存在mDevice中,然后从把InputDevice中的mContext也保存在InputMapper的mContext中。
d.d)把传递过来的NotifyMotionArg参数复制一份,然后加入QueuedInputListener::mArgsQueue例表中。
e)TouchInputMapper::dispatchHoverEnterAndMove
2)mSingleTouchMotionAccumulator.process
记录ABS相关的值,记录rawEvent->type为EV_ABS,且rawEvent->scanCode为ABS_X、ABS_Y、ABS_PRESSURE、ABS_TOOL_WIDTH、ABS_DISTANCE、ABS_TILT_X、ABS_TILT_Y的事件。我们发的ABS_X和ABS_Y在这儿被处理了。
事件处理相关数据结构如下图所示:
先温习一下,至此的消息结构变化流程:

processEventsLocked已经把来自于事件设备的事件煮熟之后放入到各种NotifyArgs(如NotifyMotionArgs)之中,然后把这些各种NotifyArgs加入InputReader::mQueuedListener::mArgsQueue链表中。本Flush函数就是要把mArgsQueue中的所有NotifyArgs进行处理。为描述方便,先看看其代码:
- void QueuedInputListener::flush() {
- size_t count = mArgsQueue.size();
- for (size_t i = 0; i < count; i++) {
- NotifyArgs* args = mArgsQueue[i];
- args->notify(mInnerListener);
- delete args;
- }
- mArgsQueue.clear();
- }
看到了吧,确实很简单,调用链表中每个NotifyArgs的notify函数,且有一个有意思的参数 mInnerListener,这个参数在前面多次提到过,它是在创建mQueuedListener时提供的,它其实就是InputManager中的mDispatcher,前面一直在InputReader中打转转,现在终于看到InputDispatcher登场了,说明事件很快就可以谢幕了。
再向下看一下吧,这么多类NotifyArgs,为描述方便,下面以NotifyMotionArgs为例,其代码为:
- void NotifyMotionArgs::notify(const sp<InputListenerInterface>& listener) const {
- listener->notifyMotion(this);
- }
下面就看看InputDispatcher(mDispatcher)的notifyMotion函数做了些什么。这个InputDispatcher::notifyMotion(const NotifyMotionArgs* args)可就不简单了。
在InputDispatcher::notifyMotion中,
1)根据NotifyMotionArgs提供的信息,构造一个MotionEvent,再调用mPolicy->filterInputEvent看是否需要丢弃此事件,如果需要丢弃则马上返加。其中mPolicy为NativeInputManager实例,在构造InputDispatcher时提供的参数。
2)对于AMOTION_EVENT_ACTION_UP或AMOTION_EVENT_ACTION_DOWN事件,则直接根据NotifyMotionArgs提供的信息,构造一个MotionEntry。
3)调用InputDispatcher::enqueueInboundEventLocked把新构造的MotionEntry添加到InputDispatcher::mInboundQueue中,并返回是否需要唤醒mLooper<向pipe中写入数据>的标识。
以上操作都是在InputReader线程中完成的,现在应该InputDispatcher线程开始工作了。
4. 4 分发输入事件InputDispatcherThread主循环如下:
Thread::_threadLoop->
InputDispatcherThread::threadLoop->
mDispatcher->dispatchOnce(InputDispatcher::dispatchOnce)->
dispatchOnceInnerLocked then
mLooper->pollOnce
下面先看看简单的mLooper->pollOnce
4.4.1 mLooper->pollOnce其功能为等待超时或被pipe唤醒(InputReader线程调用InputDispatcher::notifyMotion时, InputDispatcher::notifyMotion根据情况调用mLooper->wake)。
其调用流程如下:
mLooper->pollOnce(int timeoutMillis)->
Looper::pollOnce(int timeoutMillis, int* outFd, int* outEvents, void** outData)->
4.4.2 dispatchOnceInnerLocked1)从mInboundQueue从中依次取出EventEntry<MotionEntry的基类>,
2)调用InputDispatcher::dispatchMotionLocked处理此MotionEntry
3)调用InputDispatcher::dispatchEventToCurrentInputTargetsLocked
对于InputDispatcher::mCurrentInputTargets中的每一个InputTarget,并获取对应的Connection,调用InputDispatcher::prepareDispatchCycleLocked,
其相关代码如下:
- <span style="font-size:10px;"> for (size_t i = 0; i < mCurrentInputTargets.size(); i++) {
- const InputTarget& inputTarget = mCurrentInputTargets.itemAt(i);
- ssize_t connectionIndex = getConnectionIndexLocked(inputTarget.inputChannel);
- if (connectionIndex >= 0) {
- sp<Connection> connection = mConnectionsByReceiveFd.valueAt(connectionIndex);
- prepareDispatchCycleLocked(currentTime, connection, eventEntry, & inputTarget,
- resumeWithAppendedMotionSample);
- } else {
- #if DEBUG_FOCUS
- LOGD("Dropping event delivery to target with channel '%s' because it "
- "is no longer registered with the input dispatcher.",
- inputTarget.inputChannel->getName().string());
- #endif
- }
- }</span>
4)InputDispatcher::prepareDispatchCycleLocked
4.1)调用enqueueDispatchEntryLocked创建DispatchEntry对象,并把它增加到Connection::outboundQueue队列中。
4.2)调用activateConnectionLocked把当前Connection增加到InputDispatcher::mActiveConnections链表中
4.3)调用InputDispatcher::startDispatchCycleLocked,接着它调用Connection::inputPublisher.publishMotionEvent来发布事件到ashmem buffer中,调用Connection::inputPublisher.sendDispatchSignal发送一个dispatch信号到InputConsumer通知它有一个新的消息到了,快来消费吧! 关于消费者如何注册和如何消息的流程在下一个专题中再写。本文到此结束!!!


 7971
7971


 被折叠的 条评论
为什么被折叠?
被折叠的 条评论
为什么被折叠?
 到【灌水乐园】发言


