


最简单的cxf3.1的helloword入门例子
转载请标明出处:
http://blog.csdn.net/ouyida3/article/details/46045261
本文出自:【ouyida3的博客】
一、为什么要写这篇文章
官网的user guide指引文章是英文,难懂。即使看懂了,里面的代码样例也是丢三落四,有一定基础的人还好,没有基础的人很难根据那些代码让程序跑得起来。百度搜索了一些技术博客,搜索结果第一页里我都试了,都跑不起来,原因都是缺这或缺那,不适合初学者。
二、服务端
1、web.xml配置
web.xml
<?xml version="1.0" encoding="UTF-8"?>
<web-app xmlns:xsi="http://www.w3.org/2001/XMLSchema-instance"
    xmlns="http://java.sun.com/xml/ns/javaee"
    xsi:schemaLocation="http://java.sun.com/xml/ns/javaee http://java.sun.com/xml/ns/javaee/web-app_3_0.xsd"
    id="WebApp_ID" version="3.0">
    <display-name>cxf</display-name>

    <context-param>
        <param-name>contextConfigLocation</param-name>
        <param-value>
            classpath:/config/applicationContext.xml
        </param-value>
    </context-param>

    <listener>
        <listener-class>org.springframework.web.context.ContextLoaderListener</listener-class>
    </listener>

    <servlet>
        <servlet-name>CXFServlet</servlet-name>
        <servlet-class>org.apache.cxf.transport.servlet.CXFServlet</servlet-class>
        <load-on-startup>1</load-on-startup>
    </servlet>
    <servlet-mapping>
        <servlet-name>CXFServlet</servlet-name>
        <url-pattern>/cxf/*</url-pattern>
    </servlet-mapping>
</web-app>
PS:建议使用WEB服务器
2、spring配置
applicationContext.xml
<?xml version="1.0" encoding="UTF-8"?>

<beans xmlns="http://www.springframework.org/schema/beans" xmlns:xsi="http://www.w3.org/2001/XMLSchema-instance" xmlns:jaxws="http://cxf.apache.org/jaxws" xsi:schemaLocation=" http://www.springframework.org/schema/beans http://www.springframework.org/schema/beans/spring-beans.xsd http://cxf.apache.org/jaxws http://cxf.apache.org/schemas/jaxws.xsd">
    <bean id="hello" class="demo.spring.service.HelloWorldImpl" />
    <jaxws:endpoint id="helloWorld" implementor="#hello" address="/HelloWorld" />
</beans>
PS:建议使用spring
3、接口类
HelloWorld.java
package demo.spring.service;

import javax.jws.WebService;

@WebService
public interface HelloWorld {
    String sayHi(String text);
}
4、实现类
HelloWorldImpl.java
package demo.spring.service;

import javax.jws.WebService;

@WebService(endpointInterface = "demo.spring.service.HelloWorld")
public class HelloWorldImpl implements HelloWorld {

    public String sayHi(String text) {
        System.out.println("sayHi called");
        return "Hello " + text;
    }
}
5、WEB服务器配置
tomcat的server.xml增加
<Context path="/demo" docBase="C:\Documents and Settings\Administrator\Workspaces\MyEclipse Professional 2014\cxf\WebRoot" debug="5" reloadable="true" crossContext="true"></Context>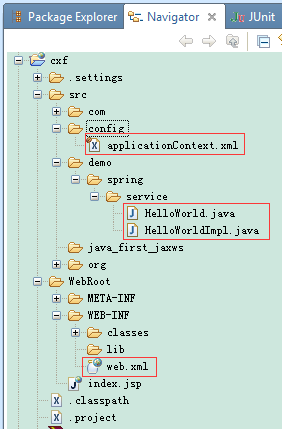
6、完成、测试
启动tomcat,浏览器输入:
http://localhost:8080/demo/cxf

三、客户端
脚注1
1、不使用spring
Clinet.java
package demo.spring.service;

import org.apache.cxf.jaxws.JaxWsProxyFactoryBean;

public class Client {
    public static void main(String[] args) {
        JaxWsProxyFactoryBean svr = new JaxWsProxyFactoryBean();
        svr.setServiceClass(HelloWorld.class);
        svr.setAddress("http://localhost:8080/demo/cxf/HelloWorld");
        HelloWorld hw = (HelloWorld) svr.create();
        hw.sayHi("abc");
    }
}
五月 26, 2015 3:31:00 下午 org.apache.cxf.wsdl.service.factory.ReflectionServiceFactoryBean buildServiceFromClass
信息: Creating Service {http://service.spring.demo/}HelloWorldService from class demo.spring.service.HelloWorldsayHi called
地址http://localhost:8080/demo/cxf/HelloWorld可在浏览器中打开。
2、使用spring
ClientWithSpring.java
package demo.spring.service;

import org.springframework.context.ApplicationContext;
import org.springframework.context.support.ClassPathXmlApplicationContext;

public class ClientWithSpring {

    public static void main(String[] args) {
        ApplicationContext context = new ClassPathXmlApplicationContext("config/applicationContext.xml");
        HelloWorld client = (HelloWorld) context.getBean("client");
        client.sayHi("");
    }
}
applicationContext.xml增加
<bean id="client" class="demo.spring.service.HelloWorld" factory-bean="clientFactory" factory-method="create"/>
<bean id="clientFactory" class="org.apache.cxf.jaxws.JaxWsProxyFactoryBean">
    <property name="serviceClass" value="demo.spring.service.HelloWorld"/>
    <property name="address" value="http://localhost:8080/demo/cxf/HelloWorld"/>
</bean>
客户端日志
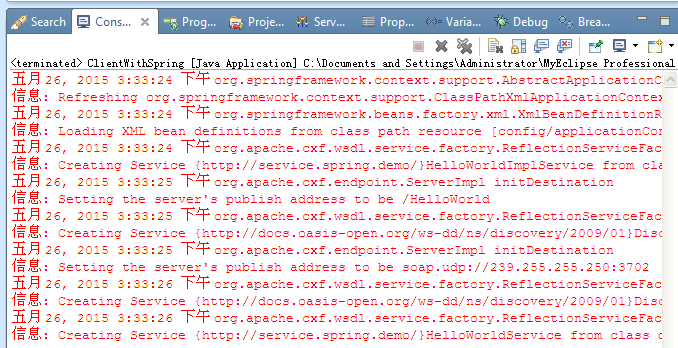
服务端日志

参考:
http://cxf.apache.org/docs/writing-a-service-with-spring.html
几个要点:
1. 官网里的web.xml漏了cxf的配置
2. 官网里没有描述浏览器应该输入什么url来测试服务是否已启动/可用
3. 官网里client没有描述地址应该怎么填
4. 最好用servlet容器,比如tomcat,不用应该也可以,因为内置了jetty,试了很久浪费了很多时间
5. 最好结合spring,不用spring试了很久浪费了很多时间
6. 把apache-cxf-3.1.0.zip里lib下的全部jar拷贝到WEB-INF/lib,不全部拷贝没试过
7. 还有java2wsdl2,QName麻烦一点,下篇文章再讲
ouyida3’s blog
2015.5.27


 1725
1725


 被折叠的 条评论
为什么被折叠?
被折叠的 条评论
为什么被折叠?
 到【灌水乐园】发言


