Android高手进阶教程(十一)----Android 在一个应用中如何启动另外一个已安装的应用!!!

今天晚上Jimmy问了我一个问题,就是如何在一个应用中 通过某个事件,而去启动另外一个已安装的应用。所以愿意和大家分享一下!

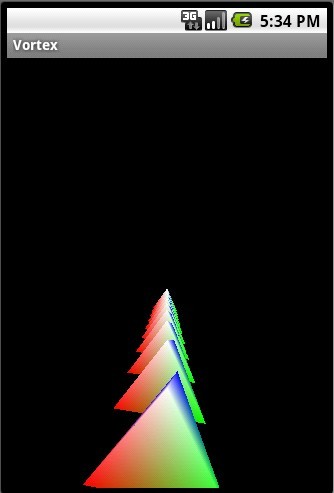
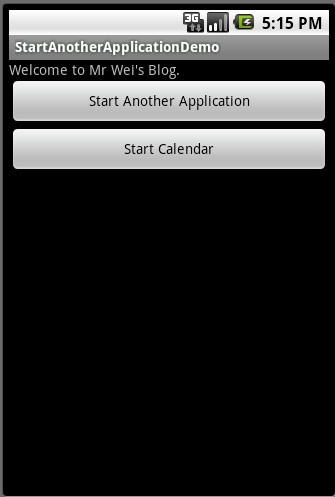
而为了能让大家更加容易的理解,我写了一个简单的Demo,我们的程序有俩个按钮,其中一个点击会启动我自己写的应用(一个3D应用为例),而另外一个按钮会启动系统自带的应用(如,日历,闹钟,计算器等等).这里我一日历为例子!


首先看一下我们的效果图(点击第一个按钮为例):


下面是Demo的详细步骤:


一、新建一个Android工程命名为StartAnotherApplicationDemo.


二、修改main.xml布局,代码如下:


  1. <?xml version="1.0" encoding="utf-8"?>  
  2. <LinearLayout xmlns:android="http://schemas.android.com/apk/res/android"  
  3.     android:orientation="vertical"  
  4.     android:layout_width="fill_parent"  
  5.     android:layout_height="fill_parent"  
  6.     >  
  7. <TextView    
  8.     android:layout_width="fill_parent"   
  9.     android:layout_height="wrap_content"   
  10.     android:text="Welcome to Mr Wei's Blog."  
  11.     />  
  12. <Button  
  13.     android:id="@+id/button"  
  14.     android:layout_width="fill_parent"   
  15.     android:layout_height="wrap_content"   
  16.     android:text="Start Another Application"  
  17. />  
  18. <Button  
  19.     android:id="@+id/start_calender"  
  20.     android:layout_width="fill_parent"   
  21.     android:layout_height="wrap_content"   
  22.     android:text="Start Calendar"  
  23. />  
  24. </LinearLayout>  


三、修改主程序StartAnotherApplicationDemo.java代码如下:


  1. package com.android.tutor;  
  2. import android.app.Activity;  
  3. import android.content.ComponentName;  
  4. import android.content.Intent;  
  5. import android.os.Bundle;  
  6. import android.view.View;  
  7. import android.widget.Button;  
  8. public class StartAnotherApplicationDemo extends Activity {  
  9.      
  10.     private Button mButton01,mButton02;  
  11.       
  12.     public void onCreate(Bundle savedInstanceState) {  
  13.         super.onCreate(savedInstanceState);  
  14.         setContentView(R.layout.main);  
  15.           
  16.         mButton01 = (Button)findViewById(R.id.button);  
  17.         mButton02 = (Button)findViewById(R.id.start_calender);  
  18.           
  19.         //-----启动我们自身写的程序------------------  
  20.         mButton01.setOnClickListener(new Button.OnClickListener(){  
  21.             public void onClick(View v) {  
  22.                 //-----核心部分----- 前名一个参数是应用程序的包名,后一个是这个应用程序的主Activity名  
  23.                 Intent intent=new Intent();  
  24.                 intent.setComponent(new ComponentName("com.droidnova.android.games.vortex",   
  25.                                                      "com.droidnova.android.games.vortex..Vortex"));  
  26.                 startActivity(intent);  
  27.             }             
  28.         });  
  29.       //-----启动系统自带的应用程序------------------  
  30.         mButton02.setOnClickListener(new Button.OnClickListener(){  
  31.             public void onClick(View v) {  
  32.                 Intent intent=new Intent();  
  33.                 intent.setComponent(new ComponentName("com.android.calendar""com.android.calendar.LaunchActivity"));  
  34.                 startActivity(intent);  
  35.             }             
  36.         });  
  37.     }  
  38. }  


四、执行之,将得到如上效果!


好了今天就到这里了,夜深了,收工睡觉!有什么不明白的,希望大家多留言,我会耐心解答!谢谢~


  • 0
    点赞
  • 0
    收藏
    觉得还不错? 一键收藏
  • 0
    评论
感谢您的提问。要实现指南针功能,我们需要使用Android的Sensor(传感器)API。下面是一些基本步骤: 1. 获取SensorManager对象。您可以通过以下方式获取: ```java SensorManager sensorManager = (SensorManager) getSystemService(Context.SENSOR_SERVICE); ``` 2. 获取方向传感器。我们需要使用Android设备上的方向传感器来获取设备的方向。您可以使用以下代码获取方向传感器: ```java Sensor orientationSensor = sensorManager.getDefaultSensor(Sensor.TYPE_ORIENTATION); ``` 请注意,`Sensor.TYPE_ORIENTATION`在Android API级别20被弃用。您应该使用`Sensor.TYPE_ROTATION_VECTOR`代替。 3. 创建SensorEventListener。我们需要实现`SensorEventListener`接口来接收传感器数据。您可以使用以下代码来创建一个SensorEventListener: ```java private final SensorEventListener sensorEventListener = new SensorEventListener() { @Override public void onSensorChanged(SensorEvent event) { // 当传感器数据更新时调用此方法 // 在这里更新指南针方向 } @Override public void onAccuracyChanged(Sensor sensor, int accuracy) { // 当传感器精度发生变化时调用此方法 } }; ``` 4. 注册SensorEventListener。您需要在Activity的生命周期方法(例如`onResume()`)注册`SensorEventListener`,以便在传感器数据更新时接收通知。您可以使用以下代码进行注册: ```java sensorManager.registerListener(sensorEventListener, orientationSensor, SensorManager.SENSOR_DELAY_UI); ``` 请注意,`SENSOR_DELAY_UI`表示传感器数据应该以与UI线程更新相同的频率更新。您可以使用其他常量来指定更新频率。 5. 实现指南针方向。您需要使用传感器数据来计算设备的方向,并更新指南针方向。您可以使用以下代码来获取设备的方向: ```java float[] orientationValues = new float[3]; SensorManager.getOrientation(event.values, orientationValues); float azimuth = Math.toDegrees(orientationValues[0]); ``` 请注意,`azimuth`表示设备的方向,以度为单位。 6. 更新指南针方向。您需要在UI线程更新指南针方向。您可以使用以下代码来更新指南针方向: ```java runOnUiThread(new Runnable() { @Override public void run() { compassView.setDirection(azimuth); } }); ``` 请注意,`compassView`是一个自定义视图,用于绘制指南针。 这些是实现指南针功能的基本步骤。您需要根据自己的需求进行调整和修改。祝您好运!

“相关推荐”对你有帮助么?

  • 非常没帮助
  • 没帮助
  • 一般
  • 有帮助
  • 非常有帮助
提交
评论
添加红包

请填写红包祝福语或标题

红包个数最小为10个

红包金额最低5元

当前余额3.43前往充值 >
需支付:10.00
成就一亿技术人!
领取后你会自动成为博主和红包主的粉丝 规则
hope_wisdom
发出的红包
实付
使用余额支付
点击重新获取
扫码支付
钱包余额 0

抵扣说明:

1.余额是钱包充值的虚拟货币,按照1:1的比例进行支付金额的抵扣。
2.余额无法直接购买下载,可以购买VIP、付费专栏及课程。

余额充值