


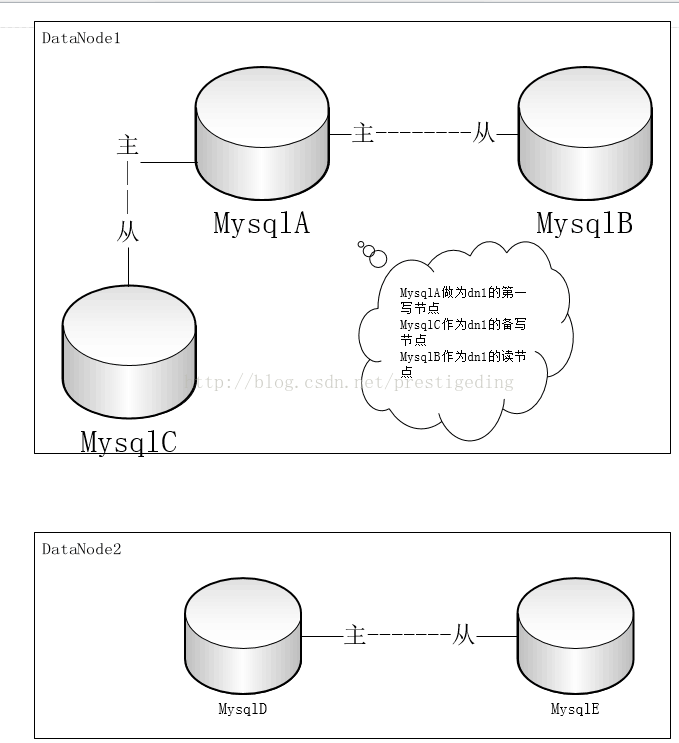
为了充分揭示mycat读写分离、写节点挂掉后的自主切换、路由解析等原理,先搭建mycat测试环境,架构如下:
1、源码安装 mysql
- 安装Linux编译等基础软件
yum -y install gcc gcc-c++ ncurses-devel pcre pcre-devel openssl openssl-devel
- 安装cmake
cmake安装包下载地址:http://pan.baidu.com/s/1qYc1vBI#list/path=%2F
比如将cmake-2.8.5.tar.gz 下载在 /root/download目录下。安装 cmake 操作如下:
cd /root/download
tar -xf cmake-2.8.5.tar.gz
cd cmake-2.8.5
./configure
make
make install
- 安装mysql
//创建mysql用户
useradd -M mysql // 创建mysql用户与用户组,不生成用户主目录
mkdir -p /usr/local/mysqlA
mkdir -p /usr/local/mysqlA/data
cd /root/download //假设mysql.5.6.1.tar.gz 源码安装包放在该目录下
tar -xvf mysql.5.6.1.tar.gz
cd mysql5.6.1
cmake . -DCMAKE_INSTALL_PREFIX=/usr/local/mysqlA -DMYSQL_DATADIR=/usr/local/mysqlA/data
-DDEFAULT_CHARSET=utf8 -DDEFAULT_COLLATION=utf8_general_ci -DEXTRA_CHARSETS=all
-DENABLED_LOCAL_INFILE=1
// 用cmake命令编译mysql,如果在编译期间发生错误,请用yum -y install 安装依懒包后,注意先将cmake产生的中间
// 文件删除
# rm -rf CMakeCache.txt
# rm -rf /etc/my.cnf
# cmake 成功后执行 make make install
make
make install
//这样就完成了mysql的基本安装了,接下来cmake指定的目录下,就会出现mysql服务器相关的文件目录。
// 接下来初始化mysql服务器的数据,以及启动服务器,登录服务
cd /usr/local/mysqlA
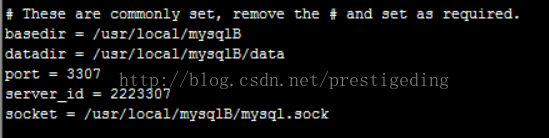
cp support-files/my-default.cnf my.cnf
vi my.cnf // 修改my.cnf的 基本参数,如下图;

设置 basedir,datadir,port,server_id socket
其中server_id主要用作主从同步时,MySQL的唯一标识,socket:mysql服务的socket文件。继续敲命令:
//初始化mysql数据库的数据,比如mysql,test等数据库。
cd scripts
./mysql_install_db -basedir=/usr/local/mysqlB/ -datadir=/usr/local/mysqlB/data --user=mysql
cd /usr/local
chown -R mysql.mysql mysqlA
cd /usr/local/mysqlA
cp support-files/mysql.server /etc/init.d/mysqlA // 做出服务
vi /etc/init.d/mysqlA // 显示指定basedir datadir的值,如下图:

// service mysqlA start | stop | restart
//启动服务,删除/etc/my.cnf文件
rm -rf /etc/my.cnf
service mysqlA start //如果启动失败,根据提示与错误日志定位并解决问
//用root用户 登录,并修改密码。
vi /etc/profile
//增加相关环境变量,方便使用mysql命令
PATH=$PATH:/usr/local/mysql/bin
export PATH
//保存并退出
source /etc/profile
mysql -u root -p -S /usr/local/mysqlA/mysql.sock
//直接回车进入到mysql操作界面
mysql:use mysql
mysql:update user set password=password('密码') where user='root';
mysql: //创建用户dev_user,可以支持远程,本地访问
mysql: grant all privileges on *.* to 'dev_user'@'%' identified by '密码';
//有的版本,使用%,可能会导致本机无法登录,故再创建一个用户
mysql: grant all privileges on *.* to 'dev_user'@'localhost' identified by '密码';
mysql:flush privileges;
//退出重新登录。
// 如需要将mysql做成系统启动项:
chkconfig --level 2345 mysqlA on
上面给出了源码编译安装mysql5.6的相关步骤与命令,如在安装过程中出现问题,请根据提示信息和错误日志,百度解决之。
2、Mysql 主从同步配置
在同一台虚拟机上安装两个mysql实例,组成主从复制结构、直接从mysqlA复制一个到mysqlB目录,然后做一些处理即可,
cd /usr/local
cp -R mysqlA mysqlB
//修改my.cnf 中的路径与端口
//然后删除mysqlB/data中的所有数据,
cd mysqlB/data
rm -rf *
//然后执行初始化遇见 ./mysql_install 见上文
cd /usr/local
chown -R mysql.mysql mysqlB
//接下来启动服务器,修改密码,创建账户等等与mysql安装一样。接下来配置主从配置
// 修改主mysql的my.cnf,加上如下配置:

补充:binlog_format=mixed
//然后重启并进入服务器:
//创建主从同步账户
grant REPLICATION SLAVE on *.* to 'repl_user'@'192.168.0.*' identified by '密码';
grant REPLICATION SLAVE ON *.* to 'repl_user'@'localhost' identified by ''密码;
flush privileges;
show master status;

留意 File 与 Position 两个字段的值。
// 最简单的主从同步,不需要修改slave的my.cnf内容
// 直接登陆到从mysql,执行如下语句:
mysql: change master to master_host=' 192.168.0.222', master_port=3306 ,master_user='repl_user', master_password='123456', master_log_file='mysql-bin.000002', master_log_pos=120;
mysql: start slave;
mysql:show slave status\G
主从配置配置完毕,测试是否正确同步,接下来master上创建我们做读写分离的数据,看slave上是否正确同步:
create database acc_user_db1 default character set utf8;
create database acc_user_db2 default character set utf8;
create database es_db1 default character set utf8;
create database es_db2 default character set utf8;
然后,通用的方式安装mysqlC,mysqlD,mysqlE等数据库实例。
3、mycat 配置
3.1 全局序列化配置
请参考权威指南(全局序列化)章节相关内容,或参考博客:http://blog.csdn.net/prestigeding/article/details/52702057
3.1.1 scheam.xml配置
<?xml version="1.0"?>

<!DOCTYPE mycat:schema SYSTEM "schema.dtd">

<mycat:schema xmlns:mycat="http://io.mycat/">

    <!-- 电商平台 逻辑数据库  -->

    <schema name="es_db" checkSQLschema="false" sqlMaxLimit="100" dataNode="dn1_es">

        <!-- 商品分类相关的表  【全局表】 start-->

        <table name="es_goods_class" dataNode="dn1_es,dn2_es" type="global"/>

        <table name="es_goods_class_tag" dataNode="dn1_es,dn2_es" type="global"/>

        <table name="es_goods_class_tag_mapping" dataNode="dn1_es,dn2_es" type="global"/>

        <table name="es_goods_class_tag_show_mapping" dataNode="dn1_es,dn2_es" type="global"/>

        <table name="es_goods_template" dataNode="dn1_es,dn2_es" type="global"/>

        <table name="es_goods_template_item" dataNode="dn1_es,dn2_es" type="global"/>

        <table name="es_goods_template_item_value" dataNode="dn1_es,dn2_es" type="global"/>

        <!-- 商品分类相关的表  【全局表】 end -->

        <!-- 其他  【全局表】 start-->

        <table name="es_hot_city" dataNode="dn1_es,dn2_es" type="global"/>

        <table name="es_logistics_code" dataNode="dn1_es,dn2_es" type="global"/>

        <!-- 其他 表  【全局表】 end-->

        <!-- 商家与商品系列表,,ER分片思想  start -->

        <table name="es_seller" dataNode="dn1_es,dn2_es" primaryKey="id" rule="rule_mod_byId">

            <!-- 下面配置ER字表,parentKey,设置为数据库的参考键,分片字段由joinKey指定   -->

            <childTable name="es_seller_area" joinKey="seller_id" parentKey="id" primaryKey="id"></childTable>

            <childTable name="es_seller_community" joinKey="seller_id" parentKey="id" primaryKey="id"></childTable>

            <childTable name="es_seller_image" joinKey="seller_id" parentKey="id" primaryKey="id"></childTable>

            <childTable name="es_order_report_file" joinKey="seller_id" parentKey="id" primaryKey="id"></childTable>

            <childTable name="es_goods" joinKey="seller_id" parentKey="id" primaryKey="id"></childTable>

            <childTable name="es_goods_community" joinKey="seller_id" parentKey="id" primaryKey="id"></childTable>

            <childTable name="es_goods_detail_image" joinKey="seller_id" parentKey="id" primaryKey="id"></childTable>

            <childTable name="es_goods_free_carriage" joinKey="seller_id" parentKey="id" primaryKey="id"></childTable>

            <childTable name="es_goods_image" joinKey="seller_id" parentKey="id" primaryKey="id"></childTable>

            <childTable name="es_goods_modify" joinKey="seller_id" parentKey="id" primaryKey="id"></childTable>

            <childTable name="es_goods_nosupp_area" joinKey="seller_id" parentKey="id" primaryKey="id"></childTable>

            <childTable name="es_sku" joinKey="seller_id" parentKey="id" primaryKey="id"></childTable>

            <childTable name="es_sku_item" joinKey="seller_id" parentKey="id" primaryKey="id"></childTable>

            <childTable name="es_community_sku" joinKey="seller_id" parentKey="id" primaryKey="id"></childTable>

            <childTable name="es_order_returned_reason" joinKey="seller_id" parentKey="id" primaryKey="id"></childTable>

            <childTable name="es_goods_review" joinKey="seller_id" parentKey="id" primaryKey="id"></childTable>

            <childTable name="es_goods_review_content" joinKey="seller_id" parentKey="id" primaryKey="id"></childTable>

            <childTable name="es_goods_review_image" joinKey="seller_id" parentKey="id" primaryKey="id"></childTable>

        </table>

        <!-- 商家与商品系列表,,ER分片思想  end-->

        <!-- 订单相关表,,ER分片思想  start -->

        <table name="es_user" dataNode="dn1_es,dn2_es" primaryKey="id" rule="rule_mod_byId">

            <childTable name="es_order" joinKey="creator" parentKey="id" primaryKey="id"></childTable>

            <childTable name="es_order_item" joinKey="creator" parentKey="id" primaryKey="id"></childTable>

            <childTable name="es_order_sku_item" joinKey="creator" parentKey="id" primaryKey="id"></childTable>

            <childTable name="es_order_returned" joinKey="creator" parentKey="id" primaryKey="id"></childTable>

            <childTable name="es_order_returned_image" joinKey="creator" parentKey="id" primaryKey="id"></childTable>

            <childTable name="es_recive_address" joinKey="creator" parentKey="id" primaryKey="id"></childTable>

            <!-- 购物车 -->

            <childTable name="es_shopcar" joinKey="creator" parentKey="id" primaryKey="id"></childTable>

        </table>

        <!-- 订单相关表,,ER分片思想  end -->

    </schema>

    <!-- 账户平台子系统   分片1,2

    <dataNode name="dn1_acc" dataHost="host_masterA" database="acc_db" />

    <dataNode name="dn2_acc" dataHost="host_masterD" database="acc_db" />

     -->

    <!-- 电商平台子系统 分片1,2 -->

    <dataNode name="dn1_es" dataHost="host_masterA" database="es_db" />

    <dataNode name="dn2_es" dataHost="host_masterD" database="es_db" />

    <dataHost name="host_masterA" maxCon="100" minCon="10" balance="1"

              writeType="0" dbType="mysql" dbDriver="native" switchType="1"  slaveThreshold="100">

              <!-- switchType =1 自动切换,,2:为主从切换,心跳语句 show slave status -->

        <heartbeat>select user()</heartbeat>

        <writeHost host="mysqlA" url="192.168.56.116:3306" user="root"

                   password="123456">

            <!-- can have multi read hosts -->

            <readHost host="mysqlB" url="192.168.56.116:3307" user="root" password="123456" />

        </writeHost>

        <writeHost host="mysqlC" url="192.168.56.116:3308" user="root"

                   password="123456" />

    </dataHost>

    <dataHost name="host_masterD" maxCon="100" minCon="10" balance="1"

              writeType="0" dbType="mysql" dbDriver="native" switchType="1"  slaveThreshold="100">

        <heartbeat>select user()</heartbeat>

        <!-- can have multi write hosts -->

        <writeHost host="mysqlD" url="192.168.56.116:3309" user="root"

                   password="123456">

            <!-- can have multi read hosts -->

            <readHost host="mysqlE" url="192.168.56.116:3310" user="root" password="123456" />

        </writeHost>

    </dataHost>

</mycat:schema>
关于表结构脚步,由于某些原因不方便公开,这里建议就是,自己根据经验,创建一系列表,这里主要的核心是,全局表、ER表。
3.1.2 rule.xml配置
<?xml version="1.0" encoding="UTF-8"?>

<!-- - - Licensed under the Apache License, Version 2.0 (the "License");

    - you may not use this file except in compliance with the License. - You

    may obtain a copy of the License at - - http://www.apache.org/licenses/LICENSE-2.0

    - - Unless required by applicable law or agreed to in writing, software -

    distributed under the License is distributed on an "AS IS" BASIS, - WITHOUT

    WARRANTIES OR CONDITIONS OF ANY KIND, either express or implied. - See the

    License for the specific language governing permissions and - limitations

    under the License. -->

<!DOCTYPE mycat:rule SYSTEM "rule.dtd">

<mycat:rule xmlns:mycat="http://io.mycat/">

    <!-- 表分片规则,分片字段  主键id ,求模 -->

    <tableRule name="rule_mod_byId">

        <rule>

            <columns>id</columns>

            <algorithm>mod-long</algorithm>

        </rule>

    </tableRule>

    <!-- 取模规则 -->

    <function name="mod-long" class="io.mycat.route.function.PartitionByMod">

        <!-- how many data nodes -->

        <property name="count">2</property>

    </function>

</mycat:rule>
3.1.3 server.xml配置
<?xml version="1.0" encoding="UTF-8"?>

<!-- - - Licensed under the Apache License, Version 2.0 (the "License");

    - you may not use this file except in compliance with the License. - You

    may obtain a copy of the License at - - http://www.apache.org/licenses/LICENSE-2.0

    - - Unless required by applicable law or agreed to in writing, software -

    distributed under the License is distributed on an "AS IS" BASIS, - WITHOUT

    WARRANTIES OR CONDITIONS OF ANY KIND, either express or implied. - See the

    License for the specific language governing permissions and - limitations

    under the License. -->

<!DOCTYPE mycat:server SYSTEM "server.dtd">

<mycat:server xmlns:mycat="http://io.mycat/">

    <system>

    <property name="useHandshakeV10">1</property>

    <property name="useSqlStat">0</property>  <!-- 1为开启实时统计、0为关闭 -->

    <property name="useGlobleTableCheck">0</property>  <!-- 1为开启全加班一致性检测、0为关闭 -->


        <property name="sequnceHandlerType">1</property>

      <!--  <property name="useCompression">1</property>--> <!--1为开启mysql压缩协议-->

        <!--  <property name="fakeMySQLVersion">5.6.20</property>--> <!--设置模拟的MySQL版本号-->

    <!-- <property name="processorBufferChunk">40960</property> -->

    <!--

    <property name="processors">1</property>

    <property name="processorExecutor">32</property>

     -->

        <!--默认为type 0: DirectByteBufferPool | type 1 ByteBufferArena-->

        <property name="processorBufferPoolType">0</property>

        <!--默认是65535 64K 用于sql解析时最大文本长度 -->

        <!--<property name="maxStringLiteralLength">65535</property>-->

        <!--<property name="sequnceHandlerType">0</property>-->

        <!--<property name="backSocketNoDelay">1</property>-->

        <!--<property name="frontSocketNoDelay">1</property>-->

        <!--<property name="processorExecutor">16</property>-->

        <!--

            <property name="serverPort">8066</property> <property name="managerPort">9066</property>

            <property name="idleTimeout">300000</property> <property name="bindIp">0.0.0.0</property>

            <property name="frontWriteQueueSize">4096</property> <property name="processors">32</property> -->

        <!--分布式事务开关,0为不过滤分布式事务,1为过滤分布式事务(如果分布式事务内只涉及全局表,则不过滤),2为不过滤分布式事务,但是记录分布式事务日志-->

        <property name="handleDistributedTransactions">0</property>


            <!--

            off heap for merge/order/group/limit      1开启   0关闭

        -->

        <property name="useOffHeapForMerge">1</property>


        <!--

            单位为m

        -->

        <property name="memoryPageSize">1m</property>


        <!--

            单位为k

        -->

        <property name="spillsFileBufferSize">1k</property>


        <property name="useStreamOutput">0</property>


        <!--

            单位为m

        -->

        <property name="systemReserveMemorySize">384m</property>


        <!--是否采用zookeeper协调切换  -->

        <property name="useZKSwitch">true</property>


        <!-- XA Recovery Log日志路径 -->

        <!--<property name="XARecoveryLogBaseDir">./</property>-->


        <!-- XA Recovery Log日志名称 -->

        <!--<property name="XARecoveryLogBaseName">tmlog</property>-->


    </system>


    <!-- 全局SQL防火墙设置 -->

    <!--白名单可以使用通配符%或着*-->

    <!--例如<host host="127.0.0.*" user="root"/>-->

    <!--例如<host host="127.0.*" user="root"/>-->

    <!--例如<host host="127.*" user="root"/>-->

    <!--例如<host host="1*7.*" user="root"/>-->

    <!--这些配置情况下对于127.0.0.1都能以root账户登录-->

    <!--

    <firewall>

       <whitehost>

          <host host="1*7.0.0.*" user="root"/>

       </whitehost>

       <blacklist check="false">

       </blacklist>

    </firewall>

    -->


    <user name="root">

        <property name="password">123456</property>

        <property name="schemas">es_db</property>


        <!-- 表级 DML 权限设置 -->

        <!--

        <privileges check="false">

            <schema name="TESTDB" dml="0110" >

                <table name="tb01" dml="0000"></table>

                <table name="tb02" dml="1111"></table>

            </schema>

        </privileges>

         -->

    </user>


    <user name="user">

        <property name="password">user</property>

        <property name="schemas">es_db</property>

        <property name="readOnly">true</property>

    </user>


</mycat:server>
本文展示mycat读写分离,写节点故障转移、全局序列号等配置过程,初步搭建了一个mycat的运行环境。为接下来 路由解析、读写分离、故障转移,存储过程执行等等打下坚实基础。
欢迎加笔者微信号(dingwpmz),加群探讨,笔者优质专栏目录:
1、源码分析RocketMQ专栏(40篇+)
2、源码分析Sentinel专栏(12篇+)
3、源码分析Dubbo专栏(28篇+)
4、源码分析Mybatis专栏
5、源码分析Netty专栏(18篇+)
6、源码分析JUC专栏
7、源码分析Elasticjob专栏
8、Elasticsearch专栏
9、源码分析Mycat专栏


 927
927


 被折叠的 条评论
为什么被折叠?
被折叠的 条评论
为什么被折叠?
 到【灌水乐园】发言


