


今天我们通过一个实例来讲解Cocos2d-x中的触屏事件
当鼠标点击某个位置,移动,精灵会跟随鼠标移动
OK。我们先创建一个新的工程
将HelloWorld中多余的代码删除掉
头文件如下:
#ifndef __HELLOWORLD_SCENE_H__
#define __HELLOWORLD_SCENE_H__

#include "cocos2d.h"

class HelloWorld : public cocos2d::CCLayer
{
public:
    // Here's a difference. Method 'init' in cocos2d-x returns bool, instead of returning 'id' in cocos2d-iphone
    virtual bool init();
    // there's no 'id' in cpp, so we recommend returning the class instance pointer
    static cocos2d::CCScene* scene();
    // implement the "static node()" method manually
    CREATE_FUNC(HelloWorld);
	virtual void onEnter();
    virtual void ccTouchesBegan(CCSet *pTouches, CCEvent *pEvent);
    virtual void ccTouchesMoved(CCSet *pTouches, CCEvent *pEvent);
    virtual void ccTouchesEnded(CCSet *pTouches, CCEvent *pEvent);
};
#endif // __HELLOWORLD_SCENE_H__
onEnter Layer层可见的时候触发,
ccThouchesBegan 手指按下的时候触发
ccThouchesMoved 手指按下并移动的时候触发
ccThouchesEnded 手指抬起的时候触发
至于重写这四个函数,我们的类又是继承CCLayer的,猜想应该CCLayer也有这四个函数吧,OK,我们跟踪源码看看
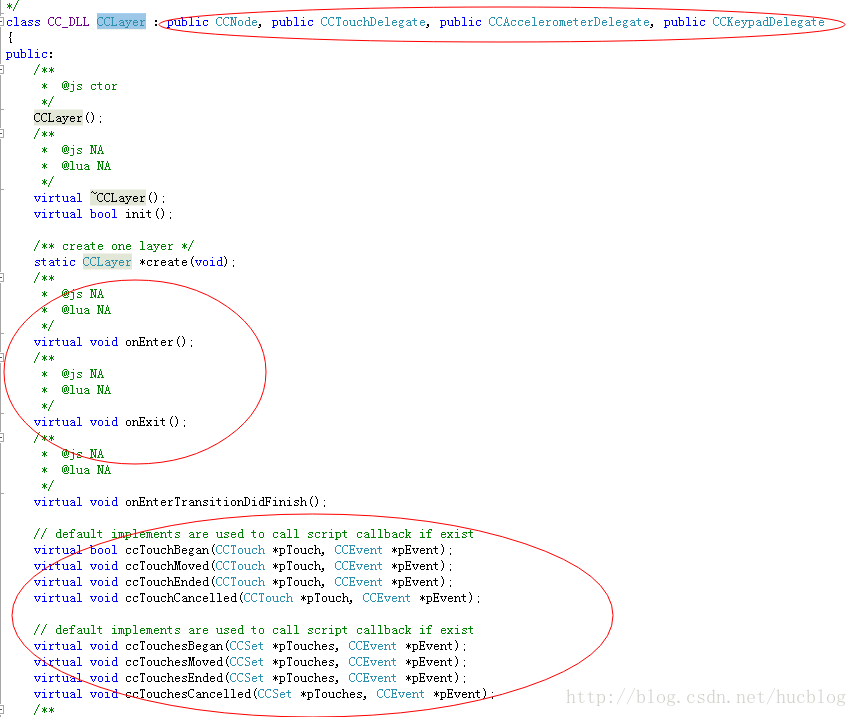
乍眼一看,貌似最后一个圈圈中的函数差不多??呵呵,这是一个是单点触控,一个是多点触控
他们之间什么区别呢??
我觉得应该是单点只支持一个手指在屏幕上点击,
多点支持多个手指同时在屏幕上点击。
当然 这只是我觉得。。。等这节讲完我们利用第一节的文章移植一下,在手机上试试就O了
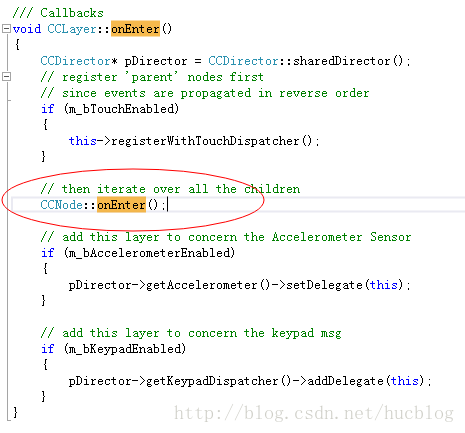
第二个圈圈中的两个函数式CCLayer的生命周期函数
onEnter CCLayer可见的时候调用,在init之后
onExit 这个不用说了吧??
第一个圈圈继承了如下类
CCNode 不解释
CCThouchDelegate 触屏事件委托类
CCAccelerometerDelegate 重力感应委托类
CCKeypadDelegate 键盘按键委托类
这节我们主要关注第一个触屏的类,
后面两个下一节介绍
我们先来实现头文件中的四个方法
#include "HelloWorldScene.h"

USING_NS_CC;

CCScene* HelloWorld::scene()
{
	// 'scene' is an autorelease object
	CCScene *scene = CCScene::create();

	// 'layer' is an autorelease object
	HelloWorld *layer = HelloWorld::create();

	// add layer as a child to scene
	scene->addChild(layer);

	// return the scene
	return scene;
}

// on "init" you need to initialize your instance
bool HelloWorld::init()
{
	//
	// 1. super init first
	if ( !CCLayer::init() )
	{
		return false;
	}
	CCLOG("init");
	return true;
}

void HelloWorld::onEnter()
{
	CCLOG("onEnter");
}
void  HelloWorld::ccTouchesBegan(CCSet *pTouches, CCEvent *pEvent)
{
	CCLOG("ccTouchesBegan");
}
void  HelloWorld::ccTouchesMoved(CCSet *pTouches, CCEvent *pEvent)
{
	CCLOG("ccTouchesMoved");
}
void  HelloWorld::ccTouchesEnded(CCSet *pTouches, CCEvent *pEvent){
	CCLOG("ccTouchesEnded");
}OK,鼠标悬浮在CCSet上面我们可以发现它是cocos2d命名空间下面的 ,我们在头文件中引入一下命名空间,using namespace cocos2d;在运行 ,很好,成功了。
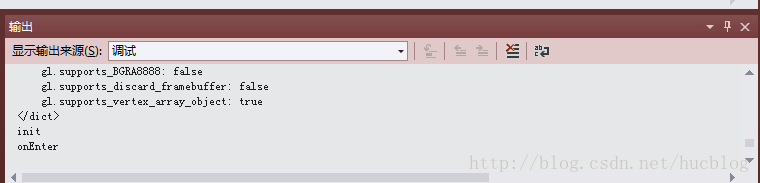
我们的猜想是正确的 果断onEnter是在init后面执行
我们在程序中触屏,移动,抬起鼠标貌似都没输出。。。
别急,我想大家都知道队列是个什么东东吧??
事件队列其实也算是一个容器,它保存了所有等待接收事件处理的类,就好比MFC什么的消息队列差不了蛮多
这个类是Cocos2d-x在后台维护的,但是我们需要将我们当前接受触屏事件的类加入到队列中,不然触屏就没用。
大家想想就可以了,现在不需要懂,等下边看代码边分析,当然,这个原理得知道哦
void HelloWorld::onEnter()
{
	CCLOG("onEnter");
	CCLayer::onEnter();
	this->setTouchEnabled(true);
}可以直接运行,看输出窗口,是不是生效了??
我们看一下setTouchEnabled的实现
void CCLayer::setTouchEnabled(bool enabled)
{
    if (m_bTouchEnabled != enabled)
    {
        m_bTouchEnabled = enabled;
        if (m_bRunning)
        {
            if (enabled)
            {
                this->registerWithTouchDispatcher();
            }
            else
            {
                // have problems?
                CCDirector::sharedDirector()->getTouchDispatcher()->removeDelegate(this);
            }
        }
    }
}enabled我们传了true,默认m_bTouchEnabled是false,为什么呢,如果是true的话我还设置什么对吧。不行可以跟踪源码看看
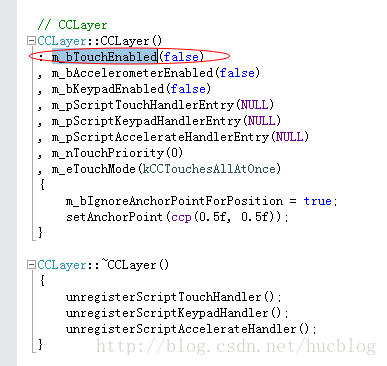
好的,第一个if成立
修改变量m_bTouchEnabled为true
第二个if为什么会成立呢??
我们发现m_bRunning是CCNode的变量,而我们跟踪发现值默认是false
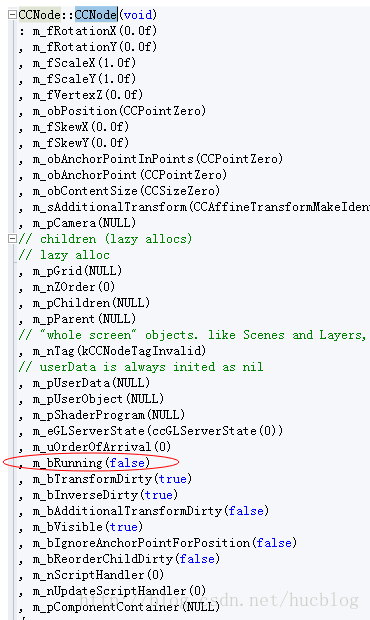
为什么这里是true呢,这就在我们执行setTouchEnabled之前执行了一次CCLayer::onEnter()了
我们在跟踪进来
OK,在到CCNode的onEnter中看看
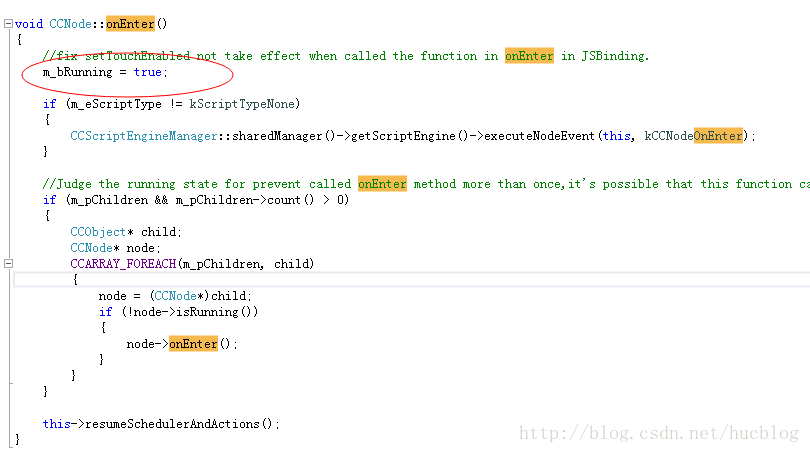
所以这里为true,
你可以把setTouchEnabled和CClayer::onEnter()的执行顺序调换一下,是不是触屏事件失效了??
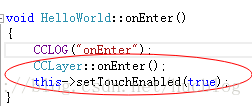
注意了,这里的顺序千万不能调换
我们讲到哪了??
哦,第二个IF,成功,如果上面执行位置调换后,第二个IF就不成立,所以没办法执行registerWithTouchDispatcher,触屏就不生效
接着我们第三个IF,肯定成功,执行注册触屏的事件队列
我们进去看看
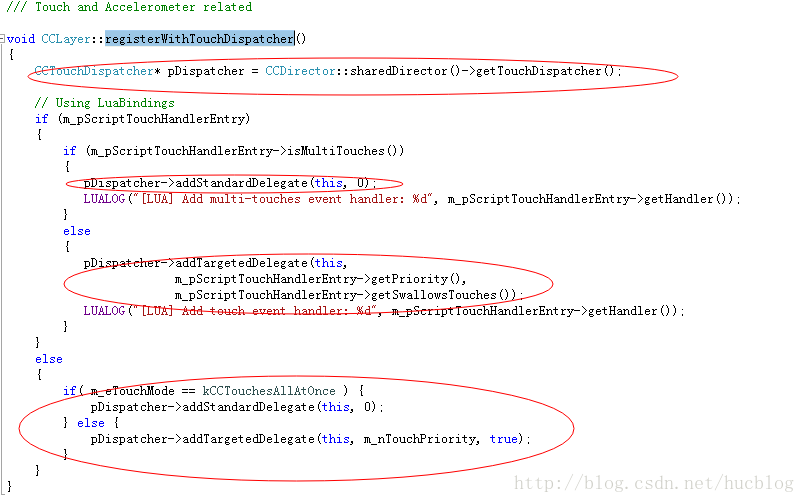
CCTouchDispatcher 这个类就是后台帮我们维护的事件队列
CCTouchDelegate 这个类就是处理触屏事件的委托的类
呃。。说不清楚,总之CCTouchDispatcher 可以看成一个容器,list什么什么的,它存放了一些类,这些类可以接受触屏事件,这里我们看到addStandardDelegate 存了this,就是我们的HelloWorld类
第二个参数是优先级
CCTouchDelegate 只有继承这个类才有触屏事件的那四个函数
我们发现这里注册其实就是将我们的类添加到Dispatcher中
这里有两种添加方式
一个是添加多点委托
一个是单点委托,两种都差不多吧,区别前面介绍过了,单点的多了第三个参数,设置为true表示自己吃掉改事件,
不如吧,我们有两个精灵重叠在一起,然后都接受触摸事件,我们优先级最先的接受到了事件处理,这时后面的精灵我们不想让它传递下去了,这就是这个参数的作用
说了大半天,不知道大家懂不懂哈,反正基本上就这样一个流程,
1.我们首先需要继承CCThouchDelegate类
2.重写相应的方法
3.注册,将类添加到CCTouchDispatcher中,注意如何获得这个类的实例,,通过导演,它是全局唯一的
4.卸载 // have problems?
CCDirector::sharedDirector()->getTouchDispatcher()->removeDelegate(this);
原理和生命周期懂了之后呢,我们就来实现我们今天的实例
#ifndef __HELLOWORLD_SCENE_H__
#define __HELLOWORLD_SCENE_H__

#include "cocos2d.h"
using namespace cocos2d;
class HelloWorld : public cocos2d::CCLayer
{
public:
    // Here's a difference. Method 'init' in cocos2d-x returns bool, instead of returning 'id' in cocos2d-iphone
    virtual bool init();
    // there's no 'id' in cpp, so we recommend returning the class instance pointer
    static cocos2d::CCScene* scene();
    // implement the "static node()" method manually
    CREATE_FUNC(HelloWorld);
	virtual void onEnter();
    virtual void ccTouchesBegan(CCSet *pTouches, CCEvent *pEvent);
    virtual void ccTouchesMoved(CCSet *pTouches, CCEvent *pEvent);
    virtual void ccTouchesEnded(CCSet *pTouches, CCEvent *pEvent);
	void updatepoint(CCTouch *pTouch);
};
#endif // __HELLOWORLD_SCENE_H__
#include "HelloWorldScene.h"

USING_NS_CC;

CCScene* HelloWorld::scene()
{
	// 'scene' is an autorelease object
	CCScene *scene = CCScene::create();

	// 'layer' is an autorelease object
	HelloWorld *layer = HelloWorld::create();

	// add layer as a child to scene
	scene->addChild(layer);

	// return the scene
	return scene;
}

// on "init" you need to initialize your instance
bool HelloWorld::init()
{
	//
	// 1. super init first
	if ( !CCLayer::init() )
	{
		return false;
	}
	CCSize visibleSize= CCDirector::sharedDirector()->getVisibleSize();
	CCSprite* sprite=CCSprite::create("Icon.png");
	sprite->setPosition(ccp(visibleSize.width/2,visibleSize.height/2));
	this->addChild(sprite,0,2);
	return true;
}

void HelloWorld::onEnter()
{
	CCLayer::onEnter();
	this->setTouchEnabled(true);
}
void  HelloWorld::ccTouchesBegan(CCSet *pTouches, CCEvent *pEvent)
{
	updatepoint((CCTouch*)pTouches->anyObject());
}
void  HelloWorld::ccTouchesMoved(CCSet *pTouches, CCEvent *pEvent)
{
	updatepoint((CCTouch*)pTouches->anyObject());
}
void  HelloWorld::ccTouchesEnded(CCSet *pTouches, CCEvent *pEvent){
}
void HelloWorld::updatepoint(CCTouch *pTouch)
{
	CCSprite* sprite=(CCSprite*) this->getChildByTag(2);
	sprite->setPosition(pTouch->getLocation());
}这个方法的意思就是从CCSet中随便选取一个点CCTouch
好了,运行看看效果,成功了吧??接下来我们知道多点了,单点其实步骤也一样
有兴趣的朋友可以自己试试


 971
971


 被折叠的 条评论
为什么被折叠?
被折叠的 条评论
为什么被折叠?
 到【灌水乐园】发言


