


未经书面许可,请勿转载
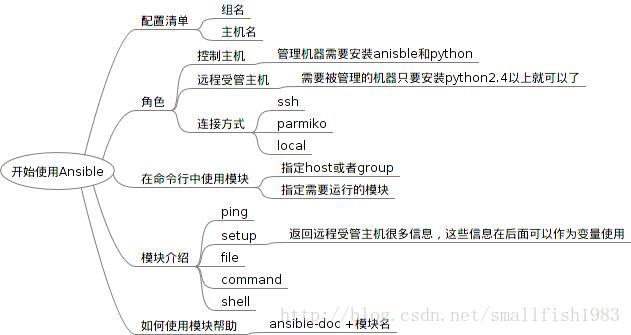
一张图描述本章内容
一、
Getting Started with Ansible
Ansible is profoundly different from other configuration management tools
available today. It has been designed to make configuration easy in almost every
way, from its simple English configuration syntax to its ease of set up. You'll find
that Ansible allows you to stop writing custom configuration and deployment
scripts and lets you simply get on with your job.
Ansible only needs to be installed on the machines that you use to manage your
infrastructure. It does not need a client to be installed on the managed machine
nor does it need any server infrastructure to be set up before you can use it. You
should even be able to use it merely minutes after it is installed, as we will show
you in this chapter.
You will be using Ansible from the command line on one machine, which we will
call the controller machine, and use it to configure another machine, which we
will call the managed machine. Ansible does not place many requirements on the
controller machine and even less on the managed machine.
The requirements for the controller machine are as follows:
•	 Python 2.6 or higher
•	 paramiko
•	 PyYAML
•	 Jinja2
The managed machine needs Python 2.4 or higher
第一章:开始使用Ansible
和其他配置管理工具不同的是,Ansible着重于使配置管理工作变的更加简单,通过简单的英语配置语法,这很容易做到。你不再需要编写自定义的配置和部署脚本,让你的工作变的更加简单。
Ansible只需要安装管理机器上,不需要安装在被管理机器上安装Ansible。他也不需要在我们在管理机器上做很多基础设施的建设、配置,在安装完Ansible仅仅几分钟后就可以使用,本章将展示这一过程。
我们把通过命令行控制其他设备的机器称为控制机器,其他的设备我们称之为受管机器。Ansible对控制机器的要求不高,对受管机器要求更低。
下面是控制机器的要求:
python2.6或者以上
paramiko
pyyaml
jinja2
受管机器仅要求安装了python2.4或者以上版本就可以了!
The following are the topics covered in this chapter:
•	 Installing Ansible
•	 Configuring Ansible
•	 Using Ansible from the command line
•	 How to get help
Installation methods
If you want to use Ansible to manage a set of existing machines or infrastructure,
you will likely want to use whatever package manager is included on those systems.
This means that you will get updates for Ansible as your distribution updates it,
which may lag several versions behind other methods. However, it doesn't mean
that you will be running a version that has been tested to work on the system you are
using.
If you run an existing infrastructure but need a newer version of Ansible, you can
install Ansible via pip. Pip is a tool used to manage packages of Python software and
libraries. Ansible releases are pushed to pip as soon as they are released, so if you are
up to date with pip, you should always be running the latest version.
If you imagine yourself developing lots of modules and possibly contributing back
to Ansible, you should be running a checked-out version. As you will be running the
latest and least tested version of Ansible, you may experience a hiccup or two.
Installing from your distribution
Most modern distributions include a package manager that automatically manages
package dependencies and updates for you. This makes installing Ansible via your
package manager by far the easiest way to get started with Ansible; usually it takes
only a single command. It will also be updated as you update your machine, though
it may be a version or two behind. The following are the commands to install Ansible
on the most common distributions. If you are using something different, refer to the
user guide for your package or your distribution's package lists.
•	 Fedora, RHEL, CentOS, and compatible: $ yum install ansible
•	 Ubuntu, Debian, and compatible: $ apt-get install ansible
以下是本章主题:
- 安装Ansible
- 配置Ansible
- 在命令行中使用Ansible
- 获取帮助
安装方法:
如果你想使用Ansible来管理现有的设备和设施,你可以使用操作系统的安装包管理软件来安装它,这样你就可以在操作系统更新的时候更新Ansible版本。但是,通常操作系统的软件版本都比较旧,使用其他的方法可以获取到更新的Ansible版本,但这也意味这你使用的版本是稳定版本,而不是测试或者开发版本。
如果要获取最新版本,可以使用python的pip包安装工具,当Ansible的版本更新的时候,他就会发布更新到pip上面,所以,如果你的pip及时更新,那么你总是能获取到最新版本的Ansible版本。
如果你想开发大量的Ansible模块来回馈Ansible,你可以下载check-out版本。
大部分时下的linux发行版都有自己的安装包管理工具,这让安装Ansible变的非常简单,通常只需要一个命令就可以了,而且软件还可以随操作系统的更新而更新,虽然版本可能会落后1-2个。下面是一些操作系统和安装命令,如果你使用的是不同的操作系统,你可以查看一下你自己操作系统的用户指南中关于发行包列表方面的内容。
Fedora, RHEL, CentOS, 以及他们的衍生版本:yum install ansibleUbuntu, Debian, 以及他们的衍生版本: $ apt-get install ansible
Installing from pip
Pip, like a distribution's package manager, will handle finding, installing, and
updating the packages you ask for and its dependencies. This makes installing
Ansible via pip as easy as installing from your package manager. It should be noted,
however, that it will not be updated with your operating system. Additionally,
updating your operating system may break your Ansible installation; however,
this is unlikely. The following is the command to install Ansible via pip:
$ pip install ansible
Installing from the source code
Installing from the source code is a great way to get the latest version, but it may not
be tested as correctly as released versions. You also will need to take care of updating
to newer versions yourself and making sure that Ansible will continue to work with
your operating system updates. To clone the git repository and install it, run the
following commands. You may need root access to your system to do this:
$ git clone git://github.com/ansible/ansible.git
$ cd ansible
$ sudo make installpip是python的包管理工具,使用它来安装Ansible非常简单,但是,需要注意的是这样安装的软件不会随操作系统的升级而升级,然而这样也无所谓。下面是从pip安装的命令
pip install ansible
从源码安装
从源码安装是获取最新版本的一个好方式,但是通过源码安装的版本没有发行版本那样经过良好的测试。在自己更新的时候也要很小心,同时还要确保操作系统系统更新之后,软件还能继续工作。从git库下载然后安装,使用以下命令
$ git clone git://github.com/ansible/ansible.git
$ cd ansible
$ sudo make install
Setting up Ansible
Ansible needs to be able to get an inventory of the machines that you want to configure
in order to manage them. This can be done in many ways due to inventory plugins.
Several different inventory plugins are included with the base install. We will go over
these later in the book, but for now we will cover the simple hosts file inventory.
The default Ansible inventory file is named hosts and placed in /etc/ansible . It is
formatted like an INI file. Group names are enclosed in square braces, and everything
underneath it, down to the next group heading, gets assigned to that group. Machines
can be in many groups at one time. Groups are used to allow you to configure many
machines at once. You can use a group instead of a hostname as a host pattern in later
examples, and Ansible will run the module on the entire group at once.
In the following example, we have three machines in a group named webservers ,
namely site01 , site02 , and site01-dr . We also have a production group that
consists of site01 , site02 , db01 , and bastion .
[webservers]
site01
site02
[production]
site01
site02
db01
bastion
配置Ansible
要管理设备,我们的Ansible首先要有一个设备清单。建立设备清单有很多自带的不同的插件,我们将在稍后介绍,现在我们先来建立一个简单的主机文件清单。默认的设备清单配置文件在/etc/ansible。他是一个类似ini的配置文件。其中,组名被方括号包裹,组名下面,在2个组名之间的配置是当前组的配置信息,一个主机可以同时属于多个组。组的设置可以让我们一次性配置管理多台主机。在稍后的例子里面,在pattern选项中,你可以使用组名来替代主机名,Ansible会一次在组内的所有主机上运行模块命令。在接下来的列子中,我们有3台机器在一个叫做webservers的组中,他们的名字分别是site01,site02 site01-dir。另外我们还有一个生产组,包括4台主机,分别是site01,site02,db01,bastion。
[webservers]
site01
site02
site01-dr
[production]
site01
site02
db01
bastion
Once you have placed your hosts in the Ansible inventory, you can start running
commands against them. Ansible includes a simple module called ping that lets you
test connectivity between yourself and the host. Let's use Ansible from the command
line against one of our machines to confirm that we can configure them.
Ansible was designed to be simple and one of the ways the developers have done
this is by using SSH to connect to the managed machines. It then sends the code over
the SSH connection and executes it. This means that you don't need to have Ansible
installed on the managed machine. It also means that Ansible can use the same
channels that you are already using to administer the machine.
First, we check connectivity to our server to be configured using the Ansible ping
module. This module simply connects to the following server:
$ ansible site01 -u root -k -m ping
This should ask for the SSH password and then produce a result that looks like the
following code:
site01 | success >> {
"changed": false,
"ping": "pong"
}
If you have an SSH key set up for the remote system, you will be able to leave off the
-k argument to skip the prompt and use the keys. You can also configure Ansible to
use a particular username all the time by either configuring it in the inventory on a
per host basis or in the global Ansible configuration.
To set the username globally, edit /etc/ansible/ansible.cfg and change the line
that sets remote_user in the [defaults] section. You can also change remote_port
to change the default port that Ansible will SSH to. These will change the default
settings for all the machines, but they can be overridden in the inventory file on a per
server or per group basis.
Ansible的设计非常简单,他开发的方法就是将我们的代码通过ssh连接来发送和执行,这意味这在你的受管机器上不需要安装Ansible,这也意味这你可以共享你现在用的ssh通道。
首先,让我们用Ansible的ping模块来验证到受管机器的连接状态,执行下面的命令连接到受管机器:
$ ansible site01 -u root -k -m ping
这条命令会要求你输入ssh密码,并返回一个执行结果,如下:
site01 | success >> {
"changed": false,
"ping": "pong"
}
如果你有远程受管机器的ssh密钥,你就可以不使用-k参数,而使用密钥文件来连接远程受管机器。你还可以通过配置清单中主机选项中的参数和全局配置中的参数来设置你每次要连接远程受管机器时使用的用户名。
编辑/etc/ansible/ansible.cfg文件,更改remote_user中的 [defaults] 选项,就可以更改全局的修改连接的用户名。你还可以通过remote_port来改变Ansible链接的远程端口。这是全局设置,他会被主机和组设置覆盖!
To set the username in the inventory file, simply append ansible_ssh_user to the
line in the inventory. For example, the next code section shows an inventory where
the site01 host uses the username root and the site02 host uses the username
daniel . There are also other variables you can use. The ansible_ssh_host file
allows you to set a different hostname and the ansible_ssh_port file allows you
to set a different port; this is demonstrated on the site01-dr host. Finally, the
db01 host uses the username fred and also sets a private key using ansible_ssh_
private_key_file .
[webservers]
#1
site01 ansible_ssh_user=root
#2
site02 ansible_ssh_user=daniel
#3
site01-dr ansible_ssh_host=site01.dr ansible_ssh_port=65422
[production]
#5
site01
#6
site02
#7
db01 ansible_ssh_user=fred
ansible_ssh_private_key_file=/home/fred/.ssh.id_rsa bastion
#4
#8
If you aren't comfortable with giving Ansible direct access to the root account on
the managed machines, or your machine does not allow SSH access to the root
account (such as Ubuntu's default configuration), you can configure Ansible to
obtain root access using sudo. Using Ansible with sudo means that you can enforce
auditing the same way you would otherwise. Configuring Ansible to use sudo is as
simple as it is to configure the port, except that it requires sudo to be configured on
the managed machine.
The first step is to add a line to the /etc/sudoers file; this may already be set up if
you choose to use your own account. You can use a password with sudo, or you can
use a passwordless sudo. If you decide to use a password, you will need to use the
-k argument to Ansible, or set the ask_sudo_pass value to true in /etc/ansible/
ansible.cfg . To make Ansible use sudo, add --sudo to the command line.
[webservers]
#1
site01 ansible_ssh_user=root #改变连接远程受管机器时使用的用户名
#2
site02 ansible_ssh_user=daniel #改变连接远程受管机器时使用的用户名
#3
site01-dr ansible_ssh_host=site01.dr ansible_ssh_port=65422 #通过ansible_ssh_host改变主机名,ansible_ssh_port参数可以改变默认的远程ssh连接端口,所有的参数必须写在一行里面
[production]
#5
site01
#6
site02
#7
db01 ansible_ssh_user=fred #改变连接远程受管机器时使用的用户名
ansible_ssh_private_key_file=/home/fred/.ssh.id_rsa bastion #指定连接时使用的ssh私钥文件
如果你不习惯使用root来连接远程受管机器,或者你的os版本不运行root登录(比如ubuntu、dabian),那么你可以制定使用sudo来获得root权限。这个配置和更改主机端口一样简单,但是你需要在受管机器上面配置sudo:
第一步,你要在/etc/sudoers文件中添加一行,如果你选择使用你现在的用户的话,他应该已经存在了。你可以选择是否需要密码,如果选择使用密码的话,在Ansible的命令行中就需要加入-k参数,或者设置ask_sudo_pass 为ture在/etc/ansible/ansible.cfg文件中,在Ansible命令行中使用sudo需要在命令行中添加--sudo。
First steps with Ansible
Ansible modules take arguments in key value pairs that look similar to key=value ,
perform a job on the remote server, and return information about the job as JSON.
The key value pairs allow the module to know what to do when requested. They can
be hard coded values, or in playbooks they can use variables, which will be covered
in Chapter 2, Simple Playbooks. The data returned from the module lets Ansible know
if anything changed or if any variables should be changed or set afterwards.
Modules are usually run within playbooks as this lets you chain many together, but
they can also be used on the command line. Previously, we used the ping command
to check that Ansible had been correctly setup and was able to access the configured
node. The ping module only checks that the core of Ansible is able to run on the
remote machine but effectively does nothing.
A slightly more useful module is called setup. This module connects to the
configured node, gathers data about the system, and then returns those values. This
isn't particularly handy for us while running from the command line, however, in a
playbook you can use the gathered values later in other modules.
To run Ansible from the command line, you need to pass two things, though usually
three. First is a host pattern to match the machine that you want to apply the module
to. Second you need to provide the name of the module that you wish to run and
optionally any arguments that you wish to give to the module. For the host pattern,
you can use a group name, a machine name, a glob, and a tilde (~), followed by a
regular expression matching hostnames, or to symbolize all of these, you can either
use the word all or simply * .
To run the setup module on one of your nodes, you need the following
command line:
$ ansible machinename -u root -k -m setup
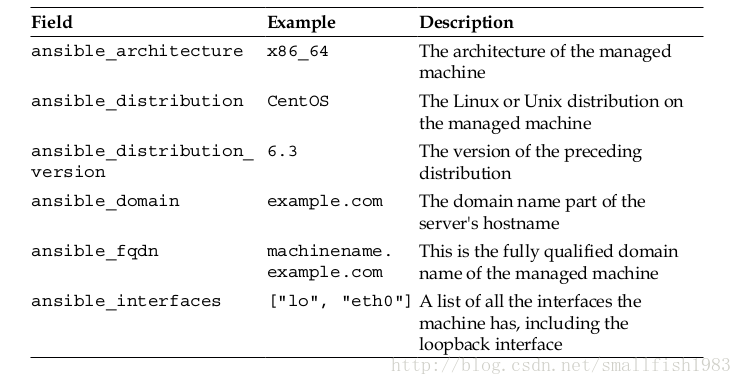
The setup module will then connect to the machine and give you a number of useful
facts back. All the facts provided by the setup module itself are prepended with
ansible_ to differentiate them from variables. The following is a table of the most
common values you will use, example values, and a short description of the fields: 开始使用
Ansible的参数使用key-value键值对的形式,在远程受管机器上运行一个任务,返回一个关于任务结果的JSON。这种形式可以让模块知道什么时候去做什么,键值对可以是硬编码的或者像在playbook中使用变量(第二章中将介绍)。从模块返回的数据让Ansible知道什么东西改变了、变量是否需要重新设置以及改变配置。模块通常被串在playbook中,这意味这你可以同时使用好几个模块。之前的列子中,ping模块只是检查了一下到远程受管机器的连接状态,实际上没有进行任何操作。
稍微更有用的一个模块叫setup,它连接远程主机,收集关于系统的数据,返回他们的值。在命令行中使用它 并不是很方便,但在之后的playbook中我们可以很好的利用这个模块的返回值。在命令行运行模块,需要指定2件事,虽然通常要指定3件,第一个是 host模块,你需要指定你希望模块应用的主机、组、~、全局、all、一个表达式匹配的主机、组、组;第二个是模块的名称和参数;
下面的命令在一个主机上运行模块:
$ ansible machinename -u root -k -m setup
setup模块会连接到远程受管机器,然后返回一些有用的数据。所有返回的数据都以ansible_为前缀。下面的表格是一些常用的值。

These variables are gathered using Python from the host system; if you have facter
or ohai installed on the remote node, the setup module will execute them and return
their data as well. As with other facts, ohai facts are prepended with ohai_ and
facter facts with facter_ . While the setup module doesn't appear to be too useful on
the command line, once you start writing playbooks, it will come into its own.
If all the modules in Ansible do as little as the setup and the ping module, we
will not be able to change anything on the remote machine. Almost all of the
other modules that Ansible provides, such as the file module, allow us to actually
configure the remote machine.
The file module can be called with a single path argument; this will cause it to return
information about the file in question. If you give it more arguments, it will try and
alter the file's attributes and tell you if it has changed anything. Ansible modules
will almost always tell you if they have changed anything, which becomes more
important when you are writing playbooks.
You can call the file module, as shown in the following command, to see details
about /etc/fstab :
$ ansible machinename -u root -k -m file -a 'path=/etc/fstab'
The preceding command should elicit a response like the following code:
machinename | success >> {
"changed": false,
"group": "root",
"mode": "0644",
"owner": "root",
"path": "/etc/fstab",
"size": 779,
"state":
"file"
}
Or like the following command to create a new test directory in /tmp :
$ ansible machinename -u root -k -m file -a 'path=/tmp/test
state=directory mode=0700 owner=root'
The preceding command should return something like the following code:
machinename | success >> {
"changed": true,
"group": "root",
"mode": "0700",
"owner": "root",
"path": "/tmp/test",
"size": 4096,
"state": "directory"
}
The second command will have the changed variable set to true , if the directory
doesn't exist or has different attributes. When run a second time, the value of
changed should be false indicating that no changes were required.
There are several modules that accept similar arguments to the file module, and one
such example is the copy module. The copy module takes a file on the controller
machine, copies it to the managed machine, and sets the attributes as required. For
example, to copy the /etc/fstab file to /tmp on the managed machine, you will use
the following command:
$ ansible machinename -m copy -a 'path=/tmp/fstab mode=0700 owner=root'
The preceding command, when run the first time, should return something like the
following code:
machinename | success >> {
"changed": true,
"dest": "/tmp/fstab",
"group": "root",
"md5sum": "fe9304aa7b683f58609ec7d3ee9eea2f",
"mode": "0700",
"owner": "root",
"size": 637,
"src": "/root/.ansible/tmp/ansible-1374060150.96-
77605185106940/source",
"state": "file"
}
这些数据是python从主机系统收集而来,如果你有facter或者 ohai安装在远程受管主机上,setup模块也会运行他们并返回结果。然而,在命令行中使用setup模块的意义并不大,在使用playbooks后,它会自动执行setup模块。如果其他的模块也像ping和setup一样,那我们也无法利用Ansible做任何有意义的事情了。事实上,Ansible的其他模块,比如file模块,它可以让我们实际的改变远程受管主机的配置。
当file模块使用一个参数(路径参数)的时候,他将返回文件的相关信息。当提供更多属性,他会尝试改变文件属性,并返回是否成功的提示。几乎所有的Ansible的模块都会返回这种提示,这种返回在接下来的palsybooks中非常重要!
使用以下命令调用file模块。
$ ansible machinename -u root -k -m file -a 'path=/etc/fstab'
返回的数据类似:
machinename | success >> {
"changed": false,
"group": "root",
"mode": "0644",
"owner": "root",
"path": "/etc/fstab",
"size": 779,
"state":
"file"
}
使用file模块在远程受管主机的/tmp下新建目录:
$ ansible machinename -u root -k -m file -a 'path=/tmp/test
state=directory mode=0700 owner=root'
返回:
machinename | success >> {
"changed": true,
"group": "root",
"mode": "0700",
"owner": "root",
"path": "/tmp/test",
"size": 4096,
"state": "directory"
}
当第一次运行这个命令的时候,改变变量被设置为Ture,所以当远程受管主机不存在该目录或者拥有不同属性的时候,命令会生效,并且改变远程受管主机的配置,当再一次运行该命令的时候,改变变量被设置为Faulse,这表示改变不会生效。
machinename | success >> {
"changed": false,
"group": "root",
"mode": "0700",
"owner": "root",
"path": "/tmp/test",
"size": 4096,
"state": "directory"
}
有很多模块跟file模块有类似的参数,比如copy模块,copy模块从控制机器复制文件到远程受管主机的相应目录,并设置权限、属性。
从本地控制主机复制/etc/fstab文件到远程受管主机的/tmp目录下,命令如下:
$ ansible machinename -m copy -a 'path=/tmp/fstab mode=0700 owner=root'
第一次运行的时候返回如下:
machinename | success >> {
"changed": true,
"dest": "/tmp/fstab",
"group": "root",
"md5sum": "fe9304aa7b683f58609ec7d3ee9eea2f",
"mode": "0700",
"owner": "root",
"size": 637,
"src": "/root/.ansible/tmp/ansible-1374060150.96-
77605185106940/source",
"state": "file"
}
原文这里应该是出错了!!!!!!
正确的命令应该是:
ansible hz17 -u root -k -m copy -a "src=/etc/fstab dest=/tmp/test/fstab mode=0700 owner=root"
当目标主机的selinux没有关闭或者libselinux-python没有被安装的时候,还会出现以下提示:
"msg": "Aborting, target uses selinux but python bindings (libselinux-python) aren't installed!"
成功的返回如下:
192.168.7.17 | success >> {
"changed": true,
"dest": "/tmp/test/fstab",
"gid": 0,
"group": "root",
"md5sum": "aa75779b5e6ce91430e64e0a64ce15af",
"mode": "0700",
"owner": "root",
"secontext": "unconfined_u:object_r:admin_home_t:s0",
"size": 616,
"src": "/root/.ansible/tmp/ansible-tmp-1405058012.34-257276861833915/source",
"state": "file",
"uid": 0
}
There is also a module called command that will run any arbitrary command on the
managed machine. This lets you configure it with any arbitrary command, such as a
preprovided installer or a self-written script; it is also useful for rebooting machines.
Please note that this module does not run the command within the shell, so you cannot
perform redirection, use pipes, and expand shell variables or background commands.
Ansible modules strive to prevent changes being made when they are not required.
This is referred to as idempotency and can make running commands against
multiple servers much faster. Unfortunately, Ansible cannot know if your command
has changed anything or not, so to help it be more idempotent you have to give it
some help. It can do this either via the creates or the removes argument. If you give
a creates argument, the command will not be run if the filename argument exists.
The opposite is true of the removes argument; if the filename exists, the command
will be run.
You run the command as follows:
$ ansible machinename -m command -a 'rm -rf /tmp/testing
removes=/tmp/testing'
If there is no file or directory named /tmp/testing , the command output will
indicate that it was skipped, as follows:
machinename | skipped
Otherwise, if the file did exist, it will look as follows:
ansibletest | success | rc=0 >>
Often it is better to use another module in place of the command module. Other
modules offer more options and can better capture the problem domain they work
in. For example, it would be much less work for Ansible and also the person writing
the configurations to use the file module in this instance, since the file module will
recursively delete something if the state is set to absent. So, this command would be
equivalent to the following command:
$ ansible machinename -m file -a 'path=/tmp/testing state=absent'
If you need to use features usually available in a shell while running your command,
you will need the shell module. This way you can use redirection, pipes, or job
backgrounding. You can pick which shell to use with the executable argument.
However, when you write the code, it also supports the creates argument but does
not support the removes argument. You can use the shell module as follows:
$ ansible machinename -m shell -a '/opt/fancyapp/bin/installer.sh >
/var/log/fancyappinstall.log creates=/var/log/fancyappinstall.log'
还有一个叫command的模块允许你在远程受管主机上运行任意命令,像一些安装命令、自己编写的脚本命令、甚至重启机器!但是,像一些不在shell里面运行的,比如执行了重定向、管道符、扩展的shell命令、以及后台命令无法执行!!
Ansible努力去避免不要被那些未定义的请求所改变,通过这个特性可以让命令在多个服务器上执行的时候变得更快一些。不幸的是,Ansible无法知道你的命令所指向的内容是否改变了什么东西,为了让Ansible知道这一点,我们需要提供删除和创建这2个参数给它,当使用创建时,如果文件已经存在,那么命令将不会被执行,如果执行删除时,文件存在,那么命令将被执行。
就像下面的命令:
$ ansible machinename -m command -a 'rm -rf /tmp/testing removes=/tmp/testing'
如果文件不存在:
返回skipped
machinename | skipped
否则:
ansibletest | success | rc=0 >>
下面是我的列子:
WaitFish ~ # ansible hz17 -u root -k -m command -a "rm -fr /tmp/test/fstab removes=/tmp/test/fstab"
SSH password:
192.168.7.17 | success | rc=0 >>
当第二次执行的时候,提示跳过
WaitFish ~ # ansible hz17 -u root -m command -a "rm -fr /tmp/test/fstab removes=/tmp/test/fstab"
192.168.7.17 | skipped
我们通常会使用其他模块来替代command模块,因为其他模块提供了更多的选项,并且容易捕捉到出现的问题。比如,如果我们用file模块来执行上述任务的话,Ansible的工作就会更少,当我们把file模块的stat属性设置为absent的时候,效果就与上述command命令相等。
$ ansible machinename -m file -a 'path=/tmp/testing state=absent'
如果你希望你的命令所有命令特性都可以用的话,你可以使用shell模块,它允许那些重定向、管道符、后台等命令也可以运行。他同样支持create参数,但是不支持removes。
例子如下:
$ ansible machinename -m shell -a '/opt/fancyapp/bin/installer.sh > /var/log/fancyappinstall.log creates=/var/log/fancyappinstall.log'
Module help
Unfortunately, we don't have enough space to cover every module that is available
in Ansible; luckily though, Ansible includes a command called ansible-doc that
can retrieve help information. All the modules included with Ansible have this
data populated; however, with modules gathered from elsewhere you may find
less help. The ansible-doc command also allows you to see a list of all modules
available to you.
To get a list of all the modules that are available to you along with a short description
of each type, use the following command:
$ ansible-doc -l
To see the help file for a particular module, you supply it as the single argument to
ansible-doc . To see the help information for the file module, for example, use the
following command:
$ ansible-doc file
Summary
In this chapter, we have covered which installation type to choose, installing Ansible,
and how to build an inventory file to reflect your environment. After this, we saw
how to use Ansible modules in an ad hoc style for simple tasks. Finally, we discussed
how to learn which modules are available on your system and how to use the
command line to get instructions for using a module.
In the next chapter, we will learn how to use many modules together in a playbook.
This allows you to perform more complex tasks than you could do with single
modules alone.
模块帮助
由于空间有限,我们无法介绍Ansible的所有模块,但是在Ansible中有个命令叫做Ansible-doc,他提供了内置模块的帮助信息,我们还可以使用-l来列出我们可以使用的模块。
$ ansible-doc -l
比如我们要查看file的帮助文档,就可以输入
$ ansible-doc file
本章小结
在本章中,我们介绍了如果选择安装方式、如何安装、如何创建设备清单文件。之后,我们要学习在ad hoc模式下使用模块来完成简单的任务。最后,我们会讨论哪些模块在你的系统中可用,以及如何在命令行中得到相应的指令来使用我们的模块。
第二章,我们将学习在一个playbook中使用更多的模块,相比使用单一的模块,这可以让我们完成更多更复杂的任务!


 126
126


 被折叠的 条评论
为什么被折叠?
被折叠的 条评论
为什么被折叠?
 到【灌水乐园】发言


