


关于FFmpeg解码请看第一篇教程:FFmpeg解码
下载转码库libyuv
一般我们用surfaceview播放视频都是才用RGBA格式等播放的,但我们解码之后的视频可能是h.264等等 所以我们这里不管解码的是什么格式直接转化为RGBA即可.
所以我们这里用ffmeg解码再用libyuv转码(谷歌推出的一个转码库)
转码库:libyuv是谷歌推出一个转码库
libyuv官网地址(请科学上网)
我用的版本是我现在看到最新的:星期六01 17:57:45 2017
我用的版本地址
注意:官网有个git XXXX 的地址 不使用git来下载的
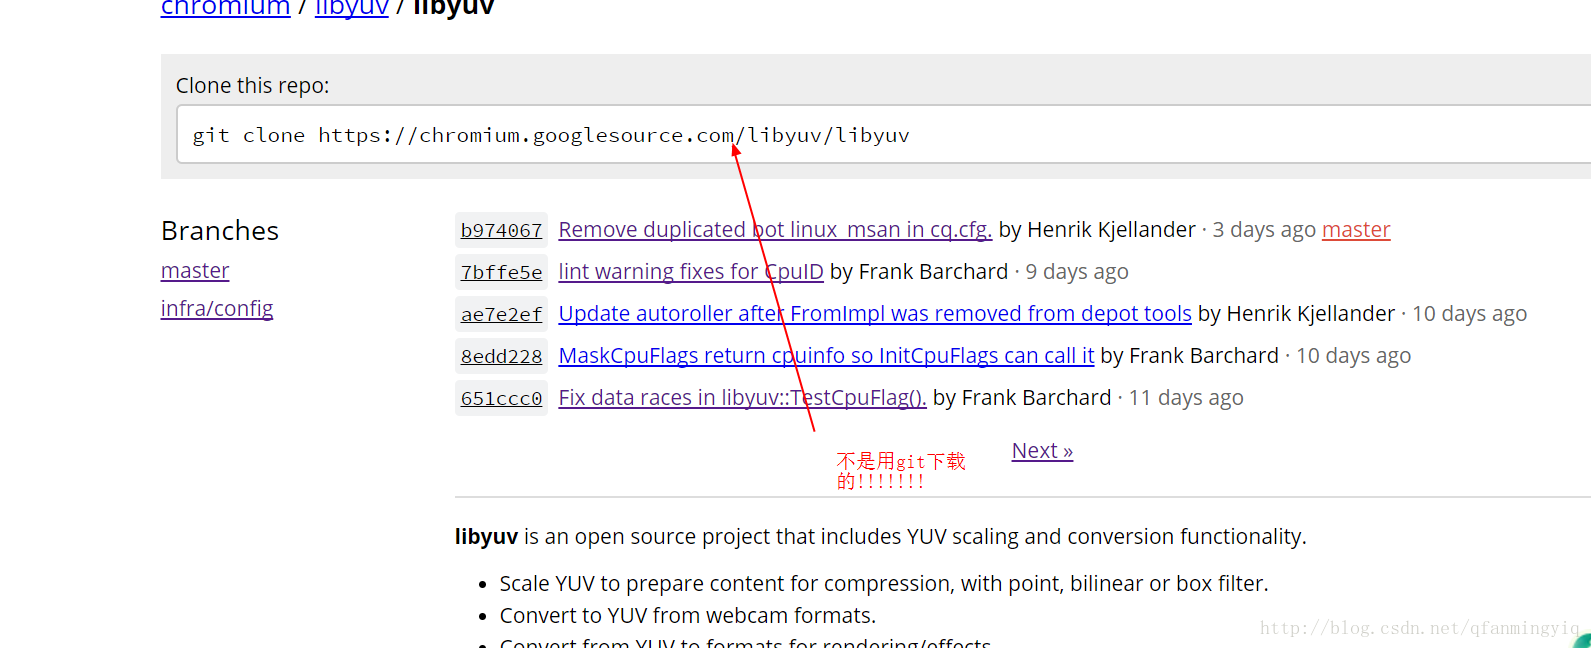
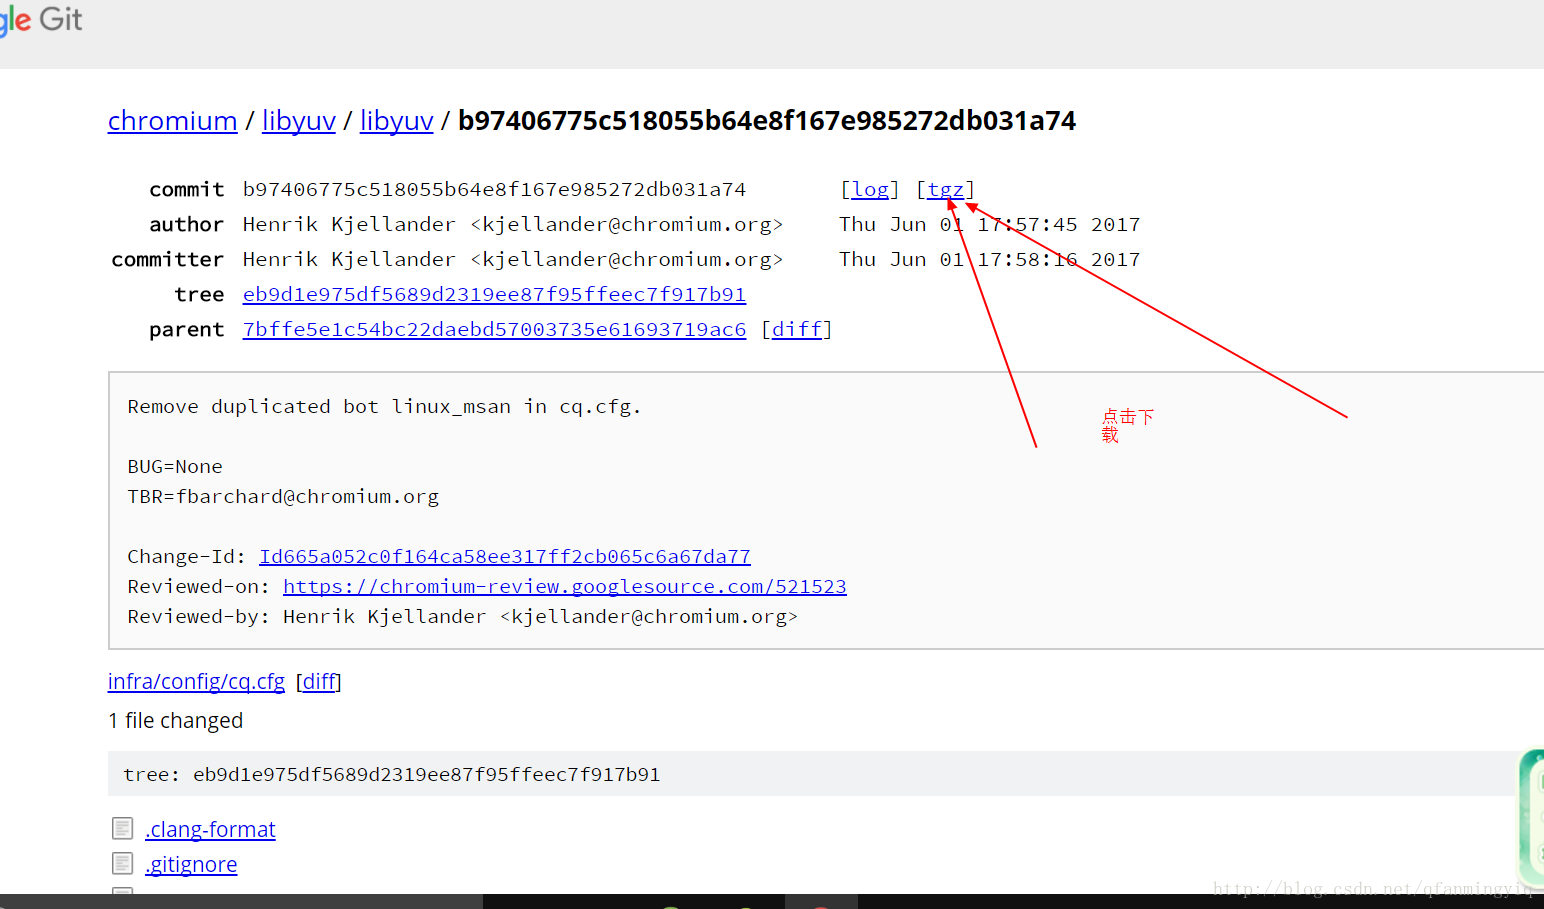
下载方式:
点击你想要的版本后 会跳转到二级页面 ,在二级界面点击tgz即可下载压缩包.
编译libyuv
我下载后打开解压查看目录:
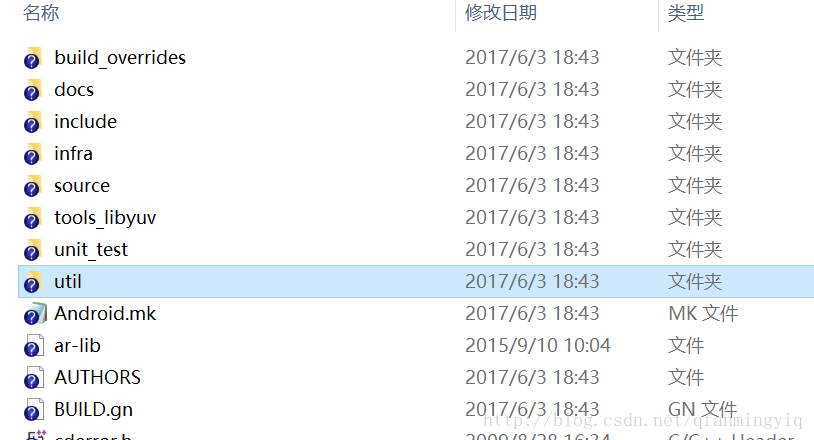
其实里面很多文件都是多余的.
我们现在来精简下.
1 创建一个文件夹名字为jni(一定要这个 后面解释)
2 将解压目录的Android.mk 和include文件夹和source文件夹放入
如图:
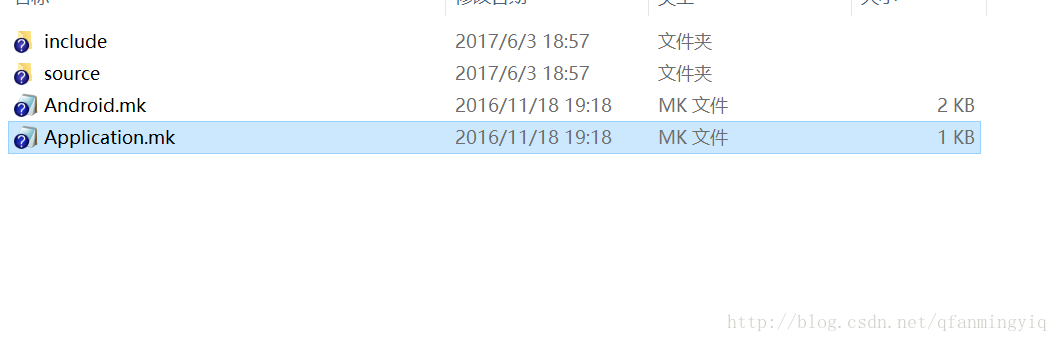
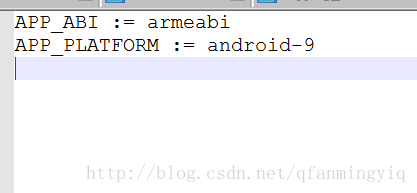
注:上面的Application.mk是我自己创建的.是用来控制编译生成不同架构的共享库,当然这个文件也可以不要默认生成arm架构
下面是这个文件内容
3 修改Android.mk内容
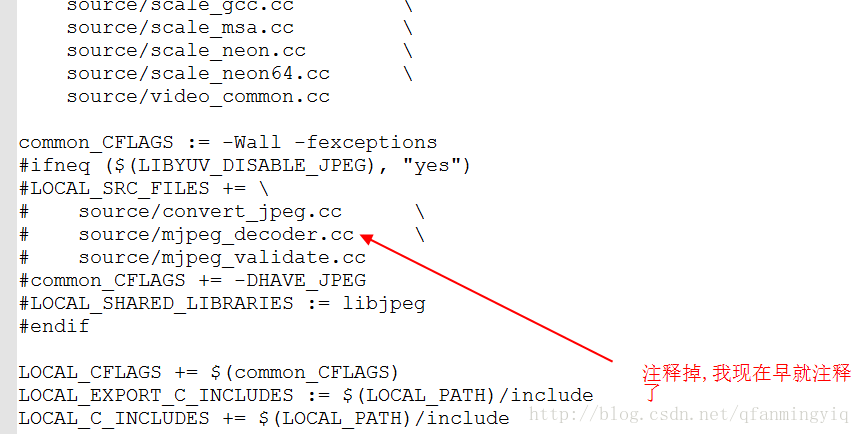
解释下为什么要修改:上面是配置libjpeg库的一些内容,这里暂时不需要,如果你需要的话,需要上面下载libjpeg库放入和修改
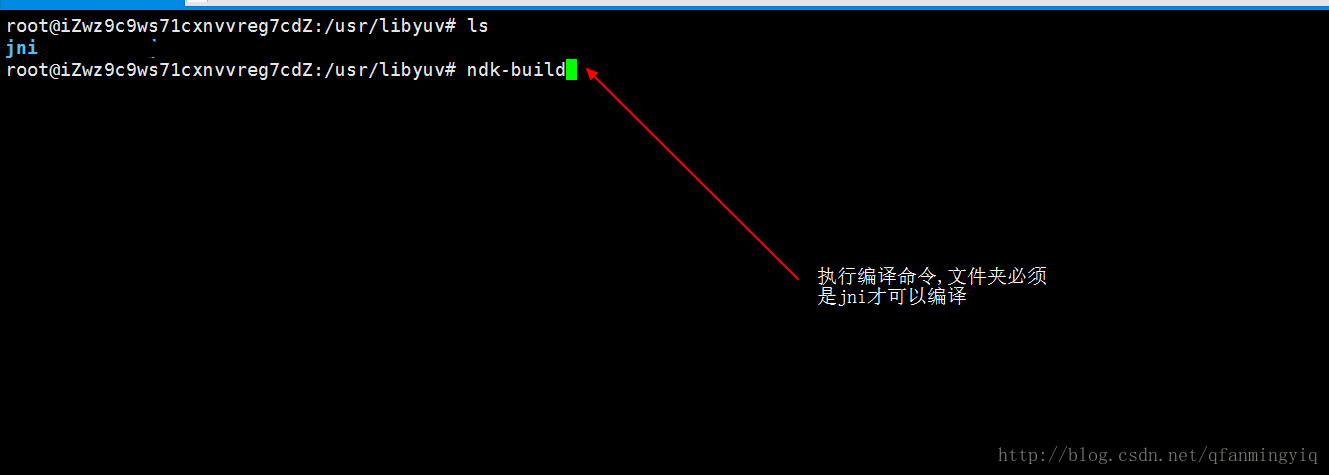
4 把jni放入linux系统下使用ndk-build进行编译
关于ndk-build编译:大家在网上自行下载bdk文件到linux下然后解压配置环境变量.
NDK下载地址
5 在linux系统下的jni目录使用ndk-build编译(刚刚第四部上传的)
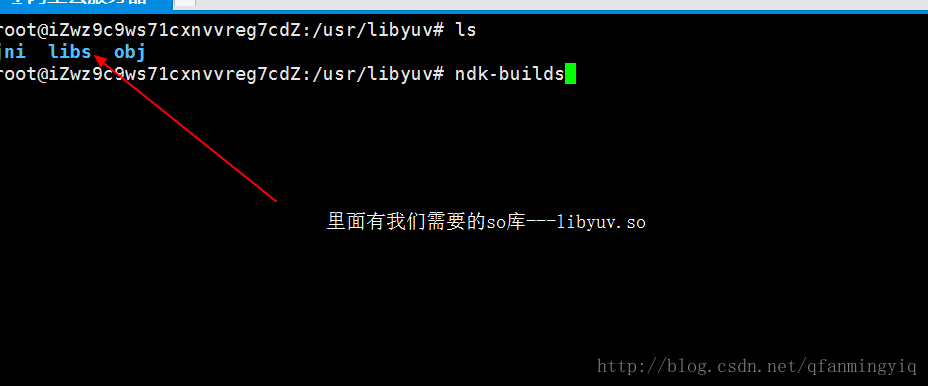
编译完成之后会在jni 目录下生成libs和obj文件夹,我们拷贝libs下的so文件到本地即可
eclipse
关于FFmpeg解码请看第一篇教程:FFmpeg解码
接续用上一篇文章的代码修改使用.
把刚才编译生成的so文件放入jni下
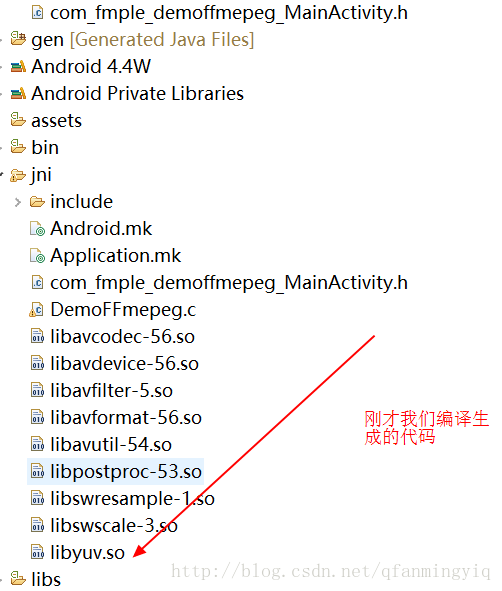
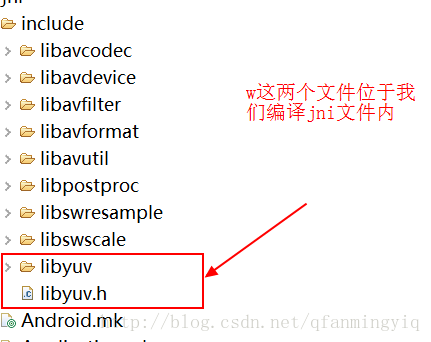
把linyuv的include(我们前面编译jni文件里面)头文件放入 jni/include下
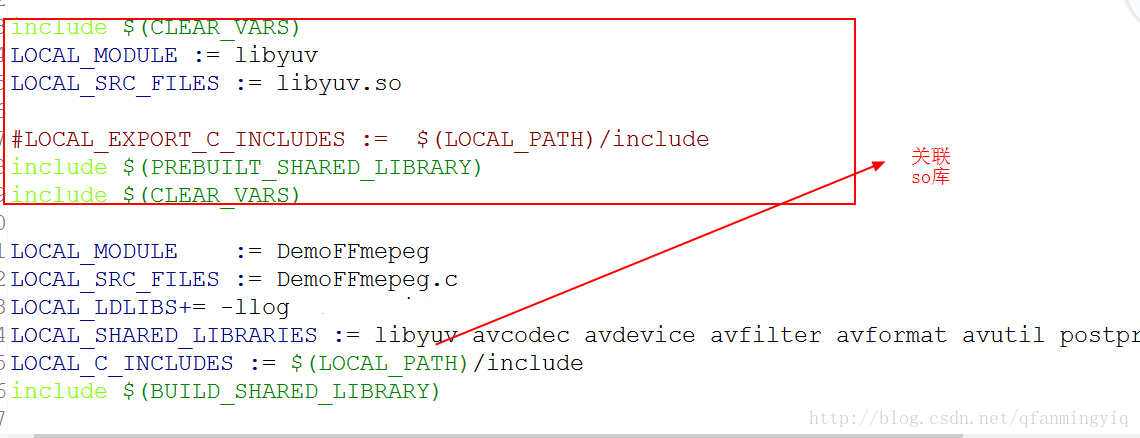
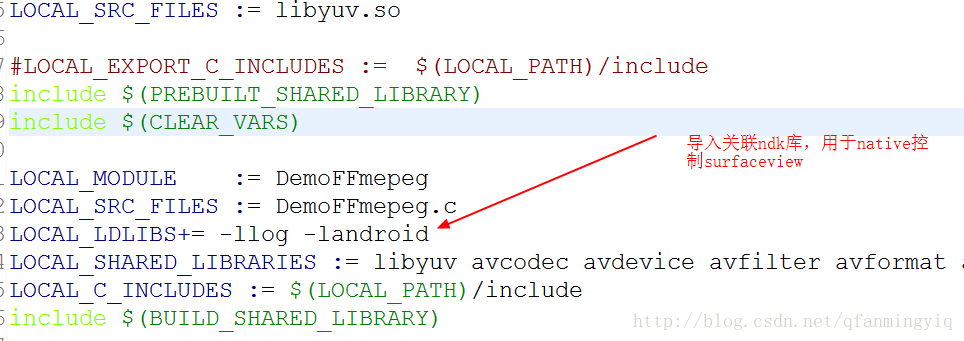
最后修改Android.mk文件关联下so库
这篇标题说了用surfaceview进行播放,那么surfaceview肯定要传入jni代码内控制。而在c代码控制(专业点就是native控制)需要带入ndk自带的库
配置完成,接下来看下其代码(需要看过上篇文章)
1 创建一个继承SurfaceView的控件VideoView.之所以继承是方便初始化的.这个控件用于解码把视频显示在界面上
//VideoView.java文件
package com.fmple.demoffmepeg;

import android.content.Context;
import android.graphics.PixelFormat;
import android.util.AttributeSet;
import android.view.SurfaceHolder;
import android.view.SurfaceView;

public class VideoView extends SurfaceView{

    public VideoView(Context context, AttributeSet attrs, int defStyle) {
        super(context, attrs, defStyle);
        init();
    }


    public VideoView(Context context, AttributeSet attrs) {
        super(context, attrs,0);

    }


    public VideoView(Context context) {
        super(context,null);

    }


    //初始化进行输出设置格式
    public void init(){
        SurfaceHolder holder = getHolder();
        holder.setFormat(PixelFormat.RGB_888);
    }
}
接着我们看布局文件:
<!--activity_main.xml-->

<RelativeLayout xmlns:android="http://schemas.android.com/apk/res/android"
    xmlns:tools="http://schemas.android.com/tools"
    android:layout_width="match_parent"
    android:layout_height="match_parent"
    android:paddingBottom="@dimen/activity_vertical_margin"
    android:paddingLeft="@dimen/activity_horizontal_margin"
    android:paddingRight="@dimen/activity_horizontal_margin"
    android:paddingTop="@dimen/activity_vertical_margin"
    tools:context="com.fmple.demoffmepeg.MainActivity" >

    <com.fmple.demoffmepeg.VideoView
        android:id="@+id/vv"
        android:layout_width="match_parent"
        android:layout_height="match_parent"
         />

</RelativeLayout>
最后看看java层代码
//MainActivity.java
package com.fmple.demoffmepeg;

import java.io.File;

import android.app.Activity;
import android.os.Bundle;
import android.os.Environment;
import android.util.Log;
import android.view.Menu;
import android.view.MenuItem;
import android.view.Surface;
import android.view.SurfaceView;


public class MainActivity extends Activity {

    private VideoView videoView;

    static{
        System.loadLibrary("DemoFFmepeg");
    }
    @Override
    protected void onCreate(Bundle savedInstanceState) {
        super.onCreate(savedInstanceState);
        setContentView(R.layout.activity_main);
        videoView = (VideoView) findViewById(R.id.vv);

        final File inputFile = new File(Environment.getExternalStorageDirectory(),"a.mov");
         //由于是耗时操作 所以开了个线程
        new Thread(){
            public void run() {
                 ffmpeg(inputFile.getAbsolutePath(),videoView.getHolder().getSurface() );
            };
        }.start();


    }

   /**
    *
    * @param input 视频文件的输入路径
    * @param out 把视频文件解码成yuv格式输出路径
    */
   public native void ffmpeg(String input,Surface surface);


}
在看c代码之前先补充知识
Native控制surfaceview方法步骤:
1 ANativeWindow_fromSurface函数关联java层的suraceview:
API介绍:
/**
*返回 ANativeWindow 相关联的java层的surfaceview对象,以它作为媒介和c交互
* 使用后一定要调用ANativeWindow_release(),不然会内存泄露
*/
2 ANativeWindow_Buffer 是一个结构体,surfaceview读取它的内容然后绘制到界面上
typedef struct ANativeWindow_Buffer {
    // The number of pixels that are show horizontally.
    int32_t width;

    // The number of pixels that are shown vertically.
    int32_t height;

    // The number of *pixels* that a line in the buffer takes in
    // memory.  This may be >= width.
    int32_t stride;

    // The format of the buffer.  One of WINDOW_FORMAT_*
    int32_t format;

    // The actual bits.
    void* bits;

    // Do not touch.
    uint32_t reserved[6];
} ANativeWindow_Buffer;
3 ANativeWindow_lock
锁定窗口(window)的下一个画面就行写入
int32_t ANativeWindow_lock(ANativeWindow* window, ANativeWindow_Buffer* outBuffer,
        ARect* inOutDirtyBounds);
第一个参数:和java层suraceview相关联的ANativeWindow对象,就是我们介绍的第一个函数所返回值
第二个参数: 缓存对象.我们介绍的第二个对象
第三个参数:输出的矩形位置.如果不指定那么全部绘制
4 ANativeWindow_setBuffersGeometry
int32_t ANativeWindow_setBuffersGeometry(ANativeWindow* window, int32_t width, int32_t height, int32_t format);
API介绍:
 改变窗口缓存区的格式和大小
 宽度和高度控制缓存区的像素数量,而不是窗口屏幕的宽高
 如果尺寸和窗口的物理尺寸不同,则缓存区将进行缩放后合成到屏幕
 对于所有参数,如果返回0则窗口的所有基本数值将会强制回滚
设置缓冲区的一些格式
第一个参数:和java层相关联的ANativeWindow
第二个参数: 宽 像素宽(不是播放的宽和高)
第三个参数:高 像素高
第四个参数:缓存区格式 一般和我们的surfaceview初始化的格式一致
5 ANativeWindow_unlockAndPost
解锁先前锁定的窗口 ,将新的缓存区内容显示在界面上
6 ANativeWindow_release
释放和java层关联的对象
那么大致的流程图:
最后看先代码吧
#include <jni.h>

#include<stdio.h>
#include<android/log.h>
//编码
#include "libavcodec/avcodec.h"
//封装格式处理
#include "libavformat/avformat.h"
//像素处理
#include "libswscale/swscale.h"
#include <android/native_window_jni.h>
#include <android/native_window.h>
#include<unistd.h>
#include "libyuv.h"
#define LOGI(FORMAT,...) __android_log_print(ANDROID_LOG_INFO," FMY",FORMAT,##__VA_ARGS__);
#define LOGE(FORMAT,...) __android_log_print(ANDROID_LOG_ERROR,"FMY",FORMAT,##__VA_ARGS__);
char * output_cstr;

JNIEXPORT void JNICALL Java_com_fmple_demoffmepeg_MainActivity_ffmpeg
(JNIEnv * env, jobject jobj, jstring input, jobject surface){


    char * input_char = (*env)->GetStringUTFChars(env,input,NULL);


    //头文件libavformat/avformat.h
    //注册所有组件
    /**
     * 初始化libavformat和注册所有的 muxers, demuxers 和协议,如果你不想使用次函数,
     * 则可以手动选择你想要的支持格式
     * 详情你可以选择下面的函数查询
     * @see av_register_input_format()
     * @see av_register_output_format()
     *
     * muxer是合并将视频文件、音频文件和字幕文件合并为某一个视频格式。如,可将a.avi, a.mp3, a.srt用muxer合并为mkv格式的视频文件。
     * demuxer是拆分这些文件的。
     */
    av_register_all();

    // 封装格式上下文结构体,也是统领全局的结构体,保存了视频文件封装格式相关信息。
    AVFormatContext * pFormatCtx = avformat_alloc_context();

    /**
     * 打开输入流并且读取头信息。但解码器没有打开
     * 这个输入流必须使用avformat_close_input()关闭
     * @param ps(第一个参数的形参名称) 指向 你由你提供AVFormatContext(AVFormatContext是由avformat_alloc_context函数分配的)。
     * 有可能ps指向空,在这种情况下,AVFormatContext由此函数分配并写入ps。
     * 注意: 你提供的AVFormatContext在函数执行失败的时候将会被释放
     * @param url 你要打开视频文件路径.
     * @param fmt  如果不为空,那么这个参数将强制作为输入格式,否则自动检索
     * @param options 一个关于AVFormatContext and demuxer-private 选项的字典.
     * 返回时,此参数将被销毁,并替换为包含未找到的选项的dict。有可能是空的
     *
     * @return 返回0表示成功, 一个负数常量AVERROR是失败的.
     *
     * @note 如果你想自定义IO,你需要预分配格式内容并且设置pd属性
     */
    if(avformat_open_input(&pFormatCtx,input_char,NULL,NULL)!=0){
        LOGE("NDK>>>%s","avformat_open_input打开失败");
        return;
    }

    //上面打开输入流后会将视频封装格式信息写入AVFormatContext中那么我们下一步就可以得到一些展示信息
    /**
     *
     * 读取媒体文件中的数据包以获取流信息,这个对于对于文件格式没有头信息的很有帮助,比如说mpeg
     * 这个函数还可以计算在MPEG-2重复帧模式的真实帧速率。
     * 逻辑文件位置不会被这个函数改变
     * 检索过的数据包或许会缓存以供后续处理
     * @param ic  第一个参数 封装格式上下文
     * @param options
     *              如果不为空, 一个长度为 ic.nb_streams (封装格式所有流,字幕 视频 音频等) 的字典。
     *              字典中第i个成员  包含一个对应ic第i个流中对的编码器。
     *              在返回时,每个字典将会填充没有找到的选项
     * @return 如果返回>=0 代表成功, AVERROR_xxx 表示失败
     *
     * @note 这个函数 不保证能打开所有编码器,所以返回一个非空的选项是一个完全正常的行为
     *
     *
     * @todo
     *  下个版本目标无视即可
     * Let the user decide somehow what information is needed so that
     *       we do not waste time getting stuff the user does not need.
     */
    if( avformat_find_stream_info(pFormatCtx,NULL)<0){
        LOGE("NDK>>>%s","avformat_find_stream_info失败");
        return ;
    }
    LOGE("NDK>>>%s","成功");
    //  //输出视频信息
    //  LOGI("视频的文件格式:%s",pFormatCtx->iformat->name);
    //  LOGI("视频时长:%d", (pFormatCtx->duration)/1000000);

    //获取视频流的索引位置
    //遍历所有类型的流(音频流、视频流、字幕流),找到视频流
    int v_stream_idx = -1;
    int i = 0;
    //遍历封装格式中所有流
    for (; i < pFormatCtx->nb_streams; ++i) {

        //获取视频流pFormatCtx->streams[i]
        //pFormatCtx->streams[i]->codec获取编码器
        //codec_type获取编码器类型
        //当前流等于视频 记录下标
        if (pFormatCtx->streams[i]->codec->codec_type ==AVMEDIA_TYPE_VIDEO) {
            v_stream_idx = i;
            break;
        }
    }
    if (v_stream_idx==-1) {
        LOGE("没有找视频流")
    }else{
        LOGE("找到视频流")
    }

    //编码器上下文结构体,保存了视频(音频)编解码相关信息
    //得到视频流编码器
    AVCodecContext *pCodecCtx = pFormatCtx->streams[v_stream_idx]->codec;

    //   每种视频(音频)编解码器(例如H.264解码器)对应一个该结构体。
    AVCodec *pCodec =avcodec_find_decoder(pCodecCtx->codec_id);

    //(迅雷看看,找不到解码器,临时下载一个解码器)
    if (pCodec == NULL)
    {
        LOGE("%s","找不到解码器\n");
        return;
    }else{
        LOGE("%s","找到解码器\n");
    }


    //打开解码器
    /**
     * 初始化 指定AVCodecContext去使用 给定的AVCodec
     * 在使用之前函数必须使用avcodec_alloc_context3()分配上下文。
     *
     * 以下函数 avcodec_find_decoder_by_name(), avcodec_find_encoder_by_name(),
     * avcodec_find_decoder() and avcodec_find_encoder() 提供了一个简便的得到一个解码器的方法
     *
     * @warning 这个函数线程不是安全的
     *
     * @note 在使用解码程序之前,始终调用此函数 (如 @ref avcodec_decode_video2()).
     * 下面是示例代码
     * @code
     * avcodec_register_all();
     * av_dict_set(&opts, "b", "2.5M", 0);
     * codec = avcodec_find_decoder(AV_CODEC_ID_H264);
     * if (!codec)
     *     exit(1);
     *
     * context = avcodec_alloc_context3(codec);
     *
     * if (avcodec_open2(context, codec, opts) < 0)
     *     exit(1);
     * @endcode
     *
     *
     * @param avctx 要初始化的编码器
     * @param codec 用这个codec去打开给定的上下文编码器.如果 codec 不为空 那么必须
     * 事先用avcodec_alloc_context3和avcodec_get_context_defaults3传递给这个context,那么这个codec
     * 要么为NULL要么就是上面调用函数所使用的codec
     *
     * @param
     *
     * 选项填充AVCodecContext和编解码器私有选项的字典。返回时,此对象将填充未找到的选项。
     *
     * @return 返回0表示成功, 负数失败
     * @see avcodec_alloc_context3(), avcodec_find_decoder(), avcodec_find_encoder(),
     *      av_dict_set(), av_opt_find().
     */
    if(avcodec_open2(pCodecCtx,pCodec,NULL)==0){
        LOGE("%s","打开编码器成功\n");
    }else{
        LOGE("%s","打开编码器失败\n");
        return;
    }
    //输出视频信息
    LOGE("视频的文件格式:%s",pFormatCtx->iformat->name);
    //得到视频播放时长
    if(pFormatCtx->duration != AV_NOPTS_VALUE){
        int hours, mins, secs, us;
        int64_t duration = pFormatCtx->duration + 5000;
        secs = duration / AV_TIME_BASE;
        us = duration % AV_TIME_BASE;
        mins = secs / 60;
        secs %= 60;
        hours = mins/ 60;
        mins %= 60;
        LOGE("%02d:%02d:%02d.%02d\n", hours, mins, secs, (100 * us) / AV_TIME_BASE);

    }
    LOGE("视频的宽高:%d,%d",pCodecCtx->width,pCodecCtx->height);
    LOGE("解码器的名称:%s",pCodec->name);

    //
    //  //存储一帧压缩编码数据。
    AVPacket *packet =av_malloc(sizeof(AVPacket));
    //
    //  //输出转码文件地址
    //  FILE *fp_yuv = fopen(output_cstr,"wb+");
    //
    //  //AVFrame用于存储解码后的像素数据(YUV)
    //  //内存分配
    AVFrame *pFrame = av_frame_alloc();
    //
    //  //YUV420转码用
    //  AVFrame *pFrameYUV = av_frame_alloc();

    //  //avpicture_get_size()函数介绍:
    //  //
    //  /**
    //   * 如果给定存储图片的格式,那么计算给定的宽高所占用的大小
    //   *
    //   * @param pix_fmt   图片像素格式
    //   * @param width     图片宽
    //   * @param height     图片高
    //   * @return 返回计算的图片缓存大小或者错误情况下的负数错误代码
    //   *
    //   *
    //   * 这里计算缓存区的大小,但是没有分配,这里是用来后面转码使用
    //   */
    //  uint8_t *out_buffer = av_malloc(avpicture_get_size(AV_PIX_FMT_YUV420P,pCodecCtx->width,pCodecCtx->height));
    //
    //  //初始化缓冲区
    //  /**
    //   * 基于指定的图片参数和提供的图片缓存区去设置图片字段
    //   *
    //   * 使用ptr所指向的图片数据缓存  填充图片属性
    //   *
    //   * 如果 ptr是空,这个函数仅填充图片行大小(linesize)的数组并且返回图片缓存请求的大小
    //   *
    //   * 要分配图片缓存并且再一次填充图片数据请使用 avpicture_alloc().
    //   * @param picture       要填充的图片
    //   * @param ptr           存储图片的数据的缓存区, or NULL
    //   * @param pix_fmt       图片像素格式
    //   * @param width         图片宽
    //   * @param height        图片高
    //   * @return 返回请求的字节大小,在错误的情况下返回负数
    //   *
    //   * @see av_image_fill_arrays()
    //   */
    //  avpicture_fill((AVPicture *)pFrameYUV, out_buffer, AV_PIX_FMT_YUV420P, pCodecCtx->width, pCodecCtx->height);
    //  //用于转码(缩放)的参数,转之前的宽高,转之后的宽高,格式等
    //  /**
    //   *分配和返回 SwsContext. You need it to perform
    //   * scaling/conversion operations using sws_scale().
    //   *
    //   * @param srcW 原始图宽
    //   * @param srcH 原始图高
    //   * @param srcFormat 原始图格式
    //   * @param dstW 目标图宽
    //   * @param dstH 不解释
    //   * @param dstFormat 不解释
    //   * @param flags 指定一个标志用于重新调整算法和选项
    //   *  具体参考:http://blog.csdn.net/leixiaohua1020/article/details/12029505
    //   * @return 一个指定分配内容的指针, 错误情况返回空
    //   * @note this function is to be removed after a saner alternative is
    //   *       written
    //   */
    //      struct SwsContext *sws_ctx =sws_getContext(pCodecCtx->width, pCodecCtx->height,pCodecCtx->pix_fmt,
    //              pCodecCtx->width, pCodecCtx->height,AV_PIX_FMT_YUV420P,
    //              SWS_BICUBIC, NULL, NULL, NULL);
    //
    //
    //  //标志位
    int got_picture, ret;
    //
    //  //返回和java surface关联的ANativeWindow通过本地本地方法交互
    ANativeWindow * nativeWindow =ANativeWindow_fromSurface(env,surface);
        //缓存
    ANativeWindow_Buffer outBuffer;
        //设置缓存的几何信息
    AVFrame *rgb_frame = av_frame_alloc();

    uint8_t *out_buffer = av_malloc(avpicture_get_size(AV_PIX_FMT_RGBA,pCodecCtx->width,pCodecCtx->height));
    //
    //
    //读取每一帧
    /**
     *返回下一帧的流
     * 此函数返回存储在文件中的内容,并且不会验证解码器有什么有效帧。
     * 函数将存储在文件中的帧进行分割 并且返回给每一个调用者。
     *
     * 函数不会删除在有效帧之间的无效数据 以便在可能解码过程中提供解码器最大的信息帮助
     * 如果 pkt->buf 是空的,那么这个对应数据包是有效的直到下一次调用av_read_frame()
     * 或者直到使用avformat_close_input().否则包无期限有效
     * 在这两种情况下 这个数据包当你不在需要的时候,你必须使用使用av_free_packet释放它
     * 对于视屏,数据包刚好只包含一帧.对于音频,如果它每一帧是一个已知固定大小的,那么他包含整数帧(如. PCM or ADPCM data)
     * 如果音频帧具有可变大小(如. MPEG audio),那么他只包含一帧
     * pkt->pts, pkt->dts and pkt->duration 始终在AVStream.time_base 单位设置正确的数值
     *(如果这个格式无法提供.那么进行猜测)
     * 如果视频格式有B帧那么pkt->pts可以是 AV_NOPTS_VALUE.如果你没有解压他的有效部分那么最好依靠pkt->dts
     *
     * @return 0表示成功, < 0 错误或者文结束
     */

    while(av_read_frame(pFormatCtx,packet)>=0){

        //一个包里有很多种类型如音频视频等 所以判断 这个包对应的流的在封装格式的下表
        //如果这个包是视频频包那么得到压缩的视频包
        if (packet->stream_index==v_stream_idx) {
            LOGE("测试");
            /**
             * 解码视频帧 从avpkt->data读取数据并且解码avpkt->size的大小后转化为图片.
             * 一些解码器可以支持在一个ACpacket中存在多帧的情况,像这样的解码器将只解码第一帧
             *
             * @warning  输入缓存区必须 实际读取的字节流小于 FF_INPUT_BUFFER_PADDING_SIZE,
             * 一些优化过的比特流 读取32位或者64字节 的时候可以一次性读取完
             *
             * @warning 在缓冲器的buf结尾设置0以确保被破坏的MPEG流不会发生超线程
             *
             * @note 有 CODEC_CAP_DELAY 才能设置一个在输入和输出之间的延迟,这些需要使用avpkt->data=NULL,
             *  在结束返回剩余帧数的时候avpkt->size=0
             *
             * @note  这个AVCodecContext 在数据包传入解码器之前必须调用avcodec_open2
             *
             *
             * @param avctx 解码器上下文
             *
             * @param[out] 解码的视频帧图片将会被存储在AVFrame.
             *                 使用av_frame_alloc 得到一个AVFrame,
             *                 编码器将会分配 使用  AVCodecContext.get_buffer2() 回调
             *                 的实际图片的内存.
             *                 当AVCodecContext.refcounted_frames 设置为1,这帧(frame)是引用计数,并且返回
             *                 的引用计数是属于调用者的.
             *             frame在长实际不使用的时候调用者必须调用av_frame_unref()就行释放
             *             如果av_frame_is_writable()返回1那么调用者可以安全的写入到这个frame中。
             *                 当AVCodecContext.refcounted_frames设置为0,返回的引用属于解码器,
             *                只有下次使用这个函数或者关闭或者刷新这个编码器之前有效。调用者不会写入它
             *
             *@param[in,out] got_picture_ptr 如果为0表示不能解压, 否者它不是0.
             *
             * @param[in] avpkt 这个输入的avpkt包含输入缓存区
             *              你能使用av_init_packet()创建像这样的packet然后设置数据和大小,
             *              一些解码器还可以添加一些其他字段 比如  flags&AV_PKT_FLAG_KEY  flags&AV_PKT_FLAG_KEY
             *          所有解码器都设计为尽可能少地使用
             *
             * @return 再错误时返回一个负数 , 否则返回使用字节数或者或者0(没有帧被解压返回0)otherwise the number of bytes
             *
             */
            ret=avcodec_decode_video2(pCodecCtx,pFrame,&got_picture,packet);
            if(ret>=0){
                LOGE("解压成功");
                //AVFrame转为像素格式YUV420,宽高
                //2 6输入、输出数据
                //3 7输入、输出画面一行的数据的大小 AVFrame 转换是一行一行转换的
                //4 输入数据第一列要转码的位置 从0开始
                //5 输入画面的高度
                //              sws_scale(sws_ctx,pFrame->data,pFrame->linesize,0,pCodecCtx->height,pFrameYUV->data,pFrameYUV->linesize);

                //输出到YUV文件
                //AVFrame像素帧写入文件
                //data解码后的图像像素数据(音频采样数据)
                //Y 亮度 UV 色度(压缩了) 人对亮度更加敏感
                //U V 个数是Y的1/4
                //              int y_size = pCodecCtx->width * pCodecCtx->height;
                ANativeWindow_lock(nativeWindow,&outBuffer,NULL);
//
                ANativeWindow_setBuffersGeometry(nativeWindow,pCodecCtx->width,pCodecCtx->height,WINDOW_FORMAT_RGBA_8888);
                avpicture_fill((AVPicture *)rgb_frame,out_buffer, AV_PIX_FMT_RGBA, pCodecCtx->width, pCodecCtx->height);
//
//
                I420ToARGB(pFrame->data[0],pFrame->linesize[0],
                        pFrame->data[2],pFrame->linesize[2],
                        pFrame->data[1],pFrame->linesize[1],
                        rgb_frame->data[0], rgb_frame->linesize[0],
                        pCodecCtx->width,pCodecCtx->height);
                int h = 0;
                for (h = 0; h < pCodecCtx->height; h++) {
                  memcpy(outBuffer.bits + h * outBuffer.stride*4, out_buffer + h * rgb_frame->linesize[0], rgb_frame->linesize[0]);
//              memcpy(outBuffer.bits,out_buffer,pCodecCtx->width*pCodecCtx->height*4);
                }
LOGE("锁定成功");

                ANativeWindow_unlockAndPost(nativeWindow);
//               //获取帧率tbr fbs
                //float fram_rate =pFormatCtx->streams[v_stream_idx]->avg_frame_rate.num/pFormatCtx->streams[v_stream_idx]->avg_frame_rate.den;
//              如果奔溃请开启下面的线程休眠
//              usleep(1000);


            }
        }
        av_free_packet(packet);
    }


    (*env)->ReleaseStringUTFChars(env,input,input_char);


    //关闭文件
    //  fclose(fp_yuv);
    ANativeWindow_release(nativeWindow);
//  //关闭资源
    av_frame_free(&pFrame);
//  //  av_frame_free(&pFrameYUV);
//  av_frame_free(&rgb_frame);
//  //关闭编码器上下文
    avcodec_close(pCodecCtx);
//  //关闭输入流
    avformat_close_input(&pFormatCtx);
//  //关闭封装格式
    avformat_free_context(pFormatCtx);
}
Studio版本
都差不多 只不过才用Cmake方式.这里和上一篇差不多 所以在上一篇基础添加修改方法而已
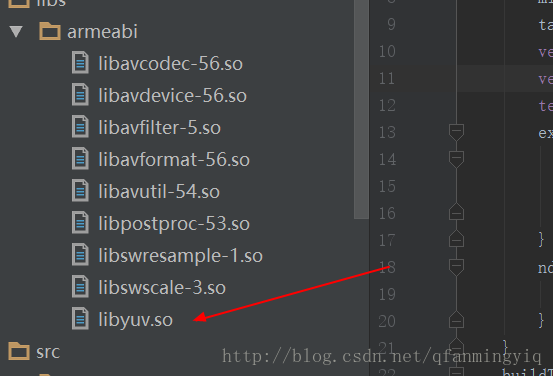
导入所有so库到
关于FFmpeg解码请看第一篇教程:FFmpeg解码
关于有人说找不到so库的,请在build.gradle里面添加如下代码
//对应子项目的build下android标签下,不是工程的build
 sourceSets{
        main{
            jniLibs.srcDirs =['libs']
        }
    }
1 添加yuvso.so到libs中
2 修改cmake文件
# For more information about using CMake with Android Studio, read the
# documentation: https://d.android.com/studio/projects/add-native-code.html

# Sets the minimum version of CMake required to build the native library.

cmake_minimum_required(VERSION 3.4.1)

# Creates and names a library, sets it as either STATIC
# or SHARED, and provides the relative paths to its source code.
# You can define multiple libraries, and CMake builds them for you.
# Gradle automatically packages shared libraries with your APK.

add_library( # Sets the name of the library.
             native-lib

             # Sets the library as a shared library.
             SHARED

             # Provides a relative path to your source file(s).
             src/main/cpp/native-lib.c)

##################################################################################################
##################################################################################################
set(distribution_DIR ${CMAKE_SOURCE_DIR}/libs/)

#libavcodec-56.so
add_library(libavcodec-56-lib SHARED IMPORTED)
set_target_properties(libavcodec-56-lib  PROPERTIES IMPORTED_LOCATION
${distribution_DIR}/${ANDROID_ABI}/libavcodec-56.so)


#libavdevice-56.so
add_library(libavdevice-56-lib SHARED IMPORTED)
set_target_properties(libavdevice-56-lib  PROPERTIES IMPORTED_LOCATION
${distribution_DIR}/${ANDROID_ABI}/libavdevice-56.so)

#libavfilter-5.so
add_library(libavfilter-5-lib SHARED IMPORTED)
set_target_properties(libavfilter-5-lib  PROPERTIES IMPORTED_LOCATION
${distribution_DIR}/${ANDROID_ABI}/libavfilter-5.so)

#libavformat-56.so
add_library(libavformat-56-lib SHARED IMPORTED)
set_target_properties(libavformat-56-lib  PROPERTIES IMPORTED_LOCATION
${distribution_DIR}/${ANDROID_ABI}/libavformat-56.so)

#libavutil-54.so
add_library(libavutil-54-lib SHARED IMPORTED)
set_target_properties(libavutil-54-lib  PROPERTIES IMPORTED_LOCATION
${distribution_DIR}/${ANDROID_ABI}/libavutil-54.so)


#libpostproc-53.so
add_library(libpostproc-53-lib SHARED IMPORTED)
set_target_properties(libpostproc-53-lib  PROPERTIES IMPORTED_LOCATION
${distribution_DIR}/${ANDROID_ABI}/libpostproc-53.so)


#libswresample-1.so
add_library(libswresample-1-lib SHARED IMPORTED)
set_target_properties(libswresample-1-lib  PROPERTIES IMPORTED_LOCATION
${distribution_DIR}/${ANDROID_ABI}/libswresample-1.so)


#libswscale-3.so
add_library(libswscale-3-lib SHARED IMPORTED)
set_target_properties(libswscale-3-lib  PROPERTIES IMPORTED_LOCATION
${distribution_DIR}/${ANDROID_ABI}/libswscale-3.so)

#libyuv.so
add_library(libyuv-lib SHARED IMPORTED)
set_target_properties(libyuv-lib PROPERTIES IMPORTED_LOCATION ${distribution_DIR}/${ANDROID_ABI}/libyuv.so)


##################################################################################################
##################################################################################################


# Searches for a specified prebuilt library and stores the path as a
# variable. Because CMake includes system libraries in the search path by
# default, you only need to specify the name of the public NDK library
# you want to add. CMake verifies that the library exists before
# completing its build.

find_library( # Sets the name of the path variable.
              log-lib

              # Specifies the name of the NDK library that
              # you want CMake to locate.
              log )
              #这个库是用于surface在c代码中交互而添加的
find_library( # Sets the name of the path variable.
              lnative_window_jni-lib

              # Specifies the name of the NDK library that
              # you want CMake to locate.
              android )
# Specifies libraries CMake should link to your target library. You
# can link multiple libraries, such as libraries you define in this
# build script, prebuilt third-party libraries, or system libraries.
include_directories(src/main/cpp/include/)
target_link_libraries( # Specifies the target library.
                       native-lib

                       # Links the target library to the log library
                       # included in the NDK.
                       ${log-lib}
                       ${lnative_window_jni-lib}
                       libavcodec-56-lib
                       libavdevice-56-lib
                       libavfilter-5-lib
                       libavformat-56-lib
                       libavutil-54-lib
                       libpostproc-53-lib
                       libswresample-1-lib
                       libswscale-3-lib
                       libyuv-lib
                        )
最后看看界面
<?xml version="1.0" encoding="utf-8"?>
<android.support.constraint.ConstraintLayout xmlns:android="http://schemas.android.com/apk/res/android"
    xmlns:app="http://schemas.android.com/apk/res-auto"
    xmlns:tools="http://schemas.android.com/tools"
    android:layout_width="match_parent"
    android:layout_height="match_parent"
    tools:context="com.example.demoffmpeg.MainActivity">


    <SurfaceView
        android:layout_width="0dp"
        android:id="@+id/sv"
        android:layout_height="0dp"
        app:layout_constraintBottom_toBottomOf="parent"
        app:layout_constraintLeft_toLeftOf="parent"
        app:layout_constraintRight_toRightOf="parent"
        app:layout_constraintTop_toTopOf="parent" />
    <TextView
        android:id="@+id/sample_text"
        android:layout_width="wrap_content"
        android:layout_height="wrap_content"
        android:onClick="onClick"
        android:textColor="#fff"
        android:text="播放视频!"
        app:layout_constraintBottom_toBottomOf="parent"
        app:layout_constraintLeft_toLeftOf="parent"
        app:layout_constraintRight_toRightOf="parent"
        app:layout_constraintTop_toTopOf="parent" />
</android.support.constraint.ConstraintLayout>
最后看java代码吧
package com.example.demoffmpeg;

import android.os.Bundle;
import android.os.Environment;
import android.support.v7.app.AppCompatActivity;
import android.view.Surface;
import android.view.SurfaceView;
import android.view.View;
import android.widget.TextView;

import java.io.File;

public class MainActivity extends AppCompatActivity {

    // Used to load the 'native-lib' library on application startup.
    static {
        System.loadLibrary("native-lib");
    }

    private SurfaceView sv;

    @Override
    protected void onCreate(Bundle savedInstanceState) {
        super.onCreate(savedInstanceState);
        setContentView(R.layout.activity_main);

        // Example of a call to a native method
        TextView tv = (TextView) findViewById(R.id.sample_text);
        sv = (SurfaceView) findViewById(R.id.sv);
    }

    /**
     * A native method that is implemented by the 'native-lib' native library,
     * which is packaged with this application.
     */
    public native void plays(String videoPath, Surface surface);

    //点击播放视频
    public void onClick(View view) {
        final File inputFile = new File(Environment.getExternalStorageDirectory(),"a.mp4");
        //由于是耗时操作 所以开了个线程
        new Thread(){
            public void run() {
                plays(inputFile.getAbsolutePath(),sv.getHolder().getSurface() );
            };
        }.start();

    }
}
附上build.gradle
apply plugin: 'com.android.application'

android {
    compileSdkVersion 25
    buildToolsVersion "25.0.3"
    defaultConfig {
        applicationId "com.example.demoffmpeg"
        minSdkVersion 21
        targetSdkVersion 25
        versionCode 1
        versionName "1.0"
        testInstrumentationRunner "android.support.test.runner.AndroidJUnitRunner"
        externalNativeBuild {
            cmake {
                cppFlags "-frtti -fexceptions"
            }
        }
        ndk{
            abiFilters 'armeabi'
        }
    }
    buildTypes {
        release {
            minifyEnabled false
            proguardFiles getDefaultProguardFile('proguard-android.txt'), 'proguard-rules.pro'
        }
    }
    externalNativeBuild {
        cmake {
            path "CMakeLists.txt"
        }
    }
    sourceSets{
        main{
            jniLibs.srcDirs =['libs']
        }
    }
}

dependencies {
    compile fileTree(dir: 'libs', include: ['*.jar'])
    androidTestCompile('com.android.support.test.espresso:espresso-core:2.2.2', {
        exclude group: 'com.android.support', module: 'support-annotations'
    })
    compile 'com.android.support:appcompat-v7:25.3.1'
    compile 'com.android.support.constraint:constraint-layout:1.0.2'
    testCompile 'junit:junit:4.12'
}


 4644
4644


 被折叠的 条评论
为什么被折叠?
被折叠的 条评论
为什么被折叠?
 到【灌水乐园】发言


