


安装文章,参考这篇文章:http://bendemott.blogspot.com/2013/11/installing-pylucene-4-451.html
Why are we installing pylucene 4?
This may be your first time using lucene with Python, or you may be upgrading. pylucene 4 adds faceting features, and reworks the module structure to be identical to that of lucene 4 itself. Check out the samples directory after you download the pylucene package for examples of new and existing functionality.Install PyLucene
Download pylucene from
http://lucene.apache.org/pylucene/install.html
Extract the Package:
Install python dev (python.h) headers:
Upgrade/install setuptools to 0.7 or higher:
Change to the jcc directory:
Edit the file named "Makefile" located at the root of the pylucene-4.5.1 directory you just extracted
Issue make and install command:
Extract the Package:
tar -zxvf pylucene-4.5.1-src.tar.gzInstall openjdk:
sudo apt-get install openjdk-7-jdkInstall Apache Ant:
sudo apt-get install antInstall gnu c++ compiler:
sudo apt-get install g++
Install python dev (python.h) headers:
sudo apt-get install python-dev
Upgrade/install setuptools to 0.7 or higher:
sudo apt-get install pip
pip install setuptools --upgrade
Change to the jcc directory:
cd pylucene-4.5.1-1/jcc (edit to match your extracted directory)Build and Install JCC:
sudo python setup.py build
sudo python setup.py installIf all that worked, you're ready to build pylucene!
# cd up to the "pylucene-4.xxx" directory
cd ..
Edit the file named "Makefile" located at the root of the pylucene-4.5.1 directory you just extracted
# Locate this line
# Linux (Ubuntu 11.10 64-bit, Python 2.7.2, OpenJDK 1.7, setuptools 0.6.16)Uncomment lines in the Makefile as shown (if you are on linux):
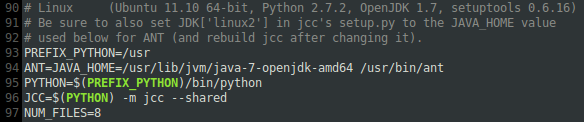
Issue make and install command:
make
sudo make installTest the installation:
# open a python interpreter
python
# now at the prompt type...
import lucene
lucene.initVM()
If no exceptions are raised you're done! You've now installed PyLucene 4 !


 1414
1414


 被折叠的 条评论
为什么被折叠?
被折叠的 条评论
为什么被折叠?
 到【灌水乐园】发言


