


 本文介绍如何在Spring框架中集成Redis并实现持久化功能,通过具体示例演示了配置过程及其实现细节。
最近研究Spring-Redis集成的问题,在网上搜了很多,但是都是没有营养的资料,最后根据Spring和Redis官方文档加上不断实践,琢磨出的一点心得。

![]()

![]()
}
}
![]()
Redis是一个分布式的内存对象缓存系统,在我们的Web应用上集成中,有的用作持久化框架的二级缓存,有的用作一个单独的缓存系统,两者最终目的都是为了减小数据库服务器的压力,如果将Redis用作持久化框架的二级缓存,则显得有点大才小用,所以,我们将它独立出来,也方便以后的Redis集群。
在Spring-Redis集成中,在Spring的官方网站上有个Project是Spring-data-redis,其中就有我们需要的东西!
我们需要的jar包有两个:
1)spring-data-redis-1.1.1.RELEASE.jar
2)需要redis的java客户端,比较流行的java客服端有Jedis、JRedis,这里我们用最popular的Jedis客户端,jedis-2.1.0.jar
一、Spring的配置文件
官方的Jedis的Spring的配置文件如下:
如果采用模板的话,配置文件如下:
在这里我们需要进行修改,自定义自己的Spring配置文件,而且我们采用连接池的方式,从连接池中获取连接,Spring配置文件如下:
这样,在我们需要用到jedisConnectionFactory的类中,将jedisConnectionFactory注入进去,并从这个工厂获取JedisConnection对象。<bean id="jedisPoolConfig" class="redis.clients.jedis.JedisPoolConfig" ><!-- 最大活跃连接数 --><property name="maxActive" value="20" /><!-- 最大闲置数量 --><property name="maxIdle" value="20" /><!-- 最大等待时间 --><property name="maxWait" value="1000" /><!-- 调用borrow 一个对象方法时,是否检查其有效性 --><property name="testOnBorrow" value="true"/><!-- 调用return 一个对象方法时,是否检查其有效性 --><property name="testOnReturn" value="ture"/></bean><bean id="jedisConnectionFactory" class="org.springframework.data.redis.connection.jedis.JedisConnectionFactory"><!-- redis所在的ip --><property name="hostName" value="192.168.1.200"/><!-- redis的端口 --><property name="port" value="6379"/><!-- 是否启用连接池 --><property name="usePool" value="true"/><!-- 连接池的配置参考 --><property name="poolConfig" ref="jedisPoolConfig" /></bean>
二、测试
1)实体类:
public class Student implements Serializable {
/**
*
*/
private static final long serialVersionUID = 3951779424645593223L;
private int id;
private String name;
private int age;
public int getId()
{
return id;
}
public void setId(int id)
{
this.id = id;
}
public String getName()
{
return name;
}
public void setName(String name)
{
this.name = name;
}
public int getAge()
{
return age;
}
public void setAge(int age)
{
this.age = age;
}
@Override
public String toString()
{
return "Student [id=" + id + ", name=" + name + ", age=" + age + "]";
}
}
2)用Mybatis作为持久化框架,我们的Mapper是用注解形式写的:
public interface StudentMapper{
@Insert("insert into user(name,age) values(#{name},#{age})")
@Options(useGeneratedKeys=true,keyProperty="id")
int insert(Student student);
@Select("select * from user where id = #{id}")
Student queryById(@Param("id")int id);
3)service的实现类
public class StudentServiceImpl extends BaseService implements IStudentService{
private StudentMapper studentMapper;
private JedisConnectionFactory jedisConnectionFactory;
@Override
public void add(Student student){
studentMapper = writableSQLSession.getMapper(StudentMapper.class);
int id = studentMapper.insert(student);
System.out.println(id);
JedisConnection connection = jedisConnectionFactory.getConnection();
Map<byte[],byte[]> map = new HashMap<byte[],byte[]>();
map.put(SerializableUtil.serialize("name"), SerializableUtil.serialize(student.getName()));
map.put(SerializableUtil.serialize("age"), SerializableUtil.serialize(student.getAge()));
connection.hMSet(SerializableUtil.serialize(id), map);
}
@Override
public Student queryById(int id){
JedisConnection connection = jedisConnectionFactory.getConnection();
Map<byte[],byte[]> map = connection.hGetAll(SerializableUtil.serialize(id));
if(map.size() > 0){
System.out.println("----进缓存----");
byte[] byteName = map.get(SerializableUtil.serialize("name"));
byte[] byteAge = map.get(SerializableUtil.serialize("age"));
String name = SerializableUtil.unserialize(byteName).toString();
int age = Integer.valueOf(SerializableUtil.unserialize(byteAge).toString());
System.out.println(name);
System.out.println(age);
Student student = new Student();
student.setAge(age);
student.setName(name);
return student;
}else{
System.out.println("----进数据库----");
studentMapper = readonlySQLSession.getMapper(StudentMapper.class);
return studentMapper.queryById(id);
}
}
public void setJedisConnectionFactory(JedisConnectionFactory jedisConnectionFactory)
{
this.jedisConnectionFactory = jedisConnectionFactory;
}
注意:
1)这里我用的数据库session是做了读写分离,并封装进BaseService中,在你做的时候,把它换成你自己的数据库Session就可以了!
2)存数据:
这里我用的向缓存中存对象的方法是用HashMap存的,这个和普通的键值对存放的方式有不同。
(1)普通键值对存放方式:
*************************************
* key * value *
* ***********************************
* key1 * value1 *
* key2 * value2 *
* key3 * value3 *
* ***********************************
(2)hashmap存放方式
例如我们存放Student对象,id:1,name:student1,age:18,其存放方式为:
***********************************************************
* key * value *
***********************************************************
* 1 * key * value *
* ***************************************
* * name * student *
* * age * 18 *
***********************************************************
这样存的好处是键值对中的值也是采用键值对的方式进行存储,方便我们取值。
3)取数据:
我们首先根据序列化之后的id,去缓存中取,也是采用hashmap这种方式去取值,同时判断这个map的大小,如果有值,则取value中的值进行反序列化,然后返回对象,如果没有,则进数据库中去取值,然后在放入缓存中!
测试类:
public class TestRedis{
static IStudentService service;
@BeforeClass
public static void setUpBefor(){
ApplicationContext context = new ClassPathXmlApplicationContext("applicationContext/applicationContext.xml");
service = (IStudentService) context.getBean("studentService");
}
@Test
public void testAdd(){
ApplicationContext context = new ClassPathXmlApplicationContext("applicationContext/applicationContext.xml");
IStudentService service = (IStudentService) context.getBean("studentService");
Student student = new Student();
student.setName("student1");
student.setAge(29);
service.add(student);
}
@Test
public void testQuery(){
int id = 10;
Student student = service.queryById(id);
System.out.println(student);
}
}
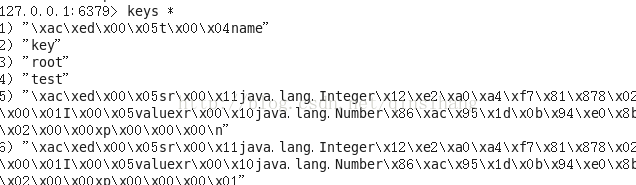
存的时候缓存中是这样的:
基本上集成并且带持久化就是这样的,这仅是我个人的一点学习心得!


 18万+
18万+

 被折叠的 条评论
为什么被折叠?
被折叠的 条评论
为什么被折叠?
 到【灌水乐园】发言


