


1 热修复原理
热修复的原理一句话总结就是:就是dex的动态替换。
首先,我们知道PC上的JVM是直接解析class字节码的,而android上的JVM是解析dex文件的,因此Android程序要运行需要先编译打包成dex,之后才可以被Android虚拟机解析运行。所以我们如果想要即时修补bug就要让修复的代码被Android虚拟机识别,如何才能让虚拟机认识我们修改过的代码呢,也就是我们需要把修改过的代码打包成单独的dex
因此要实现热补丁修复,第一步就是将修改过后的代码打包成dex的jar包或者apk文件,具体打包步骤后面再说。
然后接下来要做的就是如何让虚拟机加载我们修改过后的dex jar包中的类呢? 这里需要了解Android的类加载机制。
2 Android 类加载机制
在Android中 有 2种类加载器:
PathClassLoader和DexClassLoader。分别位于如下目录:
libcore\dalvik\src\main\java\dalvik\system\PathClassLoader.java
libcore\dalvik\src\main\java\dalvik\system\DexClassLoader.java


/**
 * Provides a simple {@link ClassLoader} implementation that operates on a list
 * of files and directories in the local file system, but does not attempt to
 * load classes from the network. Android uses this class for its system class
 * loader and for its application class loader(s).
 */
public class **PathClassLoader** extends BaseDexClassLoader {
    ......
}


/**
 * A class loader that loads classes from {@code .jar} and {@code .apk} files
 * containing a {@code classes.dex} entry. This can be used to execute code not
 * installed as part of an application.
 *
 * <p>This class loader requires an application-private, writable directory to
 * cache optimized classes. Use {@code Context.getCodeCacheDir()} to create
 * such a directory: <pre>   {@code
 *   File dexOutputDir = context.getCodeCacheDir();
 * }</pre>
 *
 * <p><strong>Do not cache optimized classes on external storage.</strong>
 * External storage does not provide access controls necessary to protect your
 * application from code injection attacks.
 */
public class **DexClassLoader** extends BaseDexClassLoader {
    ......
}
可以看到都继承了BaseDexClassLoader 这个基类,这里先不去管它。我们来看注释。
对于PathClassLoader,从文档上的注释来看:Android是使用这个类作为其系统类和应用类的加载器。并且对于这个类呢,只能去加载已经安装到Android系统中的apk文件。
对于DexClassLoader,依然看下注释:可以看到可以加载从jar包中的,apk中的类。
简单的说 如果Android要加载一个类 就会调用ClassLoader的findClass方法 在dex中查找这个类 找到后加载到内存
而我们要做的就是在findClass的时候让类加载找到的是我们修复过后的类,而不是未修复的类。
举个例子,比如说要修复的类名字叫做A 我们要做的就是 将这个类修改完成过后 打包成dex的jar 然后想办法让类加载去查找我们打包的jar中的A类 而不是先前的A类 这样 加载类的时候使用的就是我们修复过后的代码,而忽略掉原本的有问题的代码。
那么如何让类加载器只找到我们修复过后的类呢???
我们来看一下类加载器查找类时的源码:这里就是BaseDexClassLoader类了
/**
 * Base class for common functionality between various dex-based
 * {@link ClassLoader} implementations.
 */
public class BaseDexClassLoader extends ClassLoader {
    private final DexPathList pathList;

    /**
     * Constructs an instance.
     *
     * @param dexPath the list of jar/apk files containing classes and
     * resources, delimited by {@code File.pathSeparator}, which
     * defaults to {@code ":"} on Android
     * @param optimizedDirectory directory where optimized dex files
     * should be written; may be {@code null}
     * @param libraryPath the list of directories containing native
     * libraries, delimited by {@code File.pathSeparator}; may be
     * {@code null}
     * @param parent the parent class loader
     */
    public BaseDexClassLoader(String dexPath, File optimizedDirectory,
            String libraryPath, ClassLoader parent) {
        super(parent);
        this.pathList = new DexPathList(this, dexPath, libraryPath, optimizedDirectory);
    }

    @Override
    protected Class<?> findClass(String name) throws ClassNotFoundException {
        List<Throwable> suppressedExceptions = new ArrayList<Throwable>();
        Class c = pathList.findClass(name, suppressedExceptions);
        if (c == null) {
            ClassNotFoundException cnfe = new ClassNotFoundException("Didn't find class \"" + name + "\" on path: " + pathList);
            for (Throwable t : suppressedExceptions) {
                cnfe.addSuppressed(t);
            }
            throw cnfe;
        }
        return c;
    }

    @Override
    protected URL findResource(String name) {
        return pathList.findResource(name);
    }

    @Override
    protected Enumeration<URL> findResources(String name) {
        return pathList.findResources(name);
    }

    @Override
    public String findLibrary(String name) {
        return pathList.findLibrary(name);
    }

    /**
     * Returns package information for the given package.
     * Unfortunately, instances of this class don't really have this
     * information, and as a non-secure {@code ClassLoader}, it isn't
     * even required to, according to the spec. Yet, we want to
     * provide it, in order to make all those hopeful callers of
     * {@code myClass.getPackage().getName()} happy. Thus we construct
     * a {@code Package} object the first time it is being requested
     * and fill most of the fields with dummy values. The {@code
     * Package} object is then put into the {@code ClassLoader}'s
     * package cache, so we see the same one next time. We don't
     * create {@code Package} objects for {@code null} arguments or
     * for the default package.
     *
     * <p>There is a limited chance that we end up with multiple
     * {@code Package} objects representing the same package: It can
     * happen when when a package is scattered across different JAR
     * files which were loaded by different {@code ClassLoader}
     * instances. This is rather unlikely, and given that this whole
     * thing is more or less a workaround, probably not worth the
     * effort to address.
     *
     * @param name the name of the class
     * @return the package information for the class, or {@code null}
     * if there is no package information available for it
     */
    @Override
    protected synchronized Package getPackage(String name) {
        if (name != null && !name.isEmpty()) {
            Package pack = super.getPackage(name);

            if (pack == null) {
                pack = definePackage(name, "Unknown", "0.0", "Unknown",
                        "Unknown", "0.0", "Unknown", null);
            }

            return pack;
        }

        return null;
    }

    /**
     * @hide
     */
    public String getLdLibraryPath() {
        StringBuilder result = new StringBuilder();
        for (File directory : pathList.getNativeLibraryDirectories()) {
            if (result.length() > 0) {
                result.append(':');
            }
            result.append(directory);
        }
        return result.toString();
    }

    @Override public String toString() {
        return getClass().getName() + "[" + pathList + "]";
    }
}
可以看到,如果查找到了就直接返回,没有查找到就抛出一个ClassNotFoundException的异常。由于findClass调用了pathList.findClass(name, suppressedExceptions);我们直接看DexPathList 的findClass方法
final class DexPathList {
    private static final String DEX_SUFFIX = ".dex";

    ......

    /**
     * List of dex/resource (class path) elements.
     * Should be called pathElements, but the Facebook app uses reflection
     * to modify 'dexElements' (http://b/7726934).
     */
    private final Element[] dexElements;

    ......

    /**
     * Finds the named class in one of the dex files pointed at by
     * this instance. This will find the one in the earliest listed
     * path element. If the class is found but has not yet been
     * defined, then this method will define it in the defining
     * context that this instance was constructed with.
     *
     * @param name of class to find
     * @param suppressed exceptions encountered whilst finding the class
     * @return the named class or {@code null} if the class is not
     * found in any of the dex files
     */
    public Class findClass(String name, List<Throwable> suppressed) {
        for (Element element : dexElements) {
            DexFile dex = element.dexFile;

            if (dex != null) {
                Class clazz = dex.loadClassBinaryName(name, definingContext, suppressed);
                if (clazz != null) {
                    return clazz;
                }
            }
        }
        if (dexElementsSuppressedExceptions != null) {
            suppressed.addAll(Arrays.asList(dexElementsSuppressedExceptions));
        }
        return null;
    }
}
可以看到查找类是在dexElements数组中依次遍历查找的。一个classloader可以包含多个dex,其中这个集合中的对象就是所有的dex文件,查找是从头开始遍历所有的dex 如果在dex中找到所需要的类,那么就直接返回。
在这个dex中查找相应名字的类,之后 defineClass把字节码交给虚拟机就完成了类的加载。
以上就是类的加载机制,不管是热修复还是插件化,都是在dexElements这个地方下功夫。基于此热修复有以下几种方案:
3 热修复三大方案
- 1 Qzone方案
Qzone方案就是将要修复的类插入到dexElements数组前面。
了解了类的加载机制,由于我们想要加载我们后来打包好的dex文件中的类替换掉原本已有的类,只需要让我们打包的这个dex放到原本的dex之前,就可以覆盖掉原本的有问题的类了。
问题又转变到了如何让我们自己打包的dex文件放到原本的dex文件之前,也就是把我们打包的dex放到dexElements集合的靠前的位置
通俗的说 也就是我们要改变的是dexElements中的内容,在其中添加一个dex 而且放在靠前的位置,而dexElements是 PathClassLoader类中的一个成员变量。
说到这应该已经知道怎么改变了吧,如果想改变一个类中的字段,可这个字段又是私有的,我们可以通过反射来改变它,下面就是利用反射把我们自己的dex放到dexElements中了,这个不是很复杂,对反射有一定了解都可以实现,这里就不细说了。这就是QZoneDe方案。
方案缺陷:
存在CLASS_ISPREVERIFIED问题:如果你在一个A类中引用了B类,而后来我们发现了B类中有错误,需要热补丁修复,这时候需要把B类单独打包在一个jar中,假设为patch.jar 而A类在原本的jar中,假设为classes.jar ,这时候就可能出现问题,出现问题的原因是A类所在的jar和B类所在的jar不一致,因为B类是我们后来打包进去的jar,所以不一致,但这个问题是可以解决的,在什么情况才会出现这个问题呢?
1. 验证clazz->directMethods方法,directMethods包含了以下方法:
    1. static方法
    2. private方法
    3. 构造函数
2. clazz->virtualMethods
    1. 虚函数=override方法?
如果在上述方法中直接引用到的类都和当前类在同一个dex中的话,那么这个类就会被打上CLASS_ISPREVERIFIED标记,打上这个标记的在加载类时如果发现不在同一个dex中 就会报错, 那么要解决这个问题,也就是让类中调用一下一个其他的dex中的类就可以了。
Qzone给出的解决方法是 使用javassist框架 动态在 原本的A类的构造函数中 增加一行代码,该行代码需要做的就是调用一个其他dex中的类,这个dex最好是单独的,这样A类就不会被打上CLASS_ISPREVERIFIED标记。这样就可以解决这个问题了。
有关Qzone的方案的详细信息请参考下面:
安卓App热补丁动态修复技术介绍
- 2 阿里的AndFix
AndFix则没有利用Classloader,而是在native层,通过替换方法地址来实现的。在native层通过针对不同虚拟机(dalvik和art)做了不同的处理。之前通过看源码dalvik是通过把替换的方法修改为native方法,并指向一个固定的native函数,在这个函数中根据要替换的方法再进行不同的转发调用新的Java方法,不过现在已经更新了代码,更改了实现方式。art中则好像直接进行了地址替换。
从上面可以看出AndFix的替换维度是方法层的,那是怎么把新旧方法做关联的呢,AndFix用自己的差分工具apkpatch,对新旧apk差分出一个patch,patch中有新的方法的dex,并且新的方法有Annotation标识要替换之前的哪个类的哪个方法,所以这样就知道了关联关系,然后再native层进行替换。
可以看到AndFix对Classloader加载apk的dex文件没有任何干预,所以不需要重启即可生效,只是替换了方法。不过这也导致已经加载的Classz的字段已经固定,无法支持新增或者删除filed的情况。而且由于在native层做改变,可能兼容性比较差。AndFix的替换维度是方法Method。
- 3 微信的Tinker
微信团队对现有的方案优缺点进行了深入的分析和总结,由于AndFix的局限性和兼容性差原因放弃了这种方案,而对QZone方案通过研究Instant Run的冷插拔与buck的exopackage带来的灵感进行了升级。QZone方案只是插入了Elements(补丁dex),而Tinker则是替换了整个Element数组(所有dex)。替换是通过patch和apk原始的dex进行合并,重启后加载合并后的新dex,这样基本上可以认为没有对dexopt和Classloader加载dex文件的过程进行干预,所以QZone方案的两个问题也就不复存在。
可以看到微信团队的新方案Tinker通过替换整个dex,完美了规避了现有方案的一些问题。除了合并新dex稍长时间与内存消耗,以及第一次重启加载整个新dex时dexopt的时间,似乎没有其它的大问题,还是比较完美的。希望微信团队能够早日开源Tinker,以及配套的对patch进行版本管理线上监控的系统方案。
Tinker的相关资料:
Tinker github 地址
Android 热修复 Tinker接入及源码浅析
下面贴一个三大技术流派的选型:
Android热修复技术选型——三大流派解析
我这里就选了一个Tinker的例子来实战一下
4 Tinker的接入实战
关于Tinker的接入可以查看下面的wiki
Tinker 接入指南
我们以gradle接入为例讲解
1 gradle引入依赖
在你的工程的项目这一层,不是module的build.gradle中添加tinker-patch-gradle-plugin的依赖
buildscript {
    dependencies {
        classpath ('com.tencent.tinker:tinker-patch-gradle-plugin:1.7.7')
    }
}
在你的module这一层的build.gradle添加如下依赖:
dependencies {
    //可选,用于生成application类
    provided('com.tencent.tinker:tinker-android-anno:1.7.7')
    //tinker的核心库
    compile('com.tencent.tinker:tinker-android-lib:1.7.7')
}
接着我们需要参考tinker/tinker-sample-android/app/build.gradle中的配置,为我们刚刚的module下面得build.gradle添加如下内容,这一部分内容可以酌情添加
/**
 *
 *热修复
 */
def gitSha() {
    try {
        //String gitRev = 'git rev-parse --short HEAD'.execute(null, project.rootDir).text.trim()
        String gitRev = 'git rev-parse --short HEAD'.execute(null, project.rootDir).text.trim()
        if (gitRev == null) {
            throw new GradleException("can't get git rev, you should add git to system path or just input test value, such as 'testTinkerId'")
        }
        return gitRev
    } catch (Exception e) {
        throw new GradleException("can't get git rev, you should add git to system path or just input test value, such as 'testTinkerId'")
    }
}

def bakPath = file("${buildDir}/bakApk/")

/**
 * you can use assembleRelease to build you base apk
 * use tinkerPatchRelease -POLD_APK=  -PAPPLY_MAPPING=  -PAPPLY_RESOURCE= to build patch
 * add apk from the build/bakApk
 */
ext {
    //for some reason, you may want to ignore tinkerBuild, such as instant run debug build?
    tinkerEnabled = true

    //for normal build
    //old apk file to build patch apk
    tinkerOldApkPath = "${bakPath}/app-debug.apk"
    //proguard mapping file to build patch apk
    tinkerApplyMappingPath = "${bakPath}/app-debug-mapping.txt"
    //resource R.txt to build patch apk, must input if there is resource changed
    tinkerApplyResourcePath = "${bakPath}/app-debug-R.txt"

    //only use for build all flavor, if not, just ignore this field
    tinkerBuildFlavorDirectory = "${bakPath}/app-1018-17-32-47"
}


def getOldApkPath() {
    return hasProperty("OLD_APK") ? OLD_APK : ext.tinkerOldApkPath
}

def getApplyMappingPath() {
    return hasProperty("APPLY_MAPPING") ? APPLY_MAPPING : ext.tinkerApplyMappingPath
}

def getApplyResourceMappingPath() {
    return hasProperty("APPLY_RESOURCE") ? APPLY_RESOURCE : ext.tinkerApplyResourcePath
}

def getTinkerIdValue() {
    return hasProperty("TINKER_ID") ? TINKER_ID : gitSha()
}

def buildWithTinker() {
    return hasProperty("TINKER_ENABLE") ? TINKER_ENABLE : ext.tinkerEnabled
}

def getTinkerBuildFlavorDirectory() {
    return ext.tinkerBuildFlavorDirectory
}

if (buildWithTinker()) {
    apply plugin: 'com.tencent.tinker.patch'

    tinkerPatch {
        /**
         * necessary,default 'null'
         * the old apk path, use to diff with the new apk to build
         * add apk from the build/bakApk
         */
        oldApk = getOldApkPath()
        /**
         * optional,default 'false'
         * there are some cases we may get some warnings
         * if ignoreWarning is true, we would just assert the patch process
         * case 1: minSdkVersion is below 14, but you are using dexMode with raw.
         *         it must be crash when load.
         * case 2: newly added Android Component in AndroidManifest.xml,
         *         it must be crash when load.
         * case 3: loader classes in dex.loader{} are not keep in the main dex,
         *         it must be let tinker not work.
         * case 4: loader classes in dex.loader{} changes,
         *         loader classes is ues to load patch dex. it is useless to change them.
         *         it won't crash, but these changes can't effect. you may ignore it
         * case 5: resources.arsc has changed, but we don't use applyResourceMapping to build
         */
        ignoreWarning = true

        /**
         * optional,default 'true'
         * whether sign the patch file
         * if not, you must do yourself. otherwise it can't check success during the patch loading
         * we will use the sign config with your build type
         */
        useSign = true

        /**
         * optional,default 'true'
         * whether use tinker to build
         */
        tinkerEnable = buildWithTinker()

        /**
         * Warning, applyMapping will affect the normal android build!
         */
        buildConfig {
            /**
             * optional,default 'null'
             * if we use tinkerPatch to build the patch apk, you'd better to apply the old
             * apk mapping file if minifyEnabled is enable!
             * Warning:
             * you must be careful that it will affect the normal assemble build!
             */
            applyMapping = getApplyMappingPath()
            /**
             * optional,default 'null'
             * It is nice to keep the resource id from R.txt file to reduce java changes
             */
            applyResourceMapping = getApplyResourceMappingPath()

            /**
             * necessary,default 'null'
             * because we don't want to check the base apk with md5 in the runtime(it is slow)
             * tinkerId is use to identify the unique base apk when the patch is tried to apply.
             * we can use git rev, svn rev or simply versionCode.
             * we will gen the tinkerId in your manifest automatic
             */
            tinkerId = getTinkerIdValue()

            /**
             * if keepDexApply is true, class in which dex refer to the old apk.
             * open this can reduce the dex diff file size.
             */
            keepDexApply = false
        }

        dex {
            /**
             * optional,default 'jar'
             * only can be 'raw' or 'jar'. for raw, we would keep its original format
             * for jar, we would repack dexes with zip format.
             * if you want to support below 14, you must use jar
             * or you want to save rom or check quicker, you can use raw mode also
             */
            dexMode = "jar"

            /**
             * necessary,default '[]'
             * what dexes in apk are expected to deal with tinkerPatch
             * it support * or ? pattern.
             */
            pattern = ["classes*.dex",
                       "assets/secondary-dex-?.jar"]
            /**
             * necessary,default '[]'
             * Warning, it is very very important, loader classes can't change with patch.
             * thus, they will be removed from patch dexes.
             * you must put the following class into main dex.
             * Simply, you should add your own application {@code tinker.sample.android.SampleApplication}
             * own tinkerLoader, and the classes you use in them
             *
             */
            loader = ["com.tencent.tinker.loader.*", "com.qiyei.funny.MyApplication"
            ]
        }

        lib {
            /**
             * optional,default '[]'
             * what library in apk are expected to deal with tinkerPatch
             * it support * or ? pattern.
             * for library in assets, we would just recover them in the patch directory
             * you can get them in TinkerLoadResult with Tinker
             */
            pattern = ["lib/*/*.so"]
        }

        res {
            /**
             * optional,default '[]'
             * what resource in apk are expected to deal with tinkerPatch
             * it support * or ? pattern.
             * you must include all your resources in apk here,
             * otherwise, they won't repack in the new apk resources.
             */
            pattern = ["res/*", "assets/*", "resources.arsc", "AndroidManifest.xml"]

            /**
             * optional,default '[]'
             * the resource file exclude patterns, ignore add, delete or modify resource change
             * it support * or ? pattern.
             * Warning, we can only use for files no relative with resources.arsc
             */
            ignoreChange = ["assets/sample_meta.txt"]

            /**
             * default 100kb
             * for modify resource, if it is larger than 'largeModSize'
             * we would like to use bsdiff algorithm to reduce patch file size
             */
            largeModSize = 100
        }

        packageConfig {
            /**
             * optional,default 'TINKER_ID, TINKER_ID_VALUE' 'NEW_TINKER_ID, NEW_TINKER_ID_VALUE'
             * package meta file gen. path is assets/package_meta.txt in patch file
             * you can use securityCheck.getPackageProperties() in your ownPackageCheck method
             * or TinkerLoadResult.getPackageConfigByName
             * we will get the TINKER_ID from the old apk manifest for you automatic,
             * other config files (such as patchMessage below)is not necessary
             */
            configField("patchMessage", "tinker is sample to use")
            /**
             * just a sample case, you can use such as sdkVersion, brand, channel...
             * you can parse it in the SamplePatchListener.
             * Then you can use patch conditional!
             */
            configField("platform", "all")
            /**
             * patch version via packageConfig
             */
            configField("patchVersion", "1.0")
        }
        //or you can add config filed outside, or get meta value from old apk
        //project.tinkerPatch.packageConfig.configField("test1", project.tinkerPatch.packageConfig.getMetaDataFromOldApk("Test"))
        //project.tinkerPatch.packageConfig.configField("test2", "sample")

        /**
         * if you don't use zipArtifact or path, we just use 7za to try
         */
        sevenZip {
            /**
             * optional,default '7za'
             * the 7zip artifact path, it will use the right 7za with your platform
             */
            zipArtifact = "com.tencent.mm:SevenZip:1.1.10"
            /**
             * optional,default '7za'
             * you can specify the 7za path yourself, it will overwrite the zipArtifact value
             */
//        path = "/usr/local/bin/7za"
        }
    }
}
注意:这里有几个坑,下面依次介绍下:
坑1 :can’t get git rev, you should add git to system path or just input test value ….

这是因为没有电脑配置git的环境变量,可能安装git的时候就没有配置,直接配置下就行了。配置好后重启工程同步下。
坑2:Error:Execution failed for task ‘:app:tinkerProcessDebugManifest’. tinkerId is not set
这是因为配置中有这样一句
String gitRev = 'git rev-parse --short HEAD'.execute(null, project.rootDir).text.trim()
用于获取一个字符串,作为TINKER_ID。解决办法就是如下:
1 安装好git,并将该项目初始化为git工程
2 studio配置git
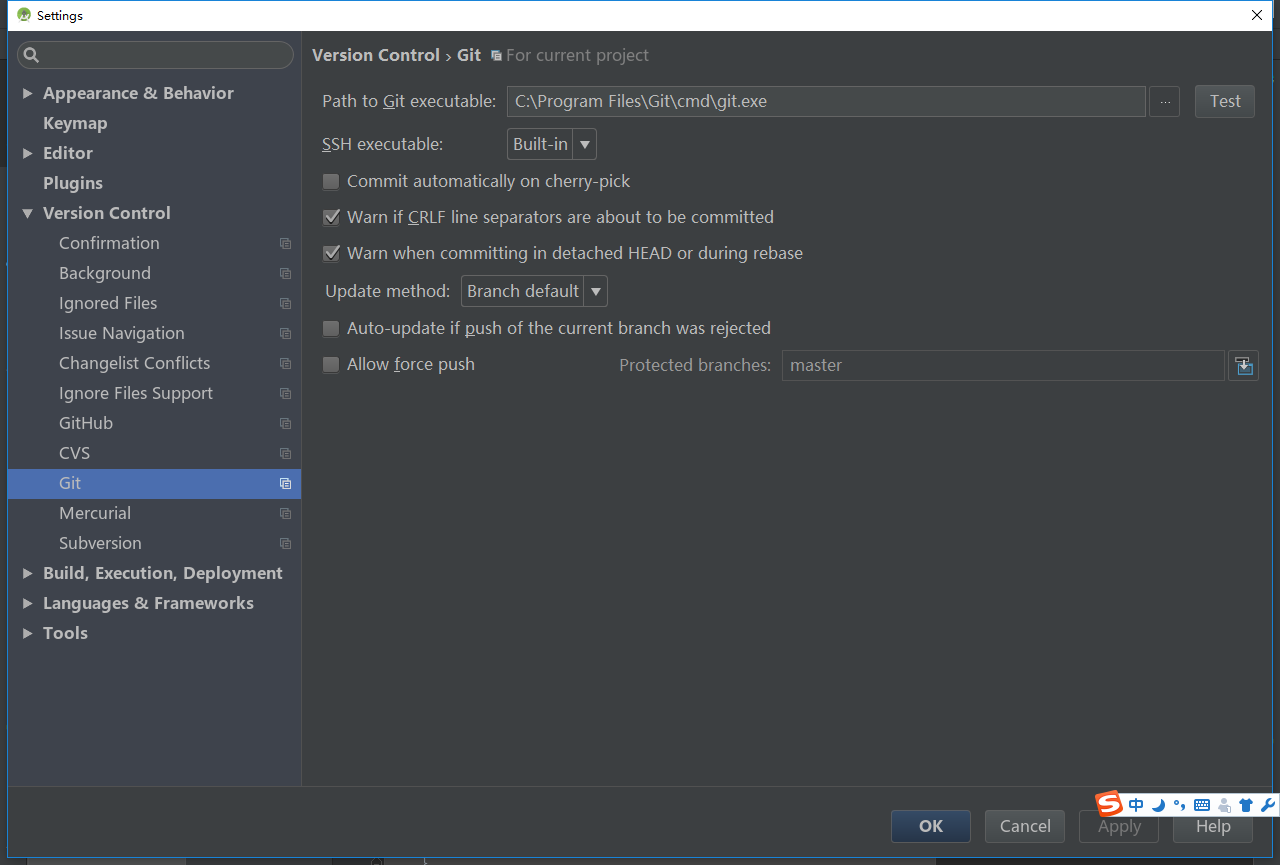
可以点击右侧的test,显示出版本号表示路径没问题。
3 给项目设置版本管理
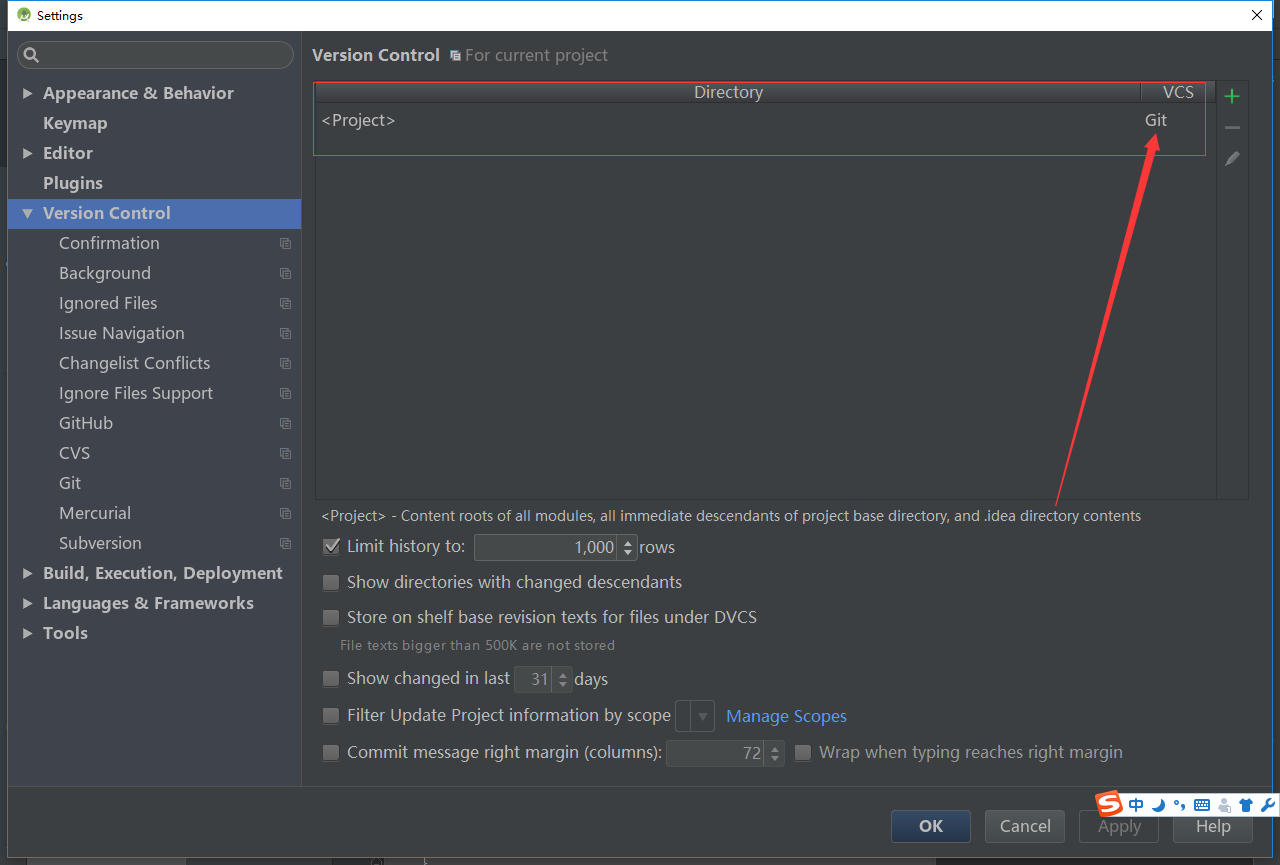
将项目添加到git,再次同步Gradle。
坑3:ignoreWarning 问题,当我们在studio终端中输入gradlew tinkerPatchDebug来生成pach时会报以下异常
Warning:ignoreWarning is false, but resources.arsc is changed, you should use applyResourceMapping mode to build the new apk, otherwise, it may be crash at some times
com.tencent.tinker.build.util.TinkerPatchException: ignoreWarning is false, but resources.arsc is changed, you should use applyResourceMapping mode to build the new apk, otherwise, it may be crash a
t some times
解决方案就是将build.gradle中的ignoreWarning = false改为true,如下:
tinkerPatch {
    .....
    ignoreWarning = true
    .....
}坑4:build.gradle中release应该有签名配置,不过这这个项目中一般都会有这样的配置。
坑5:目录事项,有以下几个目录需要注意
/**
 * you can use assembleRelease to build you base apk
 * use tinkerPatchRelease -POLD_APK=  -PAPPLY_MAPPING=  -PAPPLY_RESOURCE= to build patch
 * add apk from the build/bakApk
 */
ext {
    //for some reason, you may want to ignore tinkerBuild, such as instant run debug build?
    tinkerEnabled = true

    //for normal build
    //old apk file to build patch apk
    tinkerOldApkPath = "${bakPath}/app-debug.apk"
    //proguard mapping file to build patch apk
    tinkerApplyMappingPath = "${bakPath}/app-debug-mapping.txt"
    //resource R.txt to build patch apk, must input if there is resource changed
    tinkerApplyResourcePath = "${bakPath}/app-debug-R.txt"

    //only use for build all flavor, if not, just ignore this field
    tinkerBuildFlavorDirectory = "${bakPath}/app-1018-17-32-47"
}
其中tinkerOldApkPath = “${bakPath}/app-debug.apk”表示我们老的apk的目录,就是我们已经安装到手机上的apk的源文件的目录。
2 将继承Application改成继承DefaultApplicationLike
这里直接上代码吧。
@DefaultLifeCycle(application = "com.qiyei.funny.MyApplication",flags = ShareConstants.TINKER_ENABLE_ALL)
public class Funny extends DefaultApplicationLike{

    private static Context mContext;//application Context

    public Funny(Application application, int tinkerFlags, boolean tinkerLoadVerifyFlag, long applicationStartElapsedTime, long applicationStartMillisTime, Intent tinkerResultIntent) {
        super(application, tinkerFlags, tinkerLoadVerifyFlag, applicationStartElapsedTime, applicationStartMillisTime, tinkerResultIntent);
    }

    @Override
    public void onBaseContextAttached(Context base) {
        super.onBaseContextAttached(base);
        mContext = base;
        ToastUtil.initToast(mContext);
        SystemUtil.init(mContext);
        TinkerInstaller.install(this);
    }

    @Override
    public void onCreate() {
        super.onCreate();

    }

    public static Context getContext(){
        return mContext;
    }

}
有几点需要注意:以前我们在Application中onCreate()中要做的事,这里可以移到onBaseContextAttached(Context base)方法中。我们还初始化了Tinker。
另外,这里指定了application = “com.qiyei.funny.MyApplication”,这里的MyApplication就需要我们在
AndroidManifest.xml文件中指定:
<application
        android:name=".MyApplication"
        android:allowBackup="true"
        android:icon="@mipmap/ic_launcher"
        android:label="@string/app_name"
        android:supportsRtl="true"
        .....
3 TinkerInstaller.onReceiveUpgradePatch()加载补丁
在你需要加载补丁的地方添加如下代码:
String path = Environment.getExternalStorageDirectory().getAbsolutePath();
Log.d(TAG, "path:" + path);
//加载补丁文件
TinkerInstaller.onReceiveUpgradePatch(getApplicationContext(), path +"/app_patch/patch_signed_7zip.apk");
至此工程就配置完了。下面介绍生成补丁及加载补丁的方式
4 生成补丁
我们首先参考tinker-sample-android拷贝相关的类与方法。主要是为了显示加载是否成功:
修改之前的代码:
    @Override
    protected void onCreate(Bundle savedInstanceState) {
        super.onCreate(savedInstanceState);
        setContentView(R.layout.activity_test);
        ButterKnife.bind(this);
        mContext = this;

        initView();
        mTestView.scrollTo(0, 100);

//        mLayout1.setOnClickListener(new View.OnClickListener() {
//            @Override
//            public void onClick(View v) {
//                Log.d(TAG, "id:" + v.getId() + ",mLayout1");
//            }
//        });

        mButton.setOnClickListener(new View.OnClickListener() {
            @Override
            public void onClick(View v) {
                Intent intent = new Intent(mContext, NetworkTestActivity.class);
                startActivity(intent);
            }
        });

        mButton2.setOnClickListener(new View.OnClickListener() {
            @Override
            public void onClick(View v) {
                Animation animation = AnimationUtils.loadAnimation(mContext, R.anim.btn_animation);
                mTestView.setAnimation(animation);

                ObjectAnimator animator = ObjectAnimator.ofFloat(mTestView, "translationX", 0, 800);
                animator.setDuration(1000);
                animator.start();
                String path = Environment.getExternalStorageDirectory().getAbsolutePath();
                Log.d(TAG, "path:" + path);
                //加载补丁文件
                TinkerInstaller.onReceiveUpgradePatch(getApplicationContext(), path + "/app_patch/patch_signed_7zip.apk");
            }
        });

        //ToastUtil.showLongToast("修复之后的9999999999999999999999999999");
        ToastUtil.showLongToast("修复之前");

        mButton3.setOnClickListener(new View.OnClickListener() {
            @Override
            public void onClick(View v) {
                showInfo(mContext);
            }
        });

    }

    public boolean showInfo(Context context) {
        // add more Build Info
        final StringBuilder sb = new StringBuilder();
        Tinker tinker = Tinker.with(getApplicationContext());
        if (tinker.isTinkerLoaded()) {
            sb.append(String.format("[patch is loaded] \n"));
            sb.append(String.format("[buildConfig TINKER_ID] %s \n", BuildInfo.TINKER_ID));
            sb.append(String.format("[buildConfig BASE_TINKER_ID] %s \n", BaseBuildInfo.BASE_TINKER_ID));

            sb.append(String.format("[buildConfig MESSSAGE] %s \n", BuildInfo.MESSAGE));
            sb.append(String.format("[TINKER_ID] %s \n", tinker.getTinkerLoadResultIfPresent().getPackageConfigByName(ShareConstants.TINKER_ID)));
            sb.append(String.format("[packageConfig patchMessage] %s \n", tinker.getTinkerLoadResultIfPresent().getPackageConfigByName("patchMessage")));
            sb.append(String.format("[TINKER_ID Rom Space] %d k \n", tinker.getTinkerRomSpace()));

        } else {
            sb.append(String.format("[patch is not loaded] \n"));
            sb.append(String.format("[buildConfig TINKER_ID] %s \n", BuildInfo.TINKER_ID));
            sb.append(String.format("[buildConfig BASE_TINKER_ID] %s \n", BaseBuildInfo.BASE_TINKER_ID));

            sb.append(String.format("[buildConfig MESSSAGE] %s \n", BuildInfo.MESSAGE));
            sb.append(String.format("[TINKER_ID] %s \n", ShareTinkerInternals.getManifestTinkerID(getApplicationContext())));
        }
        sb.append(String.format("[BaseBuildInfo Message] %s \n", BaseBuildInfo.TEST_MESSAGE));

        final TextView v = new TextView(context);
        v.setText(sb);
        v.setGravity(Gravity.LEFT | Gravity.CENTER_VERTICAL);
        v.setTextSize(TypedValue.COMPLEX_UNIT_DIP, 10);
        v.setLayoutParams(new ViewGroup.LayoutParams(ViewGroup.LayoutParams.MATCH_PARENT, ViewGroup.LayoutParams.WRAP_CONTENT));
        v.setTextColor(0xFF000000);
        v.setTypeface(Typeface.MONOSPACE);
        final int padding = 16;
        v.setPadding(padding, padding, padding, padding);

        final AlertDialog.Builder builder = new AlertDialog.Builder(context);
        builder.setCancelable(true);
        builder.setView(v);
        final AlertDialog alert = builder.create();
        alert.show();
        return true;
    }
运行程序效果如下:

我们将app\build\outputs\apk\app-debug.apk拷贝到app\build\bakApk目录下,注意与tinkerOldApkPath = “${bakPath}/app-debug.apk”保持一致。接着修改代码如下:
    @Override
    protected void onCreate(Bundle savedInstanceState) {
        super.onCreate(savedInstanceState);
        setContentView(R.layout.activity_test);
        ButterKnife.bind(this);
        mContext = this;

        initView();
        mTestView.scrollTo(0, 100);

//        mLayout1.setOnClickListener(new View.OnClickListener() {
//            @Override
//            public void onClick(View v) {
//                Log.d(TAG, "id:" + v.getId() + ",mLayout1");
//            }
//        });

        mButton.setOnClickListener(new View.OnClickListener() {
            @Override
            public void onClick(View v) {
                Intent intent = new Intent(mContext, NetworkTestActivity.class);
                startActivity(intent);
            }
        });

        mButton2.setOnClickListener(new View.OnClickListener() {
            @Override
            public void onClick(View v) {
                Animation animation = AnimationUtils.loadAnimation(mContext, R.anim.btn_animation);
                mTestView.setAnimation(animation);

                ObjectAnimator animator = ObjectAnimator.ofFloat(mTestView, "translationX", 0, 800);
                animator.setDuration(1000);
                animator.start();
                String path = Environment.getExternalStorageDirectory().getAbsolutePath();
                Log.d(TAG, "path:" + path);
                //加载补丁文件
                TinkerInstaller.onReceiveUpgradePatch(getApplicationContext(), path + "/app_patch/patch_signed_7zip.apk");
            }
        });

        ToastUtil.showLongToast("修复之后的9999999999999999999999999999");
        //ToastUtil.showLongToast("修复之前");

        mButton3.setOnClickListener(new View.OnClickListener() {
            @Override
            public void onClick(View v) {
                showInfo(mContext);
            }
        });

    }
然后,不用编译,只在在studio终端中输入以下命令并执行:
gradlew tinkerPatchDebug一定要出现如下成功界面,表示patch生成成功:

接着将app\build\outputs\tinkerPatch\debug\patch_signed_7zip.apk拷贝到手机的根目录下的app_patch目录下。然后点击加载,效果如下:

重启一下,这样我们就实现了热修复。


 134
134

 被折叠的 条评论
为什么被折叠?
被折叠的 条评论
为什么被折叠?
 到【灌水乐园】发言


