


 这篇博客讲述了在docker中配置PostgreSQL的过程,包括在Dockerfile中设置postgres用户密码,解决网络问题如代理设置,以及如何导入自定义数据。还提到了遇到的Host not found和 Temporary failure resolving的问题及解决方案,并分享了Dockerfile和运行容器的步骤。
最近在做dockerize postgres-9.4,官方有Dockerfile: https://docs.docker.com/engine/examples/postgresql_service/
但是遇到了一些问题,不符合中国国情(网络问题等),在Dockerfile里增加自己的测试数据。一一解决后终于可以build并run自己的container了。
问题一:dockerfile里更改postgres用户的密码,并追加自己的数据
postgresql安装好之后,会生成一个postgres用户,默认是没有密码的,我们公司原来的postgres用户是有密码的,而且测试连接的参数也有密码,还有一些数据,为了继续使用这些参数和数据,尽量不改动测试case,需要为该用户设置密码。官网上的dockerfile没有这么做,反复查资料实验,最终找到了解决方法。
解决办法:将数据放到sql里
# change password of user ``postgres`` to ``postgres`` then
# create databases owned by the ``postgres`` role and datas by sql file.
# Note: here we use ``&&\`` to run commands one after the other - the ``\``
#       allows the RUN command to span multiple lines.
RUN    /etc/init.d/postgresql start &&\
    psql --command "\i /var/lib/postgresql/docker_allDBs.sql" &&\
    psql --command "\i /var/lib/postgresql/docker_shenzeFromOld.sql" shenze &&\
    psql --command "ALTER USER postgres with PASSWORD 'postgres'"
解释如下:
1. 启动postgresql: /etc/init.d/postgresql start
2. \i filename 从文件filename中读取并把其内容当作从键盘输入的那样执行查询:
\i /var/lib/postgresql/docker_allDBs.sql 。
3. 更改postgres用户密码: ALTER USER postgres with PASSWORD 'postgres'
4. psql --command "\i /var/lib/postgresql/docker_shenzeFromOld.sql" shenze
在shenze数据库下运行docker_shenzeFromOld.sql语句
psql [option…] [dbname [username]]
关于psql命令,参考以下网站:
http://www.php100.com/manual/PostgreSQL8/app-psql.html
注意:
docker_allDBs.sql和docker_shenzeFromOld.sql两个文件需要与Dockerfile放置在同一个目录下。
并用在Dockerfile里用ADD放进容器里
ADD docker_allDBs.sql /var/lib/postgresql/
ADD docker_shenzeFromOld.sql /var/lib/postgresql/
问题二:p80.pool.sks-keyservers.net: Host not found
# Add the PostgreSQL PGP key to verify their Debian packages.
# It should be the same key as https://www.postgresql.org/media/keys/ACCC4CF8.asc
RUN apt-key adv --keyserver hkp://p80.pool.sks-keyservers.net:80 --recv-keys B97B0AFCAA1A47F044F244A07FCC7D46ACCC4CF8
遇到的问题:
Step 2 : RUN apt-key adv --keyserver hkp://p80.pool.sks-keyservers.net:80 --recv-keys B97B0AFCAA1A47F044F244A07FCC7D46ACCC4CF8
 ---> Running in 3c999f8b76d2
Executing: gpg --ignore-time-conflict --no-options --no-default-keyring --secret-keyring /tmp/tmp.D7XMJ9aQ54 --trustdb-name /etc/apt/trustdb.gpg --keyring /etc/apt/trusted.gpg --primary-keyring /etc/apt/trusted.gpg --keyserver hkp://p80.pool.sks-keyservers.net:80 --recv-keys B97B0AFCAA1A47F044F244A07FCC7D46ACCC4CF8
gpg: requesting key ACCC4CF8 from hkp server p80.pool.sks-keyservers.net
?: p80.pool.sks-keyservers.net: Host not found
gpgkeys: HTTP fetch error 7: couldn't connect: Connection timed out
gpg: no valid OpenPGP data found.
gpg: Total number processed: 0
解决办法:加–keyserver-options http-proxy
这个是因为访问GPG server有问题,在网上查了一些资料,有列出中国能访问的GPG server列表的(http://blog.chinaunix.net/uid-20420254-id-2890214.html),试了还是不行。
最后用代理(--keyserver-options http-proxy=<myProxy>)解决了。
myProxy格式: http://ip:port
RUN apt-key adv --keyserver-options http-proxy=<myProxy> --keyserver keyserver.ubuntu.com --recv-keys B97B0AFCAA1A47F044F244A07FCC7D46ACCC4CF8问题三: Temporary failure resolving ‘archive.ubuntu.com’
Step 4 : RUN apt-get update && apt-get install -y python-software-properties software-properties-common postgresql-v9.4 postgresql-client-v9.4 postgresql-contrib-v9.4
---> Running in 5b628a7c4e20
Err http://apt.postgresql.org precise-pgdg Release.gpg
Temporary failure resolving 'apt.postgresql.org'
...
W: Failed to fetch http://archive.ubuntu.com/ubuntu/dists/precise/Release.gpg  Temporary failure resolving 'archive.ubuntu.com'
解决办法:使用命令选项-o Acquire::http::proxy
RUN apt-get -o Acquire::http::proxy="<myProxy>" -y -q install python-software-properties software-properties-common网上还有另外一种解决方法(对我来说,管用了一次,后面再build就不行了),配置谷歌的dns为8.8.8.8。
vi /etc/resolv.conf
nameserver 202.96.134.133
nameserver 8.8.8.8
其他:
docker设置代理:http://blog.csdn.net/mcmoon/article/details/44493807
postgreSQL的一些命令
- windows上用命令行导出数据:
cmd右键以管理员身份运行,然后进入pg_dump所在目录,运行
pg_dump.exe -h localhost -p 5432 -U postgres -E "UTF8" --password shenze>C:\shenze.sql用法: pg_dump [选项]… [数据库名字]
- psql [option…] [dbname [username]]
关于psql命令,参考以下网站:
http://www.php100.com/manual/PostgreSQL8/app-psql.html
psql -h $PG_PORT_5432_TCP_ADDR -p $PG_PORT_5432_TCP_PORT -d shenze -U postgres --passwordDockerfile
FROM ubuntu:14.04
MAINTAINER kwang@talend.com

# Add the PostgreSQL PGP key to verify their Debian packages.
# It should be the same key as https://www.postgresql.org/media/keys/ACCC4CF8.asc
RUN apt-key adv --keyserver-options http-proxy=<myProxy> --keyserver keyserver.ubuntu.com --recv-keys B97B0AFCAA1A47F044F244A07FCC7D46ACCC4CF8


# Add PostgreSQL's repository. It contains the most recent stable release
#     of PostgreSQL, ``v9.4``.
RUN echo "deb http://apt.postgresql.org/pub/repos/apt/ precise-pgdg main" > /etc/apt/sources.list.d/pgdg.list

# Update the Ubuntu and PostgreSQL repository indexes
RUN apt-get -o Acquire::http::proxy="<myProxy>" update

# Install ``python-software-properties``, ``software-properties-common`` and PostgreSQL v9.4
#  There are some warnings (in red) that show up during the build. You can hide
#  them by prefixing each apt-get statement with DEBIAN_FRONTEND=noninteractive
RUN apt-get -o Acquire::http::proxy="<myProxy>" -y -q install python-software-properties software-properties-common
RUN apt-get -o Acquire::http::proxy="<myProxy>" -y -q install postgresql-9.4 postgresql-client-9.4 postgresql-contrib-9.4

# Note: The official Debian and Ubuntu images automatically ``apt-get clean``
# after each ``apt-get``

#add datas
ADD docker_allDBs.sql /var/lib/postgresql/
ADD docker_shenzeFromOld.sql /var/lib/postgresql/

# Run the rest of the commands as the ``postgres`` user created by the ``postgres-v9.4`` package when it was ``apt-get installed``
USER postgres

# change password of user ``postgres`` to ``postgres`` then
# create databases owned by the ``postgres`` role and datas by sql file.
# Note: here we use ``&&\`` to run commands one after the other - the ``\``
#       allows the RUN command to span multiple lines.
RUN    /etc/init.d/postgresql start &&\
    psql --command "\i /var/lib/postgresql/docker_allDBs.sql" &&\
    psql --command "\i /var/lib/postgresql/docker_shenzeFromOld.sql" shenze &&\
    psql --command "ALTER USER postgres with PASSWORD 'postgres'"

# Adjust PostgreSQL configuration so that remote connections to the
# database are possible.
RUN echo "host all  all    0.0.0.0/0  md5" >> /etc/postgresql/9.4/main/pg_hba.conf

# And add ``listen_addresses`` to ``/etc/postgresql/9.4/main/postgresql.conf``
RUN echo "listen_addresses='*'" >> /etc/postgresql/9.4/main/postgresql.conf

# Expose the PostgreSQL port
EXPOSE 5432

# Add VOLUMEs to allow backup of config, logs and databases
VOLUME  ["/etc/postgresql", "/var/log/postgresql", "/var/lib/postgresql"]

# Set the default command to run when starting the container
CMD ["/usr/lib/postgresql/9.4/bin/postgres", "-D", "/var/lib/postgresql/9.4/main", "-c", "config_file=/etc/postgresql/9.4/main/postgresql.conf"]
构建images,并运行容器
构建images
docker build -t kwang/postgres:1.0 .运行容器
docker run --rm -p 5432:5432 --name pg_test kwang/postgres:1.0
或者
docker run -d -p 5432:5432 --name pg_test kwang/postgres:1.0
到这里,postgres服务启动,也有自己的数据,用客户端可以连接了。
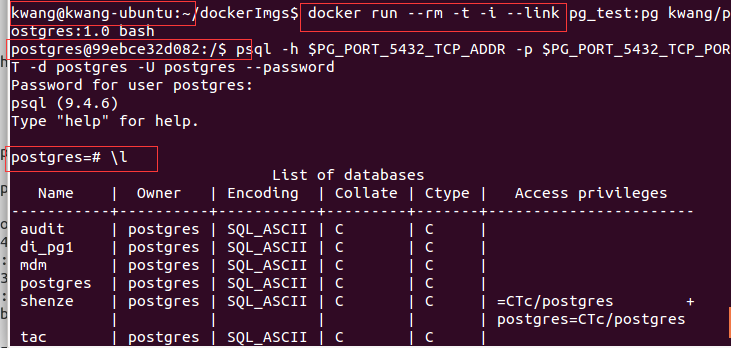
连接到容器pg_test,使用–link
docker run --rm -t -i --link pg_test:pg kwang/postgres:1.0 bash上述命令因为有bash,就出现与容器交互的terminal,在这里面可以创建数据库,表,插入数据等等,都会存到容器#(pg_test)里,输入下面的命令,就进入postgresql命令行了
–password强制psql 在与一个数据库联接前提示输入口令
psql -h $PG_PORT_5432_TCP_ADDR -p $PG_PORT_5432_TCP_PORT -d postgres -U postgres --password列出服务器上所有数据库的名字和它们的所有者以及字符集编码 \l
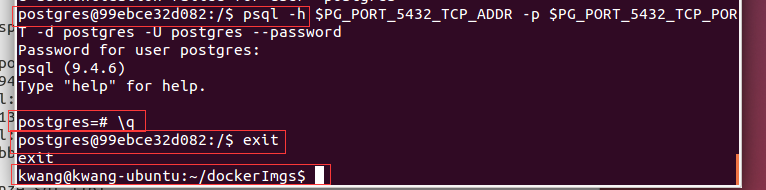
\l\q 退出psql程序。
\q导出数据,命令运行完自动退出到交互命令行
pg_dump -h $PG_PORT_5432_TCP_ADDR -p $PG_PORT_5432_TCP_PORT -U postgres --password shenze > /var/lib/postgresql/shenze.sql退出与容器交互
exit以上命令运行结果:


 382
382

 被折叠的 条评论
为什么被折叠?
被折叠的 条评论
为什么被折叠?
 到【灌水乐园】发言


