


Overview of MVC Projects
MVC项目概述
We are going to provide some additional context before we start diving into the details of specific MVC Framework features. This chapter gives an overview of the structure and nature of an ASP.NET MVC application, including the default project structure and naming conventions that you must follow.
在我们潜入特定的MVC框架特性之前,我们打算提供一些补充材料。本章给出了ASP.NET MVC应用程序结构和性质的概述,包括默认的项目结构,以及你必须遵循的命名约定。
Working with Visual Studio MVC Projects
与Visual Studio的MVC项目一起工作
When you create a new MVC3 project, Visual Studio gives you a choice between three starting points: Empty, Internet Application, or Intranet Application, as shown in Figure 10-1.
在你生成一个新的MVC 3项目时,Visual Studio让你在三个起点之间进行选择:空项目、Internet应用程序、或Intranet应用程序,如图10-1所示。
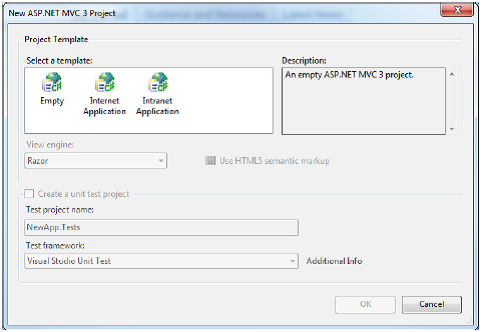
Figure 10-1. Choosing the initial configuration of an MVC 3 project
图10-1. 选择MVC项目的最初配置
The Empty project template is the one we used in Chapter 3 for the RSVP application and in Chapter 7 when we set up for the SportsStore application. It creates a relatively small number of files and directories, and gives you just the minimum structure on which to build.
Empty项目模板是我们第3章的RSVP(电子回复)应用程序、以及第7章在我们建立SportsStore应用程序时所使用的模板。它生成相对较少的文件和目录,并且只为你建立最小化的结构。
n Note The New ASP.NET MVC 3 Project dialog box (Figure 10-1) has a Use HTML5 semantic markup checkbox. Microsoft has started the process of addingHTML5 support to Visual Studio. We have chosen to ignore HTML5 in this book. The MVC Framework is agnostic toward the version of HTML used in a project. HTML5 is a topic in its own right. If you are interested in learning more about HTML5, consider reading Adam’s The Definitive Guide to HTML5, also published by Apress.
注:最新的ASP.NETMVC 3项目对话框(图10-1)有一个“使用HTML 5语义标记”复选框。微软已经启动了把HTML5加入到Visual Studio的过程。我们在这本书中忽略了这个HTML 5选项。MVC框架在项目中使用的HTML版本是无法确知的(比如将来也可能用HTML 6等等 —译者注)。再则,HTML 5是一个有它自己权利的论题(即,HTML 5如何发展是HTML 5自己的事 —译者注)。如果你有兴趣学习更多HTML 5知识,可以考虑阅读Adam的“The Definitive Guide to HTML 5”(《HTML 5权威指南》),也由Apress出版。
The Internet Application and Intranet Application templates fill out the project to give a more complete starting point, using different authentication mechanisms that are suited to Internet and intranet applications(see Chapter 22 for details on both authentication systems).
Internet应用程序和Intranet应用程序模板扩充了项目以达到更复杂的起点,采用不同的认证机制以适应Internet和intranet应用程序(两种认证机制详情请参阅第22章)。
n Tip When using the Internet Application or Intranet Application template, you can also elect to create a unit test project as part of the Visual Studio solution. This is another convenience, since you can also create a test project yourself, as we did in Chapter 7.
提示:当使用Internet应用程序或Intranet应用程序模板时,你也可以选择生成一个单元测试项目作为VisualStudio解决方案的一部分。这是另一个便利,因为你也可以生成一个自己的测试项目,就像我们在第7章所做的那样。
You can see the difference between these three startup options in Figure 10-2, which shows the initial project set up for these three templates.
你可以在图10-2中看到这三个开始选项之间的差别,该图显示了这三个模板所建立的最初项目。

Figure 10-2. The initial configuration of MVC projects created using the Empty, Internet Application, and Intranet Application templates
图10-2. 用Empty、Internet应用程序、Intranet应用程序模板生成的MVC项目最初配置
The templates create projects that have a common structure. Some of the project items have special roles, which are hard-coded into ASP.NET or the MVC Framework. Others are subject to naming conventions. We have described each of these files and folders in Table 10-1.
这些模板生成了具有通用结构的项目。项目中的一些条目有特定的作用,它们被硬编码到了ASP.NET或MVC框架之中。其它则从属于命名约定。我们在表10-1中对每个文件或文件夹作了描述。
Table 10-1. Summary ofMVC 3 Project Items
| Folder or File | Description | Notes |
| /App_Data | This directory is where you put private data, such as XML files or databases if you are using SQL Server Express, SQLite, or other file-based repositories. | IIS will not serve the contents of this directory. |
| /bin | The compiled assembly for your MVC application is placed here, along with any referenced assemblies that are not in the GAC. | IIS will not serve the contents of this directory. You won’t see the bin directory in the Solution Explorer window unless you click the Show All Files button. Since these are binary files generated on compilation, you should not normally store them in source control. |
| /Content | This is where you put static content such as CSS files and images. | This is a convention but not required. You can put your static content anywhere that suits you. |
| /Controllers | This is where you put your controller classes. | This is a convention. You can put your controller classes anywhere you like, because they are all compiled into the same assembly. |
| /Models | This is where you put your view model and domain model classes, although all but the simplest applications benefit from defining the domain model in a dedicated project, as we demonstrated for SportsStore. | This is a convention. You can define your model classes anywhere in the project or in a separate project. |
| /Scripts | This directory is intended to hold the JavaScript libraries for your application. Visual Studio adds the libraries for jQuery and Microsoft AJAX helpers by default. | This is a convention. You can put script files in any location, as they are really just another type of static content. |
| /Views | This directory holds views and partial views, usually grouped together in folders named after the controller with which they are associated. | The /Views/Web.config file prevents IIS from serving the content of these directories. Views must be rendered through an action method. |
| /Views/Shared | This directory holds layouts and views which are not specific to a single controller. | |
| /Views/Web.config | This is not the configuration file for your application. It contains the configuration required to make views work with ASP.NET and prevents views from being served by IIS. | |
| /Global.asax | This is the global ASP.NET application class. Its code-behind class (Global.asax.cs) is the place to register routing configuration, as well as set up any code to run on application initialization or shutdown, or when unhandled exceptions occur. | The Global.asax file has the same role in an MVC application as it does in a Web Forms application. |
| /Web.config | This is the configuration file for your application. We’ll explain more about its role later in the chapter. | The Web.config file has the same role in an MVC application as it does in a Web Forms application. |
n Note As you’ll see in Chapter 23, an MVC application is deployed by copying the folder structure to your web server. For security reasons, IIS won’t serve files whose full paths contain Web.config, bin, App_code, App_GlobalResources, App_LocalResources, App_WebReferences, App_Data, orApp_Browsers. IIS will also filter out requests for .asax, .ascx, .sitemap, .resx, .mdb, .mdf, .ldf, .csproj, and various other file name extensions. If you do decide to restructure your project, you must be sure not to use these names and extensions in your URLs.
注:正如你将在第23章看到的,MVC应用程序是通过把目录结构拷贝到web服务器来部署的。出于安全性原因,IIS不会对完整路径含有Web.config、bin、App_code、App_GlobalResources、App_LocalResources、App_WebReferences、App_Data、或App_Browsers的文件进行服务。IIS也会过滤掉对.asax、.ascx、.sitemap、.resx、.mdb、.mdf、.ldf、.csproj以及各种其它文件扩展名的请求。如果你决定重构你的项目,你必须确保在你的URL中不会使用这些名字和扩展名。
Table 10-2 describes the folders and files that have special meanings if they exist in your MVC 3project.
如果你的MVC 3项目中存在表10-2所描述的文件或文件夹,它们具有特殊的含义。
Table 10-2. Summary of Optional MVC 3 Project Items
| Folder or File | Description |
| /Areas | Areas are a way of partitioning a large application into smaller pieces. We’ll explain how areas work in Chapter 11. |
| /App_GlobalResources /App_LocalResources | These contain resource files used for localizing Web Forms pages. |
| /App_Browsers | This folder contains .browser XML files that describe how to identify specific web browsers, and what such browsers are capable of (whether they support JavaScript, for example). |
| /App_Themes | This folder contains Web Forms themes (including .skin files), which influence how Web Forms controls are rendered. |
n Note Except for /Areas, the items in Table 10-2 are part of the core ASP.NET platform and are not particularly relevant for MVC applications. Adam goes into detail about the underlying ASP.NET features in his books Applied ASP.NET 4 in Context and Pro ASP.NET 4, both published by Apress.
注:除/Areas外,表10-3中的条目都是ASP.NET平台的核心部分,而与MVC应用程序并非特别相关。Adam(作者)在他的著作《Applied ASP.NET 4 in Context》和《Pro ASP.NET 4》中详细介绍了当今的ASP.NET特性,这两本书都由Apress出版。
Using the Internet and Intranet Application Controllers
使用Internet和Intranet应用程序控制器
Figure 10-2 shows that the Internet Application and Intranet Application templates add some default controllers, views, layouts, and view models. Quite a bit of functionality is included, especially in projects created using the Intranet Application template.
图10-2显示了Internet应用程序和Intranet应用程序模板添加的一些默认控制器、视图、布局、和视图模型。特别是在用Intranet应用程序模板生成的项目中,包括了相当多的功能。
The HomeController(present in both the Internet Application and Intranet Application templates) can render a Home page and an About page. These pages are generated with the default layout, which uses a soothing blue-themed CSS file.
HomeController(Internet和Intranet应用程序模板都有)可以渲染Home页和About页。这些页面是用默认的布局生成的,它们使用了一个舒心的蓝色主题的CSS文件。
The Internet Application template also includes AccountController, which allows visitors to register and log on. It uses forms authentication to keep track of whether you’re logged in, and it uses the core ASP.NET membership facility (which we discuss in Chapter22) to record the list of registered users. The membership facility will try to create a SQL Server Express file-based database on the fly in your /App_Data folder the first time anyone tries to register or log in. This will fail, after a long pause, if you don’t have SQL Server Express installed and running. AccountController also has actions and views that let registered users change their passwords. (The Intranet Application template omits AccountController because accounts and passwords are expected to be managed through a Windows domain/Active Directory infrastructure.)
Internet应用程序模板也包括了AccountController,这允许访问者进行注册和登录。它使用表单认证来跟踪你是否登录,而且它使用核心的ASP.NET成员工具(第22章讨论)来记录已注册用户。这个成员工具将在有人第一次试图注册或登录时,试着在你闲置的/App_Data文件夹中生成一个基于文件的SQL Server Express数据库。如果你未安装和运行SQL Server Express,经过一段较长时间的暂停之后,这一生成过程将会失败。AccountController也有让已注册用户修改其口令的动作和视图。(intranet应用程序模板略去了AccountController,因为账号和口令是期望通过一个Windows域/活动目录体系结构去管理的。)
The default controllers and views can be useful to get your project started, but we tend to use the Empty template so that our application contains only the items that we need.
默认的控制器和视图可能对你开始项目是有用的,但我们倾向于使用空模板,以使我们的应用程序只含有我们所需要的条目。
Understanding MVC Conventions
理解MVC约定
There are two kinds of conventions in an MVC project. The first kind are really just suggestions as to how you might like to structure your project. For example, it is conventional to put your JavaScript files in the Scripts folder. This is where other MVC developers would expect to find them, and where Visual Studio puts the initial JavaScript files for a new MVC project. But you are free to rename the Scripts folder, or remove it entirely, and put your scripts anywhere you like. That wouldn’t prevent the MVC Framework from running your application.
在一个MVC项目中有两种约定。第一种其实只是建议你如何去构造项目。例如,把你的JavaScript文件放在Scripts文件夹中是方便的。这是其他MVC开发人员期望找到脚本文件的地方,也是Visual Studio最初为一个新的MVC项目放置JavaScript文件的地方。但你可以自由地重命名Scripts文件夹,或完全删除它,并把你的脚本文件放在你喜欢的任何地方。这不会阻碍MVC框架运行你的应用程序。
The other kind of convention arises from the principle of convention over configuration, which was one of the main selling points that made Ruby on Rails so popular. Convention over configuration means that you don’t need to explicitly configure associations between controllers and their views. You just follow a certain naming convention, and everything works. There is less flexibility in changing your project structure when dealing with this kind of convention. The following sections explain the conventions that are used in place of configuration.
另一种约定源于约定优于配置的原则,这是使Ruby On Rails如此流行的主要卖点之一。约定优于配置意即,你不需要明确地配置控制器与其视图之间的关联。你只要遵照某种命名约定,一切都会正常工作。当涉及这种约定时,在修改你应用程序结构方面的灵活性较小。以下章节解释用来代替配置的这些约定。
n Tip All of the conventions can be changed using a custom view engine, which we cover in Chapter 15.
提示:所有约定都可以用一个自定义视图引擎来修改,我们将在第15章涉及这一论题。
Following Conventions for Controller Classes
遵循控制器类约定
Controller classes must have names that end with Controller, such as ProductController, AdminController, and HomeController.
控制器必须具有以Controller结尾的名字,如,ProductController、AdminController、及HomeController等。
When referencing a controller from an MVC route or an HTML helper method, you specify the first part of the name (such as Product), and the DefaultControllerFactory class automatically appends Controller to the name and starts looking for the controller class. You can change this behavior by creating your own implementation of the IControllerFactory interface, which we describe in Chapter 14.
当从一个MVC路由或一个HTML辅助方法引用一个控制器时,你指定控制器名的第一部分(如Product),而DefaultControllerFactory类自动地把Controller添加到该名字的后面,并开始去查找这个控制器类。你可以通过生成你自己IControllerFactory接口实现的办法来修改这种(默认)行为,我们将在第14章描述。
Following Conventions for Views
遵循视图约定
Views and partial views should go into the folder /Views/Controllername. For example, a view associated with the ProductController class would go in the /Views/Product folder.
视图及部分视图应该放在/Views/<控制器名>文件夹中。例如,一个与ProductController类相关联的视图应当放在/Views/Product文件夹中。
n Note Notice that we omit the Controller part of the class from the Views folder; we use the folder /Views/Product, not /Views/ProductController. This may seem counterintuitive at first, but it quickly becomes second nature.
注:注意,在Views文件夹中,我们忽略了控制器类名的Controller部分,我们使用的是/Views/Product文件夹,而不是/Views/ProductController。这也许最初感觉有点违背直觉,但这很快会成为你的第二本性。
The MVC Framework expects that the default view for an action method should be named after that method .For example, the view associated with an action method called List should be called List.cshtml (or List.aspx if you are using the legacy ASPX view engine).Thus, for the List action method in the ProductController class, the default view is expected to be /Views/Product/List.cshtml.
MVC框架期望对一个动作方法的默认视图应当按照该方法命名。例如,与名为List动作方法相关联的视图应该被叫做List.cshtml(或List.aspx,如果你用的是遗留的ASPX视图引擎)。这样,对于ProductController中的List动作方法,所期望的默认视图便是/Views/Product/List.cshtml。
The default view is usedwhen you return the result of calling the View method in an action method, likethis:
当你在动作方法中调用View方法返回结果时,使用的是默认视图,像这样:
return View();
You can specify a different view by name, like this:
你可以通过名字来指定不同的视图,像这样:
return View("MyOtherView");
Notice that we don’t include the file name extension or the path to the view. The MVC Framework will try to find the view using the file name extensions for the installed view engines (Razor and the ASPX engine by default).
注意,我们并没有包括文件扩展名或视图路径。MVC框架将试图采用用于所安装的视图引擎(默认是Razor或ASPX引擎)的扩展名来查找这个视图。
When looking for a view, the MVC Framework looks in the folder named after the controller and then in the /Views/Shared folder. This means that we can put views that will be used bymore than one controller in the /Views/Shared folder and rely on the framework to find them.
当查找一个视图时,MVC框架查看控制器命名的文件夹,然后是/Views/Shared文件夹。意即,你可以把要由多个控制器使用的视图放在/Views/Shared文件夹中,并依靠框架去找到它们。
Following Conventions for Layouts
遵循布局约定
The naming convention for layouts is to prefix the file with an underscore (_) character (as we explained in Chapter 9, this originates from WebMatrix, which also uses Razor), and layout files are placed in the /Views/Shared folder. Visual Studio creates a layout called _Layout.cshtml as part of the initial project template. This layout is applied to all views by default, through the /Views/_ViewStart.cshtmlfile, which we discussed in Chapter 5.
对于布局的命名约定是以下划线(_)字符作为文件名前缀(正如我们在第9章解释的那样,它起源于WebMatrix,它也使用Razor),而布局文件被放在/Views/Shared文件夹中。Visual Studio生成了一个名为_Layout.cshtml的文件,作为初始项目模板的一部分。默认情况下,布局,/Views/_ViewStart.cshtml文件,被运用于所有视图,我们在第5章对之作过讨论。
If you don’t want the default layout applied to views, you can change the settings in_ViewStart.cshtml (or delete the file entirely) to specify another layout in the view, like this:
如果你不想把默认布局用于视图,你可以修改_ViewStart.cshtml中的设置(或完全删除这个文件)以指定视图中的其它布局,像这样:
@{
    Layout ="~/Views/Shared/MyLayout.cshtml";
}
Or you can disable any layout for a given view, like this:
或者你可以为一个给定的视图取消任何布局,像这样:
@{
    Layout =null;
}
Debugging MVC Applications
调试MVC应用程序
You can debug an ASP.NETMVC application in exactly the same way as you debug an ASP.NET Web Forms application. The Visual Studio debugger is a powerful and flexible tool, with many features and uses. We can only scratch the surface in this book. We will show you how to set up the debugger, create breakpoints, and run the debugger on your application and unit tests.
你可以以调试ASP.NET的Web表单应用程序完全相同的方式来调试ASP.NET MVC应用程序。Visual Studio调试器是一个功能强大而灵活的工具,它附带了许多特性和运用。我们本书只能划过它的表层。我们将向你演示如何在你的应用程序和单元测试上设置调试器、生成断点、以及运行调试。
Creating the Project
生成项目
To demonstrate using the debugger, we have created a new MVC 3 project using the Internet Application template. This gives us the initial controller and views to use. We have called our project DebuggingDemo and checked the option to create a unit test project, as shown in Figure 10-3.
为了演示调试器的使用,我们已经用Internet应用程序模板生成了一个新的MVC 3项目。这给了我们可以使用的初始控制器和视图。我们把项目命名为DebuggingDemo,并选中了“create a unit test project(生成一个单元测试项目)”选项,如图10-3所示。
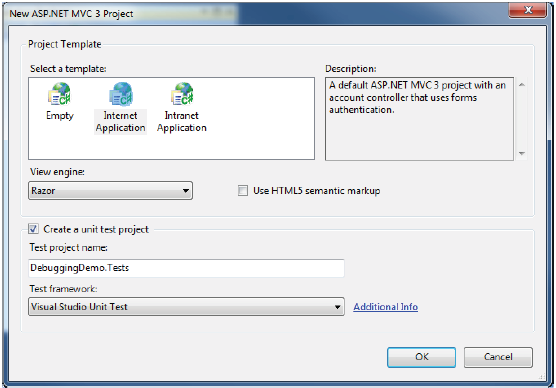
Figure 10-3. Creating the DebuggingDemo project
图10-3. 生成DebuggingDemo项目
Launching the Visual Studio Debugger
运行Visual Studio调试器
Before we can debug an MVC application, we should check our configuration in Visual Studio. We want to compile our C# classes (such as controllers and domain model entities) in debug mode. The menu for setting this option is shown in Figure10-4; Debug is the default.
在我们可以调试一个MVC应用程序之前,我们应该检查我们的Visual Studio配置。我们希望以调试模式编译我们的C#类(如控制器和域模型实体)。用于设置这一选项的菜单如图10-4所示,“调试”是默认值。
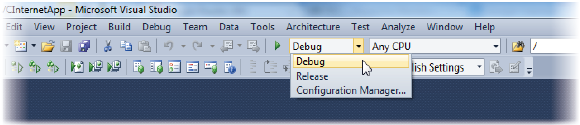
Figure 10-4. Selecting the Debug configuration
图10-4. 选择调试配置
The simplest way to start the debugger is to press F5. Alternatively, you can select Start Debugging from the Visual Studio Debug menu. The first time that you start the debugger on an application, you may see the dialog box shown in Figure 10-5.
启动调试器最简单的办法是按F5键。另一种办法是,从Visual Studio的“调试”菜单中选择“启动调试”。对一个应用程序第一次启动调试时,你可能会看到如图10-5所示的对话框。
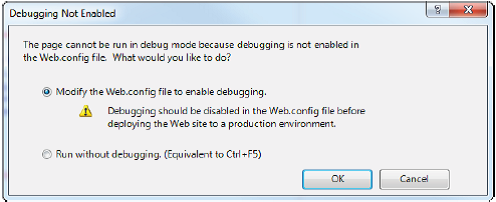
Figure 10-5. Enabling debugging in an MVC application
图10-5. 在一个MVC应用程序启用调试
If you select the option to modify the Web.config file, the compilation section will be updated so that the value of the debug attribute is true, as shown in Listing 10-1. You can change this value by hand if you prefer.
如果你选择“修改Web.config文件”选项,将对compilation小节进行更新,以使debug属性的值为ture,如清单10-1所示。如果你喜欢,你可以手工修改这个值。
Listing 10-1. Enabling the Debug Attribute in the Web.config File
<configuration>
    ...
    <system.web>
        <compilation debug="true"targetFramework="4.0">
             ...
        </compilation>
    </system.web>
</configuration>
n Caution Do not deploy your application to a production server without disabling the debug settings. We explain why this is, and how you can automate this change as part of your deployment process, in Chapter 23.
注意:在没有取消调试设置之前(指debug=”false”的设置 — 译者注),不要把你的应用程序部署到一个产品服务器上。我们将在第23章解释为什么要这么做,以及如何才能够在部署过程中自动修改这一设置。
At this point, your application will be started and displayed in a new browser window. The debugger will be attached to your application, but you won’t notice any difference until the debugger breaks (we explain what this means in the next section). To stop the debugger, select Stop Debugging from the Visual Studio Debug menu.
此刻,你的应用程序将运行并在一个新的浏览器窗口中显示。调试器将附着到你的应用程序上,但你不会注意到任何差异,直到调试器中断(我们在下一小节解释这意味着什么)。要停止调试器,从Visual Studio的“调试”菜单选择“停止调试”。
Causing the Visual Studio Debugger to Break
引发VisualStudio调试器中断
An application that is running with the debugger attached will behave normally until a break occurs, at which point the execution of the application is halted and control is turned over to the debugger. At this point, you can inspect and control the state of the application. Breaks occur for two main reasons: when a breakpoint is reached and when an unhandled exception arises. You’ll see examples of both in the following sections.
一个附着了调试器运行的应用程序将具有正常的行为,直到发生一个中断。这时,应用程序的运行被停止,控制被返回给调试器。此刻,你可以检查和控制应用程序的状态。中断发生于两个主要原因:达到中断点时,和出现未处理异常时。你将在以下小节看到这两种例子。
n Tip You can manually break the debugger by selecting Break All from the Visual Studio Debug menu while the debugger is running.
提示:在调试器运行期间,你可以通过在Visual Studio的“调试”菜单中选择“全部终止”的办法,来中断调试器。
Using Breakpoints
使用断点
A breakpoint is an instruction that tells the debugger to halt execution of the application and hand control to the programmer. At this point, you can inspect the state of the application and see what is happening. To demonstrate a breakpoint, we have added some statements to the Index method of the HomeController class, as shown in Listing 10-2.
一个断点是告诉调试器停止执行应用程序、并把控制交给程序员的一个指令。这时,你可以检查应用程序的状态,并查看发生了什么。为了演示一个断点,我们把一些语句加到HomeController类的Index方法,如清单10-2所示。
Listing 10-2. Additional Statements in the HomeController Class
using System.Web.Mvc;

namespace DebuggingDemo.Controllers {
    publicclass HomeController : Controller {
        publicActionResult Index() {
            intfirstVal = 10;
            intsecondVal = 5;
            intresult = firstVal / secondVal;
            ViewBag.Message= "Welcome to ASP.NET MVC!";
            returnView(result);
        }

        publicActionResult About() {
            return View();
        }
    }
}
These statements don’t do anything interesting. We’ve included them just so we can demonstrate some o fthe debugger features. For this demonstration, we want to add a breakpoint for the statement that sets a value for the ViewBag.Message property.
这些语句没做什么有趣的事。我们把它们包括进来只是要能够演示一些调试器特性。对于本演示,我们只是想对一条语句添加一个断点,这是一个为ViewBag.Message属性设置一个值的语句。
To create a breakpoint, right-click a code statement and select Breakpoint → Insert Breakpoint from the pop-up menu. A red dot will appear to the left of the statement, as shown in Figure10-6.
要生成一个断点,右击一条代码语句,然后从弹出菜单选择“断点”→“插入断点”,一个红点将出现在这条语句的左边,如图10-6所示。
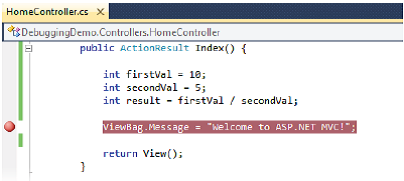
Figure 10-6. Adding a breakpoint
图10-6. 添加一个断点
If we start the application with the debugger (by selecting Start Debugging from the Debug menu), the application will run until the statement that has the breakpoint is reached, at which point the debugger will transfer control back to us, as shown in Figure 10-7.
如果我们启动带有调试器的应用程序(选择“调试”菜单的“启动调试”),该应用程序将运行,直至到达这条具有断点的语句,这时,调试器将把控制传给我们,如图19-7所示。
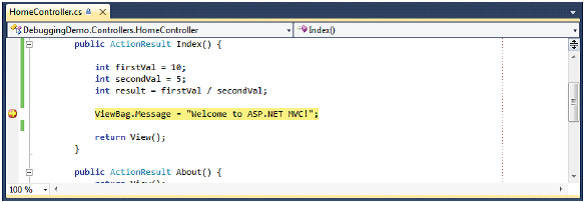
Figure 10-7. Hitting a breakpoint
图10-7. 击中一个断点
n Note A breakpoint is triggered only when the statement it is associated with is executed. Our example breakpoint was reached as soon as we started the application because it is inside the action method that is called when a request for the default URL is received. If you place a breakpoint inside another action method, you must use the browser to request a URL associated with that method. This can mean working with the application in the way a user would or navigating directly to the URL in the browser window.
注:一个断点只当与之相关的语句被执行时才被触发。我们的例子断点只要我们启动应用程序就会达到,因为它位于默认URL的请求被接收时就进行调用的动作方法中。如果你把一个断点放在另一个动作方法中,你必须用浏览器请求与这个动作方法相关联的URL。这可能意味着以一个用户的方式与应用程序一起工作,或在浏览器窗口中直接导航到这个URL。
You can place breakpoints where you think there are problems in the application. Once a breakpoint has been reached, you can see the call stack that has led to the currently executed method, view the values of fields and variables, and much more. Figure 10-8shows two ways in which you can see the values of the variables we added to the Index method: using the Locals window and by moving the mouse over the variable in the code window.
你可以把断点放在你认为应用程序有问题的任何地方。一旦已经达到了一个断点,你就可以看到已经引导到当前执行方法的调用栈,查看字段和变量的值等等。图10-8显示了两种方式,你可以在其中看到我们添加到Index方法的变量值:采用Locals(位置)窗口,以及把鼠标放到代码窗口中的变量上。

Figure 10-8. Viewing variable values in the debugger
图10-8. 在调试器中查看变量值
You can also control the execution of the application. If you drag the yellow arrow that appears in the breakpoint dot, you can specify the statement that will be executed next. Additionally, you can use the Step Into, Step Over, and Step Out items in the Debug menu.
你也可以控制应用程序的执行。如果你拽动断点中出现的黄色箭头,你可以指定下一次将被执行的语句。另外,你可以用“调试”菜单中的“Step Into(逐句)”、“Step Over(跳过)”、和“Step Out(跳出)”选项。
To remove a breakpoint, right-click the code statement and select Breakpoint → Delete Breakpoint from the pop-up menu. To remove all breakpoints, select Delete All Breakpoints from the Debug menu.
要删除一个断点,右击此代码语句,并从弹出菜单选择“断点”→“删除断点”。要删除所有断点,从“调试”菜单中选择“删除所有断点”。
n Tip You can add breakpoints to views in order to debug Razor views. This can be very helpful for inspecting the values of view model properties, for example. You add a breakpoint to a view just as we did in the code file: right-click the Razor statement that you are interested in and select Breakpoint → Insert Breakpoint.
提示:为了调试视图,你可以在视图上添加断点。例如,这对考查视图模型属性的值可能是很有用的。你可以把断点加到视图上,就像我们在代码文件中所做的那样:右击你感兴趣的Razor语句,并选择“断点”→“插入断点”。
Breaking on Exceptions
异常中断
Unhandled exceptions are a fact of development. One of the reasons that we do a lot of unit and integration testing in our projects is to minimize the likelihood that such an exception will occur in production. The Visual Studio debugger will break automatically when it sees an unhandled exception.
未处理异常是一种开发事实。我们在项目中做很多单元和集成测试的原因之一就是最小化这种异常在产品中出现的可能性。Visual Studio调试器在它看到一个未处理异常时,自动中断。
n Note Only unhandled exceptions cause the debugger to break. An exception becomes handled if you catch and handle it in a try...catch block. Handled exceptions are a useful programming tool. They are used to represent the scenario where a method was unable to complete its task and needs to notify its caller. Unhandled exceptions are bad, because they represent an unexpected condition that we didn’t try to compensate for (and because they drop the userinto an error page).
注:只有未处理异常会引起调试器中断。如果你在一个try…catch块中捕捉并处理了一个异常,这个异常就变成已处理的。已处理异常是一种有用的编程工具。它们被用于表示这样的场景:一个方法不能完成它的任务,并需要通知它的调用者。未处理异常是有害的,因为它们表示了我们没有试图弥补的一种异常情况(而且因为这种异常把用户扔到了一个错误页面)。
To demonstrate breaking on an exception, we have made a small change to the Index action method, as shown in Listing 10-3.
为了演示异常中断,我们对Index动作方法做了一个小的修改,如清单10-3所示。
Listing 10-3. Adding a Statement That Will Cause an Exception
using System.Web.Mvc;

namespace DebuggingDemo.Controllers {
    publicclass HomeController : Controller {
        publicActionResult Index() {
            ViewBag.Message= "Welcome to ASP.NET MVC!";
            intfirstVal = 10;
            intsecondVal = 0;
            intresult = firstVal / secondVal;
            returnView(result);
        }

        publicActionResult About() {
            returnView();
        }
    }
}
We changed the value of the secondVal variable to be 0, which will cause an exception in the statement that divides firstVal by secondVal. If you start the debugger, the application will run until the exception is thrown, at which point the exception helper pop-up will appear, as shown in Figure 10-9.
我们把secondVal变量的值改为0,这会在firstVal除以secondVal语句中引发一个异常。如果你启动调试器,应用程序将运行直到弹出这个异常,这时,会弹出异常帮助窗口,如图10-9所示。
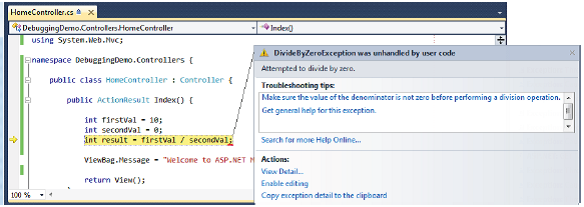
Figure 10-9. The exception helper
图10-9. 异常帮助窗口
The exception helper gives you details of the exception. When the debugger breaks on an exception, you can inspect the application state and control execution, just as when a breakpoint is hit.
异常帮助窗口给出了该异常的细节。当调试器中断一个异常时,你可以检测应用程序的状态并进行控制执行,就像断点被击中那样。
Using Edit and Continue
使用编辑并继续
One of the most interesting Visual Studio debugging features is called Edit and Continue. When the debugger breaks, you can edit you code and then continue debugging. Visual Studio recompiles your application and re-creates the state of your application at the moment of the debugger break.
一个最有趣的VisualStudio调试特性叫做“编辑并继续”。当调试器中断时,你可以编辑你的代码,然后继续调试。Visual Studio重新编译你的应用程序,并重新生成调试器中断时刻的应用程序状态。
Enabling Edit and Continue
启用编辑并继续
We need to enable Edit and Continue in two places:
我们需要在两个地方启用“编辑并继续”:
l In the Edit and Continue section of the Debugging options (select Options from the Visual Studio Tools menu), make sure that Enable Edit and Continue is checked, as shown in Figure 10-10.
在调试选项的“编辑并继续”小节(从Visual Studio的“工具”菜单中选择“选项”)。确保选中了“启用编辑并继续”,如图10-10所示。
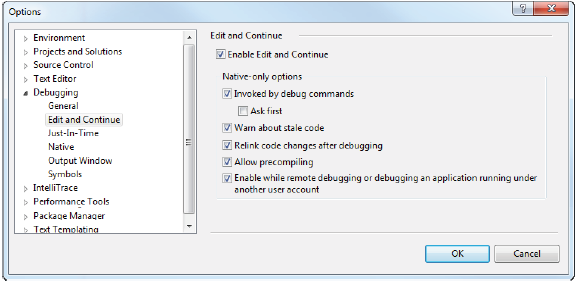
Figure 10-10. Enabling Edit and Continue in the Options dialog box
图10-10. 选项对话框中的“启用编辑并继续”
l In the project properties (select <projectname> Properties from the Visual Studio Project menu), click the Web section and ensure thatEnable Edit and Continue is checked, as shown in Figure 10-11.
在项目属性中(从VisualStudio的“项目”菜单中选择“<项目名>属性”),点击Web小节,并确保选中了“启用编辑并继续”,如图10-11所示。
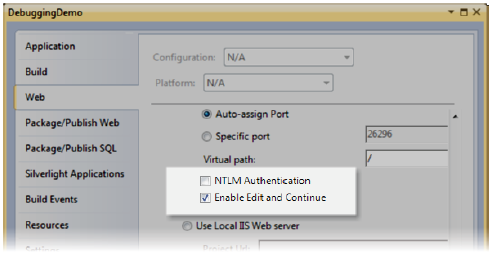
Figure 10-11. Enabling Edit and Continue in the project properties
图10-11. 项目属性中的“启用编辑并继续”
Modifying the Project
修改项目
The Edit and Continue feature is somewhat picky. There are some conditions under which it cannot work. One such condition is present in the Index action method of the HomeController class: the use of dynamic objects. In this case, we are using the View Bag feature to set a message to be displayed by the view. We havereplaced this with a call to the View Data feature instead, as shown in bold in Listing 10-4.
“编辑并继续”特性有点过于讲究。有某些情况下它不能工作。一种情况是HomeController类的Index动作方法中的情况:使用动态对象。在这种情况下,我们在使用View Bag特性来设置由视图显示的消息。我们用一个View Data特性来代替它,如清单10-4的黑体所示。
Listing 10-4. Removing the View Bag Call from the Index Method
public ActionResult Index() {
    intfirstVal = 10;
    intsecondVal = 0;
    intresult = firstVal / secondVal;
    ViewData["Message"] ="Welcome to ASP.NET MVC!";
    returnView(result);
}
We need to make a corresponding change in the Index.cshtml view, as shown in Listing 10-5.
我们需要在Index.cshtml视图中作相应的修改,如清单10-5所示。
Listing 10-5. Removing the View Bag Call from the View
@model int
@{
    ViewBag.Title = "Home Page";
}
<h2>@ViewData["Message"]</h2>
<p>
    The calculation result value is: @Model
</p>
We’ve also taken the opportunity to make the view strongly typed and display the result of the calculation performed in the Index method in the output.
我们也借此机会让视图为强类型,并显示输出在Index方法中执行的计算结果。
Editing and Continuing
编辑并继续
We are ready for a demonstration of the Edit and Continue feature. Begin by selecting Start Debugging from the Visual Studio Debug menu. The application will be started with the debugger attached and run until it reaches the line where we perform a simple calculation in the Index method. The value of the second parameter iszero, which causes an exception to be thrown. At this point, the debugger halts execution, and the exception helper pops up (see Figure 10-9).
我们做好了演示“编辑并继续”特性的准备。从调试菜单选择启动调试开始。应用程序将附带调试器启动并运行,直到它到达我们在Index方法中执行简单计算的这一行。第二个参数的值是零,这会引发一个异常弹出。
Click the Enable editing link in the exception helper window, and change the statement that performs the calculation as shown in Listing 10-6.
在异常帮助窗口中点击“启用编辑”,并修改那条执行计算的语句,如清单10-6所示。
Listing 10-6. EditingLive Code
public ActionResult Index() {
    intfirstVal = 10;
    intsecondVal = 0;
    intresult = firstVal / 5;
    ViewData["Message"]= "Welcome to ASP.NET MVC!";
    returnView(result);
}
Select Continue from the Debug menu. The application will continue to execute, and the browser will display the rendered page, which is shown in Figure 10-12.
从“调试”菜单选择“继续”。应用程序将继续执行,而浏览器便会显示所渲染的页面,如图10-12所示。

Figure 10-12. The effect of Edit and Continue
图10-12. “编辑并继续”的效果
Take a moment to reflection what happened here. We started the application with a bug in it—an attempt to divide a value by zero. The debugger detected the exception and stopped executing the program. We edited the code to fix the bug, replacing the reference to the variable with the literal value 5. We then told the debugger to continue the execution.
花一点时间去思考这里发生了什么。我们启动一个含有缺陷的应用程序— 一个除以零值的企图。调试器检测到了这个异常并停止了程序的执行。我们编辑了代码来修正这个缺陷,用一个字面值5替换了对变量的引用。然后我们告诉调试器去继续执行。
At this point, Visual Studio recompiled our application so that our change was included in the build process, restarted execution, re-created the state that led to the exception,and then carried on as normal. The browser received the rendered result, which reflected our correction.
这时,Visual Studio重新编译了我们的应用程序,以使我们的修改被包括在这个已建立的过程中、重新执行、重新生成了导致这个异常的状态,随后得到了正常执行。浏览器收到了所渲染的结果,这反映了我们的修正。
Without Edit and Continue, we would have needed to stop the application, make our changes, compile the application, and restart the debugger. We would then use the browser to repeat the steps that we took up to the moment of the debugger break. It is avoiding this last step that can be the most important. Complex bugs may require many steps through the application to re-create, and the ability to test potential fixes without needing to repeat those steps over and over can save the programmer’s time and sanity.
没有“编辑并继续”,我们就需要停止应用程序、作出修改、编译应用程序、并重启调试器。我们要用浏览器来重复我们在调试中断期间的这些步骤。这避免最后一步(重启调试器— 译者注)可能是最重要的。复杂的缺陷可能需要涉及应用程序再生的许多步骤,而且测试潜在修正而不需要一次又一次地重复这些步骤的能力可以节省程序员的时间和精力。
DEBUGGING UNIT TESTS
调试单元测试
We can use the Visual Studio debugger to debug unit tests. We do this by selecting one of the options in the Test → Debug menu. This is like running the unit tests, but with the debugger attached. That may seem like an odd thing to do, but there are two situations in which this is a useful feature:
我们可以使用Visual Studio调试器来调试单元测试。我们通过选择“测试”→“调试”菜单中的一个选项的办法来进行这一工作。这很像在运行单元测试,但却附着了调试器。这似乎在做一件奇怪的事情,但在两种情况下这是一种有用的特性:
- When you are getting unexpected or inconsistent behavior from a unit test. When this happens, you can use breakpoints to interrupt execution of the unit test and see what is going on.
当你得到一个单元测试的异常或不一致行为时。出现这种情况时,你可以用断点来中断这个单元测试的执行,并看看是怎么回事。 - When you want to know more about the state of a test when it fails. This is the situation we found ourselves facing most frequently. The Assert methods we use to check the result of a unit test throw an exception if the specific condition isn’t true, and since the debugger breaks when it encounters an unhandled exception, we can debug our unit test, wait until it fails, and then see what was happening up until the moment the assertion failed.
当你在单元测试失败时,想更多地了解该单元测试的状态。这是我们最经常要面对的情况。如果我们所指定的条件不为真,我们用来检查单元测试结果的Assert方法会弹出一个异常,而从调试器遇到一个未处理异常而中断开始,我们可以调试我们的单元测试、等待直到它失败、然后看看直到断言失败时都发生了些什么。
Project-Wide Dependency Injection
项目范围的依赖性注入
In the chapters that follow, you’ll see just how many different ways the MVC Framework provides fo ryou to extend or customize how requests are serviced, each of which is defined by an interface to implement or a base class from which to derive.
在以下各章中,你将看到MVC框架为你提供了许多不同的办法去扩展或定制对请求如何进行服务,每一种办法都是由一个要实现的接口,或一个从中派生的基类进行定义的。
You have already seen one example of customizing the MVC Framework when we developed the SportsStore application. We derived from the DefaultControllerFactory class to create NinjectControllerFactory so that we could create controllers using Ninject to manage DI. If we followed this approach for each of the points of customization in the MVC Framework, we would end up being able to use DI throughout an application, but we would have a lot of code duplication and more Ninject kernels than we would ideally like.
在我们开发SportsStore应用程序时,你已经看到了定制MVC框架的一个例子。我们从DefaultControllerFactory类派生以生成NinjectControllerFactory,以使我们可以生成用Ninject来管理DI的控制器。如果我们对MVC框架中的每个定制点都遵循这种办法,我们最终将对整个应用程序都能使用DI,但是,我们也会有很多重复代码和比我们想象更多的Ninject内核。
When the MVC Framework needs to create an instance of a class, it calls the static methods of theSystem.Web.Mvc.DependencyResolver class. We can add DI throughout an MVC application by implementing the IDependencyResolver interface and registering our implementation with DependencyResolver. That way, whenever the framework needs to create an instance of a class, it will call our class, and we can call Ninject to create the object.
当MVC框架需要生成一个类的实例时,它调用System.Web.Mvc.DependencyResolver类的静态方法。我们可以通过实现IDependencyResolver接口,并用DependencyResolver来注册这个实现的办法把DI添加到整个MVC应用程序。这样,在框架需要生成一个类实例的任何时候,它将调用我们的类,而我们可以调用Ninject来生成这个对象。
We didn’t consolidate our DI during the development of SportsStore because we just wanted to demonstrate adding DI to controllers. Listing 10-7 shows how we can implement the IDependencyResolver interface for that application.
我们在SportsStore的开发期间未考虑DI,因为我们只想演示把DI添加到控制器。清单19-7演示了我们可以如何为这个应用程序实现IDependencyResolver接口。
Listing 10-7. The NinjectIDependencyResolver Implementation
using System;
using System.Collections.Generic;
using System.Web.Mvc;
using Ninject;
using Ninject.Parameters;
using Ninject.Syntax;
using SportsStore.Domain.Abstract;
using SportsStore.Domain.Concrete;
using SportsStore.WebUI.Infrastructure.Abstract;
using SportsStore.WebUI.Infrastructure.Concrete;
using System.Configuration;

namespace SportsStore.WebUI.Infrastructure {
    publicclass NinjectDependencyResolver : IDependencyResolver {
        privateIKernel kernel;
        publicNinjectDependencyResolver() {
            kernel= new StandardKernel();
            AddBindings();
        }

        publicobject GetService(Type serviceType) {
            return kernel.TryGet(serviceType);
        }

        publicIEnumerable<object> GetServices(Type serviceType) {
            returnkernel.GetAll(serviceType);
        }

        publicIBindingToSyntax<T> Bind<T>() {
            returnkernel.Bind<T>();
        }

        publicIKernel Kernel {
            get{ return kernel; }
        }

        privatevoid AddBindings() {
            //put additional bindings here
            Bind<IProductRepository>().To<EFProductRepository>();
            Bind<IAuthProvider>().To<FormsAuthProvider>();

            //create the email settings object
            EmailSettingsemailSettings = new EmailSettings {
                WriteAsFile = bool.Parse(
                    ConfigurationManager.AppSettings["Email.WriteAsFile"] ??"false")
                };

            Bind<IOrderProcessor>()
                     .To<EmailOrderProcessor>()
                     .WithConstructorArgument("settings", emailSettings);
        }
    }
}
This class is simpler than it looks. The first two methods are called by the MVC Framework when it requires a new instance of a class, and we simply call the Ninject kernel to pass along the request. We have added the Bind method so that we can add bindings from outside this class. This is strictly optional because we have also included the AddBindings method, which is called from the constructor, just as we did in the NinjectControllerFactory class in Chapter 7.
这个类比它看上去要简单些。最初两个方法是由MVC框在它请求一个类的新实例时调用的,而我们只是简单地调用Ninject内核来传递这个请求。我们已经添加了Bind方法,于是我们可以从这个类的外部添加绑定。这是一个严格的选项,因为我们也已经包括了AddBindings方法,它通过构造器被调用,就像我们在第7章的NinjectControllerFactory类中所做的那样。
We can now delete the NinjectControllerFactory class and register the more general NinjectDependencyResolver class in the Application_Start method of Global.asax,as shown in Listing 10-8.
现在,我们可以删除NinjectControllerFactory类,并在Global.asax的Application_Start方法中注册这个更通用的NinjectDependencyResolver类,如清单10-8所示。
Listing 10-8. Registering the IDependencyResolver Implementation
protected void Application_Start() {
    AreaRegistration.RegisterAllAreas();
    RegisterGlobalFilters(GlobalFilters.Filters);
    RegisterRoutes(RouteTable.Routes);

     DependencyResolver.SetResolver(newNinjectDependencyResolver());
    ModelBinders.Binders.Add(typeof(Cart),new CartModelBinder());
}
With these changes, we have put Ninject at the heart of the MVC application. We can still take advantage of the extension points in the MVC Framework, but we no longer need to if all we want to do is introduce DI into some part of the request pipeline.
利用这些修改,我们已经把Ninject放到了MVC应用程序的心脏。如果我们想要做的只是把DI引入请求管道的某个部分,我们仍然可以利用MVC框架中的扩展点,但我们不再需要了。
Summary
概要
In this chapter, we have shown you the structure of a Visual Studio MVC 3 project and how the various parts fit together. We have also touched on two of the most important characteristics of the MVC Framework: convention and extensibility. These are topics that we will return to again and again in the chapters that follow, as we dig deeper into how the MVC Framework operates.
本章中,我们向你演示了VisualStudio MVC 3项目的结构,以及各种部件如何装配在一起。我们也接触了MVC框架的两个最重要的特征:约定和可扩展性。这些是以下各章中,我们深入到如何操纵MVC框架时,一次又一次地返回来讨论的论题。


 被折叠的 条评论
为什么被折叠?
被折叠的 条评论
为什么被折叠?
 到【灌水乐园】发言


