


我们要实现的功能是:
1.未登录的情况下,点击某个按钮进入到不需要登录的功能,则直接进入
2.未登录的情况下,点击某个按钮进入到需要登录的功能A,则先进入登录界面,登录成功后直接跳转到这个功能A,登录不成功不跳转
3.已经登录的情况下,点击某个按钮进入到需要登录的功能A,则直接进入
实现这个功能有简单版的(重复代码会多,容易理解),稍复杂版的(简单版的封装,重复代码少,逻辑稍微有点复杂)
简单版目录截图:
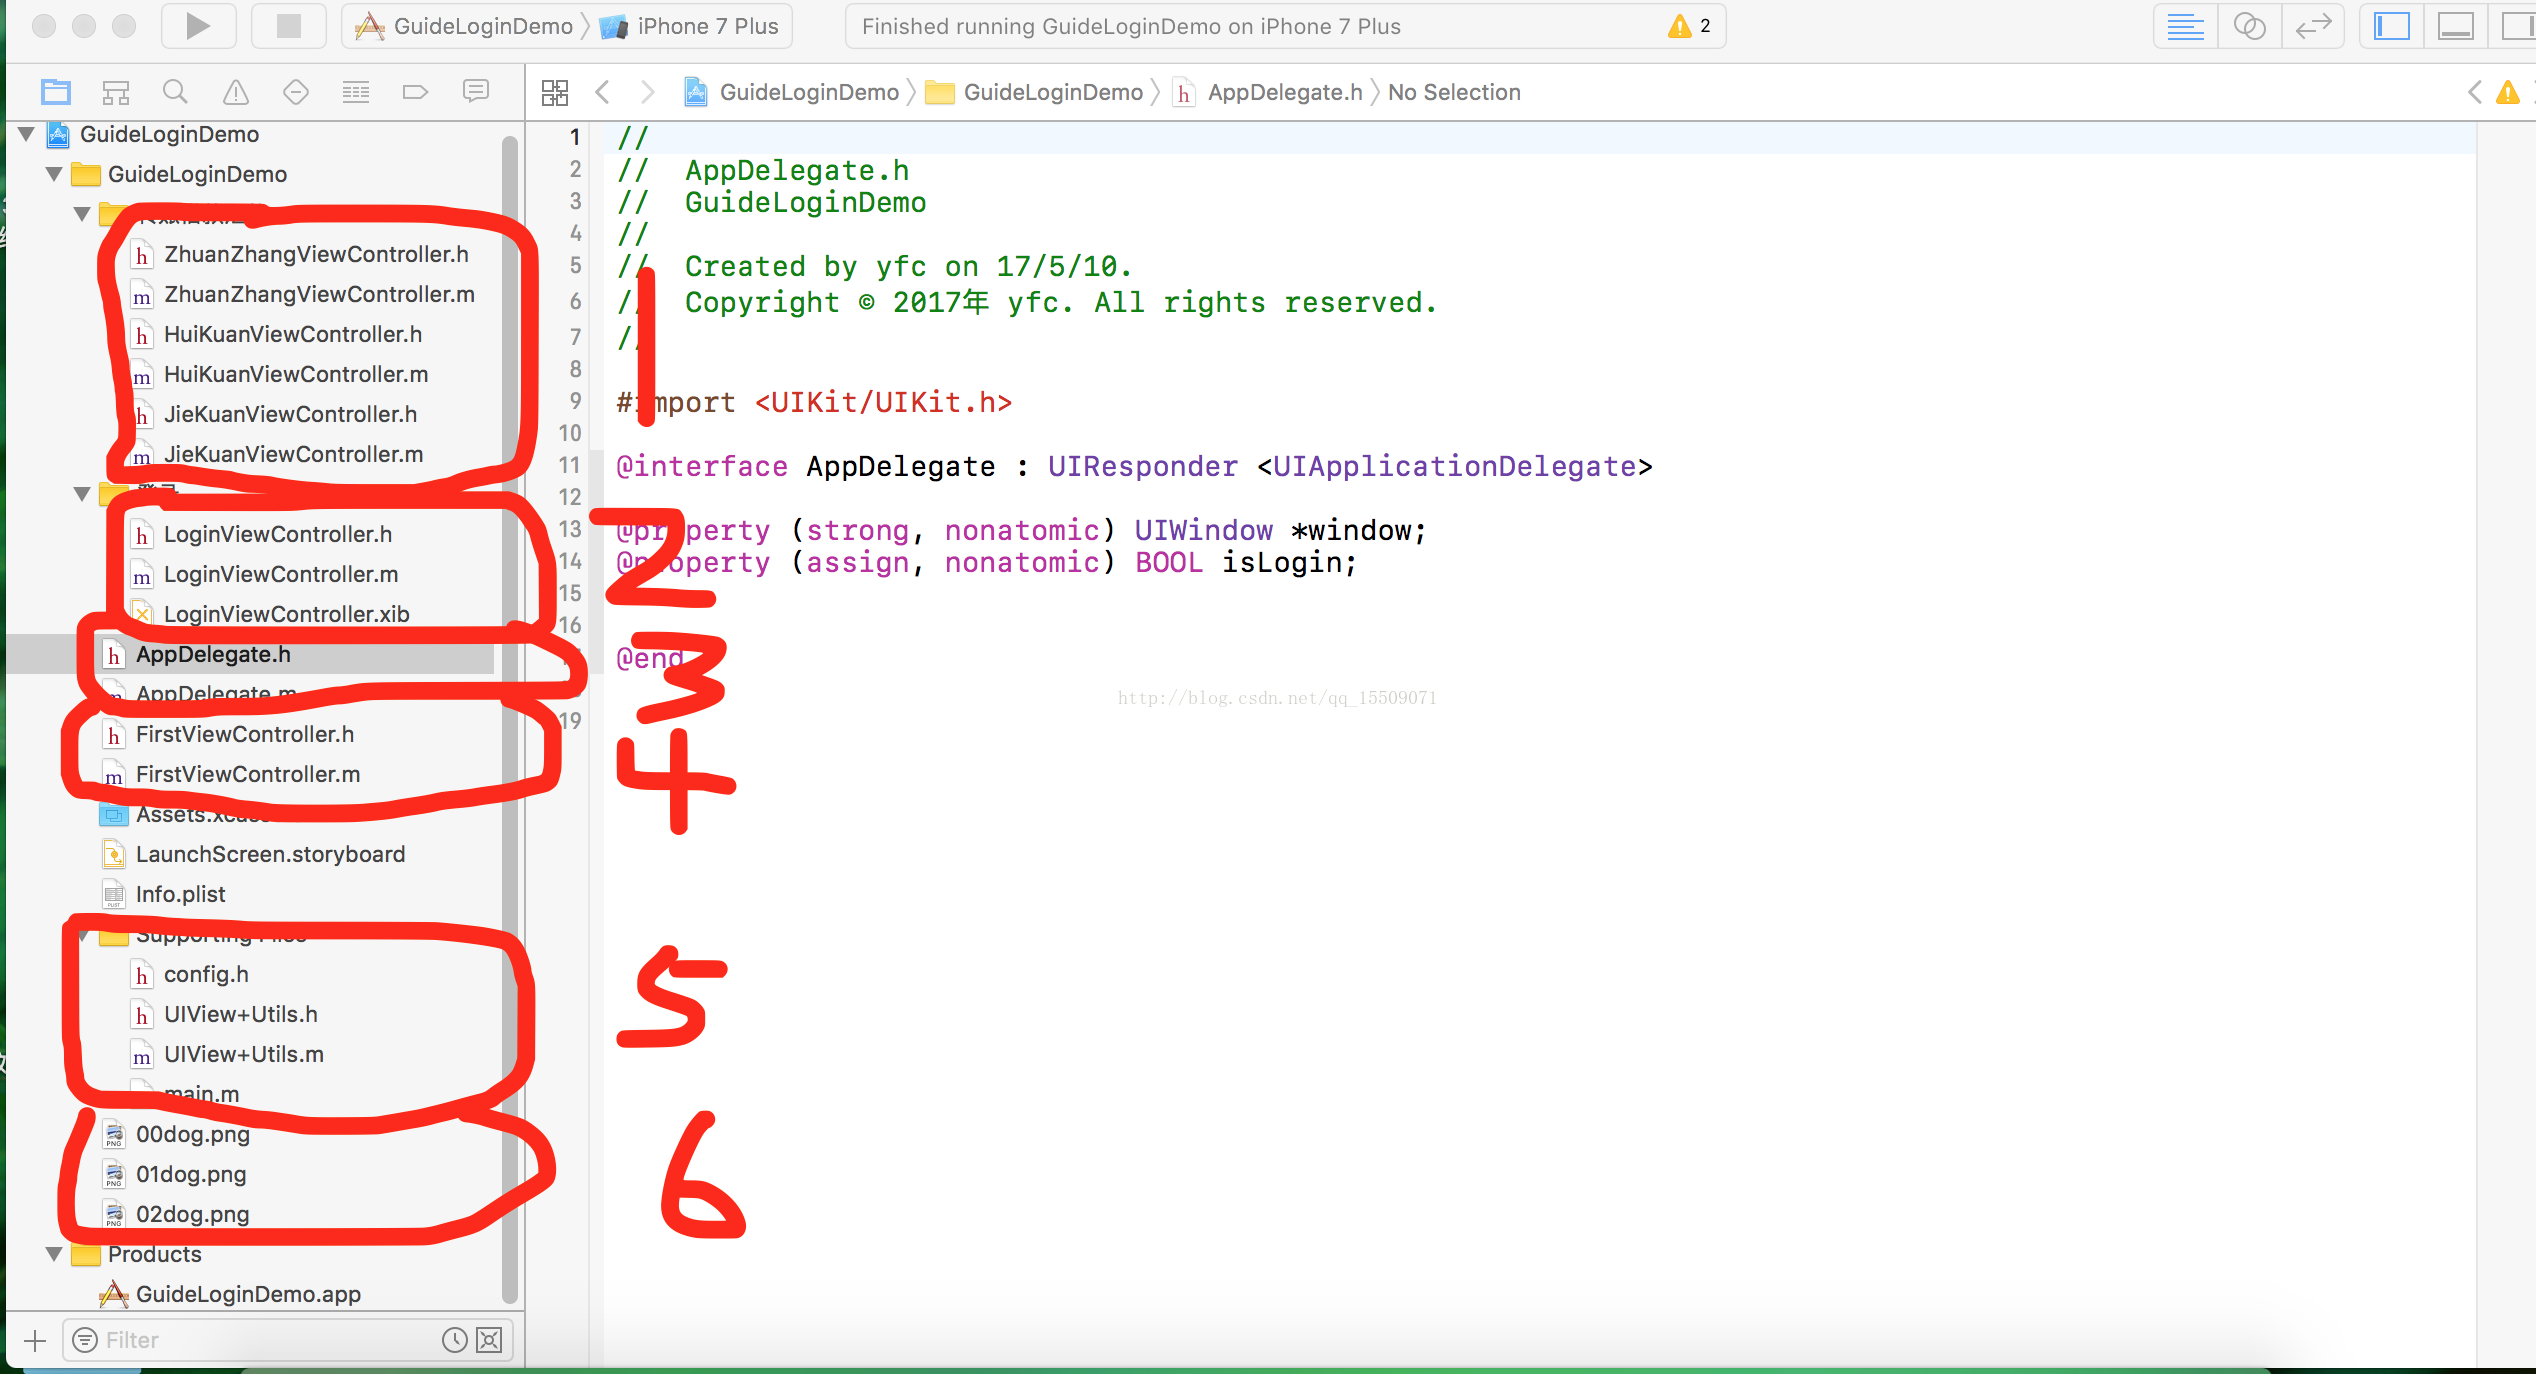
说明:
1是三个功能页面,分别为转账,汇款,借款
2是登录界面,包括:用户名输入框,密码输入框,登录按钮,取消按钮
3是AppDelegate 设置TabbarController
4是TabbarController的viewControllers元素,页面包括三个圆按钮
5是 写宏定义的文件 和 frame的方便调用方法
6是按钮图标
简单实现的demo地址是:
https://github.com/XiaoHeHe1/GuideLoginDemoSimple
下面说实现过程,只贴关键代码,
1.用一个全局变量记录是否登录 ,点击一个按钮时,进行判断,如果没有登录则往NSNotificationCenter添加一个观察者和名字然后展示登录界面
//三个按钮的点击事件
- (void)btnClicked:(UIButton *)btnn{

    if (btnn.tag == 0) {
        //
        //判断是否登录 登录了直接进 没登录引导登录并登录成功后直接跳到对应业务
        //
        if (APPLICATION.isLogin == YES) {
            [self jumpToZhuanZhang];
        }else{
            //
            //先移除本通知,原因是:点击一个功能跳到登录界面,但是在登录界面点的取消,反复操作,再点这个功能,
            //相同的通知会增加多次,登陆成功后会多次进入相应的功能
            //
            [[NSNotificationCenter defaultCenter] removeObserver:self name:@"LOGIN_ZZ" object:nil] ;
            [[NSNotificationCenter defaultCenter] addObserver:self selector:@selector(jumpToZhuanZhang) name:@"LOGIN_ZZ" object:nil];
            LoginViewController *loginVC = [[LoginViewController alloc]init];
            [self.navigationController presentViewController:loginVC animated:YES completion:^{}];
        }
    }else if(btnn.tag == 1){
        if (APPLICATION.isLogin == YES) {
            [self jumpToHuiKuan];
        }else{

            [[NSNotificationCenter defaultCenter] removeObserver:self name:@"LOGIN_HK" object:nil] ;
            [[NSNotificationCenter defaultCenter] addObserver:self selector:@selector(jumpToHuiKuan) name:@"LOGIN_HK" object:nil];
            LoginViewController *loginVC = [[LoginViewController alloc]init];
            [self.navigationController presentViewController:loginVC animated:YES completion:^{

            }];
        }

    }else{
        if (APPLICATION.isLogin == YES) {
            [self jumpToJieKuan];
        }else{

            [[NSNotificationCenter defaultCenter] removeObserver:self name:@"LOGIN_JK" object:nil] ;
            [[NSNotificationCenter defaultCenter] addObserver:self selector:@selector(jumpToJieKuan) name:@"LOGIN_JK" object:nil];
            LoginViewController *loginVC = [[LoginViewController alloc]init];
            [self.navigationController presentViewController:loginVC animated:YES completion:^{

            }];
        }

    }

}
-(void)jumpToZhuanZhang{
    ZhuanZhangViewController *vc = [[ZhuanZhangViewController alloc]init];
    vc.hidesBottomBarWhenPushed =YES;
    [self.navigationController pushViewController:vc animated:YES];
}
-(void)jumpToHuiKuan{
    HuiKuanViewController *vc = [[HuiKuanViewController alloc]init];
    vc.hidesBottomBarWhenPushed =YES;
    [self.navigationController pushViewController:vc animated:YES];
}
-(void)jumpToJieKuan{
    JieKuanViewController *vc = [[JieKuanViewController alloc]init];
    vc.hidesBottomBarWhenPushed =YES;
    [self.navigationController pushViewController:vc animated:YES];
}
2.登录验证成功后,去掉登录页面,并发送通知执行。不成功则在当前页t停留
- (IBAction)loginBtnClicked:(id)sender {

    if (self.userName.text.length > 0 && self.passWord.text.length > 0) {

        APPLICATION.isLogin = YES;

        [self dismissViewControllerAnimated:YES completion:^{
            [[NSNotificationCenter defaultCenter] postNotificationName:@"LOGIN_ZZ" object:nil ];
            [[NSNotificationCenter defaultCenter] postNotificationName:@"LOGIN_HK" object:nil ];
            [[NSNotificationCenter defaultCenter] postNotificationName:@"LOGIN_JK" object:nil ];

        }];
    }else{
        UIAlertView *alertView = [[UIAlertView alloc]initWithTitle:@"提示" message:@"输入有误" delegate:nil cancelButtonTitle:@"确定" otherButtonTitles:nil, nil];
        [alertView show];
    }
}
3.这样基本就实现了,但是有问题。依次点击转账按钮---->出现登录界面--->点取消--->登录界面消失--->点汇款按钮---->出现登录界面--->输入用户名密码点登录。结果是依次进入了转账页面和汇款页面。修改这个问题需要增加一个enum记录引导登录的功能。代码更改为:
********声明********


typedef enum JumpType{ ZHUANZHANG_HOME_LOGIN = 0, HUIKUAN_HOME_LOGIN , JIEKUAN_HOME_LOGIN , }MYJumpType;


********转账按钮点击事件********

    if (btnn.tag == 0) {
        //
        //判断是否登录 登录了直接进 没登录引导登录并登录成功后直接跳到对应业务
        //
        if (APPLICATION.isLogin == YES) {
            [self jumpToZhuanZhang];
        }else{
            //
            //先移除本通知,原因是:点击一个功能跳到登录界面,但是在登录界面点的取消,反复操作,再点这个功能,
            //相同的通知会增加多次,登陆成功后会多次进入相应的功能
            //
            APPLICATION.jumpType = ZHUANZHANG_HOME_LOGIN;
            [[NSNotificationCenter defaultCenter] removeObserver:self name:@"LOGIN_ZZ" object:nil] ;
            [[NSNotificationCenter defaultCenter] addObserver:self selector:@selector(jumpToZhuanZhang) name:@"LOGIN_ZZ" object:nil];
            LoginViewController *loginVC = [[LoginViewController alloc]init];
            [self.navigationController presentViewController:loginVC animated:YES completion:^{}];
        }


    }

********登录按钮点击事件********


- (IBAction)loginBtnClicked:(id)sender {

    if (self.userName.text.length > 0 && self.passWord.text.length > 0) {
        APPLICATION.isLogin = YES;

        [self dismissViewControllerAnimated:YES completion:^{
            if(APPLICATION.jumpType == ZHUANZHANG_HOME_LOGIN){
                [[NSNotificationCenter defaultCenter] postNotificationName:@"LOGIN_ZZ" object:nil ];
            }else if (APPLICATION.jumpType == HUIKUAN_HOME_LOGIN){
                [[NSNotificationCenter defaultCenter] postNotificationName:@"LOGIN_HK" object:nil ];
            }else if (APPLICATION.jumpType == JIEKUAN_HOME_LOGIN){
                [[NSNotificationCenter defaultCenter] postNotificationName:@"LOGIN_JK" object:nil ];
            }
        }];
    }else{
        UIAlertView *alertView = [[UIAlertView alloc]initWithTitle:@"提示" message:@"输入有误" delegate:nil cancelButtonTitle:@"确定" otherButtonTitles:nil, nil];
        [alertView show];
    }
}
4简单的实现就完成了。
5开始对上面代码封装
5.1增加路由类
//
//  RouteManager.h
//  GuideLoginDemo
//
//  Created by yfc on 17/5/11.
//  Copyright © 2017年 yfc. All rights reserved.
//

#import <Foundation/Foundation.h>
#import <UIKit/UIKit.h>
@interface RouteManager : NSObject
+ (void)pushViewControllerWithOriginViewController:(UIViewController *)originViewController loginFlag:(NSString *)loginFlag identifier:(const NSString *)identifier otherParameters:(NSDictionary *)parameters;
@end
//
//  RouteManager.m
//  GuideLoginDemo
//
//  Created by yfc on 17/5/11.
//  Copyright © 2017年 yfc. All rights reserved.
//

#import "RouteManager.h"
#import "config.h"
static RouteManager *routeManager = nil;

@interface RouteManager ()
@property(nonatomic,assign)UIViewController *originViewController;
@property(nonatomic,retain)NSString *currentIdentifier;
@property(nonatomic,assign)RouteManager *manager_;

@end


@implementation RouteManager
+ (RouteManager*)sharedRouteManager{
    @synchronized(routeManager)
    {
        if(!routeManager)
        {
            routeManager = [[RouteManager alloc]init];
        }
    }
    return routeManager;
}


+ (void)pushViewControllerWithOriginViewController:(UIViewController *)originViewController loginFlag:(NSString *)loginFlag identifier:(const NSString *)identifier otherParameters:(NSDictionary *)parameters;{
    RouteManager *manager = [RouteManager sharedRouteManager];

    NSLog(@"manager=%@",manager);

    manager.manager_ = manager;
    [manager pushViewControllerWithOriginViewController:originViewController loginFlag:loginFlag   identifier:identifier otherParameters:parameters];

}
- (void)pushViewControllerWithOriginViewController:(UIViewController *)originViewController loginFlag:(NSString *)loginFlag identifier:(const NSString *)identifier otherParameters:(NSDictionary *)parameters;{
    self.originViewController = originViewController;
    self.currentIdentifier = (NSString *)identifier;

    if ([loginFlag isEqualToString:@"Y"]) {

        if (APPLICATION.isLogin == YES){
            [self pushViewController];
        }else{
            //引导登录
            [self setNotiObserverLogin];
        }

    }
    else{
        [self pushViewController];
    }
}
- (void)setNotiObserverLogin{

    APPLICATION.jumpType = ROUTE_MANAGER;
    [[NSNotificationCenter defaultCenter] removeObserver:self name:@"ROUTE_MANAGER" object:nil];
    [[NSNotificationCenter defaultCenter] addObserver:self selector:@selector(pushViewController) name:@"ROUTE_MANAGER" object:nil];

    //如果已经有登录页了 不要重复弹出
    UINavigationController *topNavi = (UINavigationController*)APPLICATION.window.rootViewController.presentedViewController;
    for (UIViewController *loginVC in topNavi.viewControllers) {
        if ([loginVC isKindOfClass:NSClassFromString(@"LoginViewController")]) {
            return;
        }
    }
    NSLog(@"%@",(APPLICATION.window.rootViewController.presentedViewController));

    LoginViewController *loginVC = [[LoginViewController alloc]init];
    [APPLICATION.window.rootViewController presentViewController:loginVC animated:YES completion:^{}];

}
- (void)pushViewController{
    {
        id viewController = [[NSClassFromString(self.currentIdentifier) alloc]init];
        if ([self.originViewController isKindOfClass:[UINavigationController class]]) {
            [(UINavigationController*)self.originViewController pushViewController:viewController animated:YES];
        }else{

            [self.originViewController.navigationController pushViewController:viewController animated:YES];
        }

    }

}
@end
5.2枚举值声明改为
typedef enum JumpType{
    ROUTE_MANAGER= 0,
}MYJumpType;
5.3三个按钮的点击事件改为
//三个按钮的点击事件
- (void)btnClicked:(UIButton *)btnn{

    if (btnn.tag == 0) {
        [RouteManager pushViewControllerWithOriginViewController:self loginFlag:@"Y" identifier:@"ZhuanZhangViewController" otherParameters:nil];
    }else if(btnn.tag == 1){
        [RouteManager pushViewControllerWithOriginViewController:self loginFlag:@"Y" identifier:@"HuiKuanViewController" otherParameters:nil];
    }else{
        [RouteManager pushViewControllerWithOriginViewController:self loginFlag:@"Y" identifier:@"JieKuanViewController" otherParameters:nil];
    }

}
5.4登录按钮的事件
- (IBAction)loginBtnClicked:(id)sender {

    if (self.userName.text.length > 0 && self.passWord.text.length > 0) {
        APPLICATION.isLogin = YES;

        [self dismissViewControllerAnimated:YES completion:^{
            if(APPLICATION.jumpType == ROUTE_MANAGER){
                [[NSNotificationCenter defaultCenter] postNotificationName:@"ROUTE_MANAGER" object:nil ];
            }
        }];
    }else{
        UIAlertView *alertView = [[UIAlertView alloc]initWithTitle:@"提示" message:@"输入有误" delegate:nil cancelButtonTitle:@"确定" otherButtonTitles:nil, nil];
        [alertView show];
    }
}增加路由的代码demo:https://github.com/XiaoHeHe1/LoginGuideDemo
20190304备注: 成功之后的通知可改成block回调


 6840
6840


 被折叠的 条评论
为什么被折叠?
被折叠的 条评论
为什么被折叠?
 到【灌水乐园】发言


