


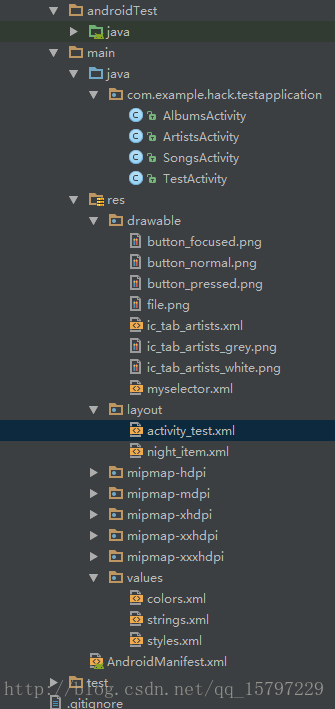
Android程序目录结构
Android Studio之中:
1. R.java文件的路径:build/generated/source/r/debug/…
2. src/main/java目录下存放源代码
3. src/main/res目录下存放资源
4. res/drawable目录专门用于存放图标文件
5. res/layout目录用于存放xml界面文件
6. res/values目录用于存放应用使用到的各种常量
7. AndroidManifest.xml 功能清单文件
Android布局
- 线性布局(LinearLayout)
1.android:orientation=”vertical”表示垂直布局
2.android:orientation=”horizontal”表示水平布局
3.android:layout_width=”fill_parent”宽填充整个屏幕,”wrap_content”根据内容显示
4.android:textSize表示该控件中文字的大小
5.android:background指该控件的背景
6.android:layout_weight指该控件在纵向或横向上所占有的比例值高度或宽度
<LinearLayout xmlns:android="http://schemas.android.com/apk/res/android"
    xmlns:app="http://schemas.android.com/apk/res-auto"
    xmlns:tools="http://schemas.android.com/tools"
    android:orientation="vertical"
    android:layout_width="fill_parent"
    android:layout_height="fill_parent"
    android:gravity="center_horizontal" >

    <TextView
        android:layout_width="fill_parent"
        android:layout_height="wrap_content"
        android:text="第一行"
        android:textSize="20px"
        android:textColor="#0ff"
        android:background="#333"
        />

    <TextView
        android:layout_width="wrap_content"
        android:layout_height="wrap_content"
        android:text="第二行"
        android:textSize="20px"
        android:textColor="#0f0"
        android:background="#eee"
        android:layout_weight="10"
        />

    <TextView
        android:layout_width="wrap_content"
        android:layout_height="wrap_content"
        android:text="第三行字多所以宽一些"
        android:textSize="20px"
        android:textColor="#00f"
        android:background="#ccc"
        android:layout_weight="1"
        />

    <TextView
        android:layout_width="fill_parent"
        android:layout_height="wrap_content"
        android:text="第四行"
        android:textSize="20px"
        android:textColor="#f33"
        android:background="#888"
        android:layout_weight="1"
        />

    <TextView
        android:layout_width="fill_parent"
        android:layout_height="wrap_content"
        android:text="第五行"
        android:textSize="20px"
        android:textColor="#ff3"
        android:background="#333"
        android:layout_weight="1"
        />
</LinearLayout>- 相对布局(RelativeLayout)–>ViewGroup
1.相对于兄弟元素
android:layout_below=”@id/xxx”:在指定View的下方
android:layout_above=”@id/xxx”:在指定View的上方
android:layout_toLeftOf=”@id/xxx”:在指定View的左边
android:layout_toRightOf=”@id/xxx”:在指定View的右边
2.相对于父元素
android:layout_alignParentLeft=”true”:在父元素内左边
android:layout_alignParentRight=”true”:在父元素内右边
android:layout_alignParentTop=”true”:在父元素内顶部
android:layout_alignParentBottom=”true”:在父元素内底部
3.对齐方式
android:layout_centerInParent=”true”:居中布局
android:layout_centerVertical=”true”:水平居中布局
android:layout_centerHorizontal=”true”:垂直居中布局
android:layout_alignTop=”@id/xxx”:与指定View的上边界一致
android:layout_alignBottom=”@id/xxx”:与指定View下边界一致
android:layout_alignLeft=”@id/xxx”:与指定View的左边界一致
android:layout_alignRight=”@id/xxx”:与指定View的右边界一致
4.间隔
android:layout_marginBottom=”“; 离某元素底边缘的距离
android:layout_marginLeft=”“; 离某元素左边缘的距离
android:layout_marginRight =”“;离某元素右边缘的距离
android:layout_marginTop=”“; 离某元素上边缘的距离
android:layout_paddingBottom=”“; 离父元素底边缘的距离
android:layout_paddingLeft=”“; 离父元素左边缘的距离
android:layout_paddingRight =”“;离父元素右边缘的距离
android:layout_paddingTop=”“; 离父元素上边缘的距离
<!--相对布局(RelativeLayout)
<RelativeLayout xmlns:android="http://schemas.android.com/apk/res/android"
    xmlns:app="http://schemas.android.com/apk/res-auto"
    xmlns:tools="http://schemas.android.com/tools"
    android:layout_width="fill_parent"
    android:layout_height="fill_parent">

    <TextView
        android:layout_width="fill_parent"
        android:layout_height="wrap_content"
        android:text="输入标题:"
        android:id="@+id/label"
        />

    <EditText
        android:layout_width="fill_parent"
        android:layout_height="wrap_content"
        android:background="@android:drawable/editbox_background"
        android:id="@+id/entry"
        android:layout_below="@id/label"
        />

    <Button
        android:layout_width="wrap_content"
        android:layout_height="wrap_content"
        android:text="确认"
        android:id="@+id/ok"
        android:layout_below="@id/entry"
        android:layout_centerInParent="true"
        android:layout_marginLeft="10dip"
        />

    <Button
        android:layout_width="wrap_content"
        android:layout_height="wrap_content"
        android:text="取消"
        android:id="@+id/cancel"
        android:layout_toLeftOf="@id/ok"
        android:layout_alignTop="@id/ok"
        />
</RelativeLayout>
-->
5.其它
android:layout_alignBaseline=”@id/xxx”:与指定View的底线对齐
android:layout_alignWithParentIfMissing=”true”:当使用layout_toLeftOf和layout_toRightOf等时没有找到指定的View,转而使用父View作为参照对象
- 帧布局(FrameLayout)
1.该布局中所有的控件都处于左上角的位置相互重叠,而你无法改变他们的位置
2.可以通过android:layout_gravity来设置它的子View的位置(bottom,center)
<!--帧布局(FrameLayout)
<FrameLayout xmlns:android="http://schemas.android.com/apk/res/android"
    xmlns:app="http://schemas.android.com/apk/res-auto"
    xmlns:tools="http://schemas.android.com/tools"
    android:layout_width="fill_parent"
    android:layout_height="fill_parent">

    <ImageView
        android:layout_width="fill_parent"
        android:layout_height="fill_parent"
        android:scaleType="center"
        />

    <TextView
        android:layout_width="wrap_content"
        android:layout_height="wrap_content"
        android:text="@string/hello"
        android:id="@+id/text1"
        android:layout_gravity="center"
        android:textColor="#00ff00"
        />

    <Button
        android:layout_width="wrap_content"
        android:layout_height="wrap_content"
        android:text="start"
        android:id="@+id/start"
        android:layout_gravity="bottom"
        />
</FrameLayout>
-->- 表格布局(TableLayout)–>ViewGroup
1.Android的表格布局与HTML中的表格布局类似,TableRow类似于<tr>标记
2.android:shrinkColumns=”0,1,2”表示第1,2,3列的内容是收缩的以适合屏幕,对应的方法为:setShrinkAllColumns(boolean)
3.android:collapseColumns,对应的方法为:setColumnCollapsed(int, boolean),作用为设置表格的列是否隐藏
4.android:stretchColumns,对应的方法为:setStretchAllColumns(boolean),作用为设置表格的列是否拉伸
<!--表格布局(TableLayout)
<TableLayout xmlns:android="http://schemas.android.com/apk/res/android"
    xmlns:app="http://schemas.android.com/apk/res-auto"
    xmlns:tools="http://schemas.android.com/tools"
    android:layout_width="fill_parent"
    android:layout_height="fill_parent"
    android:shrinkColumns="0,1,2">

    <TableRow>
        <Button android:id="@+id/button1"
            android:layout_width="wrap_content"
            android:layout_height="wrap_content"
            android:text="Hello,I am a Button1"
            android:layout_column="0"
            />

        <Button android:id="@+id/button2"
            android:layout_width="wrap_content"
            android:layout_height="wrap_content"
            android:text="Hello,I am a Button2"
            android:layout_column="1"
            />
    </TableRow>

    <TableRow>
        <Button android:id="@+id/button3"
            android:layout_width="wrap_content"
            android:layout_height="wrap_content"
            android:text="Hello,I am a Button3"
            android:layout_column="1"
            />

        <Button android:id="@+id/button4"
            android:layout_width="wrap_content"
            android:layout_height="wrap_content"
            android:text="Hello,I am a Button4"
            android:layout_column="1"
            />
    </TableRow>

    <TableRow>
        <Button android:id="@+id/button5"
            android:layout_width="wrap_content"
            android:layout_height="wrap_content"
            android:text="Hello,I am a Button5"
            android:layout_column="2"
            />
    </TableRow>
</TableLayout>
-->- 绝对布局(AbsoluteLayout)
1.通过坐标布局,以左上角为原点(0,0),向下为y轴,向右为x轴
<!--绝对布局(AbsoluteLayout)
<AbsoluteLayout xmlns:android="http://schemas.android.com/apk/res/android"
    xmlns:app="http://schemas.android.com/apk/res-auto"
    xmlns:tools="http://schemas.android.com/tools"
    android:layout_width="fill_parent"
    android:layout_height="fill_parent"
    android:orientation="horizontal">

    <TextView
        android:layout_width="wrap_content"
        android:layout_height="wrap_content"
        android:text="TextView01"
        android:id="@+id/TextView01"
        android:layout_x="110px"
        android:layout_y="110px"
        />
</AbsoluteLayout>
-->
Android ViewGroup
- View对象是Android表示用户界面的基本单元
- Android用户界面由一系列的视图树(tree of views)构成
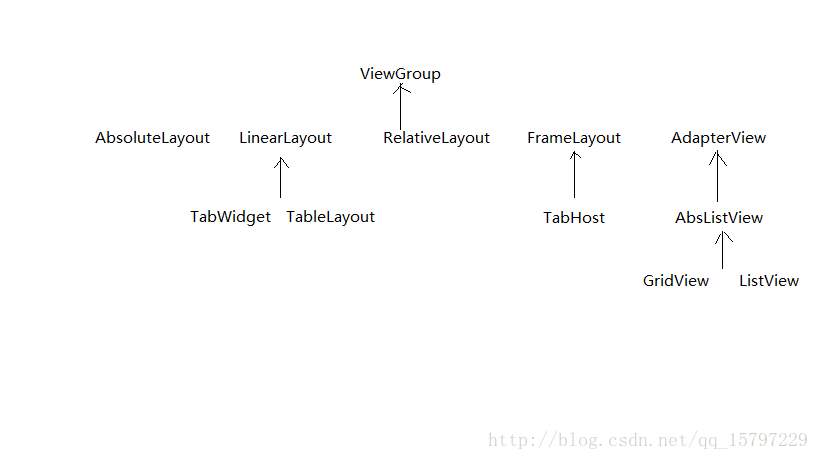
TabWidget和TabHost
1.TabHost是一个用来存放多个Tab标签的容器,TabHost必须是布局的根结点
<!--TabWidget和TabHost的应用
<TabHost xmlns:android="http://schemas.android.com/apk/res/android"
xmlns:app="http://schemas.android.com/apk/res-auto"
xmlns:tools="http://schemas.android.com/tools"
android:id="@android:id/tabhost"
android:layout_width="fill_parent"
android:layout_height="fill_parent"
>
<LinearLayout
    android:layout_width="fill_parent"
    android:layout_height="fill_parent"
    android:orientation="vertical"
    android:padding="5dp"
    >
    <TabWidget
        android:layout_width="fill_parent"
        android:layout_height="wrap_content"
        android:id="@android:id/tabs"/>
    <FrameLayout
        android:layout_width="fill_parent"
        android:layout_height="fill_parent"
        android:id="@android:id/tabcontent"
        android:padding="5dp"/>
</LinearLayout>
</TabHost>
-->
//入口
public class TestActivity extends AppCompatActivity{
@Override
protected void onCreate(Bundle savedInstanceState) {
super.onCreate(savedInstanceState);
setContentView(R.layout.activity_test);
//TabWidget和TabHost的应用
//拿到资源
Resources res = getResources();
//拿到容器
TabHost tabHost = getTabHost();
TabHost.TabSpec spec;
Intent intent;
//intent用来通信
intent = new Intent().setClass(this, ArtistsActivity.class);
//newTabSpec(String)方法创建一个新的TabHost.TabSpec
//setIndicator(CharSequence, Drawable)方法为每个标签设置文字和图标
spec = tabHost.newTabSpec("artists").setIndicator("Artists", res.getDrawable(R.drawable.ic_tab_artists)).setContent(intent);
//将每个TabHost.TabSpec添加到TabHost
tabHost.addTab(spec);
intent = new Intent().setClass(this, AlbumsActivity.class);
spec = tabHost.newTabSpec("Albums").setIndicator("Albums", res.getDrawable(R.drawable.ic_tab_artists)).setContent(intent);
tabHost.addTab(spec);
intent = new Intent().setClass(this, SongsActivity.class);
spec = tabHost.newTabSpec("Songs").setIndicator("Songs", res.getDrawable(R.drawable.ic_tab_artists)).setContent(intent);
tabHost.addTab(spec);
//设置打开默认显示的标签(打开第二个标签)
tabHost.setCurrentTab(1);
}
}//AlbumsActivity.java文件
package com.example.hack.testapplication;
import android.support.v7.app.AppCompatActivity;
import android.os.Bundle;
import android.widget.TextView;
public class AlbumsActivity extends AppCompatActivity {
@Override
protected void onCreate(Bundle savedInstanceState) {
super.onCreate(savedInstanceState);
TextView textView = new TextView(this);
textView.setText("This is the Albums tab");
setContentView(textView);
}
}//ArtistsActivity.java文件
package com.example.hack.testapplication;
import android.support.v7.app.AppCompatActivity;
import android.os.Bundle;
import android.widget.TextView;
public class ArtistsActivity extends AppCompatActivity {
@Override
protected void onCreate(Bundle savedInstanceState) {
super.onCreate(savedInstanceState);
TextView textView = new TextView(this);
textView.setText("This is the Artists tab");
setContentView(textView);
}
}//SongsActivity.java文件
package com.example.hack.testapplication;
import android.support.v7.app.AppCompatActivity;
import android.os.Bundle;
import android.widget.TextView;
public class SongsActivity extends AppCompatActivity {
@Override
protected void onCreate(Bundle savedInstanceState) {
super.onCreate(savedInstanceState);
TextView textView = new TextView(this);
textView.setText("This is the Songs tab");
setContentView(textView);
}
}//ic_tab_artists.xml文件
<?xml version="1.0" encoding="utf-8"?>
<selector xmlns:android="http://schemas.android.com/apk/res/android">
<!--当选中的时候使用grey-->
<item android:drawable="@drawable/ic_tab_artists_grey"
android:state_selected="true"/>
<!--当未被选中的时候使用white-->
<item android:drawable="@drawable/ic_tab_artists_white"/>
</selector>列表视图(ListView)
1.ListView里面的每个子项Item可以是一个字符串,也可以是一个组合控件
2.Android中ListView的XML属性
- android:choiceMode:规定此ListView所使用的选择模式,0表示无选择模式,1表示可以有一项被选中,2表示可以有多项被选中
- android:divider:规定List项目之间用某个图形或颜色来分隔
- android:dividerHeight:分隔符的高度
- android:entries:引用一个将使用在此ListView里的数组
- android:footerDividerEnabled:值为false时,此ListView将不会在页脚视图前画分隔符
- android:headerDividerEnabled:值为false时,此ListView将不会在页眉视图后画分隔符
<LinearLayout
    xmlns:android="http://schemas.android.com/apk/res/android"
    android:id="@+id/LinearLayout01"
    android:layout_width="fill_parent"
    android:layout_height="fill_parent" >
    <ListView
        android:layout_width="wrap_content"
        android:layout_height="wrap_content"
        android:id="@+id/MyListView">
    </ListView>
</LinearLayout>
//my_imageitem.xml文件
<?xml version="1.0" encoding="utf-8"?>
<RelativeLayout xmlns:android="http://schemas.android.com/apk/res/android"
android:layout_width="fill_parent"
android:layout_height="wrap_content"
android:id="@+id/RelativeLayout01"
android:paddingBottom="4dip"
android:paddingLeft="12dip">
<ImageView
android:layout_width="wrap_content"
android:layout_height="wrap_content"
android:id="@+id/ItemImage"/>
<TextView
android:layout_width="fill_parent"
android:layout_height="wrap_content"
android:text="TextView01"
android:textSize="30dip"
android:layout_toRightOf="@+id/ItemImage"
android:id="@+id/ItemTitle"/>
<TextView
android:layout_width="fill_parent"
android:layout_height="wrap_content"
android:text="TextView02"
android:layout_below="@+id/ItemTitle"
android:layout_toRightOf="@+id/ItemImage"
android:id="@+id/ItemText"/>
</RelativeLayout>public class TestActivity extends AppCompatActivity {
@Override
protected void onCreate(Bundle savedInstanceState) {
super.onCreate(savedInstanceState);
setContentView(R.layout.activity_test);
//绑定XML中的ListView,作为Item的容器
ListView list = (ListView) findViewById(R.id.MyListView);
//生成动态数组,并转载数据
ArrayList<HashMap<String, Object>> lstImageItem = new
ArrayList<HashMap<String, Object>>();
for(int i = 0; i < 10; i++){
HashMap<String, Object> map = new HashMap<String, Object>();
map.put("ItemImage", R.drawable.file); //添加图像资源的ID
map.put("ItemTitle", "This is Title...");
map.put("ItemText", "This is text...");
lstImageItem.add(map);
}
//生成适配器的ImageItem<====>动态数组的元素,两者一一对应
SimpleAdapter saImageItems = new SimpleAdapter(this,
lstImageItem, //数据来源
R.layout.my_imageitem, //ListItem的XML实现
//动态数组与ImageItem对应的子项
new String[]{"ItemImage", "ItemTitle", "ItemText"},
//ImageItem的XML文件里面的一个ImageView,两个TextView ID
new int[]{R.id.ItemImage, R.id.ItemTitle, R.id.ItemText});
//添加并显示
list.setAdapter(saImageItems);
}
}
GridView
1.GridView用于实现九宫图
<!--GridView的使用
    <GridView xmlns:android="http://schemas.android.com/apk/res/android"
    android:id="@+id/gridview"
    android:layout_width="fill_parent"
    android:layout_height="fill_parent"
    android:numColumns="auto_fit"
    android:verticalSpacing="10dp"
    android:horizontalSpacing="10dp"
    android:columnWidth="90dp"
    android:stretchMode="columnWidth"
    android:gravity="center"
    />
-->
//night_item.xml文件
<?xml version="1.0" encoding="utf-8"?>
<RelativeLayout
xmlns:android="http://schemas.android.com/apk/res/android"
android:layout_height="wrap_content"
android:paddingBottom="4dip"
android:layout_width="fill_parent"
>
<ImageView
android:layout_width="wrap_content"
android:layout_height="wrap_content"
android:id="@+id/ItemImage"
android:layout_centerHorizontal="true">
</ImageView>
<TextView
android:layout_width="wrap_content"
android:layout_height="wrap_content"
android:layout_below="@+id/ItemImage"
android:text="TextView01"
android:layout_centerHorizontal="true"
android:id="@+id/ItemText"
/>
</RelativeLayout>public class TestActivity extends AppCompatActivity{
@Override
protected void onCreate(Bundle savedInstanceState) {
super.onCreate(savedInstanceState);
setContentView(R.layout.activity_test);
//GridView的使用
//拿到GridView作为容器
GridView gridView = (GridView) findViewById(R.id.gridview);
//生成动态数组,并且转入数据
ArrayList<HashMap<String, Object>> lstImageItem = new
ArrayList<HashMap<String, Object>>();
for(int i = 0; i < 10; i++) {
HashMap<String, Object> map = new HashMap<String, Object>();
map.put("ImageItem", R.drawable.file); //添加图像资源的ID
map.put("ItemText", "NO."+String.valueOf(i)); //按序号做ItemText
lstImageItem.add(map);
}
//生成适配器的ImageItem<====>动态数组的元素,两者一一对应
SimpleAdapter saImageItems = new SimpleAdapter(this,
lstImageItem, //数据来源
R.layout.night_item, //night_item的XML实现
//动态数组与ImageItem对应的子项
new String[]{"ImageItem", "ItemText"},
//ImageItem的XMl文件里面的一个ImageView,一个TextView ID
new int[]{R.id.ItemImage, R.id.ItemText});
//添加并显示
gridView.setAdapter(saImageItems);
//添加消息处理
gridView.setOnItemClickListener(new ItemClickListener());
}
//GridView的使用
class ItemClickListener implements AdapterView.OnItemClickListener {
public void onItemClick(AdapterView<?> arg0, //AdapterView
View arg1, //在AdapterView中的view
int arg2, //在adapter中的第几个view
long arg3 //adapter中的第几项
){
HashMap<String, Object> item = (HashMap<String, Object>)arg0.getItemAtPosition(arg2);
//显示所选Item的ItemText
setTitle((String)item.get("ItemText"));
}
}
}Android View
1.文本框(TextView)
2.AutoCompleteTextView是TextView的子类,类似EditText,当用户输入两个以上字符时,它可以适配绑定,android:completionThreshold=”1”规定用户输入了多少个字符后才自动提示,默认值为2
<!--AutoCompleteTextView的使用
    <LinearLayout xmlns:android="http://schemas.android.com/apk/res/android"
        android:orientation="vertical"
        android:layout_width="fill_parent"
        android:layout_height="fill_parent"
    >
        <AutoCompleteTextView
            android:layout_width="fill_parent"
            android:layout_height="wrap_content"
            android:id="@+id/AutoCompleteTextView01"
            android:completionThreshold="1"
            android:hint="请输入">
        </AutoCompleteTextView>
    </LinearLayout>
-->
public class TestActivity extends AppCompatActivity{
//AutoCompleteTextView的使用
//匹配源
static final String[] COUNTRIES = new String[]{
"ABC", "afrgie", "aerim", "sereere", "banana", "bfhedue"};
@Override
protected void onCreate(Bundle savedInstanceState) {
super.onCreate(savedInstanceState);
setContentView(R.layout.activity_test);
//AutoCompleteTextView的使用
//定义数组适配器
ArrayAdapter adapter = new ArrayAdapter(this, android.R.layout.simple_dropdown_item_1line, COUNTRIES);
//找到自动完成组件
AutoCompleteTextView atv = (AutoCompleteTextView)findViewById(R.id.AutoCompleteTextView01);
//为其设置适配器
atv.setAdapter(adapter);
}
}3.编辑框(EditText)
    //EditText的使用
    <EditText xmlns:android="http://schemas.android.com/apk/res/android"
    android:id="@+id/txtTest"
    android:layout_width="100dp"
    android:layout_height="wrap_content"
    android:imeOptions="actionGo">
    </EditText>
public class TestActivity extends AppCompatActivity{
@Override
protected void onCreate(Bundle savedInstanceState) {
super.onCreate(savedInstanceState);
setContentView(R.layout.activity_test);
//EditText的使用
((EditText)findViewById(R.id.txtTest)).setOnEditorActionListener(new TextView.OnEditorActionListener() {
@Override
public boolean onEditorAction(TextView textView, int i, KeyEvent keyEvent) {
if(i == EditorInfo.IME_ACTION_GO) {
Toast.makeText(TestActivity.this, "你点了!", Toast.LENGTH_SHORT).show();
}
return false;
}
});
}
}4.按钮(Button)
监听器和根据XML中的onClick属性值android:onClick两种方式实现按钮事件
5.图片按钮(ImageButton)
按钮的图片可以通过android:src属性或setImageResource(int)方法指定
<LinearLayout xmlns:android="http://schemas.android.com/apk/res/android"
    android:orientation="vertical"
    android:layout_width="fill_parent"
    android:layout_height="fill_parent">
    <ImageButton
        android:layout_width="wrap_content"
        android:layout_height="wrap_content"
        android:id="@+id/click"
        android:text="@string/sure"
        android:onClick="clickMyself"
        android:src="@drawable/myselector"/>
</LinearLayout>
//myselector.xml文件
<?xml version="1.0" encoding="utf-8"?>
<selector xmlns:android="http://schemas.android.com/apk/res/android">
<item android:drawable="@drawable/button_pressed" android:state_pressed="true"/>
<item android:drawable="@drawable/button_focused" android:state_focused="true"/>
<item android:drawable="@drawable/button_normal"/>
</selector>public class TestActivity extends AppCompatActivity{
@Override
protected void onCreate(Bundle savedInstanceState) {
super.onCreate(savedInstanceState);
setContentView(R.layout.activity_test);
final ImageButton ok = (ImageButton) findViewById(R.id.click);
ok.setOnClickListener(new View.OnClickListener() {
@Override
public void onClick(View view) {
Toast.makeText(TestActivity.this, "hello you clicked!", Toast.LENGTH_SHORT).show();
}
});
}
//Button的使用
public void clickMyself(View view) {
Toast.makeText(TestActivity.this, "clickMyself!", Toast.LENGTH_SHORT).show();
}
}6.图片框(ImageView)
ImageView可以加载各种来源的图片(如资源或图片库)
Android UI事件处理
1.注册监听器–>监听器实现–>事件处理


 339
339


 被折叠的 条评论
为什么被折叠?
被折叠的 条评论
为什么被折叠?
 到【灌水乐园】发言


