


继上篇http://blog.csdn.net/qq_15947787/article/details/78428478训练完成后,需要对单张图片进行测试。
1.将D:\caffe\scripts\build\examples\cpp_classification\Release下生成的文件classification.exe复制到D:\caffe-train\tools下。
Usage: classification.exe deploy.prototxt network.caffemodel mean.binaryproto labels.txt img.jpg
下面依次准备这些文件
2.修改D:\caffe-train\models\bvlc_reference_caffenet\deploy.prototxt 中 fc8层 num_output:5
完整的deploy.prototxt内容为:
name: "CaffeNet"
layer {
  name: "data"
  type: "Input"
  top: "data"
  input_param { shape: { dim: 10 dim: 3 dim: 227 dim: 227 } }
}
layer {
  name: "conv1"
  type: "Convolution"
  bottom: "data"
  top: "conv1"
  convolution_param {
    num_output: 96
    kernel_size: 11
    stride: 4
  }
}
layer {
  name: "relu1"
  type: "ReLU"
  bottom: "conv1"
  top: "conv1"
}
layer {
  name: "pool1"
  type: "Pooling"
  bottom: "conv1"
  top: "pool1"
  pooling_param {
    pool: MAX
    kernel_size: 3
    stride: 2
  }
}
layer {
  name: "norm1"
  type: "LRN"
  bottom: "pool1"
  top: "norm1"
  lrn_param {
    local_size: 5
    alpha: 0.0001
    beta: 0.75
  }
}
layer {
  name: "conv2"
  type: "Convolution"
  bottom: "norm1"
  top: "conv2"
  convolution_param {
    num_output: 256
    pad: 2
    kernel_size: 5
    group: 2
  }
}
layer {
  name: "relu2"
  type: "ReLU"
  bottom: "conv2"
  top: "conv2"
}
layer {
  name: "pool2"
  type: "Pooling"
  bottom: "conv2"
  top: "pool2"
  pooling_param {
    pool: MAX
    kernel_size: 3
    stride: 2
  }
}
layer {
  name: "norm2"
  type: "LRN"
  bottom: "pool2"
  top: "norm2"
  lrn_param {
    local_size: 5
    alpha: 0.0001
    beta: 0.75
  }
}
layer {
  name: "conv3"
  type: "Convolution"
  bottom: "norm2"
  top: "conv3"
  convolution_param {
    num_output: 384
    pad: 1
    kernel_size: 3
  }
}
layer {
  name: "relu3"
  type: "ReLU"
  bottom: "conv3"
  top: "conv3"
}
layer {
  name: "conv4"
  type: "Convolution"
  bottom: "conv3"
  top: "conv4"
  convolution_param {
    num_output: 384
    pad: 1
    kernel_size: 3
    group: 2
  }
}
layer {
  name: "relu4"
  type: "ReLU"
  bottom: "conv4"
  top: "conv4"
}
layer {
  name: "conv5"
  type: "Convolution"
  bottom: "conv4"
  top: "conv5"
  convolution_param {
    num_output: 256
    pad: 1
    kernel_size: 3
    group: 2
  }
}
layer {
  name: "relu5"
  type: "ReLU"
  bottom: "conv5"
  top: "conv5"
}
layer {
  name: "pool5"
  type: "Pooling"
  bottom: "conv5"
  top: "pool5"
  pooling_param {
    pool: MAX
    kernel_size: 3
    stride: 2
  }
}
layer {
  name: "fc6"
  type: "InnerProduct"
  bottom: "pool5"
  top: "fc6"
  inner_product_param {
    num_output: 4096
  }
}
layer {
  name: "relu6"
  type: "ReLU"
  bottom: "fc6"
  top: "fc6"
}
layer {
  name: "drop6"
  type: "Dropout"
  bottom: "fc6"
  top: "fc6"
  dropout_param {
    dropout_ratio: 0.5
  }
}
layer {
  name: "fc7"
  type: "InnerProduct"
  bottom: "fc6"
  top: "fc7"
  inner_product_param {
    num_output: 4096
  }
}
layer {
  name: "relu7"
  type: "ReLU"
  bottom: "fc7"
  top: "fc7"
}
layer {
  name: "drop7"
  type: "Dropout"
  bottom: "fc7"
  top: "fc7"
  dropout_param {
    dropout_ratio: 0.5
  }
}
layer {
  name: "fc8"
  type: "InnerProduct"
  bottom: "fc7"
  top: "fc8"
  inner_product_param {
    num_output: 5
  }
}
layer {
  name: "prob"
  type: "Softmax"
  bottom: "fc8"
  top: "prob"
}
0 车辆
1 恐龙
2 大象
3 花
4 马
4.在caffe-train下新建classification.bat,输入
tools\classification.exe ^
D:\caffe-train\models\bvlc_reference_caffenet\deploy.prototxt ^
D:\caffe-train\models\bvlc_reference_caffenet_iter_500.caffemodel ^
D:\caffe-train\data\imagenet_mean.binaryproto ^
D:\caffe-train\label.txt ^
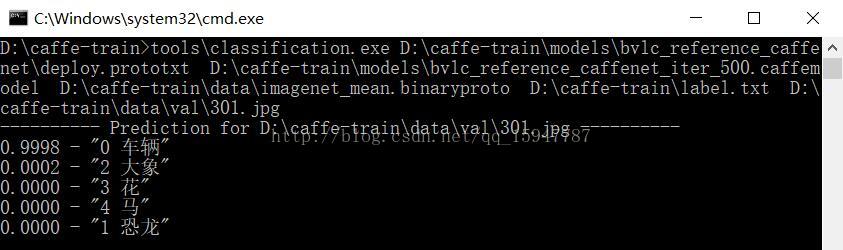
D:\caffe-train\data\val\301.jpg
pause
5.运行classification.bat


 1521
1521


 被折叠的 条评论
为什么被折叠?
被折叠的 条评论
为什么被折叠?
 到【灌水乐园】发言


