


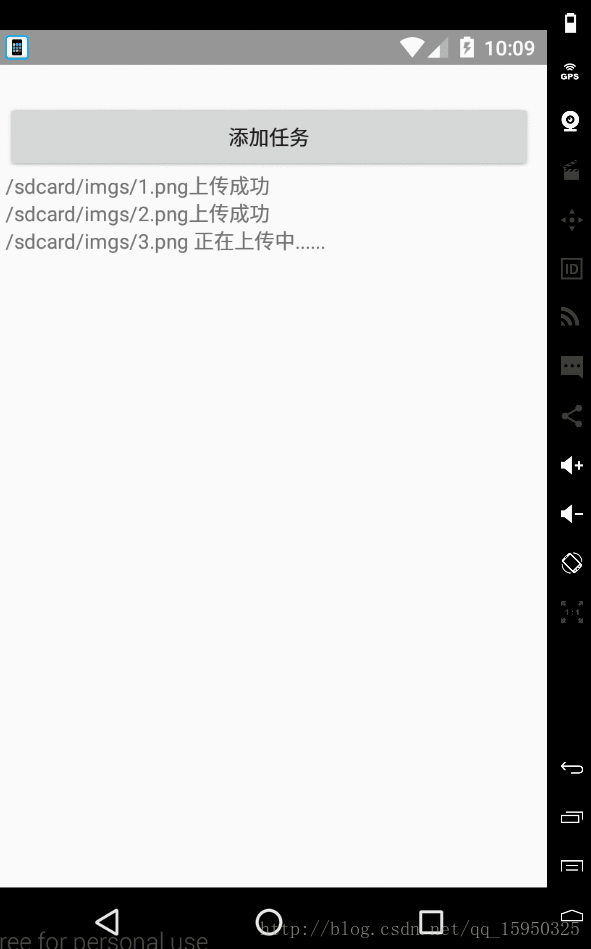
首先看下效果吧 其实我很早就像写一篇 关于IntentService,一直到现在我感觉我还没准备好 哈哈!好了看下效果
然后看下API
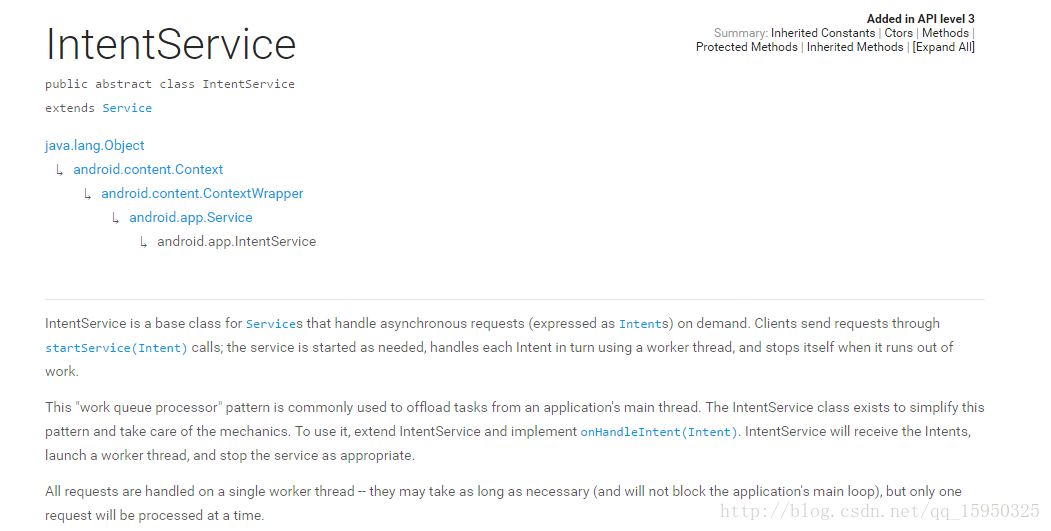
从上图可以看出IntentService是Service的子类 听到这个相信大家都明白了吧!凡是Service有的特性他都有,因为继承老子的东西很正常对不对。
IntentService是处理异步请求(表示为Intents)的服务的基类。 客戶端通过startService(Intent)调用发送请求; 然后服务端根须需要启动,使用工作线程依次处理每个Intent,并在其工作不足时候停止。
这种“工作队列处理器”模式通常用于从应用程序的主线程卸载任务。 IntentService类存在这种简化模式处理机制。 要使用它,要使用它请扩展IntentService并实现onHandleIntent(Intent)。 IntentService将接收Intents,然后启动工作线程,并根据工作需求停止服务。
所有請求都在單個工作線程上處理 - 它們可能需要很長時間(並且不會阻塞應用程序的主循環),但一次只能處理一個請求。
下面看一下简单的实例实现图片的上传,通过点击按钮发送一个广播收到广播之后返回信息给用户。
首先看下MyIntentService由于是自定义所以需要继承IntentService毫无疑问对不对,然后重写 protected void onHandleIntent(Intent intent) 方法
初始化操作
    //标记名
   private static final String TAG = "MyIntentService";
    //图片上传的Action
    public static final String ACTION_UPLOAD_IMG="com.demo.demo_gridview.action.UPLOAD_IMAGE";
    //图片上传的路径
    public static final String EXTRA_IMG_PATH="com.demo.demo_gridview.extra.IMG_PATH";
首先实现上传,一般肯定需要一个上下文对象以及你需要上传的路径
下面看下代码
/**
     *
     * @param context 上下文
     * @param path  上传路径
     */
    public static void startUpUploadImg(Context context,String path)
    {
        Intent intent=new Intent(context,MyIntentService.class);
        intent.setAction(ACTION_UPLOAD_IMG);
        intent.putExtra(EXTRA_IMG_PATH,path);
        context.startService(intent);
    }
下面看下具体的耗时操作这里就模拟一下就ok哈
 @Override
    protected void onHandleIntent(Intent intent) {
        if(intent!=null)
        {
               final String action=intent.getAction();
            if(ACTION_UPLOAD_IMG.equals(action))
            {
                final String path=intent.getStringExtra(EXTRA_IMG_PATH);
                handleUploadImg(path);
            }
        }
    }
上传的handleUploadImg方法
    /**
     *
     * @param path
     */
    private void handleUploadImg(String path) {
        //模拟耗时操作 3秒
        try {
            Thread.sleep(3000);
            Intent intent=new Intent(IntentServiceActivity.UPLOAD_RESULT);
            intent.putExtra(EXTRA_IMG_PATH,path);
            sendBroadcast(intent);
        } catch (InterruptedException e) {
            e.printStackTrace();
        }

    }
以及声明周期的创建和销毁
@Override
    public void onCreate() {
        super.onCreate();
        Log.e(TAG, "onCreate: ");
    }

    @Override
    public void onDestroy() {
        super.onDestroy();
        Log.e(TAG, "onDestroy: ");
    }
然后在主Activity中需要注册广播事件
 //注册广播接收器
    private void  registerReceiver()
    {
        IntentFilter filter=new IntentFilter();
        filter.addAction(UPLOAD_RESULT);
        registerReceiver(uploadImgReceiver,filter);
    }
初始化
  public static final String UPLOAD_RESULT="com.demo.demo_gridview.UPLOAD_RESULT";
   private void initView() {
        mLayTaskContainer= (LinearLayout) findViewById(R.id.mLyTaskContainer);
    }
private BroadcastReceiver uploadImgReceiver=new BroadcastReceiver() {
@Override
public void onReceive(Context context, Intent intent) {
if(intent.getAction()==UPLOAD_RESULT)
{
String path=intent.getStringExtra(MyIntentService.EXTRA_IMG_PATH);
handlerResult(path);
}
}
};上传结果处理
private void handlerResult(String path) {
TextView tv= (TextView) mLayTaskContainer.findViewWithTag(path);
tv.setText(path+"上传成功");
}实现按钮多任务添加
/**
* 添加多任务
* @param v
*/
int i=0;
public void addTask(View v)
{
//模拟路径
String path="/sdcard/imgs/"+ (++i)+ ".png";
MyIntentService.startUpUploadImg(IntentServiceActivity.this,path);
TextView tv=new TextView(this);
mLayTaskContainer.addView(tv);
tv.setText(path+" 正在上传中......");
tv.setTag(path);
}
最后别忘记注销广播事件在OnDestory中
/**
* 销毁广播
*/
@Override
protected void onDestroy() {
super.onDestroy();
unregisterReceiver(uploadImgReceiver);
}最后直接在清单文件中注册Service
<service android:name=".MyIntentService">
</service>看下log

布局文件activity_intent_service.xml
<?xml version="1.0" encoding="utf-8"?>
<LinearLayout xmlns:android="http://schemas.android.com/apk/res/android"
android:layout_width="match_parent"
android:layout_height="match_parent"
android:padding="10dp"
android:id="@+id/mLyTaskContainer"
android:orientation="vertical">
<Button
android:layout_width="match_parent"
android:layout_height="wrap_content"
android:layout_marginTop="40dp"
android:layout_gravity="center"
android:text="添加任务"
android:onClick="addTask"/>
</LinearLayout>
最后贴上IntentServiceActivity完整代码
package com.demo.demo_gridview;
import android.content.BroadcastReceiver;
import android.content.Context;
import android.content.Intent;
import android.content.IntentFilter;
import android.os.Bundle;
import android.support.annotation.Nullable;
import android.support.v7.app.AppCompatActivity;
import android.view.View;
import android.widget.LinearLayout;
import android.widget.TextView;
/**
* Created by John on 2017/3/3.
*/
public class IntentServiceActivity extends AppCompatActivity {
public static final String UPLOAD_RESULT="com.demo.demo_gridview.UPLOAD_RESULT";
private LinearLayout mLayTaskContainer;
private BroadcastReceiver uploadImgReceiver=new BroadcastReceiver() {
        @Override
        public void onReceive(Context context, Intent intent) {
            if(intent.getAction()==UPLOAD_RESULT)
            {
                String path=intent.getStringExtra(MyIntentService.EXTRA_IMG_PATH);
                handlerResult(path);
            }

        }
    };
private void handlerResult(String path) {
        TextView tv= (TextView) mLayTaskContainer.findViewWithTag(path);
        tv.setText(path+"上传成功");
    }
@Override
protected void onCreate(@Nullable Bundle savedInstanceState) {
super.onCreate(savedInstanceState);
setContentView(R.layout.activity_intent_service);
initView();
registerReceiver();
}
//注册广播
private void registerReceiver()
{
IntentFilter filter=new IntentFilter();
filter.addAction(UPLOAD_RESULT);
registerReceiver(uploadImgReceiver,filter);
}
private void initView() {
mLayTaskContainer= (LinearLayout) findViewById(R.id.mLyTaskContainer);
}
/**
     * 添加多任务
     * @param v
     */
    int i=0;
    public void addTask(View v)
    {
        //模拟路径
        String path="/sdcard/imgs/"+ (++i)+ ".png";
        MyIntentService.startUpUploadImg(IntentServiceActivity.this,path);

        TextView tv=new TextView(this);
        mLayTaskContainer.addView(tv);
        tv.setText(path+" 正在上传中......");
        tv.setTag(path);

    }
/**
     * 销毁广播
     */
    @Override
    protected void onDestroy() {
        super.onDestroy();
        unregisterReceiver(uploadImgReceiver);
    }
}
下次再与Service比较,今天就简单的介绍到这里,有问题大家一起讨论,同时喜欢的开车的也欢迎加群哈!转载请注明出处!http://blog.csdn.net/qq_15950325/article/details/60136596谢谢合作!


 3672
3672


 被折叠的 条评论
为什么被折叠?
被折叠的 条评论
为什么被折叠?
 到【灌水乐园】发言


