


所谓布局管理器,大概意思就是装载控件的容器。使用布局管理器可以方便管理界面中的组件。下面是简单的布局管理器体系图,面试题也应该总应该被问到,说一下Android中常用的五种布局。
                                            View

                                             ↑ extends

                                          ViewGroup

                                             ↑ extends

    LinearLayout  RelativeLayout  FrameLayout  AbsoluteLayout  GridLayout(4.0+以后出现)

                      ↑ extends

                   TableLayout
大家都应该知道,通过布局管理器.addView()方法,可以向容器中添加其他控件。但是布局管理器也可以嵌套本身,因为这些布局管理器都间接的继承了View,所以本身就是控件,当然可以当做一般控件来使用。下面给大家一一介绍!
LinearLayout
LinearLayout是线性布局,最重要的两个属性就是orientation和gravity属性
<LinearLayout
        android:layout_width="match_parent"
        android:layout_height="match_parent"
        android:orientation="horizontal"
        android:gravity="right|bottom">
        <TextView
            android:layout_width="wrap_content"
            android:layout_height="wrap_content"
            android:text="1" />

        <TextView
            android:layout_width="wrap_content"
            android:layout_height="wrap_content"
            android:text="2" />

        <TextView
            android:layout_width="wrap_content"
            android:layout_height="wrap_content"
            android:text="3" />

        <TextView
            android:layout_width="wrap_content"
            android:layout_height="wrap_content"
            android:text="4" />

        <TextView
            android:layout_width="wrap_content"
            android:layout_height="wrap_content"
            android:text="5" />
    </LinearLayout>
上面的布局结构非常简单,就是一个LinearLayout布局中包含了5个TextView,其中LinearLayout的orientation属性用于指定里面的内容是怎么排列的,horizontal值代表横着排列,vertical代表竖着排列。
gravity属性使用起来更是爽,可以任意的组合,比如让布局里面的控件在任意位置:左上,坐下,右上,水平居中,垂直居中,写法比如右上,就是right|bottom。但是这个|两边一定不能加空格哦!
TableLayout
表格布局,如果你曾经学过Html中的Table,那么恭喜你,没啥用!Android里面的TableLayout用法不太一样!Android中TableLayout不是通过几行几列来管理的,而是通过TabRow来管理的。可以这么说,如果你不想使用列,就不用使用TabRow了,如果你想使用列,就需要添加一个TabRow,至于几列,是由你里面的控件决定的,你在TabRow里面添加一个控件,你就多了一列!来看下下面的第一种情景
<TableLayout
android:layout_width="match_parent"
android:layout_height="wrap_content">
<Button android:layout_width="wrap_content" android:layout_height="wrap_content" android:text="按钮"/>
<Button android:layout_width="wrap_content" android:layout_height="wrap_content" android:text="按钮"/>
<Button android:layout_width="wrap_content" android:layout_height="wrap_content" android:text="按钮"/>
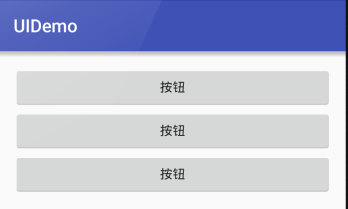
</TableLayout>这种场景下,因为我不需要列,所以我就直接在TableLayout里面写Button就OK了。
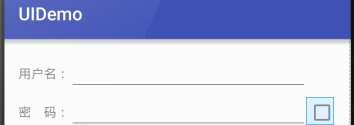
如果你需要列,就需要添加TabRow,下面用表格布局,实现了登陆的效果。
<TableLayout
       android:layout_width="match_parent"
       android:layout_height="wrap_content"
       android:stretchColumns="1">

      <TableRow>
          <TextView android:layout_width="wrap_content" android:layout_height="wrap_content" android:text="用户名:"/>
          <EditText android:layout_width="70dp" android:layout_height="wrap_content"/>
      </TableRow>

       <TableRow>
           <TextView android:layout_width="wrap_content" android:layout_height="wrap_content" android:text="密    码:"/>
           <EditText android:layout_width="70dp" android:layout_height="wrap_content"/>
           <android.support.v7.widget.AppCompatCheckBox />
       </TableRow>

   </TableLayout>
其实你看了之后可能都理解,就一个android:stretchColumns=”1”属性不理解,为什么要加这个属性呢?因为如果你不加,第二列会和第一列的表格大小一模一样,这样的话EditText编辑框设置宽度就没用,因为没设置允许EditText所在的表格可以拉伸。设置一下就可以了!
stretchColumns= “2”这个属性代表允许第二列表格可以拉伸,相对应还有一个属性shrinkColumns= “1”这个就代表第二列的表格可以收缩。
还有一个属性就是collapseColnmus,他指定的列被隐藏
 <TableLayout
       android:layout_width="match_parent"
       android:layout_height="wrap_content"
       android:collapseColumns="1"
       android:id="@+id/tableLayout">

       <TableRow>
           <TextView android:layout_width="wrap_content" android:layout_height="wrap_content" android:text="文本1"/>
           <TextView android:layout_width="wrap_content" android:layout_height="wrap_content" android:text="文本2"/>
           <TextView android:layout_width="wrap_content" android:layout_height="wrap_content" android:text="文本3"/>
       </TableRow>

   </TableLayout>
看,android:collapseColumns=”1”使第二列被隐藏掉了。到这,TableLayout就搞定了。
简单的总结一下:你要用列,就添加一个TableRow,每在TableRow里面添加一个控件,就多了一列
collapseColnmus隐藏列
stretchColumns允许拉伸
shrinkColumns允许收缩
这些属性对应的Java代码不用说了吧?看图

FrameLayout
帧布局也是比较简单的了,不用多说,看图就知道了,他就是可以让子控件叠加。但是并没有提供谁在谁上面,谁在谁下面的方法或属性!
    <FrameLayout
        android:layout_width="match_parent"
        android:layout_height="match_parent">

        <ImageView
            android:layout_width="50dp"
            android:layout_height="50dp"
            android:layout_gravity="center"
            android:background="#ff00ff" />

        <ImageView
            android:layout_width="40dp"
            android:layout_height="40dp"
            android:layout_gravity="center"
            android:background="#00ff00" />

    </FrameLayout>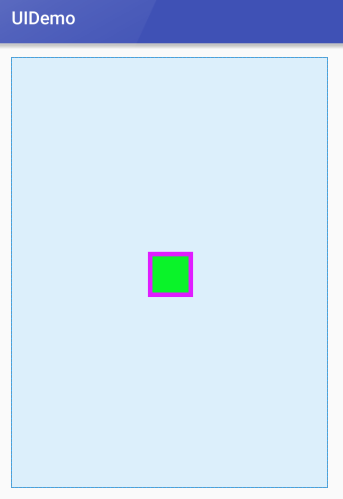
RelativeLayout
RelativeLayout是相对布局,这个介绍的属性有点多。我们一点一点解释!
首先父控件,也就是RelativeLayout,你只要记住gravity就可以了,这个gravity跟LinearLayout中的gravity一样,都是指定子空间的位置的
子控件在RelativeLayout中拥有的属性,先看下面这个图
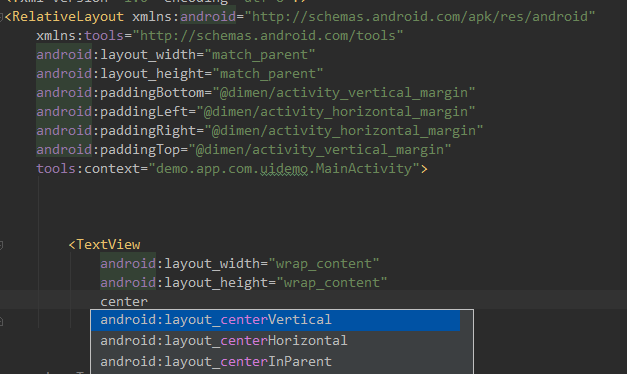
layout_centerVertival 代表子空间位于父控件垂直居中
layout_centerHorizontal 代表子空间位于父控件水平居中
layout_centerInparent 代表上面两个属性的结合体
只是设置居中是不行的,还提供了一下属性,用于更精准的控制!
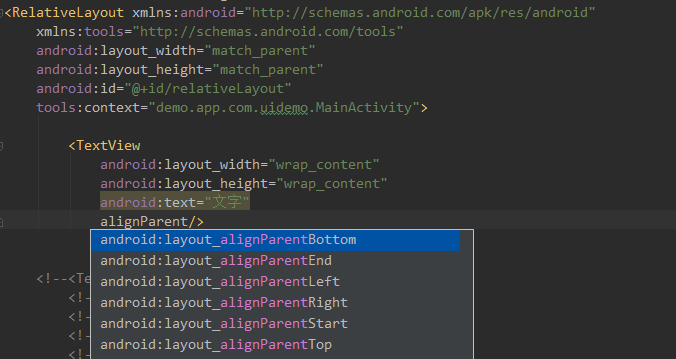
layout_alignParentBottom代表子控件位于父控件的下面
layout_alignParentLeft代表子控件位于父控件的左面
layout_alignParentRight代表子控件位于父控件的右面
layout_alignParentTop代表子控件位于父控件的上面
相对布局的来源不只是父与子的相对关系,还可以控制子控件和子控件之间的位置关系
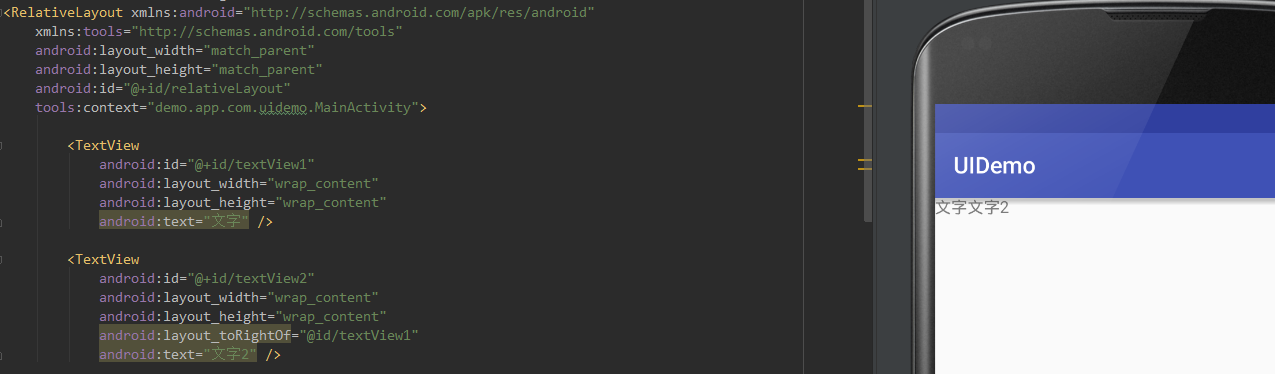
这段代码中,TextView2用了toRightOf= “@id/textView1”属性,代表位于id为textView1控件的右面,有右就有左,上,下
上:alove
下:below
左:toLeftOf
右:toRightOf
除了这些,还提供了控件与控件之间对其的属性
alignTop当前控件位于指定控件的上边缘对其
alignBottom当前控件位于指定控件的下边缘对其
alignLeft当前控件位于指定控件的左边缘对其
alignRight当前控件位于指定控件的右边缘对其
看到了这,基本上RelativeLayout使用就没有问题了。
到这,五种布局就介绍完了。其实还有一个布局,就是GridLayout,这个只能在Android4.0以后使用!用法很简单,这个才是跟Html中的Table标签一样,指定行和列,还有合并属性。你看一遍下面的代码啥都懂了。
<GridLayout
          android:layout_width="match_parent"
          android:layout_height="wrap_content"
          android:rowCount="5"
          android:columnCount="4">

          <Button android:text="1" />
          <Button android:text="2" />
          <Button android:text="3" />
          <Button android:text="+" />

          <Button android:text="4" />
          <Button android:text="5" />
          <Button android:text="6" />
          <Button android:text="-" />

          <Button android:text="7" />
          <Button android:text="8" />
          <Button android:text="9" />
          <Button android:text="*" />

          <Button android:text="0" android:layout_columnSpan="2" android:layout_gravity="fill"/>
          <Button android:text="."/>
          <Button android:text="/" android:layout_rowSpan="2" android:layout_gravity="fill_vertical"/>

          <Button android:text="=" android:layout_columnSpan="3" android:layout_gravity="fill"/>

      </GridLayout>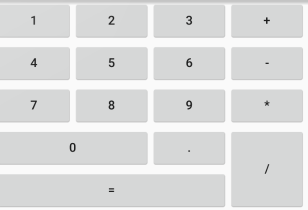
AbsoluteLayout
AbsoluteLayout是Android中的绝对布局,他通过X,Y坐标的方式来控制控件的位置。
玩这个布局的时候,就记住两个属性就可以了
layout_x和layout_y
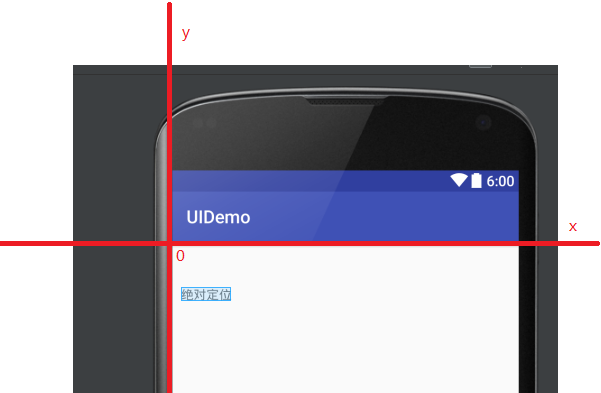
世界上没有任何一件事是一张图不能解决的,如果有,那就两张!

我记得当时我学习的时候,讲师告诉我,这个东西除了游戏以外已经很少使用了!可以看见5.0以后已经废除这个布局了,不推荐使用了!
好,到这里布局管理器就完全结束了,其实我感觉开发中常用的还是线性布局和相对布局用的比较多吧!如果有问题,欢迎QQ骚扰:997797281!


 291
291

 被折叠的 条评论
为什么被折叠?
被折叠的 条评论
为什么被折叠?
 到【灌水乐园】发言


