


对于项目中遇到的高德地图标注问题,本人差点没有把十万个为什么给问个10万次。先说一下自己遇到的问题:
在地图加载完成后自动弹出 自定义的标注点 和 气泡框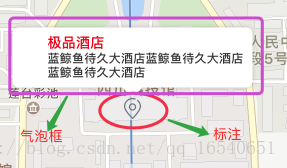 ,然后当点击气泡框的时候,可以直接响应气泡框上的Button事件。
跟一些人一样,开始在网上查找相关的一些帖子,结果基本上都说的一些无关重要的。想想也是心塞塞,没办法,自己写demo测试,然后就写得让自己开始怀疑人生了。
好了废话不多说。直接上代码了。希望下次有人遇到会避免这个坑。
一、手动配置高德地图SDK。
这里是自己直接手动配置SDK,当然有一些麻烦。没办法,网络差,cocoapods又半天下不来。这里就说一些手动配置的步骤,其实更直接一点就去高德开发者中心去查看文档,有相当细的环节配置。高德SDK下载位置:(http://lbs.amap.com/api/ios-sdk/download/)
下载完以后,直接拉入项目中自己需要的包,当然这里本人就只拉了三个需要的包:AMap3DMap、AMapFoundation、AmapLocation。
包创建好了,当然还没有完。继续手动添加依赖库,如果不添加依赖库编译不会成功,你就会看到无数个红色警告。然后找到工程。

添加完这个依赖库以后,再次编辑,嗯,没问题了。可以一下步了。
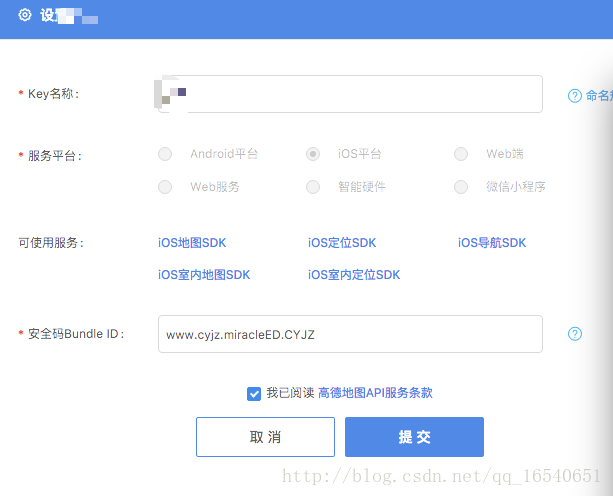
二、配置高德apiKey
关于高德的api,首先是需要账号的,so,没有账号就先注册一个,然后在控制台里去创建”我的应用”设置app的信息,提交以后会自动生成一个apiKey,复制保存这个key。在项目工程中会用到。这里说明一下。Bundle ID需要跟项目中的Bundle Identifier一致。因为一个key只能对应一个ID
三、配置AppDelegate
在AppDelegate.m文件中,先导入第三方库AMapFoundationKit/AMapFoundationKit.h然后在下面的方法中调用AMapServices 这个类,添加上之前申请的Key。
- (BOOL)application:(UIApplication )application didFinishLaunchingWithOptions:(NSDictionary )launchOptions {
[AMapServices sharedServices].apiKey = @”xxxxxxxxxxxxxxxxxx”;
- }
工程到这里基本上就配置完成了,接下来可以开始愉快的写代码了。
四、创建地图
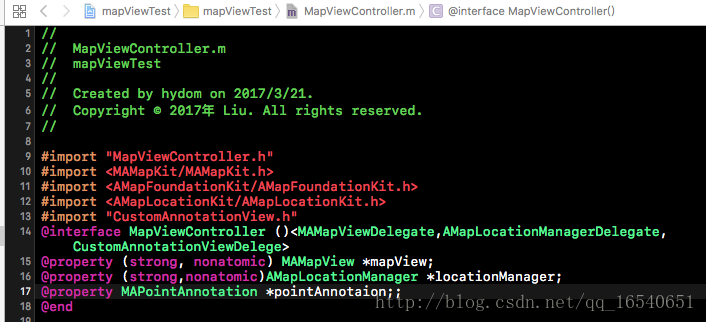
我在需要添加地图的控制器上,先在头部导入了需要的三方库MAMapKit/MAMapKit.h、AMapFoundationKit/AMapFoundationKit.h、AMapLocationKit/AMapLocationKit.h 然后再添加需要遵从的代理:MAMapViewDelegate、AMapLocationManagerDelegate。
接着,初始化地图,让地图默认加载到视图控制器上,
self.mapView = [[MAMapView alloc]initWithFrame:self.view.bounds];
 //追踪模式
self.mapView.userTrackingMode = MAUserTrackingModeFollowWithHeading;
//地图类型
self.mapView.mapType = MAMapTypeStandard;
//遵循代理
self.mapView.delegate = self;
//不显示自己位置
self.mapView.showsUserLocation = NO;
[self.view addSubview: self.mapView];//把地图添加至view
到这里结束,运行工程就能愉快的跑起来了。会在界面上直接显示坐标为北京为中心的地图
五、显示自定义标注
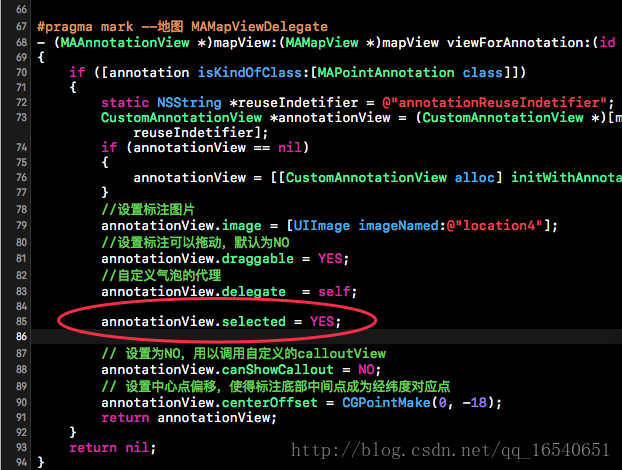
这里就不再写关于系统自定义标注的创建方法,可以直接到高德官方文档去查看。关于标注,它的原理就是先有地图,再在地图上加载标注。高德SDK里有封装好了的一个类:MAPointAnnotation,在前面我调用了这个类,并且创建成了属性。所以直接初始化就行了。
 self.pointAnnotaion = [[MAPointAnnotation alloc]init];
 //设置标题
 self.pointAnnotaion.title = @"酒店极品";
 //设置副标题
 self.pointAnnotaion.subtitle = @"蓝鲸鱼待久大酒店蓝鲸鱼待久大酒店蓝鲸鱼待久大酒店";
 //设置经纬度
 CLLocationCoordinate2D coordinate = {30.6594620000,104.0657350000};
 //设置地图中心点
 self.mapView.centerCoordinate = coordinate;
 //设置标注点的位置
 self.pointAnnotaion.coordinate = coordinate;
 //地图放大级别
 self.mapView.zoomLevel = 17;
 [self.mapView addAnnotation:self.pointAnnotaion];
既然创建了标注,前面说需要加载自定义气泡,那也就需要去重写构造。调用下面的这个方法:
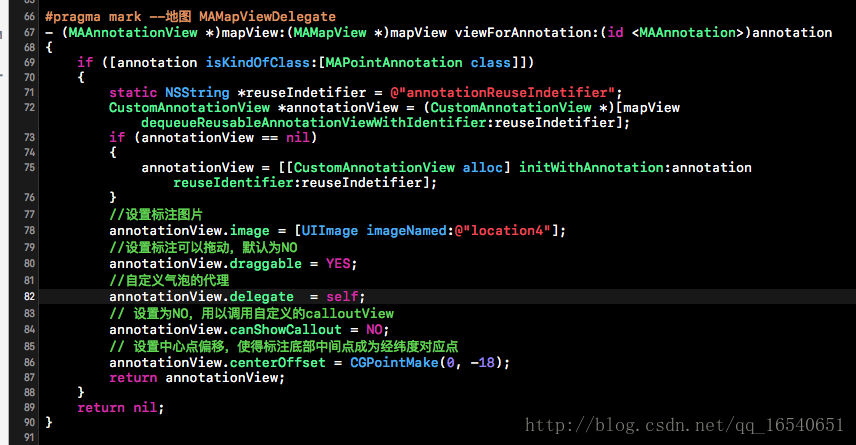
CustomAnnotationView是关于气泡的自定义样式,因为气泡本来是创建在标注的视图层上,所以在创建的时候需要去继承:MAAnnotationView这个类
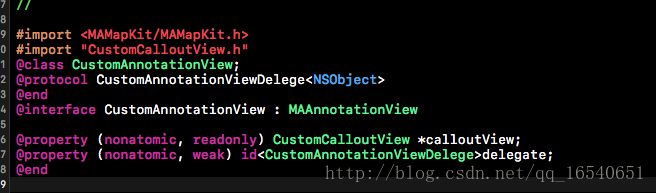
在CustomAnnotationView.m文件里加载自定义气泡样式的CustomCalloutView,并且将数据传递给气泡CustomCalloutView上需要显示的label字符串。
创建自定义气泡View
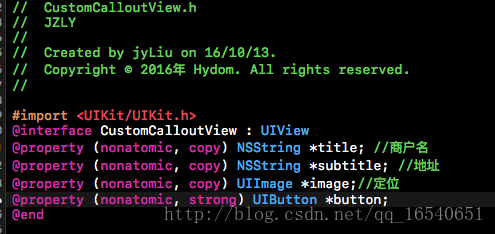
在 .h 文件中创建需要传值的字符串、图片和按钮
在.m文件里实现自定义View的样式
#import "CustomCalloutView.h"
#define kArrorHeight        10
#define kTitleWidth         200
#define kTitleHeight        20
    #define COLOR(R, G, B, A) [UIColor colorWithRed:R/255.0 green:G/255.0 blue:B/255.0 alpha:A]
@interface CustomCalloutView()
@property (nonatomic, strong) UILabel *subtitleLabel;
@property (nonatomic, strong) UILabel *titleLabel;
@property (nonatomic, strong) UIImageView *pointImge;
@end
@implementation CustomCalloutView
//创建气泡背景样式
- (void)drawRect:(CGRect)rect
{
[self drawInContext:UIGraphicsGetCurrentContext()];
self.layer.shadowColor = [[UIColor blackColor] CGColor];
self.layer.shadowOpacity = 0.2;
self.layer.shadowOffset = CGSizeMake(0.0f, 0.0f);
}
- (void)drawInContext:(CGContextRef)context
{
CGContextSetLineWidth(context, 2.0);
CGContextSetFillColorWithColor(context, [UIColor whiteColor].CGColor);
[self getDrawPath:context];
CGContextFillPath(context);
}
- (void)getDrawPath:(CGContextRef)context
{
CGRect rrect = self.bounds;
CGFloat radius = 6.0;
CGFloat minx = CGRectGetMinX(rrect),
midx = CGRectGetMidX(rrect),
maxx = CGRectGetMaxX(rrect);
CGFloat miny = CGRectGetMinY(rrect),
maxy = CGRectGetMaxY(rrect)-kArrorHeight;

CGContextMoveToPoint(context, midx+kArrorHeight, maxy);
CGContextAddLineToPoint(context,midx, maxy+kArrorHeight);
CGContextAddLineToPoint(context,midx-kArrorHeight, maxy);

CGContextAddArcToPoint(context, minx, maxy, minx, miny, radius);
CGContextAddArcToPoint(context, minx, minx, maxx, miny, radius);
CGContextAddArcToPoint(context, maxx, miny, maxx, maxx, radius);
CGContextAddArcToPoint(context, maxx, maxy, midx, maxy, radius);
CGContextClosePath(context);
}

- (id)initWithFrame:(CGRect)frame
{
self = [super initWithFrame:frame];
if (self)
{
    self.backgroundColor = [UIColor clearColor];
    [self initSubViews];
}
return self;
}
//自定义样式
- (void)initSubViews
{
// 添加图片,即商户图
self.pointImge = [[UIImageView alloc]initWithFrame:CGRectMake(10, 20, 16, 18)];
//    self.pointImge.backgroundColor = COLOR(102, 102, 102, 1.0);
[self addSubview:self.pointImge];

// 添加标题,即商户名
self.titleLabel = [[UILabel alloc] initWithFrame:CGRectMake(35, 8, kTitleWidth, kTitleHeight)];
self.titleLabel.font = [UIFont boldSystemFontOfSize:12];
self.titleLabel.textColor = COLOR(102, 102, 102, 1.0);
//    self.titleLabel.text = @"titletitletitletitle";
[self addSubview:self.titleLabel];

// 添加副标题,即商户地址
self.subtitleLabel = [[UILabel alloc] initWithFrame:CGRectMake(35 ,5, kTitleWidth, kTitleHeight+30)];
self.subtitleLabel.numberOfLines = 0;//表示label可以多行显示
self.subtitleLabel.font = [UIFont boldSystemFontOfSize:12];
self.subtitleLabel.textColor = COLOR(51, 51, 51, 1.0);
//    self.subtitleLabel.text = @"subtitleLabelsubtitleLabelsubtitleLabel";
[self addSubview:self.subtitleLabel];

//添加按钮
self.button = [UIButton buttonWithType:UIButtonTypeCustom];
self.button.frame = self.bounds;
[self.button addTarget:self action:@selector(respondsToOnBtn) forControlEvents:UIControlEventTouchUpInside];
[self addSubview:self.button];
}

- (void)setTitle:(NSString *)title
{
   self.titleLabel.text = title;
}

- (void)setSubtitle:(NSString *)subtitle
{
self.subtitleLabel.text = subtitle;
}

- (void)respondsToOnBtn{

    NSLog(@"11111111111");
}
恩,写到这里代码基本上就算全部完成了。运行工程跑起来,也能看到默认的标注点了,but,气泡却没有自动弹出来,也响应不了按钮的点击事件。why? 然后就开始搜索技术贴,果然,有一些收获,有人说是因为本来气泡就写在了标注的视图上,层级关系不对,所以响应不到按钮,相对应的解决方法:在CustomAnnotationView.m文件中添加
- (UIView )hitTest:(CGPoint)point withEvent:(UIEvent )event
解释一下这个方法的原理:iOS系统检测到手指触摸(Touch)操作时会将其放入当前活动Application的事件队列,UIApplication会从事件队列中取出触摸事件并传递给key window(当前接收用户事件的窗口)处理,window对象首先会使用hitTest:withEvent:方法寻找此次Touch操作初始点所在的视图(View),即需要将触摸事件传递给其处理的视图,称之为hit-test view。
- (UIView *)hitTest:(CGPoint)point withEvent:(UIEvent *)event {
UIView *view = [super hitTest:point withEvent:event];
if (view == nil) {
    CGPoint tempoint = [self.calloutView.button convertPoint:point fromView:self];
    if (CGRectContainsPoint(self.calloutView.button.bounds, tempoint))
    {
        view = self.calloutView.button;
    }
}
return view;
}
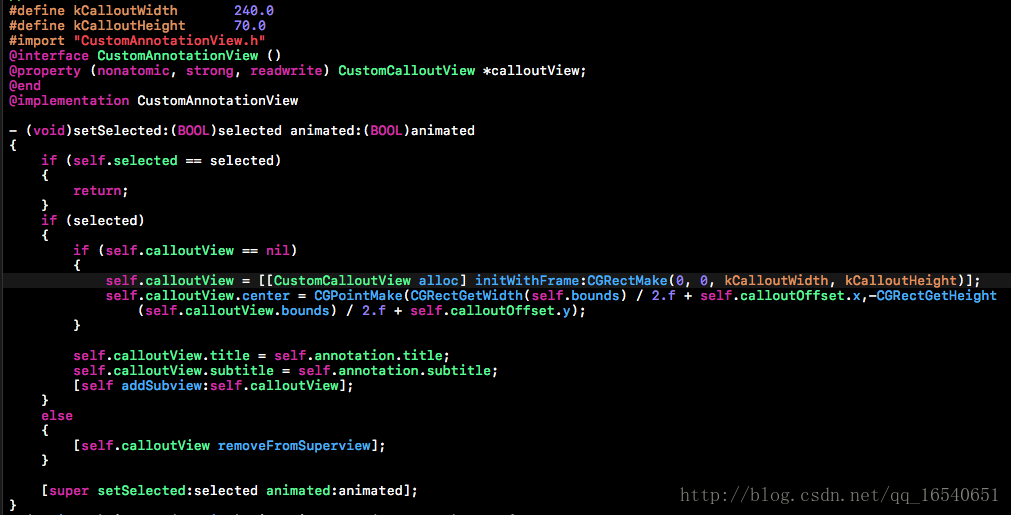
这里设置了,按道理说,应该能够响应气泡层的按钮事件了。可是,地图上应该先弹出气泡,才能响应按钮事件。到这里,我又卡住了。然后直接在MAAnnotation代理中查看了相关代理方法。发现了有一个selected 的属性,瞬间欣喜如狂,在这下面加上了这个选中的属性。再次运行Demo.有一种感觉自己很聪明的傲娇。结果,地图上确实能够显示标注了,可是却点不动,而且点击气泡以外的View位置,居然气泡不消失了。what?这又是怎么回事…..
然后,在经历了多次测试后发现,气泡要默认弹出显示在地图上,是需要加载定位这个属性所调用的方法。在初始化加载地图的后面补上这段代码。
self.locationManager = [[AMapLocationManager alloc]init];//获取定位创建个人坐标
self.locationManager.delegate = self;
self.locationManager.desiredAccuracy = kCLLocationAccuracyHundredMeters;//定位精确度在10米以内
    //单次定位
[self.locationManager requestLocationWithReGeocode:YES completionBlock:^(CLLocation *location, AMapLocationReGeocode *regeocode, NSError *error) {
    if (location) {
        _pointAnnotaion = [[MAPointAnnotation alloc]init];
        _pointAnnotaion.title = @"蓝鲸鱼待久大酒店蓝鲸鱼待久大酒店蓝鲸鱼待久大酒店";
        CLLocationCoordinate2D coordinate = {30.6594620000,104.0657350000};
        _mapView.centerCoordinate = coordinate;
        _pointAnnotaion.coordinate = coordinate;
        _mapView.zoomLevel = 17;
        [self.mapView addAnnotation:self.pointAnnotaion];
        //默认选中标注数据对应的view (同时在地图 MAMapViewDelegate方法中,去掉selected这个选中)
        [self.mapView selectAnnotation:self.pointAnnotaion animated:YES];
    }
}];
然后就可以完全实现自己想要的效果了。


 2935
2935


 被折叠的 条评论
为什么被折叠?
被折叠的 条评论
为什么被折叠?
 到【灌水乐园】发言


