1:环境
eclipse indigo,
JDK1.6,
maven 3.2.1,
tomcat7.0.42
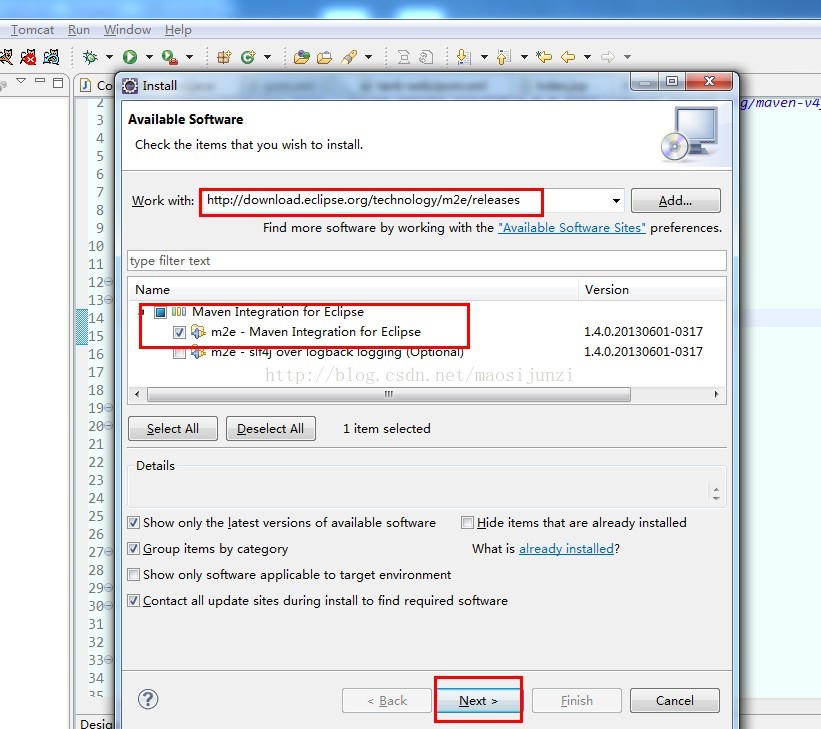
2:安装eclipse maven插件 m2eclipse
第一种方法:从网上下载m2eclipse,这个网上有很多下载的地方。然后放到eclipse安装目录的plugins下。
第二种方法:打开eclipse->help->install new software。在work with后输入:http://download.eclipse.org/technology/m2e/releases。如图:
3:下载maven和tomcat
上apache官网下载maven:http://maven.apache.org/download.cgi。下载完成后解压即可。
上apache官网下载tomcat:http://tomcat.apache.org/。
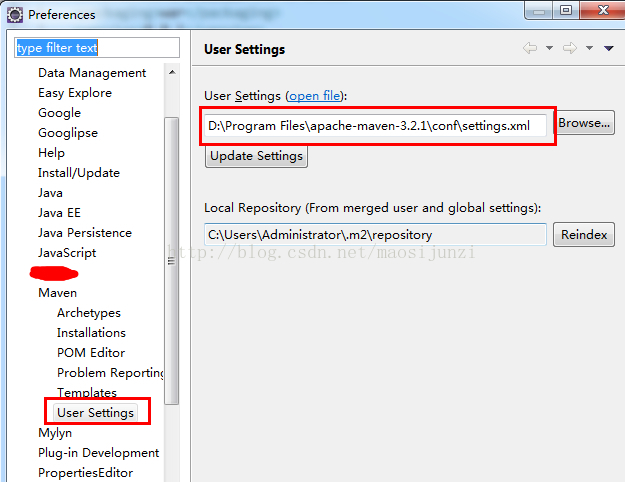
4:eclipse配置maven
window-》prefrences-》maven-》user setting。如图
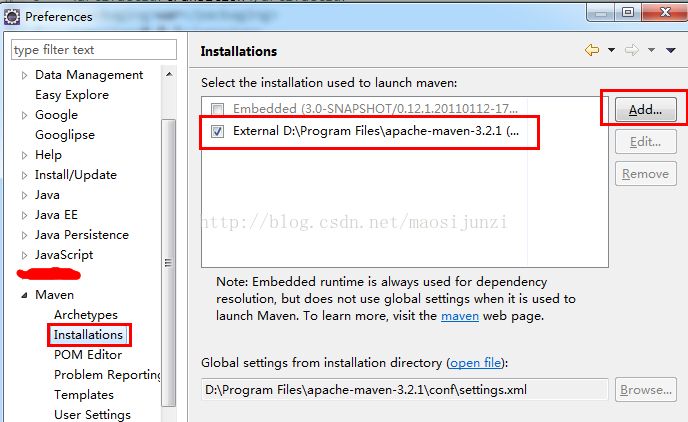
window-》prefrences-》maven-》installations。如图
5:配置tomcat和maven
进入tomcat_home/conf/tomcat_users.xml:修改如下:
- <role rolename="admin-gui"/>
- <role rolename="admin-script"/>
- <role rolename="manager-gui"/>
- <role rolename="manager-script"/>
- <role rolename="manager-jmx"/>
- <role rolename="manager-status"/>
- <user username="admin" password="admin" roles="manager-gui,manager-script,manager-jmx,manager-status,admin-script,admin-gui"/>
进入maven_home/conf/settings.xml:修改如下:
- <server>
- <id>tomcat</id>
- <username>admin</username>
- <password>admin</password>
- </server>
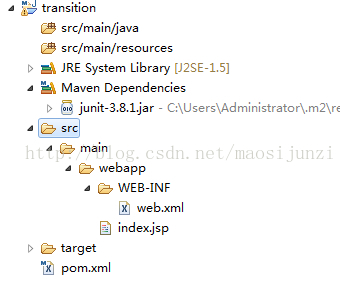
6:eclipse创建maven web项目
这个简单,new-》other-》maven project-》next。这里注意groupid选org.apache.maven.archetypes ,artifactid 选maven-archetype-webapp,然后next,输入我们自己的groupid(com.test),artifactid(transition),然后finish,OK。如图所示:
7:修改pom.xml
- <project xmlns="http://maven.apache.org/POM/4.0.0" xmlns:xsi="http://www.w3.org/2001/XMLSchema-instance"
- xsi:schemaLocation="http://maven.apache.org/POM/4.0.0 http://maven.apache.org/maven-v4_0_0.xsd">
- <modelVersion>4.0.0</modelVersion>
- <groupId>com.test</groupId>
- <artifactId>transition</artifactId>
- <packaging>war</packaging>
- <version>0.0.1</version>
- <name>transition Maven Webapp</name>
- <url>http://maven.apache.org</url>
- <repositories>
- <repository>
- <id>maven_remote_1</id>
- <url>http://mirrors.ibiblio.org/pub/mirrors/maven2/</url>
- </repository>
- </repositories>
- <dependencies>
- <dependency>
- <groupId>junit</groupId>
- <artifactId>junit</artifactId>
- <version>3.8.1</version>
- <scope>test</scope>
- </dependency>
- </dependencies>
- <build>
- <finalName>transition</finalName>
- <plugins>
- <plugin>
- <groupId>org.codehaus.mojo</groupId>
- <artifactId>tomcat-maven-plugin</artifactId>
- <configuration>
- <warFile>target/transition.war</warFile>
- <server>tomcat</server>
- <url>http://localhost:8080/manager/text</url>
- <path>/transition</path>
- </configuration>
- </plugin>
- </plugins>
- </build>
- </project>
8:运行maven项目
先进入tomcat目录启动tomcat,然后右键项目 run as-》run configrations:
Goals项输入:package tomcat:redeploy
Maven Runtime选择我们自己的maven。如图:
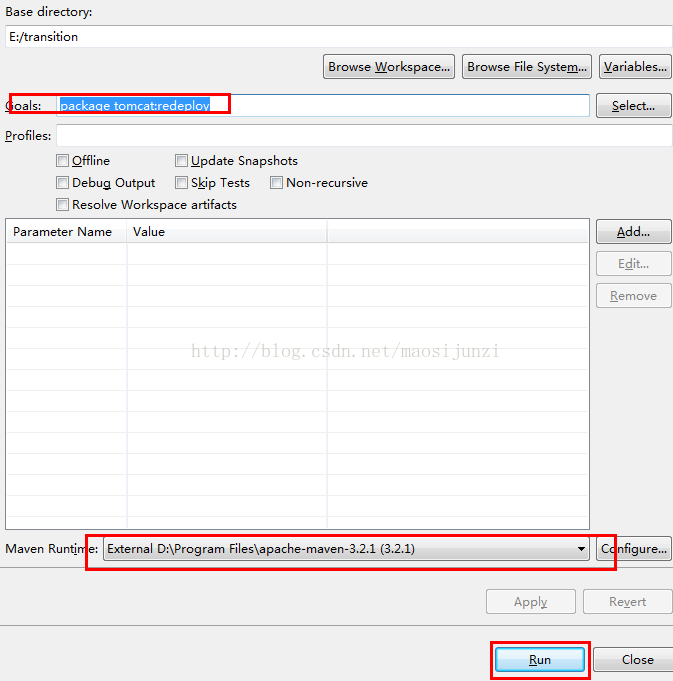
然后点Run,控制台显示如下:
- [INFO] Processing war project
- [INFO] Copying webapp resources [E:\transition\src\main\webapp]
- [INFO] Webapp assembled in [3 msecs]
- [INFO] Building war: E:\transition\target\transition.war
- [INFO] WEB-INF\web.xml already added, skipping
- [INFO]
- [INFO] <<< tomcat-maven-plugin:1.1:redeploy (default-cli) @ transition <<<
- [INFO]
- [INFO] --- tomcat-maven-plugin:1.1:redeploy (default-cli) @ transition ---
- [INFO] Deploying war to http://localhost:8080/transition
- [INFO] OK - Undeployed application at context path /transition
- [INFO] OK - Deployed application at context path /transition
- [INFO] ------------------------------------------------------------------------
- [INFO] BUILD SUCCESS
- [INFO] ------------------------------------------------------------------------
- [INFO] Total time: 2.412 s
- [INFO] Finished at: 2014-03-13T11:43:42+08:00
- [INFO] Final Memory: 6M/15M
- [INFO] ------------------------------------------------------------------------
这里省略很多控制台输出,出现BUILD SUCCESS 则说明部署成功,浏览器输入:http://localhost:8080/transition/。显示Hello world..
注意:这样成功之后项目会直接打成war包,部署到tomcat下,每次build不需要重启tomcat。这样致命的缺点就是,不能调试。如果需要调试且在eclipse中启动tomcat的话。会发现右键项目没有run as server,有两种方法解决:
第一种:这时需要把项目转变成dynamic web module。右键项目-》properties-》project facets,然后右边选中dynamic web module。之后就会出现run as server了.
第二种:右键项目,run/debug as configrations 如上第8步骤的图。不过Goals中天上【tomcat:run】。然后run就OK了,注意这里不需要提前启动tomcat。


 1万+
1万+


 被折叠的 条评论
为什么被折叠?
被折叠的 条评论
为什么被折叠?
 到【灌水乐园】发言


