


效果图:
重点分析:
1. class的使用,设置class,可以实现不同控制器之间的跳转.
2. 思路分析 :
2.1. 首先配置数据模型,在控制器中设置数据调用设置类(模型)方法,添加标题和图片和跳转的类,添加到组(模型)中,最后添加到存储数据模型的(数组中).
2.2. 再将模型传入cell中,设置cell标题,图片,和根椐不同模型类设置cell右边显示不同内容.
2.3. 当点击cell后,根据模型类实现跳转可不跳转操作.
重点知识
3.1 block实现版本更新弹框,使用GCD实现延时加载.
3.2 cell右边显示内容控件 accessoryView.
3.3 点击cell后取消选中方法 [tableView deselectRowAtIndexPath:indexPath animated:YES]; .
3.4 点击cell后没有灰色显示, self.selectionStyle = UITableViewCellSelectionStyleNone; .
3.5 设置控件圆角.
3.6 继承与多态
self.productImage.layer.cornerRadius = 10;
    self.productImage.clipsToBounds = YES;
一.数据模型(M)
功能实现:
(1).设置统一的模型(父类),此模型包含所有的cell共有的东西,如标题,图标,然后再在(子类)模型中设置自己私有的属性和方法,实现cell显示不同的内容.
(2).block的使用,实现版本更新的弹出窗口.
(3).思路分析:设置cell的内容,并设置方法从外界传入然后设置.
1.父类模型,设置所有cell共有的特性
#import <Foundation/Foundation.h>

/**定义block,用做版本更新时的回调*/
typedef void (^myBlock)();
@interface SettingModel : NSObject
/**标题文字*/
@property (copy, nonatomic) NSString *title;

/**图标*/
@property (copy, nonatomic) NSString *icon;

/**block*/
@property (copy, nonatomic) myBlock myBlocks;

/**添加cell的标题和icon*/
+ (instancetype)settingModelWithTitle:(NSString *)title andIcon:(NSString *)icon;

/**只添加cell的标题*/
+ (instancetype)settingModelWithTitle:(NSString *)title;
@end
/**.m文件中实现*/
#import "SettingModel.h"
@implementation SettingModel
+ (instancetype)settingModelWithTitle:(NSString *)title andIcon:(NSString *)icon{
/**创建数据模型,这里用self调用的好处是其他类使用时不用转换*/
    SettingModel *items = [[self alloc] init];
    items.icon = icon;
    items.title = title;
    return items;
}
+ (instancetype)settingModelWithTitle:(NSString *)title{
    return [self settingModelWithTitle:title andIcon:nil];
}
@end
2.cell右边显示箭头的模型(子类)
/**2.1继承SettingModel*/
@interface SettingArrowModel : SettingModel

/**2.2增加自己的私胡有,设置要跳转的控制器*/
@property (assign, nonatomic) Class desClass;

/**2.3设置跳转控制器方法,私有方法,只有箭头才可以跳转控制器*/
+ (instancetype)settingModelWithTitle:(NSString *)title andIcon:(NSString *)icon andDesClass:(Class)desClass;

/**.m中实现的代码*/
+ (instancetype)settingModelWithTitle:(NSString *)title andIcon:(NSString *)icon andDesClass:(Class)desClass{

    SettingArrowModel *items = [[self settingModelWithTitle:title andIcon:icon] init];
    items.desClass = desClass;
    return items;
}
@end
3.开关模型或其它(子类)
/**3.1开关模型*/
#import "SettingModel.h"
@interface SettingSwitchModel : SettingModel
@end

/**3.2lable模型*/
#import "SettingModel.h"
@interface SettingLabelModel : SettingModel
@end
4.设置组模型(用来装上面的模型数据)
#import <Foundation/Foundation.h>
@interface Group : NSObject
/**4.1设置cell头部标题,如果有*/
@property (copy, nonatomic) NSString *header;

/**4.2设置cell尾部标题,如果有*/
@property (copy, nonatomic) NSString *fooder;

/**4.3存储cell的数据模型的数组*/
@property (strong, nonatomic) NSArray *items;
@end
二.控制器(C)
重点分析:
1. 调用了父类的init 和initWithStyle方法实现cell分组.
2. 调用模型中方法添加标题和图片和跳转的类,再添加到Group(组模型)数组中,最后添加到存储所有cell的数组中.
3. 在添加cell内容的方法中,应用的多态,根据cell显示不同内容,来设置后面的子类.
4. 将存储有数据的数据模型,传入cell的模型中.
5. 当点击cell时,如果是箭头将跳转别的控制器,如果开关或其它则不跳转.
6. 实现block,如果block中有值,则执行模型中block,用于版本更新.
7. 实现继承,父类需要设置共有的东西,子类只需设置数据模型即可.
1.父类(设置控制器共有的东西)
#import <UIKit/UIKit.h>
@interface BaseTableViewController : UITableViewController
/**1.1存放模型数据,这个属性必须方法.h文件中,这样继承它的子类才可以调用*/
@property (strong, nonatomic) NSMutableArray *dataArray;
@end
1.2设置.m文件中代码
#import "BaseTableViewController.h"
#import "SettingModel.h"       /**添加模型数据*/
#import "SettingArrowModel.h"  /**添加箭头模型数据*/
#import "Group.h"              /**添加组模型数据*/
#import "SettingCell.h"        /**添加cell*/
@implementation BaseTableViewController
1.2.1 因为是继承自UITableViewController,所以这里要设置分组,重写父类的init和initWithStyle方法
#pragma mark--外界调用这两个方法时,返回TableView类型是分组的
- (instancetype)init{
    return [super initWithStyle:UITableViewStyleGrouped];
}

- (instancetype)initWithStyle:(UITableViewStyle)style{
    return [super initWithStyle:UITableViewStyleGrouped];
}
1.2.2懒加载可变数组,用来存储所有的cell模型数据,注意调用懒加载方法时,必须用self来调用,否则将不会执行这个方法
- (NSMutableArray *)dataArray{

    if (_dataArray == nil){
        _dataArray = [NSMutableArray array];
    }
    return _dataArray;
}
- (void)viewDidLoad {
    [super viewDidLoad];
}
#pragma mark - Table view data source

/**1.2.3 返回dataArray数组的总数*/
- (NSInteger)numberOfSectionsInTableView:(UITableView *)tableView {
    return self.dataArray.count;
}
/**1.2.4 从数组中取出每个section的组模型,再返回组模型中items的数量*/
- (NSInteger)tableView:(UITableView *)tableView numberOfRowsInSection:(NSInteger)section {
    Group *group = self.dataArray[section];
    return group.items.count;
}
/**1.2.5 自定义cell*/
- (UITableViewCell *)tableView:(UITableView *)tableView cellForRowAtIndexPath:(NSIndexPath *)indexPath {

    SettingCell *setCell = [SettingCell settingCellWithTableView:tableView];
    /**1.2.6 给cell传递数据模型*/
    Group *group = self.dataArray[indexPath.section];
    setCell.items = group.items[indexPath.row];
    return setCell;
}
1.3 点击cell跳转
- (void)tableView:(UITableView *)tableView didSelectRowAtIndexPath:(NSIndexPath *)indexPath{
    /**1.3.1 点击cell后,立即取消选中,即点击后,马上灰色部分消失*/
    [tableView deselectRowAtIndexPath:indexPath animated:YES];
    /**1.3.2 取出数据模型*/
    Group *group = self.dataArray[indexPath.section];
    SettingModel *items = group.items[indexPath.row];

    /**1.3.3 执行更新,如果block中有值,调用*/
    if (items.myBlocks){
        items.myBlocks();
    }
    /**1.3.4 如果cell右边显示是箭头,跳转控制器*/
    if ([items isKindOfClass:[SettingArrowModel class]]) {
    /**将数据模型转换成箭头模型*/
        SettingArrowModel *arrowItems = (SettingArrowModel *)items;
   /**如果箭头模型中的class为空,直接返回*/
        if (arrowItems.desClass == nil) return;
  /**创建控制器,根据箭头中的class属性*/
        UIViewController *VC = [[arrowItems.desClass alloc] init];
        [self.navigationController pushViewController:VC animated:YES];
    }
}
@end
设置类(子类)
/**继承BaseTableViewController*/
#import <UIKit/UIKit.h>
#import "BaseTableViewController.h"
@interface SettingTableViewController : BaseTableViewController
@end
/**设置cell数据*/
//
// SettingTableViewController.m
// Lottery
//
// Created by star on 15-5-22.
// Copyright (c) 2015年 Star. All rights reserved.
//
#import "SettingTableViewController.h"
#import "SettingModel.h"
#import "PushController.h"
#import "SettingSwitchModel.h"
#import "SettingArrowModel.h"
#import "Group.h"
#import "SettingCell.h"
#import "MBProgressHUD+MJ.h"
#import "ProductCollection.h"
#import "HelpViewController.h"
@interface SettingTableViewController ()
@end
@implementation SettingTableViewController
- (void)viewDidLoad {
[super viewDidLoad];
/**1.设置第一组数据*/
[self setupGroup1];
/**2.设置第二组数据*/
[self setupGroup2];
}
#pragma mark--下载数据源
/**第一组*/
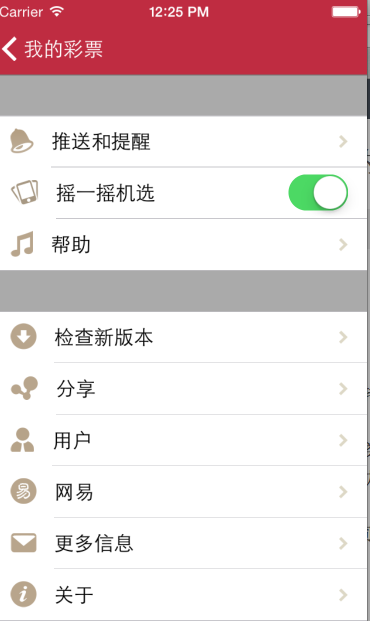
- (void)setupGroup1{
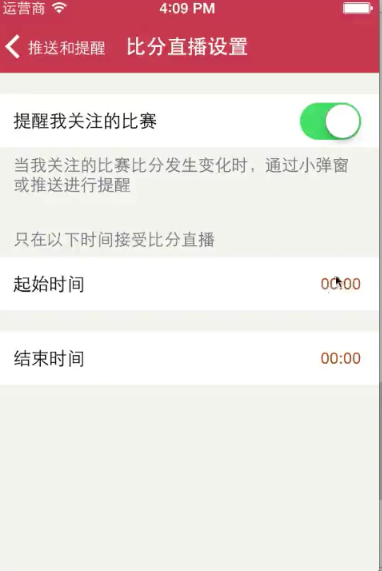
SettingModel *MorePush = [SettingArrowModel settingModelWithTitle:@"推送和提醒" andIcon:@"MorePush@2x.png" andDesClass:[PushController class]];
SettingModel *handShake = [SettingSwitchModel settingModelWithTitle:@"摇一摇机选" andIcon:@"handShake@2x.png" ];
SettingModel *soundEffect = [SettingArrowModel settingModelWithTitle:@"帮助" andIcon:@"sound_Effect@2x.png" andDesClass:[HelpViewController class]];
Group *group = [[Group alloc] init];
group.items = @[MorePush,handShake,soundEffect];
[self.dataArray addObject:group];
}
/**第二组*/
- (void)setupGroup2{
SettingModel *MoreUpdate = [SettingArrowModel settingModelWithTitle:@"检查新版本" andIcon:@"MoreUpdate@2x.png"];
MoreUpdate.myBlocks = ^{
/**1.加载图片*/
[MBProgressHUD showMessage:@"程序猿正在玩命加载中"];
#warning 如果有网络,发送请求
/**2.暂停几秒显示信息*/
dispatch_after(dispatch_time(DISPATCH_TIME_NOW, (int64_t)(1.0 * NSEC_PER_SEC)), dispatch_get_main_queue(), ^{
/**2.1隐藏HUD*/
[MBProgressHUD hideHUD];
/**2.2反馈更新信息*/
[MBProgressHUD showError:@"当前是最新版本"];
});
};
SettingModel *MoreShare = [SettingArrowModel settingModelWithTitle:@"分享" andIcon:@"MoreShare@2x.png" andDesClass:[PushController class]];
SettingModel *IDInfo = [SettingArrowModel settingModelWithTitle:@"用户" andIcon:@"IDInfo@2x.png" andDesClass:[PushController class]];
/**跳转到collection*/
SettingModel *MoreNetease = [SettingArrowModel settingModelWithTitle:@"网易" andIcon:@"MoreNetease@2x.png" andDesClass:[ProductCollection class]];
SettingModel *MoreMessage = [SettingArrowModel settingModelWithTitle:@"更多信息" andIcon:@"MoreMessage@2x.png" andDesClass:[PushController class]];
SettingModel *MoreAbout = [SettingArrowModel settingModelWithTitle:@"关于" andIcon:@"MoreAbout@2x.png" andDesClass:[PushController class]];
Group *group = [[Group alloc] init];
group.items = @[MoreUpdate,MoreShare,IDInfo,MoreNetease,MoreMessage,MoreAbout];
[self.dataArray addObject:group];
}
@end三.UITableViewCell视图(V)
重点分析:
1. 设置数据模型属性,且封装cell.
2. 根据数据模型中不同的class,设置cell右边显示的内容.
3. cell的循环复用的总题,就是当cell滑出去时,右边显示不同内容.
#import <UIKit/UIKit.h>
@class SettingModel;
@interface SettingCell : UITableViewCell
/**封装Cell*/
+ (instancetype)settingCellWithTableView:(UITableView *)tableView;
@property (strong, nonatomic) SettingModel *items;
@end
/**.m实现内容*/
#import "SettingCell.h"
#import "SettingModel.h"
#import "SettingArrowModel.h"
#import "SettingSwitchModel.h"
#import "SettingLabelModel.h"
@interface SettingCell()
/**箭头*/
@property (strong, nonatomic) UIImageView *arrowView;
/**开关*/
@property (strong, nonatomic) UISwitch *mySwitch;
/**标签文字*/
@property (strong, nonatomic) UILabel *myLabel;
@end
@implementation SettingCell懒加载,初始化控件,这样系统只会创建一次.
- (UIImageView *)arrowView{
    if (_arrowView == nil){
        _arrowView = [[UIImageView alloc] initWithImage:[UIImage imageNamed:@"CellArrow@2x.png"]];
    }
    return _arrowView;
}
- (UISwitch *)mySwitch{
    if (_mySwitch == nil) {
        _mySwitch = [[UISwitch alloc] init];
    }
    return _mySwitch;
}
- (UILabel *)myLabel{
    if (_myLabel == nil) {
        _myLabel = [[UILabel alloc] init];
        _myLabel.backgroundColor = [UIColor orangeColor];
        _myLabel.frame = CGRectMake(0, 0, 100, 20);
    }
    return _myLabel;
}
实现cell的封装,外界直接调用这个方法,传入tableView就行
+ (instancetype)settingCellWithTableView:(UITableView *)tableView{

    static NSString *ID = @"SettingCell";
    SettingCell *cell = [tableView dequeueReusableCellWithIdentifier:ID];
    if (cell == nil) {
        cell = [[SettingCell alloc] initWithStyle:UITableViewCellStyleSubtitle reuseIdentifier:ID];
    }
    return cell;
}
设置数据模型,配置图片,标题和cell右边显示内容
- (void)setItems:(SettingModel *)items{

    _items = items;
    /**1.设置数据*/
    [self setupData];
    /**2.设置右边内容*/
    [self setupRightContent];
}
#pragma mark--设置数据
- (void)setupData{

    self.imageView.image = [UIImage imageNamed:self.items.icon];
    self.textLabel.text = self.items.title;
}
#pragma mark--设置右边内容
- (void)setupRightContent{

/**如果是箭头模型类,cell的accessoryView显示箭头*/
    if ([self.items isKindOfClass:[SettingArrowModel class]]) {
        self.accessoryView = self.arrowView;
    }else if ([self.items isKindOfClass:[SettingSwitchModel class]]){
        self.accessoryView = self.mySwitch;
        self.selectionStyle = UITableViewCellSelectionStyleNone;
    }else if ([self.items isKindOfClass:[SettingLabelModel class]]){
        self.accessoryView = self.myLabel;
        self.myLabel.backgroundColor = [UIColor orangeColor];
    }else{
        self.accessoryView = nil;
    }
}
@end


 3541
3541


 被折叠的 条评论
为什么被折叠?
被折叠的 条评论
为什么被折叠?
 到【灌水乐园】发言


