


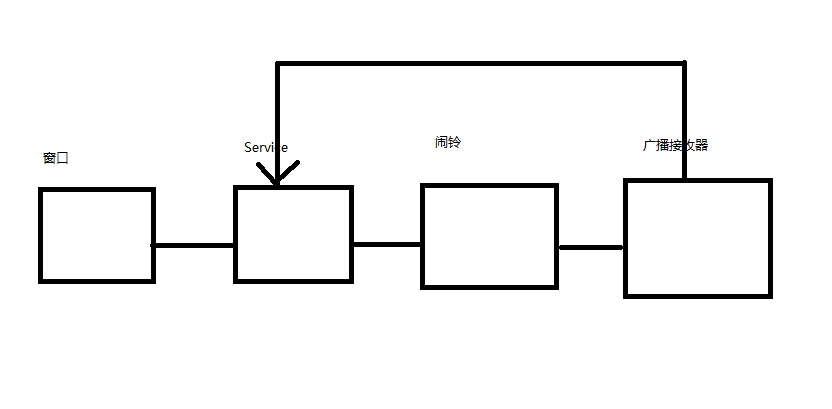
设计思路如上图
package com.example.demo35;

import android.app.Activity;
import android.app.AlarmManager;
import android.app.PendingIntent;
import android.content.Intent;
import android.os.Bundle;
import android.os.SystemClock;

import com.example.demo35.receiver.MessageReceiver;
import com.example.demo35.service.MessageService;

public class MainActivity extends Activity {

    @Override
    protected void onCreate(Bundle savedInstanceState) {
        super.onCreate(savedInstanceState);
        setContentView(R.layout.fragment_main);

        /*//先得到闹铃管理器
        AlarmManager manager=(AlarmManager)
                getSystemService(ALARM_SERVICE);
       //设置下一次闹铃的时间
        //SystemClock.elapsedRealtime();  开机到现在的毫秒数
        //long timer=SystemClock.elapsedRealtime()+ 1000*10;
        long timer=System.currentTimeMillis()+ 1000*10;

        Intent i=new Intent(this,MessageReceiver.class);
        PendingIntent pi=PendingIntent.getBroadcast(this, 0, i, 0);
        //manager.set(AlarmManager.ELAPSED_REALTIME_WAKEUP, timer, pi);
        manager.set(AlarmManager.RTC_WAKEUP, timer, pi);*/

        Intent i=new Intent(this,MessageService.class);
        this.startService(i);
    }
}
package com.example.demo35.receiver;

import com.example.demo35.service.MessageService;

import android.content.BroadcastReceiver;
import android.content.Context;
import android.content.Intent;
import android.widget.Toast;

public class MessageReceiver extends BroadcastReceiver{

    @Override
    public void onReceive(Context context, Intent intent) {
        Toast.makeText(context, "呼叫我了", Toast.LENGTH_SHORT).show();
        Intent i=new Intent(context,MessageService.class);
        context.startService(i);
    }

}
package com.example.demo35.service;

import java.util.Date;

import android.app.AlarmManager;
import android.app.PendingIntent;
import android.app.Service;
import android.content.Intent;
import android.os.IBinder;
import android.os.SystemClock;
import android.util.Log;

import com.example.demo35.receiver.MessageReceiver;

public class MessageService extends Service {

    @Override
    public IBinder onBind(Intent arg0) {

        return null;
    }


    @Override
    public void onCreate() {
        Log.i("messageService", "onCreate");
        super.onCreate();
    }

    @Override
    public int onStartCommand(Intent intent, int flags, int startId) {
        Log.i("messageService", "onStartCommand"+new Date().toLocaleString());
        // 耗时的工作可以放到线程里面执行
        new Thread(){
            public void run() {

            }
            ;
        }.start();

        AlarmManager manager=(AlarmManager)
                getSystemService(ALARM_SERVICE);
       //设置下一次闹铃的时间
        //SystemClock.elapsedRealtime();  开机到现在的毫秒数
        long timer=SystemClock.elapsedRealtime()+ 1000*4;
        //long timer=System.currentTimeMillis()+ 1000*10;
        Intent i=new Intent(this,MessageReceiver.class);
        PendingIntent pi=PendingIntent.getBroadcast(this, 0, i, 0);
        manager.set(AlarmManager.ELAPSED_REALTIME_WAKEUP, timer, pi);
        //manager.set(AlarmManager.RTC_WAKEUP, timer, pi);
        return super.onStartCommand(intent, flags, startId);
    }
}
<?xml version="1.0" encoding="utf-8"?>
<manifest xmlns:android="http://schemas.android.com/apk/res/android"
    package="com.example.demo35"
    android:versionCode="1"
    android:versionName="1.0" >

    <uses-sdk
        android:minSdkVersion="14"
        android:targetSdkVersion="19" />

    <application
        android:allowBackup="true"
        android:icon="@drawable/ic_launcher"
        android:label="@string/app_name"
        android:theme="@style/AppTheme" >
        <activity
            android:name="com.example.demo35.MainActivity"
            android:label="@string/app_name" >
            <intent-filter>
                <action android:name="android.intent.action.MAIN" />

                <category android:name="android.intent.category.LAUNCHER" />
            </intent-filter>
        </activity>
        <activity
            android:name="com.example.demo35.MessageReceiver"
            android:label="@string/title_activity_message_receiver" >
        </activity>
        <!-- 注册广播接收器 -->
        <receiver
            android:name="com.example.demo35.receiver.MessageReceiver"></receiver>
        <service
            android:name="com.example.demo35.service.MessageService"></service>
    </application>

</manifest>
最后说明一下闹钟类型
关于闹铃类型:
AlarmManager.RTC,硬件闹钟,不唤醒手机(也可能是其它设备)休眠;当手机休眠时不发射闹钟。
AlarmManager.RTC_WAKEUP,硬件闹钟,当闹钟发躰时唤醒手机休眠;
AlarmManager.ELAPSED_REALTIME,真实时间流逝闹钟,不唤醒手机休眠;当手机休眠时不发射闹钟。
AlarmManager.ELAPSED_REALTIME_WAKEUP,真实时间流逝闹钟,当闹钟发躰时唤醒手机休眠;
RTC闹钟和ELAPSED_REALTIME最大的差别就是前者可以通过修改手机时间触发闹钟事件,后者要通过真
实时间的流逝,即使在休眠状态,时间也会被计算。
假如使用System.currentTimeMillis()计算闹铃时间,需要使用RTC 或者 RTC_WAKEUP
在android中, 如何使用持续的service?
1) service + thread + while + sleep: 不够持续的原因在于线程的级别比较低
2) activity—>service—>闹铃—->唤醒cpu—->广播接收器—–>service
注意, 在4.4版本中, 闹铃有可能时间不够准确, 因为在4.4中, 为了省电, 有可能会把所有的闹铃集中在一起
进行执行, 这样时间就会有所延误
如果要保证时间的绝对准确, 建议使用
manager.setExact(AlarmManager.ELAPSED_REALTIME_WAKEUP,
timer, pi);
去替代set


 435
435


 被折叠的 条评论
为什么被折叠?
被折叠的 条评论
为什么被折叠?
 到【灌水乐园】发言


