简介
我们都知道,Android的App分两种,一种是本地的,一种是需要联网的,本地的App缺少交互,无法形成一种用户粘性,连接网络的App在这方面就很好的交互效果,笔者最初在尝试让App连接网络的时候,遇到了很多的困难,其实,这些问题都是很简单。这就是自学的一个弊端吧!在遇到问题的时候无法再短时间内有效的解决。
那么,什么是虚拟主机呢?简单的说就是一个公司,将公司的服务主机业务出租,利用软件将数据库分成不同的大小,那么,我们购买的虚拟主机就具备了服务器的功能(服务器+数据库)。即处理信息,存储数据。
很多刚开始学习Android的学习者,想要给他们的App搭建一个服务器,就感到疑惑,应该用什么语言作为服务器端,其实,服务器端和客户端之间只要符合Http通信协议,无论你是使用java,php还是asp,这些都没有关系,都可以实现通信。
为什么我们选择使用虚拟主机用做服务器端呢,原因有两点:
第一: 快捷便利,我们不需要配置环境变量,一切都是配置好的。
第二:安全,我们不用考虑数据的备份问题,同时你可以根据你擅长的后台语言,如ASP,PHP,SSH,Node.js等等。
虚拟主机我们可以在淘宝上面获得,这里不做推荐,避免广告嫌疑。由于我采用的后台语言是PHP,选择合适的就好了,一般来说,JSP的虚拟主机价格会高一点,因为JSP的维护成本要大一点。

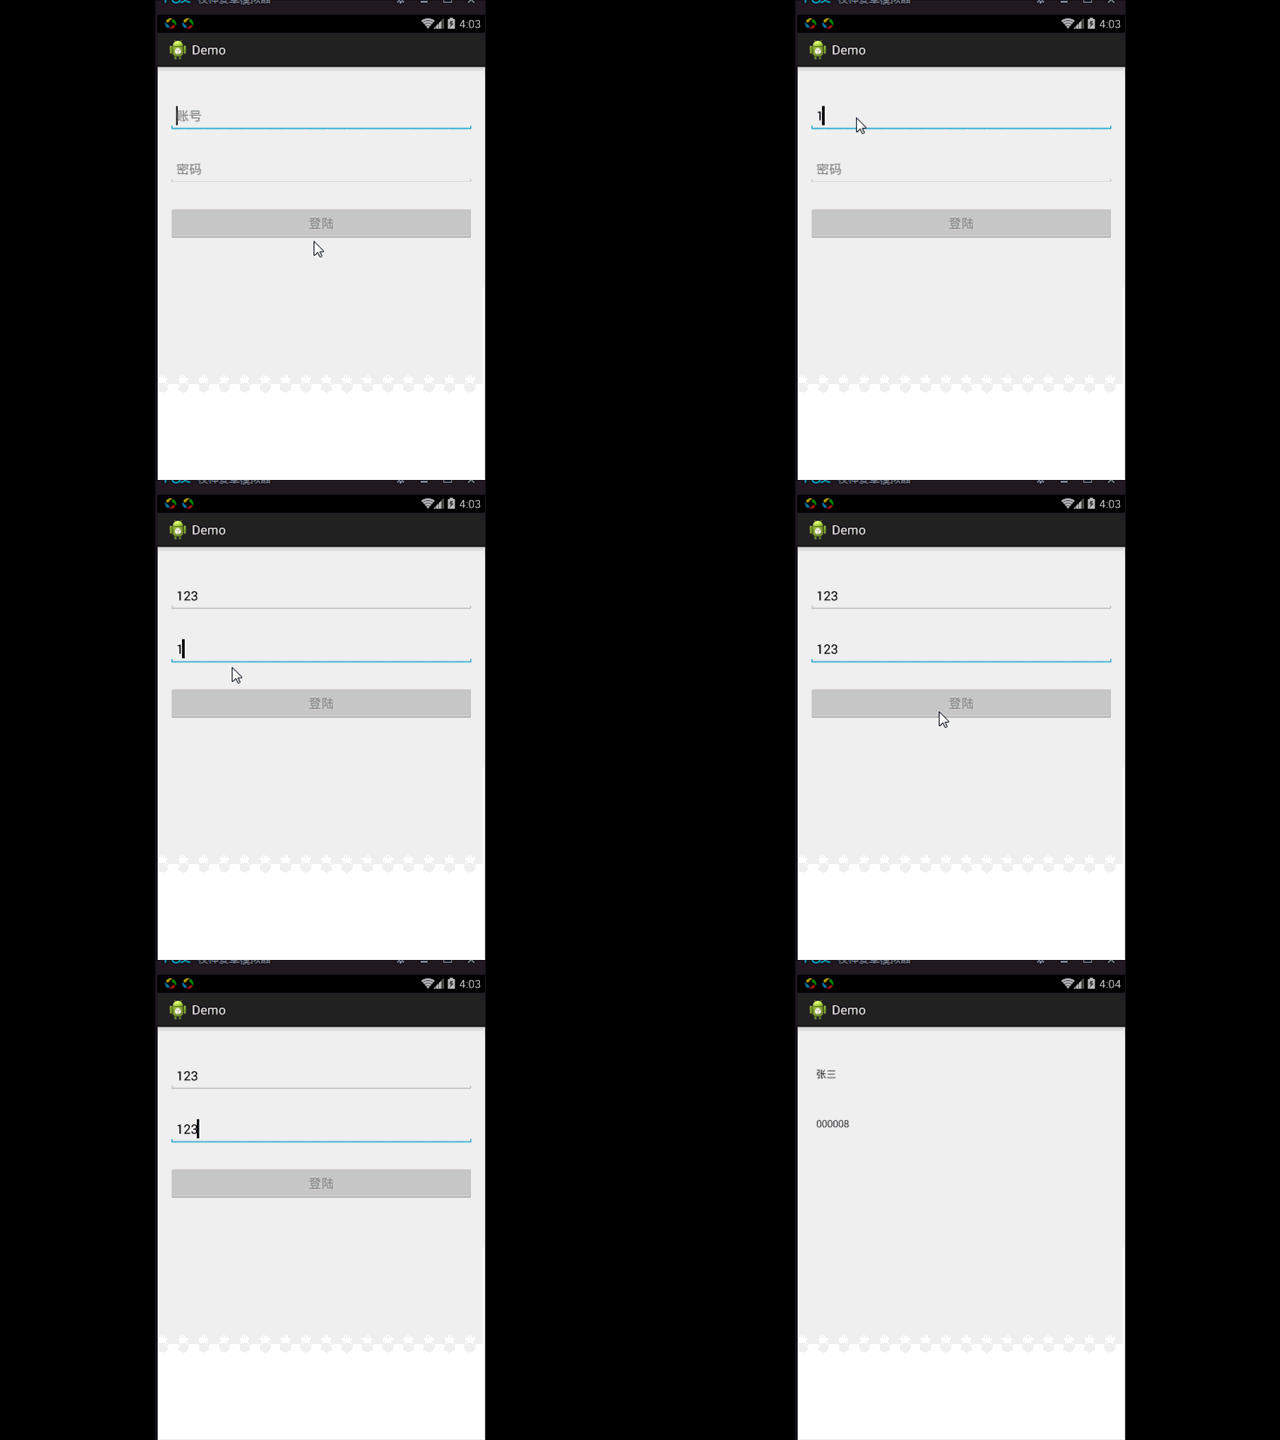
下面我们通过一个登陆功能的Demo来演示一下,先来看一下图片。
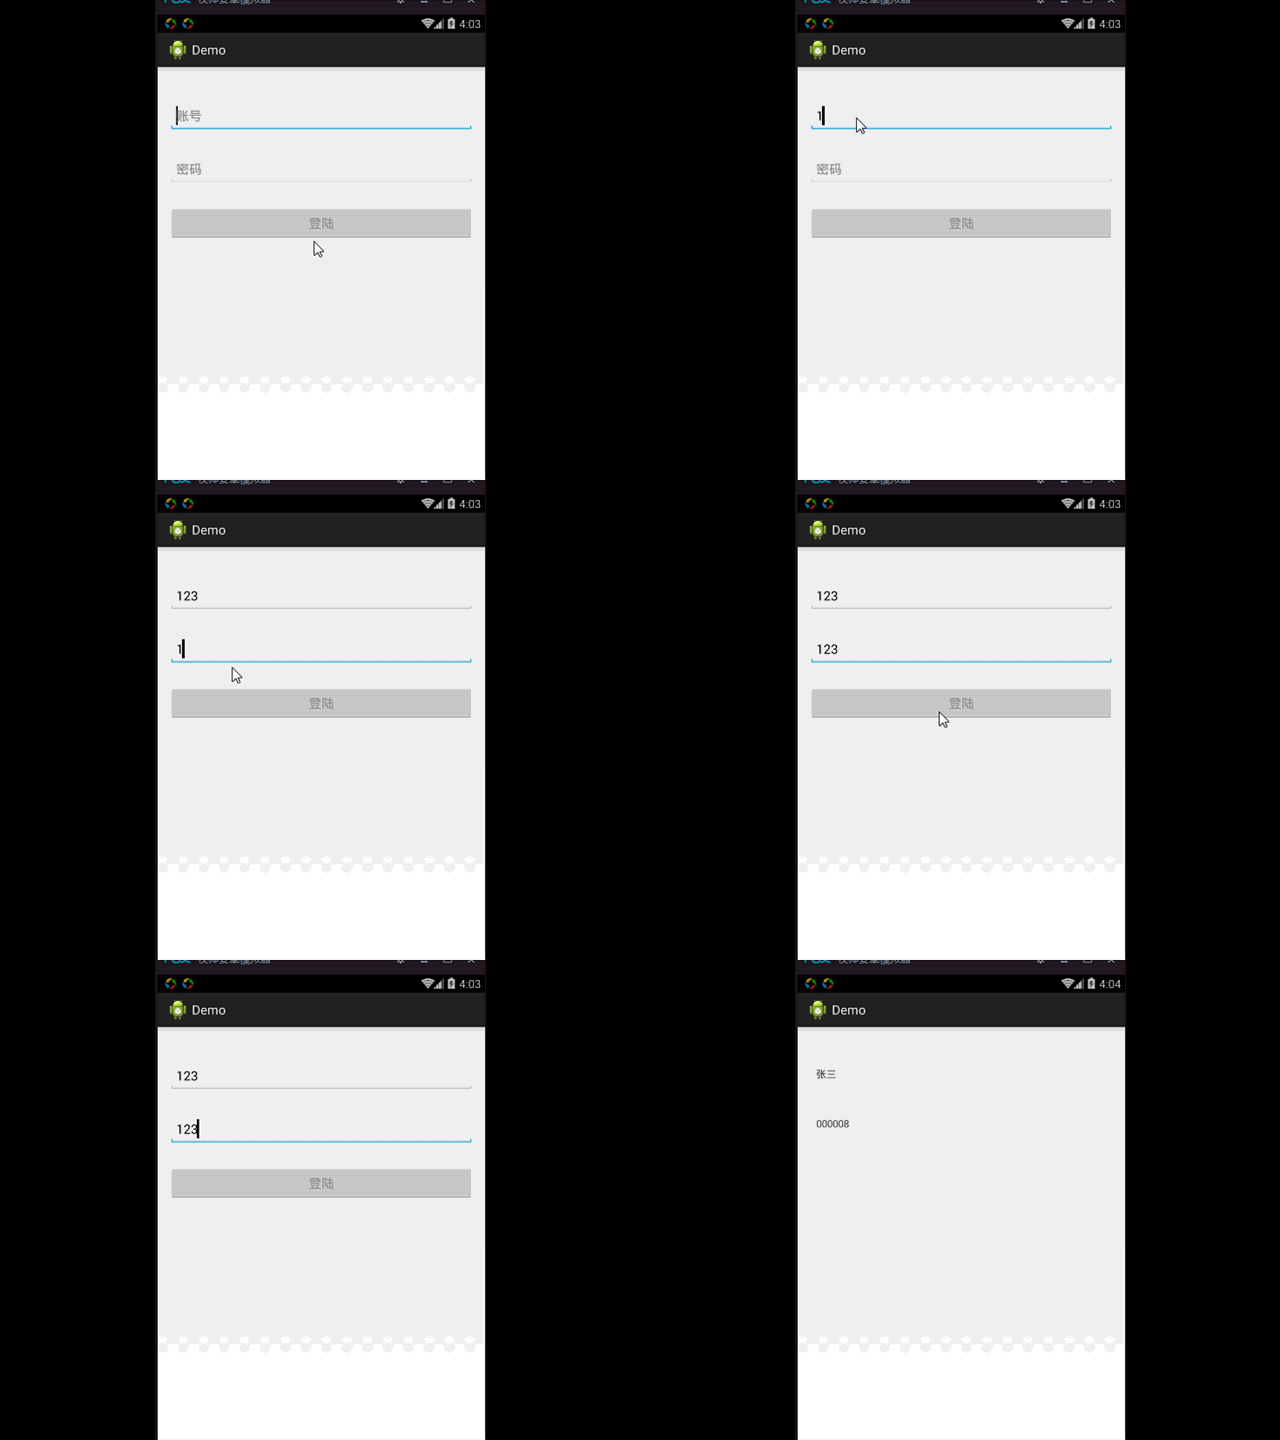
我们知道从图中可以看出,一共两个界面,一个是登陆界面,一个是登陆成功后返回消息的界面。
前期准备
我们需要购买合适的虚拟主机,因为不同的虚拟主机支持的语言是不一样的,比如,我用的后台语言是PHP那么,它必须是支持PHP的,服务器才能运行这段PHP的代码。当然,还有版本的考虑,比如前几天PHP7发布了,那么如果是PHP7的使用者,你的代码夹杂了PHP7特有的代码,也会在运行的时候,出现问题。这些,都是需要考虑的,需要我们在购买前,和客户了解清楚。
购买的时候,不同的提供商的购买过程不太一样,比如,笔者购买的时候,有一次,是需要在服务商的官网上注册一个账号,然后告诉他账号,利用这个账号注册你的服务信息,遇到另一种就是,问了你使用的后台语言,和利用虚拟主机的目的之后(主要是合法性,不能用来做色情,赌博,非法讨论政治),然后直接给你提供一个账号。
笔者说到这里,小伙伴们该着急了吧,让我们来看看虚拟主机的控制面板张啥样吧(不同的提供商的不一样哦)
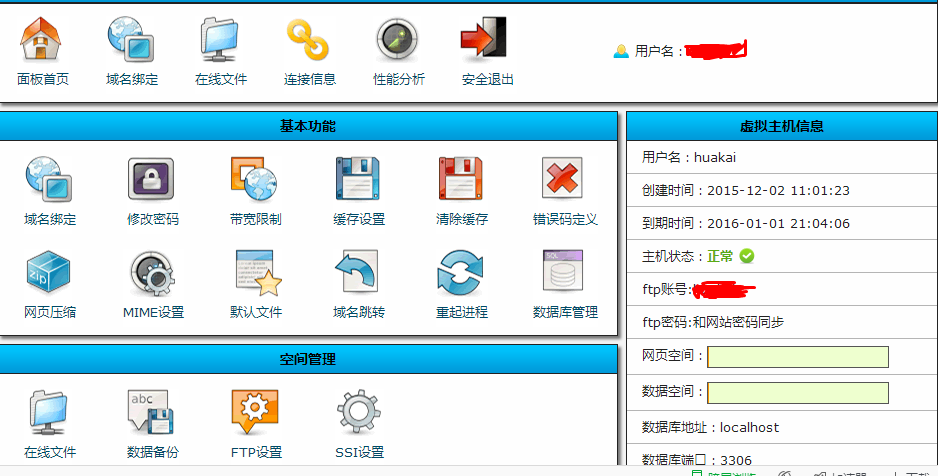
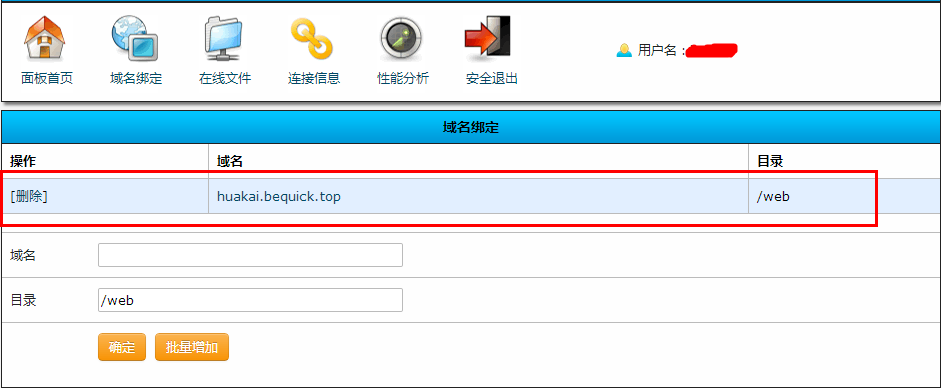
由于笔者购买的虚拟主机是共享IP,IP地址是客户单发给我的。我们需要向一个网页发出请求。那么就需要得到网址,网址在在面板上面可以看到:
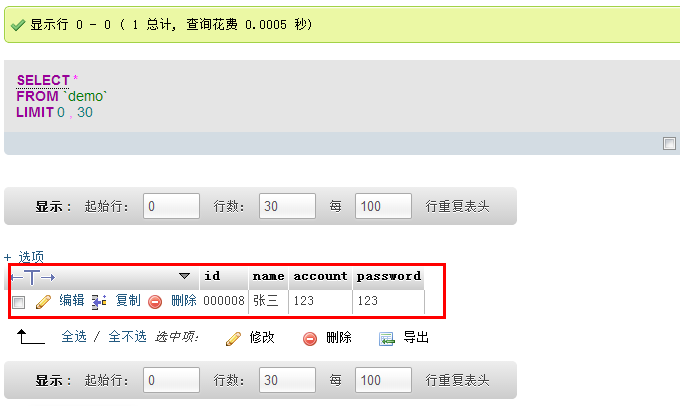
好了,我们进入面板主页的数据库管理,同时建一个记录用户信息的登录表,用来登陆使用。网络的可视化管理工具一般是phpAdamin。建立信息如下。
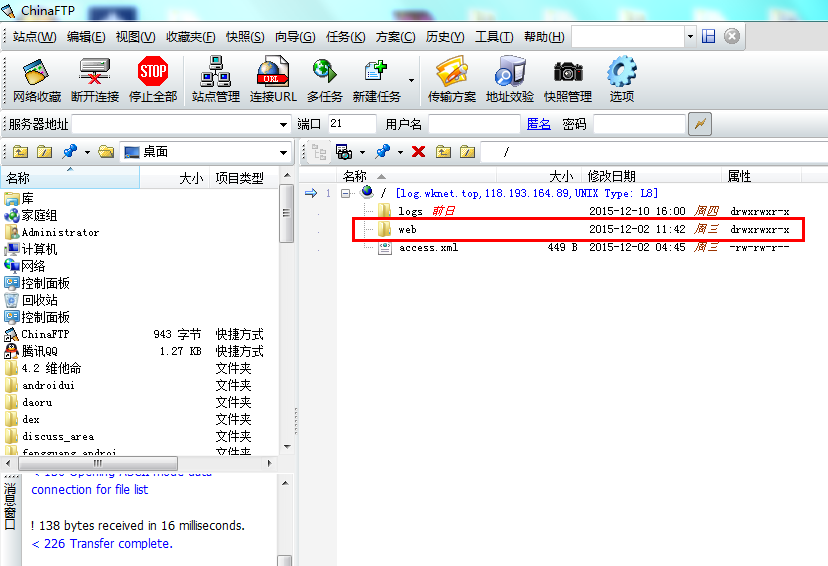
到了这里后,我们采用ftp将信息发送上去。笔者采用的fttp工具是ChinaFtp,点击下载
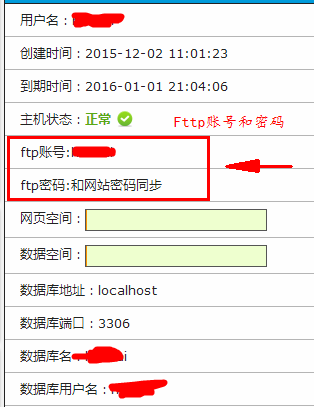
Fttp的账号和密码会提供,笔者的提供如下:
登陆Ftp后,我们将php代码一定要上传到Web文件夹里面。
代码如下
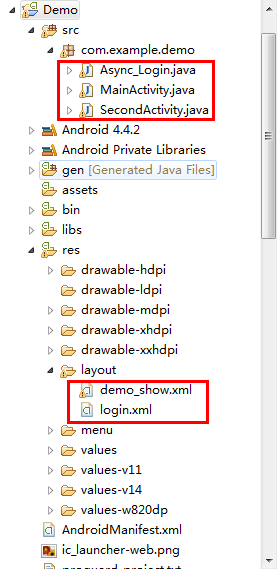
XML
login.xml
<RelativeLayout xmlns:android="http://schemas.android.com/apk/res/android"
    xmlns:tools="http://schemas.android.com/tools"
    android:layout_width="match_parent"
    android:layout_height="match_parent"
    android:paddingBottom="@dimen/activity_vertical_margin"
    android:paddingLeft="@dimen/activity_horizontal_margin"
    android:paddingRight="@dimen/activity_horizontal_margin"
    android:paddingTop="@dimen/activity_vertical_margin"
    tools:context="com.example.demo.MainActivity" >

    <EditText
        android:id="@+id/account"
        android:layout_width="match_parent"
        android:layout_height="wrap_content"
        android:layout_marginTop="30dip"
        android:hint="账号"
        android:padding="10dip" />

    <EditText
        android:id="@+id/pwd"
        android:layout_width="match_parent"
        android:layout_height="wrap_content"
        android:layout_below="@id/account"
        android:layout_marginTop="30dip"
        android:hint="密码"
        android:padding="10dip" />

    <Button
        android:id="@+id/submit"
        android:layout_width="match_parent"
        android:layout_height="wrap_content"
        android:layout_below="@id/pwd"
        android:layout_marginTop="30dip"
        android:hint="登陆"
        android:padding="10dip" />

</RelativeLayout>
demo_show.xml
<RelativeLayout xmlns:android="http://schemas.android.com/apk/res/android"
    xmlns:tools="http://schemas.android.com/tools"
    android:layout_width="match_parent"
    android:layout_height="match_parent"
    android:paddingBottom="@dimen/activity_vertical_margin"
    android:paddingLeft="@dimen/activity_horizontal_margin"
    android:paddingRight="@dimen/activity_horizontal_margin"
    android:paddingTop="@dimen/activity_vertical_margin"
    tools:context="com.example.demo.MainActivity" >

    <TextView
        android:id="@+id/Demo_id"
        android:layout_width="match_parent"
        android:layout_height="wrap_content"
        android:layout_marginTop="30dip"
        android:hint="账号"
        android:padding="10dip" />

    <TextView
        android:id="@+id/Demo_name"
        android:layout_width="match_parent"
        android:layout_height="wrap_content"
        android:layout_below="@id/Demo_id"
        android:layout_marginTop="30dip"
        android:hint="密码"
        android:padding="10dip" />

</RelativeLayout>
JAVA
MainActivity.java
public class MainActivity extends Activity {
    private EditText account;
    private EditText pwd;
    private Button submit;

    @Override
    protected void onCreate(Bundle savedInstanceState) {
        super.onCreate(savedInstanceState);
        setContentView(R.layout.login);
        account = (EditText) findViewById(R.id.account);
        pwd = (EditText) findViewById(R.id.pwd);
        submit = (Button) findViewById(R.id.submit);
        submit.setOnClickListener(new View.OnClickListener() {

            @Override
            public void onClick(View v) {
                String accountt = account.getText().toString();
                String pwdd = pwd.getText().toString();
                Async_Login login = new Async_Login(MainActivity.this);
                login.execute(accountt, pwdd);

            }
        });

    }

}
Async_Login.java
public class Async_Login extends AsyncTask<String, String, String[]> {
    private Context mcontext;
    private String info[];

    private InputStream is = null;
    private String result = "";
    private String URL = "http://huakai.bequick.top/demoo/login.php";
    private List<BasicNameValuePair> nameValuesPairs;

    public Async_Login(Context mcontext) {
        this.mcontext = mcontext;
    }

    @Override
    protected String[] doInBackground(String... params) {
        nameValuesPairs = new ArrayList<BasicNameValuePair>();
        nameValuesPairs.add(new BasicNameValuePair("account", params[0]));
        nameValuesPairs.add(new BasicNameValuePair("password", params[1]));
        HttpClient httpClient = new DefaultHttpClient();
        HttpPost httpPost = new HttpPost(URL);
        try {
            UrlEncodedFormEntity en = new UrlEncodedFormEntity(nameValuesPairs,
                    HTTP.UTF_8);
            httpPost.setEntity(en);
        } catch (UnsupportedEncodingException e1) {
            e1.printStackTrace();
        }

        HttpResponse httpResponse;
        try {
            httpResponse = httpClient.execute(httpPost);
            Log.v("HttpDebug", "response成功");
            if (httpResponse.getStatusLine().getStatusCode() == HttpStatus.SC_OK) {
                HttpEntity entity = httpResponse.getEntity();
                is = entity.getContent();
                BufferedReader br = new BufferedReader(new InputStreamReader(
                        is, "UTF-8"), 8);

                StringBuilder sb = new StringBuilder();
                String line = null;
                while ((line = br.readLine()) != null) {
                    sb.append(line + "\n");
                }
                is.close();
                result = sb.toString();
                System.out.println("result is " + result);
                JSONObject object;
                object = new JSONObject(result);

                JSONObject msg = object.getJSONObject("info");
                Log.v("JSON", msg.toString());
                String id = msg.getString("id");
                Log.v("INFO", id);
                String name = msg.getString("name");
                Log.v("INFO", name);

                info = new String[2];
                info[0] = name;
                info[1] = id;

                return info;

            }
        } catch (ClientProtocolException e) {
            System.out.println("ClientProtocolException异常");
            e.printStackTrace();
        } catch (IOException e) {
            System.out.println("IOException异常");
            e.printStackTrace();
        } catch (JSONException e) {
            System.out.println("JSONException异常");
            e.printStackTrace();
        }

        return null;
    }

    @Override
    public void onPostExecute(String[] info) {
        if (info != null) {
            Intent intent = new Intent(mcontext, SecondActivity.class);
            intent.putExtra("info", info);
            mcontext.startActivity(intent);
            ((Activity) (mcontext)).finish();

        } else {
            Toast.makeText(mcontext, "密码错误", Toast.LENGTH_LONG).show();
        }

    }

}
SecondActivity.java
public class SecondActivity extends Activity {
    private TextView Demo_id;
    private TextView Demo_name;
    private String idd, namee;/

    @Override
    public void onCreate(Bundle savedInstanceState){
        super.onCreate(savedInstanceState);
        setContentView(R.layout.demo_show);
        Demo_id = (TextView)findViewById(R.id.Demo_id);
        Demo_name = (TextView)findViewById(R.id.Demo_name);
        Intent intent = getIntent();
        String[] info = intent.getStringArrayExtra("info");

        idd = info[0];
        namee = info[1];

        Demo_id.setText(idd);
        Demo_name.setText(namee);
    }

}
PHP
conn.php
<?php
mysql_connect("118.193.164.85", "huakai", "huakai");
mysql_query("SET NAMES utf8");
mysql_select_db("huakai");
?>
login.php
<?php
require_once('conn.php');

$sql = " select * from demo where account = '$_POST[account]' and
                                                password = '$_POST[password]' ";

$res = mysql_query($sql);
$ress = mysql_query($sql);
if(is_array(mysql_fetch_row($res)))
{
    $response["info"] = mysql_fetch_assoc($ress);
}


 echo json_encode($response);
 mysql_close();

?>
效果显示
总结
使用虚拟主机确实是一种很快捷的方法,搭建后台,但是如果你的项目有很多隐私信息,那么我认为虚拟主机不应该成为你的选择,当然了,如果你喜欢用来作为小项目练习的话,也不推荐,因为你完全可以使用XAMPP的集成环境代替。那么什么情况比较合适呢?笔者认为,如果你项目没有太多隐私信息,同时项目不大,对安全要求一般,同时最求高的开发效率,那么,它是你的选择。




 930
930


 被折叠的 条评论
为什么被折叠?


