


效果展示

原理分析
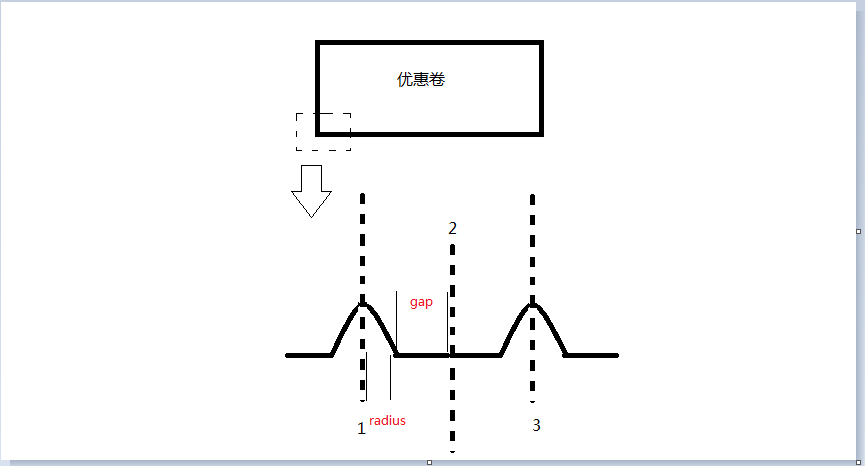
View继承LinearLayout,在View的上下边缘画出白色的圆形即可,这里只要计算出圆的个数和圆的循环规律即可,下面请看分析
我们取卡片的前2个凹凸来看,将其分为四部分,并且两部分为循环可得到另两部分,其中我们只要计算出圆的半径位置,我们就可以重复的画出第二个圆,因为gap和radius是已知的,并且你可以发现虚线部分为1、2、3,其中圆心的位置就在1、3中,也就是(2i-1)之中,同时圆的个数我们可以用总宽度/(2倍的radius+2倍的gap)即可。
实现步骤
1、初始化变量,并绘制出边缘线上的圆
public class MyCardView extends LinearLayout {
    //圆的半径
    private int radius = 8;
    //圆之间的间距
    private int gap = 8;
    private Paint mPaint;

    public MyCardView(Context context) {
        super(context);
        init();
    }

    public MyCardView(Context context, AttributeSet attrs) {
        super(context, attrs);
        init();
    }

    public MyCardView(Context context, AttributeSet attrs, int defStyleAttr) {
        super(context, attrs, defStyleAttr);
        init();
    }

    private void init() {
        mPaint = new Paint();
        mPaint.setColor(Color.WHITE);
        mPaint.setStyle(Paint.Style.FILL);
        mPaint.setDither(true);
    }

    @Override
    protected void onDraw(Canvas canvas) {
        super.onDraw(canvas);
        //圆的个数
        int roundNum = getWidth() / (radius * 2 + gap * 2);
        for (int i = 1; i <= roundNum; i++) {
            canvas.drawCircle((gap + radius) * (2 * i - 1), 0, radius, mPaint);
            canvas.drawCircle((gap + radius) * (2 * i - 1), getHeight(), radius, mPaint);
        }
    }
}
2、布局中使用
<LinearLayout xmlns:android="http://schemas.android.com/apk/res/android"
android:layout_width="match_parent"
android:layout_height="match_parent"
android:background="#ffffff"
android:orientation="vertical"
android:padding="16dp">
<com.handsome.app2.View.Custom.MyCardView
android:layout_width="match_parent"
android:layout_height="120dp"
android:background="#5ED6FF"
android:orientation="horizontal"
android:padding="20dp">
<TextView
android:layout_width="wrap_content"
android:layout_height="wrap_content"
android:layout_gravity="center_vertical"
android:text="¥2.3"
android:textColor="#ffffff"
android:textSize="30dp" />
<View
android:layout_width="1dp"
android:layout_height="match_parent"
android:layout_marginLeft="16dp"
android:layout_marginRight="16dp"
android:background="#888888" />
<LinearLayout
android:layout_width="match_parent"
android:layout_height="match_parent"
android:gravity="center_vertical"
android:orientation="vertical">
<TextView
android:layout_width="wrap_content"
android:layout_height="wrap_content"
android:text="分享红包"
android:textColor="#90000000"
android:textSize="16dp" />
<TextView
android:layout_width="wrap_content"
android:layout_height="wrap_content"
android:layout_marginTop="2dp"
android:text="· 满18元可用"
android:textColor="#80000000"
android:textSize="12dp" />
<TextView
android:layout_width="wrap_content"
android:layout_height="wrap_content"
android:layout_marginTop="2dp"
android:text="· 限尾号3235手机号可用"
android:textColor="#80000000"
android:textSize="12dp" />
<TextView
android:layout_width="wrap_content"
android:layout_height="wrap_content"
android:layout_marginTop="2dp"
android:text="· 2016-08-29 - 2016-08-31"
android:textColor="#80000000"
android:textSize="12dp" />
</LinearLayout>
</com.handsome.app2.View.Custom.MyCardView>
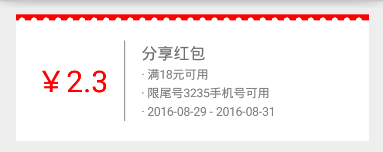
</LinearLayout>效果展示
原理分析
效果其实是个合成布局,红色为我们的自定义的部分,而下面白色内容部分为LinearLayout
实现步骤
1、初始化变量,并绘制出边缘线上的圆
public class MyMoneyView extends LinearLayout {
    private int radius = 6;
    private int gap = 6;
    private Paint mPaint;

    public MyMoneyView(Context context) {
        super(context);
        init();
    }

    public MyMoneyView(Context context, AttributeSet attrs) {
        super(context, attrs);
        init();
    }

    public MyMoneyView(Context context, AttributeSet attrs, int defStyleAttr) {
        super(context, attrs, defStyleAttr);
        init();
    }

    private void init() {
        mPaint = new Paint();
        mPaint.setColor(Color.WHITE);
        mPaint.setStyle(Paint.Style.FILL);
        mPaint.setDither(true);
    }

    @Override
    protected void onDraw(Canvas canvas) {
        super.onDraw(canvas);
        for (int i = 1; i <= getWidth() / (radius * 2 + gap * 2); i++) {
            canvas.drawCircle((gap + radius) * (2 * i - 1), radius*2, radius, mPaint);
        }
    }
}<LinearLayout xmlns:android="http://schemas.android.com/apk/res/android"
android:layout_width="match_parent"
android:layout_height="match_parent"
android:orientation="vertical"
android:padding="16dp">
<com.handsome.app2.View.Custom.MyMoneyView
android:layout_width="match_parent"
android:layout_height="6dp"
android:background="#ff0000" />
<LinearLayout
android:layout_width="match_parent"
android:layout_height="120dp"
android:background="#ffffff"
android:orientation="horizontal"
android:padding="20dp">
<TextView
android:layout_width="wrap_content"
android:layout_height="wrap_content"
android:layout_gravity="center_vertical"
android:text="¥2.3"
android:textColor="#ff0000"
android:textSize="30dp" />
<View
android:layout_width="1dp"
android:layout_height="match_parent"
android:layout_marginLeft="16dp"
android:layout_marginRight="16dp"
android:background="#888888" />
<LinearLayout
android:layout_width="match_parent"
android:layout_height="match_parent"
android:gravity="center_vertical"
android:orientation="vertical">
<TextView
android:layout_width="wrap_content"
android:layout_height="wrap_content"
android:text="分享红包"
android:textColor="#90000000"
android:textSize="16dp" />
<TextView
android:layout_width="wrap_content"
android:layout_height="wrap_content"
android:layout_marginTop="2dp"
android:text="· 满18元可用"
android:textColor="#80000000"
android:textSize="12dp" />
<TextView
android:layout_width="wrap_content"
android:layout_height="wrap_content"
android:layout_marginTop="2dp"
android:text="· 限尾号3235手机号可用"
android:textColor="#80000000"
android:textSize="12dp" />
<TextView
android:layout_width="wrap_content"
android:layout_height="wrap_content"
android:layout_marginTop="2dp"
android:text="· 2016-08-29 - 2016-08-31"
android:textColor="#80000000"
android:textSize="12dp" />
</LinearLayout>
</LinearLayout>
</LinearLayout>


 938
938


 被折叠的 条评论
为什么被折叠?
被折叠的 条评论
为什么被折叠?
 到【灌水乐园】发言


