


每日更新关注:http://weibo.com/hanjunqiang 新浪微博!
iOS开发者交流QQ群: 4463102061.iOS中我们能看到的控件都是UIView的子类,比如UIButton UILabel UITextField UIImageView等等
2.UIView能够在屏幕的显示是因为在创建它的时候内部自动添加一个CALayer图层,通过这个图层在屏幕上显示的时候会调用一个drawRect: 的方法,完成绘图,才能在屏幕上显示
3.CALayer 本身就具有显示功能,但是它不能响应用户的交互事件,如果只是单纯的显示一个图形,此时你可以使用CALayer创建或者是使用UIView创建,但是如果这个图形想响应用户交互事件,必须使用UIView或者子类
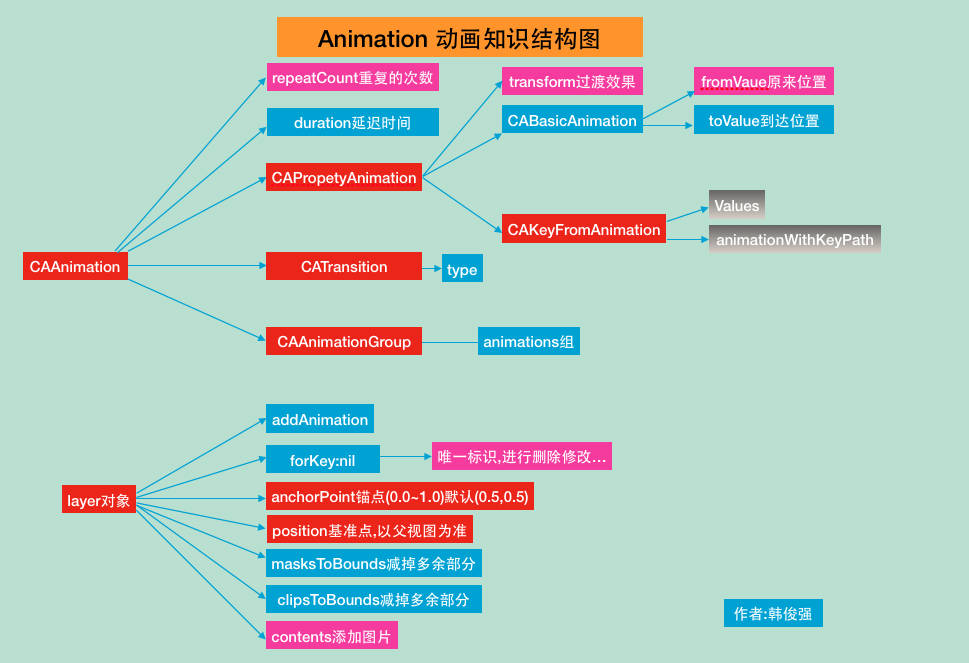
动画知识框图如下:
#import "ViewController.h"
#import "UITextField+Shake.h"
@interface ViewController ()
@property (retain, nonatomic) IBOutlet UIImageView *balloon;
@property (retain, nonatomic) IBOutlet UITextField *TF;
@property (retain, nonatomic) IBOutlet UIButton *bounces;
@property (retain, nonatomic) IBOutlet UIView *animationView;
@property (retain, nonatomic) IBOutlet UIImageView *cloud;
@end<span style="font-family: 'STHeiti Light';">@implementation ViewController</span>
- (void)viewDidLoad {
[super viewDidLoad];
//取到当前视图控制器自带view的图层
CALayer *layer = self.view.layer;
// UIButton *button = [UIButton buttonWithType:UIButtonTypeSystem];
// button.layer //button的图层
//layer 的color必须是CGColor
self.animationView.layer.backgroundColor = [UIColor greenColor].CGColor;
}//给TF创建一个类目:
UITextField+Shake.h
#import <UIKit/UIKit.h>
@interface UITextField (Shake)
- (void)shake;
@end

UITextField+Shake.m
#import "UITextField+Shake.h"

@implementation UITextField (Shake)
//震动的方法
- (void)shake{
    CAKeyframeAnimation *keyFrame = [CAKeyframeAnimation animationWithKeyPath:@"position.x"];
    keyFrame.values = @[@(self.center.x + 10),@(self.center.x),@(self.center.x - 10)];
    keyFrame.repeatCount = 10;
    keyFrame.duration = 0.03;
    [self.layer addAnimation:keyFrame forKey:nil];

}
@end
开始动画按钮点击事件
- (IBAction)handleAnimation:(UIButton *)sender {
    //UIView的属性动画
    [self handlePropertyAnimation];

    //UIView的属性动画 Block形式
    [self handlePrepertyAnimationBlock];

     //UIView的过渡动画
    [self handleTrabsitionAnimation];

    //CALayer动画
    [self handleCALayer];

    //CALayer 的基础动画
    [self handleBasicAnimation];
    //CALayer的关键帧动画
    [self handleKeyFrameAnimation];
    //UITextField 调用输入震动框方法
    [self.TF shake];

    //CALayer的过渡动画
    [self handleLayerCATransactionAnimation];
    //CAAinmationGroup 分组动画
    [self handleAnimatonGroup];

}每日更新关注:http://weibo.com/hanjunqiang 新浪微博!
//UIView的属性动画 可动画的属性 : frame center bounds alpha backgroundColor transfrom
//修改属性做动画,动画结束后属性修改的结果是真实的作用到动画的视图上,不能恢复到之前的样子
- (void)handlePropertyAnimation{
    //iOS4.0之前必须把要修改的可动画属性写在begin 和 commit 之间
    //开始动画
    [UIView beginAnimations:nil context:nil];
    //指定代理 动画的代理不需要遵循协议,因为此代理就没有制定协议
    [UIView setAnimationDelegate:self];
    //设置动画的持续时间
    [UIView setAnimationDuration:3.0];
    //设置动画的重复次数 给重复效果旋转效果立即消失
    [UIView setAnimationRepeatCount:3.0];
    //设置动画的反转效果
    [UIView setAnimationRepeatAutoreverses:YES];
    //设置动画的变化速度
    [UIView setAnimationCurve:UIViewAnimationCurveEaseInOut];

    //如果要实现这个方法必须设置代理,此方法在动画结束后触发
    [UIView setAnimationDidStopSelector:@selector(makeAnimationBack)];

    //修改属性做动画
    //1.center 修改中心点
    CGPoint center = self.animationView.center;
    center.y += 10;
    self.animationView.center =center;
    //2.修改透明度 alpha
    self.animationView.alpha = 0.0;
    //3.变形 tranform
    //<#CGAffineTransform t#> 之前形变量
    //旋转的角度180/4
    self.animationView.transform = CGAffineTransformRotate(self.animationView.transform, M_PI_4);

    self.animationView.transform = CGAffineTransformScale(self.animationView.transform, 0.5, 0.5);

    //提交动画
    [UIView commitAnimations];
}
//恢复到视图之前的状态
- (void)makeAnimationBack{
    //

    self.animationView.center = self.view.center;

    self.animationView.alpha = 1.0;
    //恢复到tranform最初状态,最初状态就在CGAffineTransformIdentity记录
    self.animationView.transform = CGAffineTransformIdentity;

}

//UIView的属性动画 Block形式
- (void)handlePrepertyAnimationBlock{
    //iOS4.0之后使用block的形式做动画


    __block typeof(self)weakSelf = self;
    //1.block 的第一种形式
    //01.动画的持续时间
//    [UIView animateWithDuration:2 animations:^{
//        //1.修改中心点
//        CGPoint center = weakSelf.animationView.center;
//        center.y += 50;
//        weakSelf.animationView.center = center;
//        //2.透明度
//        weakSelf.animationView.alpha = 0.0;
//        //3.变形
//        weakSelf.animationView.transform = CGAffineTransformRotate(weakSelf.animationView.transform, M_PI_4);
//}];

    //2.block的第二种形式
    [UIView animateWithDuration:2 animations:^{
        //1.获得中心点
        CGPoint center = weakSelf.animationView.center;
        //改变中心点
        center.y += 50;
        weakSelf.animationView.center =center;
        //2.透明度
        weakSelf.animationView.alpha = 0.0;
        //3.形变修改transform
        weakSelf.animationView.transform = CGAffineTransformScale(weakSelf.animationView.transform, 0.5, 0.2);


    } completion:^(BOOL finished) {
        //返回动画之前的状态
        [weakSelf makeAnimationBack];
    }];

    //3.block的第三种形式
    //01:持续时间
    //02:动画执行的延迟时间
    //03:设置动画的特效
    //04:修好的动画属性
    //05:动画执行结束后的block块
    [UIView animateWithDuration:3 delay:1 options:UIViewAnimationOptionAllowAnimatedContent animations:^{
        //1.获得中心点
        CGPoint center = weakSelf.animationView.center;
        //改变中心点
        center.y += 50;
        weakSelf.animationView.center =center;
        //2.透明度
        weakSelf.animationView.alpha = 0.0;
        //3.形变修改transform
        weakSelf.animationView.transform = CGAffineTransformScale(weakSelf.animationView.transform, 0.5, 0.2);

    } completion:^(BOOL finished) {
         //返回动画之前的状态
        [weakSelf makeAnimationBack];
    }];

    //block的第四种形式
    //参数1:动画持续时间
    //参数2:动画的延迟时间
    //参数3:设置弹簧的强度 范围(0.0~1.0)
    //参数4:设置弹簧的速度
    //参数5:动画效果
    //参数6:改变动画的属性写在这里
    //参数7:结束动画的时候调用的block
    [UIView animateWithDuration:2 delay:1 usingSpringWithDamping:0.5 initialSpringVelocity:500 options:UIViewAnimationOptionCurveEaseInOut animations:^{
        CGPoint center = weakSelf.bounces.center;
        center.y += 10;
        weakSelf.bounces.center = center;
        //transform
        weakSelf.bounces.transform = CGAffineTransformScale(weakSelf.bounces.transform, 1.2, 1.2);
    } completion:^(BOOL finished) {
        CGPoint center = weakSelf.bounces.center;
        center.y -= 10;
        weakSelf.bounces.center = center;
        weakSelf.bounces.transform = CGAffineTransformIdentity;

    }];
}
每日更新关注:http://weibo.com/hanjunqiang 新浪微博!
//UIView的过渡动画
- (void)handleTrabsitionAnimation{


    __block typeof(self)weakSelf = self;
    //01:对哪个视图添加过渡动画
    //02:动画时常
    //03:动画效果
    [UIView transitionWithView:self.animationView duration:2 options:UIViewAnimationOptionAllowAnimatedContent animations:^{

        weakSelf.animationView.transform = CGAffineTransformRotate(weakSelf.animationView.transform, M_PI_4);

    } completion:nil];

}
//CALayer动画,修改layer层的属性做动画并没有真实的作用到这个视图上,动画知识一种假象
- (void)handleCALayer{
    //CALyer 动画就是对layer做动画
    //边框的宽
    self.animationView.layer.borderWidth = 10.0;
    //边框颜色
    self.animationView.layer.borderColor = [UIColor redColor].CGColor;
    //切圆角
//    self.animationView.layer.cornerRadius = 100;
    //取出layer多余的部分
//    self.animationView.layer.masksToBounds = YES;
    //减掉layer多出的部分
//    self.animationView.clipsToBounds = YES;
    //背景图片
    self.animationView.layer.contents = (id)[UIImage imageNamed:@"WDGJ785Q{`CKL4J}1{_4{(Y.jpg"].CGImage;


    //视图一创建出来的时候  锚点 基准点  中心点三个点是重合的
    //锚点 anchorPoint  决定layer层上的哪个点是position 锚点默认是(0.5,0.5),跟视图的中心点重合
    self.animationView.layer.anchorPoint = CGPointMake(0.5, 0);
    self.animationView.transform = CGAffineTransformRotate(self.animationView.transform, M_PI_4);

    //基准点 Position 决定当前视图的layer,在父视图的位置,它以父视图的坐标系为准
    self.animationView.layer.position = CGPointMake(160, 184);
}
//CALayer 的动画基类:CAAnimation
//CABasicAnimation 基础动画
- (void)handleBasicAnimation{
    //CA动画是根据KVC的原理,就修改layer的属性,以达到做动画的效果
    CABasicAnimation *basic = [CABasicAnimation animationWithKeyPath:@"position.x"];

    basic.fromValue = @(-80);
    basic.toValue = @(400);
    //设置动画持续的时间
    basic.duration = 5.0;
    //设置动画重复的次数
    basic.repeatCount = 1000;
    [self.cloud.layer addAnimation:basic forKey:nil];
}
//CAKeyFrameAnimation 关键帧动画
- (void)handleKeyFrameAnimation{
    CAKeyframeAnimation *keyFrame = [CAKeyframeAnimation animationWithKeyPath:@"position"];
    CGPoint point1 = self.cloud.center;
    CGPoint point2 = CGPointMake(160, 100);
    CGPoint point3 = CGPointMake(270, self.cloud.center.y);

    //把一组要播放的动画需求的数值,按顺序放到数组中,此时动画执行的效果,就会按照数组中数据的顺序发生变化;
    //转化point结构体类型 转化成对象类型
    NSValue *value1 = [NSValue valueWithCGPoint:point1];
    NSValue *value2 = [NSValue valueWithCGPoint:point2];
    NSValue *value3 = [NSValue valueWithCGPoint:point3];
    keyFrame.repeatCount = 1000;
    keyFrame.duration = 15.0;
    keyFrame.values = @[value1,value2,value3,value1];
    [self.cloud.layer addAnimation:keyFrame forKey:nil];
}
//CATransition CALayer 的过度动画
- (void)handleLayerCATransactionAnimation{

    /*

     各种动画效果  其中除了'fade', `moveIn', `push' , `reveal' ,其他属于似有的API(我是这么认为的,可以点进去看下注释).

     *  ↑↑↑上面四个可以分别使用'kCATransitionFade', 'kCATransitionMoveIn', 'kCATransitionPush', 'kCATransitionReveal'来调用.

     *  @"cube"                     立方体翻滚效果

     *  @"moveIn"                   新视图移到旧视图上面

     *  @"reveal"                   显露效果(将旧视图移开,显示下面的新视图)

     *  @"fade"                     交叉淡化过渡(不支持过渡方向)             (默认为此效果)

     *  @"pageCurl"                 向上翻一页

     *  @"pageUnCurl"               向下翻一页

     *  @"suckEffect"               收缩效果,类似系统最小化窗口时的神奇效果(不支持过渡方向)

     *  @"rippleEffect"             滴水效果,(不支持过渡方向)

     *  @"oglFlip"                  上下左右翻转效果

     *  @"rotate"                   旋转效果

     *  @"push"

     *  @"cameraIrisHollowOpen"     相机镜头打开效果(不支持过渡方向)

     *  @"cameraIrisHollowClose"    相机镜头关上效果(不支持过渡方向)

     */

    //创建过渡动画对象
    CATransition *transition = [CATransition animation];
    //配置动画过渡的样式
    transition.type = @"cameraIrisHollowClose";
    //将过渡动画添加到layer上
    [self.view.layer  addAnimation:transition forKey:nil];

}
//CAAinmationGroup 分组动画
- (void)handleAnimatonGroup{
    //1.创建第一个关键帧动画,给热气球一个运动轨迹
    CAKeyframeAnimation *keyframePath = [CAKeyframeAnimation animationWithKeyPath:@"position"];
    //贝塞尔曲线
    //1.指定贝塞尔曲线的半径
    CGFloat  radius = [UIScreen mainScreen].bounds.size.height / 2.0;
    //01:圆心
    //02:半径
    //03:开始的角度
    //04:结束的角度
    //05:旋转方向 (YES表示顺时针 NO表示逆时针)
    UIBezierPath *path = [UIBezierPath bezierPathWithArcCenter:CGPointMake(0, radius) radius:radius startAngle:-M_PI_2 endAngle:M_PI_2 clockwise:YES];
    //将贝塞尔曲线作为运动轨迹
    keyframePath.path = path.CGPath;

    //2.创建第二组关键帧动画,让热气球在运动的时候  由小--->大--->小   ;
    CAKeyframeAnimation *keyFrameScale = [CAKeyframeAnimation animationWithKeyPath:@"transform.scale"];
    //通过一组数据修改热气球的大小
    keyFrameScale.values = @[@1.0,@1.2,@1.4,@1.6,@1.8,@1.6,@1.4,@1.2,@1.0];
    //创建动画分组对象
    CAAnimationGroup *group = [CAAnimationGroup animation];
    //将两个动画效果添加到分组动画中
    group.animations = @[keyframePath,keyFrameScale];

    group.duration = 8;
    group.repeatCount = 1000;


    [self.balloon.layer addAnimation:group forKey:nil];

}
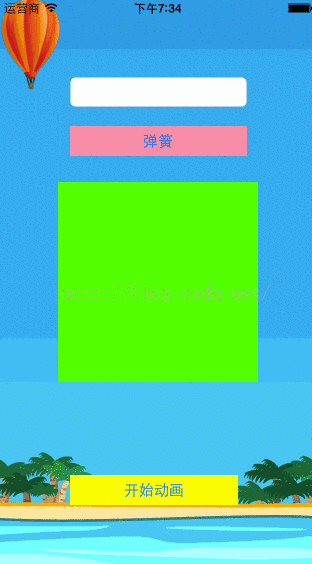
最终效果:
每日更新关注:http://weibo.com/hanjunqiang 新浪微博!
iOS开发者交流QQ群: 446310206


 377
377

 被折叠的 条评论
为什么被折叠?
被折叠的 条评论
为什么被折叠?
 到【灌水乐园】发言


