


1.代理模式的定义
给委托对象提供一个代理对象,并由代理对象控制对于委托对象的访问,也就是说客户不能够直接操作委托对象,而是通过代理对象间接地操作委托对象。
简单地说就是:通过代理对象对委托对象的相关方法的调用来提供特定的服务。
代理对象一般主要负责的行为有:
为委托对象预处理消息、过滤消息、转发消息给委托对象(代理对象对于委托对象的调用/控制)以及事后处理消息。
再来,以经典的代理模式的例子来说明(引用计数–reference counting)代理:
当需要一个复杂对象的多份副本时,代理模式可以结合享元模式以减少存储器的使用量。
典型的做法时创建一个复杂对象以及多个代理,每个代理都会引用原本的复杂对象,在代理产生操作数据时会把数据传输到原本的复杂对象。如果所有的代理都不存在时,复杂对象也没有存在的意义了,它将会被移除。
现实中代理的例子:
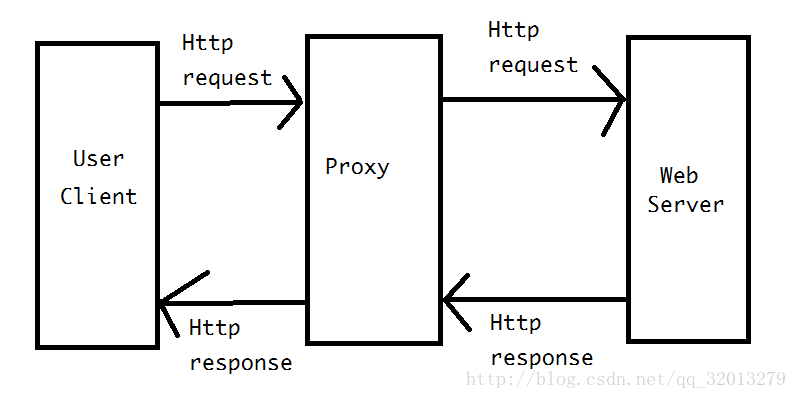
譬如,我们搭个梯子来越过GFW来访问海外网站,这个远程代理的过程是这样的:
(1)用户把Http请求发送给代理
(2)代理把Http请求发送给服务器
(3)服务器把Http响应发送给代理
(4)代理把Http响应发送给用户
2.代理模式的实现思路
代理类和目标类都需要实现同一个接口。
代理类和目标类分别实现接口的具体逻辑。
在代理类的构造函数中实例化一个目标类的对象。
在代理类中调用目标类中实现的接口逻辑。
客户如果需要访问或调用目标类的接口逻辑只能通过代理来进行。
3.静态代理和动态代理(JDK、cglib)
静态代理:
即不通过反射的方式,而是通过直接对委托类的初始化和方法访问进行控制。在所有的源代码进过编译之后,所有的类都会产生.class文件,此时,我们为了获取更好的加载性能,一开始并不是就对所有的类进行加载,而是选择加载他们的代理类。这样的做法的优势是 加快系统的启动速度,减少用户的等待时间。
下面给出一个能很好地解释静态代理设计模式–懒汉模式(延迟加载,即使用时才会加载)
public interface MyInterface{
    //public abstract是可以不用写的,因为在接口中默认的Modifier就是public abstract
    public abstract void method();
    public abstract void method2();
}
public class ConsignorSubject implements MyInterface{
public ConsignorSubject(){}
@Override
public void method(){
System.out.println("hello method");
}
@Override
public void method2(){
System.out.println("hello method2");
}
}public class StaticProxy implements MyInterface{
//指定代理对象
private ConsignorSubject consignor = null;
//加载的时候主要对象是对代理类
//需要使用new进行代理类的初始化
public StaticProxy(){}
//在静态代理中,代理类和委托类都必须实现统一的接口
@Override
public void method(){
if(null == consignor)
consignor = new ConsignorSubject();
//前置消息的过滤、修饰
System.out.println("Information filtering and decorating");
//消息转发给委托类、控制委托类处理消息
consignor.method();
//后置消息的清除
System.out.println("After!")
}
@Override
public void method2(){
Sif(null == consignor)
consignor = new ConsignorSubject();
//前置消息的过滤、修饰
System.out.println("Information filtering and decorating");
//消息转发给委托类、控制委托类处理消息
consignor.method2();
//后置消息的清除
System.out.println("After!")
}
}public class Demo{
public static void main(String[] args){
StaticProxy sp = new StaticProxy();
sp.method();
sp.method2();
}
}动态代理:
在程序运行时,通过反射机制创建生成;动态代理Proxy是一个静态类,它已经是在java.lang.reflect.Proxy中封装好的,不需要我们再去编写它的具体实现,只需要传入相应的参数即可通过反射来代理委托类。
Proxy类提供了创建动态代理类及其实例的静态方法。
(1)getProxyClass0()静态方法负责创建动态代理类,它的完整定义如下:
public static Class<?> getProxyClass0(ClassLoader loader,Class<?>[] interfaces) throwsIllegalArgumentException参数loader 指定动态代理类的类加载器,参数interfaces指定动态代理类需要实现的所有接口。
(2)newProxyInstance()静态方法负责创建动态代理类的实例,它的完整定义如下:
public static Object newProxyInstance(ClassLoader loader,Class<?>[] interfaces,InvocationHandler handler) throws
     IllegalArgumentException
参数loader指定动态代理类的类加载器,参数interfaces 指定动态代理类需要实现的所有接口,参数handler 指定与动态代理类关联的InvocationHandler 对象。
下面我们来看一个实例:
package com.unicorn.reflect.pojo;

public interface Person {
    public void testMethod();

    public void testMethod2();

    public int testMethod3(String str);
}
package com.unicorn.reflect.pojo;
import java.io.Serializable;
import lombok.EqualsAndHashCode;
import lombok.Getter;
import lombok.NoArgsConstructor;
import lombok.NonNull;
import lombok.Setter;
import lombok.ToString;
@NoArgsConstructor/**JavaBean规范:实现无参构造器*/
@ToString(exclude={"id"})/**JavaBean规范:重载tostring方法*/
@EqualsAndHashCode
public class Emp implements Serializable, Person{
/**
* JavaBean规范:实现序列化接口
*/
private static final long serialVersionUID = -720655243074260608L;
/**
* JavaBean规范:实现getter and setter
* 在这里使用lombok的注解简化冗余的代码
*/
@Getter @Setter private Long id;
@Getter @Setter private String empName;
@Getter @Setter private String depart;
@Getter @Setter private Double salary;
@Getter @Setter public Byte Sex;
public static final int STABLE_VAL = 1;
public Emp(@NonNull Long id){
this.id = id;
}
@Override
public void testMethod() {
// TODO Auto-generated method stub
System.out.println("method1 says'I wanna to do somthing crazy!'");
}
@Override
public void testMethod2() {
// TODO Auto-generated method stub
System.out.println("method2 says'I wanna to kick the method1 for its crazy behaviors!'");
}
@Override
public int testMethod3(String str) {
// TODO Auto-generated method stub
System.out.println("method2 says'The crazy world! Are you fxxxing kiding me ?" + str + "'");
return 0;
}
// @Override public boolean equals(Object o){
// if(o == this)
// return true;
// if(!(o instanceof Emp))
// return false;
// }
}
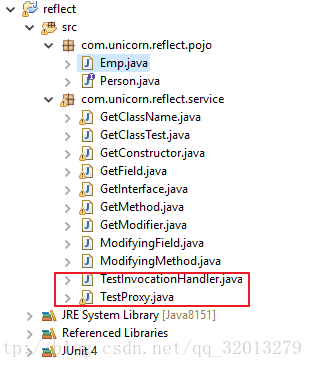
package com.unicorn.reflect.service;

import java.lang.reflect.InvocationHandler;
import java.lang.reflect.Method;

import lombok.NoArgsConstructor;
import lombok.NonNull;

/**
 * 反射中最重要的动态代理
 * @author Unicorn
 *
 */
@NoArgsConstructor
public class TestInvocationHandler implements InvocationHandler {

    private Object tar;

    public TestInvocationHandler(@NonNull Object tar){
        this.tar = tar;
    }

    @Override
    public Object invoke(Object proxy, Method method, Object[] args) throws Throwable {
        // TODO Auto-generated method stub
        System.out.println("Look!");
        Object result = method.invoke(tar, args);
        System.out.println("Bye!");
        return result;
    }

}
package com.unicorn.reflect.service;
import java.lang.reflect.InvocationTargetException;
import java.lang.reflect.Proxy;
import org.junit.Test;
import com.unicorn.reflect.pojo.Emp;
import com.unicorn.reflect.pojo.Person;
public class TestProxy {
@Test
public void testFunc() throws Throwable{
/**
* 原本,正常的emp实现的接口功能是这样的
*/
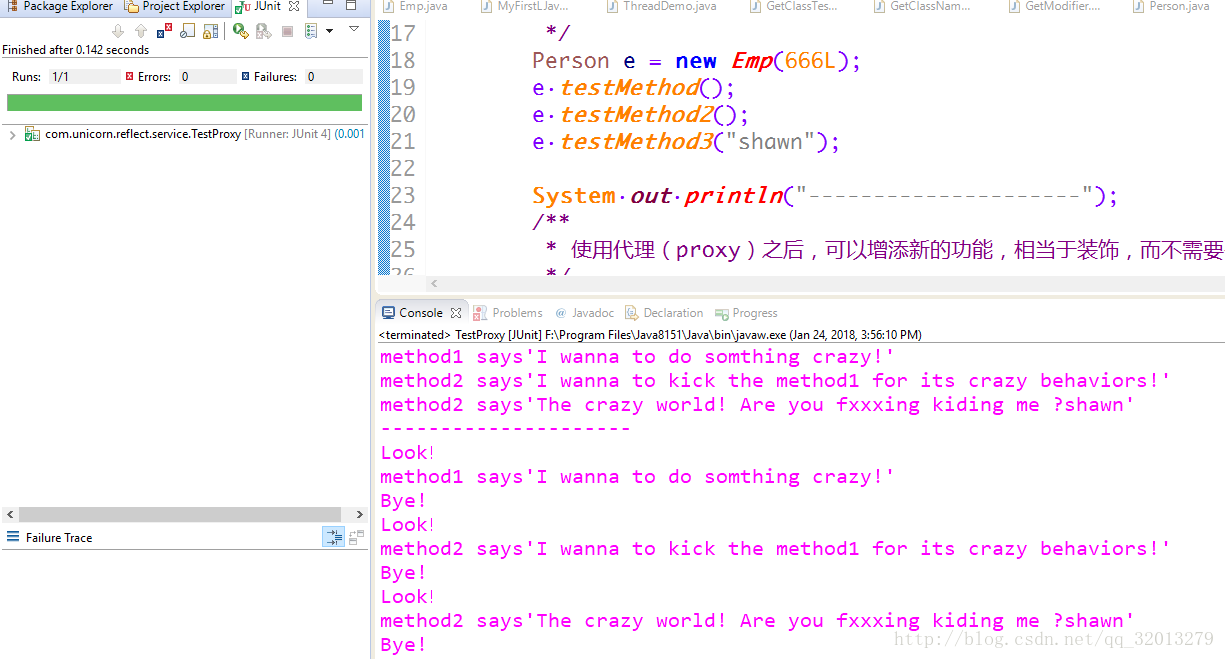
Person e = new Emp(666L);
e.testMethod();
e.testMethod2();
e.testMethod3("shawn");
System.out.println("---------------------");
/**
* 使用代理(proxy)之后,可以增添新的功能,相当于装饰,而不需要去改变原本的类
*/
TestInvocationHandler t = new TestInvocationHandler(e);
Person eProxy = (Person)Proxy.newProxyInstance(e.getClass().getClassLoader(),
e.getClass().getInterfaces(), t);
eProxy.testMethod();
eProxy.testMethod2();
eProxy.testMethod3("shawn");
}
}
这个例子是使用了JDK提供的Proxy代理方式,它的特点就是面向接口编程,它所能代理的委托类一定是一个接口,非接口类是不能够通过Proxy代理的,只能通过cglib来进行纯粹的类代理。
使用Proxy是不需要实现接口类的,但是需要传入InvocationHandler的实现类,前两个参数是传递给getProxyClass0来创建动态代理类。
我们现在来看看源代码关于proxy对象的创建流程:
/**
     * Returns an instance of a proxy class for the specified interfaces
     * that dispatches method invocations to the specified invocation
     * handler.
     *
     * <p>{@code Proxy.newProxyInstance} throws
     * {@code IllegalArgumentException} for the same reasons that
     * {@code Proxy.getProxyClass} does.
     *
     * @param   loader the class loader to define the proxy class
     * @param   interfaces the list of interfaces for the proxy class
     *          to implement
     * @param   h the invocation handler to dispatch method invocations to
     * @return  a proxy instance with the specified invocation handler of a
     *          proxy class that is defined by the specified class loader
     *          and that implements the specified interfaces
     * @throws  IllegalArgumentException if any of the restrictions on the
     *          parameters that may be passed to {@code getProxyClass}
     *          are violated
     * @throws  SecurityException if a security manager, <em>s</em>, is present
     *          and any of the following conditions is met:
     *          <ul>
     *          <li> the given {@code loader} is {@code null} and
     *               the caller's class loader is not {@code null} and the
     *               invocation of {@link SecurityManager#checkPermission
     *               s.checkPermission} with
     *               {@code RuntimePermission("getClassLoader")} permission
     *               denies access;</li>
     *          <li> for each proxy interface, {@code intf},
     *               the caller's class loader is not the same as or an
     *               ancestor of the class loader for {@code intf} and
     *               invocation of {@link SecurityManager#checkPackageAccess
     *               s.checkPackageAccess()} denies access to {@code intf};</li>
     *          <li> any of the given proxy interfaces is non-public and the
     *               caller class is not in the same {@linkplain Package runtime package}
     *               as the non-public interface and the invocation of
     *               {@link SecurityManager#checkPermission s.checkPermission} with
     *               {@code ReflectPermission("newProxyInPackage.{package name}")}
     *               permission denies access.</li>
     *          </ul>
     * @throws  NullPointerException if the {@code interfaces} array
     *          argument or any of its elements are {@code null}, or
     *          if the invocation handler, {@code h}, is
     *          {@code null}
     */
    @CallerSensitive
    public static Object newProxyInstance(ClassLoader loader,
                                          Class<?>[] interfaces,
                                          InvocationHandler h)
        throws IllegalArgumentException
    {
        Objects.requireNonNull(h);
        //获取委托类的接口信息
        final Class<?>[] intfs = interfaces.clone();
        final SecurityManager sm = System.getSecurityManager();
        if (sm != null) {
            checkProxyAccess(Reflection.getCallerClass(), loader, intfs);
        }

        /*
         * Look up or generate the designated proxy class.
         */
         //生成动态代理类
        Class<?> cl = getProxyClass0(loader, intfs);

        /*
         * Invoke its constructor with the designated invocation handler.
         */
        try {
            if (sm != null) {
                checkNewProxyPermission(Reflection.getCallerClass(), cl);
            }

            final Constructor<?> cons = cl.getConstructor(constructorParams);
            final InvocationHandler ih = h;
            if (!Modifier.isPublic(cl.getModifiers())) {
                AccessController.doPrivileged(new PrivilegedAction<Void>() {
                    public Void run() {
                        cons.setAccessible(true);
                        return null;
                    }
                });
            }
            return cons.newInstance(new Object[]{h});
        } catch (IllegalAccessException|InstantiationException e) {
            throw new InternalError(e.toString(), e);
        } catch (InvocationTargetException e) {
            Throwable t = e.getCause();
            if (t instanceof RuntimeException) {
                throw (RuntimeException) t;
            } else {
                throw new InternalError(t.toString(), t);
            }
        } catch (NoSuchMethodException e) {
            throw new InternalError(e.toString(), e);
        }
    }
/**
* Generate a proxy class. Must call the checkProxyAccess method
* to perform permission checks before calling this.
*/
private static Class<?> getProxyClass0(ClassLoader loader,
Class<?>... interfaces) {
if (interfaces.length > 65535) {
throw new IllegalArgumentException("interface limit exceeded");
}
// If the proxy class defined by the given loader implementing --->loader
// the given interfaces exists, this will simply return the cached copy; --->interfaces
// otherwise, it will create the proxy class via the ProxyClassFactory
/**
*这段英文说的是,如果loader已经定义过和interfaces已经存在(也就是说proxy已经至少实现过一次),就会从缓存中直接拿proxy副本作为proxy;否则就通过ProxyClassFactory生成一个
*/
return proxyClassCache.get(loader, interfaces);
}/**
* a cache of proxy classes
*/
private static final WeakCache<ClassLoader, Class<?>[], Class<?>>
proxyClassCache = new WeakCache<>(new KeyFactory(), new ProxyClassFactory()); /**
* Look-up the value through the cache. This always evaluates the
* {@code subKeyFactory} function and optionally evaluates
* {@code valueFactory} function if there is no entry in the cache for given
* pair of (key, subKey) or the entry has already been cleared.
*
* @param key possibly null key
* @param parameter parameter used together with key to create sub-key and
* value (should not be null)
* @return the cached value (never null)
* @throws NullPointerException if {@code parameter} passed in or
* {@code sub-key} calculated by
* {@code subKeyFactory} or {@code value}
* calculated by {@code valueFactory} is null.
*/
public V get(K key, P parameter) {
Objects.requireNonNull(parameter);
//清理持有弱引用的WeakHashMap这种数据结构,一般用于缓存
expungeStaleEntries();
//从队列中获取cacheKey
Object cacheKey = CacheKey.valueOf(key, refQueue);
// lazily install the 2nd level valuesMap for the particular cacheKey
//利用懒加载的方式填充Supplier, ConcurrentMap是一种线程安全的map
ConcurrentMap<Object, Supplier<V>> valuesMap = map.get(cacheKey);
if (valuesMap == null) {
ConcurrentMap<Object, Supplier<V>> oldValuesMap
= map.putIfAbsent(cacheKey,
valuesMap = new ConcurrentHashMap<>());
if (oldValuesMap != null) {
valuesMap = oldValuesMap;
}
}
// create subKey and retrieve the possible Supplier<V> stored by that
// subKey from valuesMap
Object subKey = Objects.requireNonNull(subKeyFactory.apply(key, parameter));
Supplier<V> supplier = valuesMap.get(subKey);
Factory factory = null;
//while循环的作用就是不停的获取实现InvokeHandler的类, 这个类可以是从缓存中拿到,也可是是从proxyFactoryClass生成的
while (true) {
if (supplier != null) {
// supplier might be a Factory or a CacheValue<V> instance
//supplier可能是一个工厂或者是CacheValue<V>的实例对象
V value = supplier.get();
if (value != null) {
return value;
}
}
// else no supplier in cache
// or a supplier that returned null (could be a cleared CacheValue
// or a Factory that wasn't successful in installing the CacheValue)
// lazily construct a Factory
if (factory == null) {
factory = new Factory(key, parameter, subKey, valuesMap);
}
if (supplier == null) {
supplier = valuesMap.putIfAbsent(subKey, factory);
if (supplier == null) {
// successfully installed Factory
supplier = factory;
}
// else retry with winning supplier
} else {
if (valuesMap.replace(subKey, supplier, factory)) {
// successfully replaced
// cleared CacheEntry / unsuccessful Factory
// with our Factory
supplier = factory;
} else {
// retry with current supplier
supplier = valuesMap.get(subKey);
}
}
}
}
proxyClassCache对象中传入new ProxyClassFactory()
中的apply方法才是创建代理的方法
@Override
        public Class<?> apply(ClassLoader loader, Class<?>[] interfaces) {

            Map<Class<?>, Boolean> interfaceSet = new IdentityHashMap<>(interfaces.length);
            for (Class<?> intf : interfaces) {
                /*
                 * Verify that the class loader resolves the name of this
                 * interface to the same Class object.
                 */
                Class<?> interfaceClass = null;
                try {
                    interfaceClass = Class.forName(intf.getName(), false, loader);
                } catch (ClassNotFoundException e) {
                }
                if (interfaceClass != intf) {
                    throw new IllegalArgumentException(
                        intf + " is not visible from class loader");
                }
                /*
                 * Verify that the Class object actually represents an
                 * interface.
                 */
                if (!interfaceClass.isInterface()) {
                    throw new IllegalArgumentException(
                        interfaceClass.getName() + " is not an interface");
                }
                /*
                 * Verify that this interface is not a duplicate.
                 */
                if (interfaceSet.put(interfaceClass, Boolean.TRUE) != null) {
                    throw new IllegalArgumentException(
                        "repeated interface: " + interfaceClass.getName());
                }
            }

            String proxyPkg = null;     // package to define proxy class in
            int accessFlags = Modifier.PUBLIC | Modifier.FINAL;
//到此为止都是对接口的必要检查
            /*
             * Record the package of a non-public proxy interface so that the
             * proxy class will be defined in the same package.  Verify that
             * all non-public proxy interfaces are in the same package.
             */
            for (Class<?> intf : interfaces) {
                int flags = intf.getModifiers();
                if (!Modifier.isPublic(flags)) {
                    accessFlags = Modifier.FINAL;
                    String name = intf.getName();
                    int n = name.lastIndexOf('.');
                    String pkg = ((n == -1) ? "" : name.substring(0, n + 1));
                    if (proxyPkg == null) {
                        proxyPkg = pkg;
                    } else if (!pkg.equals(proxyPkg)) {
                        throw new IllegalArgumentException(
                            "non-public interfaces from different packages");
                    }
                }
            }

            if (proxyPkg == null) {
                // if no non-public proxy interfaces, use com.sun.proxy package
                proxyPkg = ReflectUtil.PROXY_PACKAGE + ".";
            }

            /*
             * Choose a name for the proxy class to generate.
             */
            long num = nextUniqueNumber.getAndIncrement();
            String proxyName = proxyPkg + proxyClassNamePrefix + num;
//产生代理的随机名称,如果日后调试看到了$Proxy+数字的exception那么很可能就是你的代理出现问题了

            /*
             * Generate the specified proxy class.
             */
             //以上通过之后,就会真正产生代理啦
            byte[] proxyClassFile = ProxyGenerator.generateProxyClass(
                proxyName, interfaces, accessFlags);
            //这个generateProxyClass才是核心,apply只是调用了它产生代理
            try {
                return defineClass0(loader, proxyName,
                                    proxyClassFile, 0, proxyClassFile.length);//返回代理对象的字节流
            } catch (ClassFormatError e) {
                /*
                 * A ClassFormatError here means that (barring bugs in the
                 * proxy class generation code) there was some other
                 * invalid aspect of the arguments supplied to the proxy
                 * class creation (such as virtual machine limitations
                 * exceeded).
                 */
                throw new IllegalArgumentException(e.toString());
            }
        }
    }
private byte[] generateClassFile() {
   /*
    * Step 1: Assemble ProxyMethod objects for all methods to
    * generate proxy dispatching code for.
    */
    //addProxyMethod方法,就是将方法都加入到一个列表中,并与对应的class对应起来
   //这里给Object对应了三个方法hashCode,toString和equals
   addProxyMethod(hashCodeMethod, Object.class);
   addProxyMethod(equalsMethod, Object.class);
   addProxyMethod(toStringMethod, Object.class);
   //将接口列表中的接口与接口下的方法对应起来
   for (int i = 0; i < interfaces.length; i++) {
     Method[] methods = interfaces[i].getMethods();
     for (int j = 0; j < methods.length; j++) {
       addProxyMethod(methods[j], interfaces[i]);
     }
   }
   /*
    * For each set of proxy methods with the same signature,
    * verify that the methods' return types are compatible.
    */
   for (List<ProxyMethod> sigmethods : proxyMethods.values()) {
     checkReturnTypes(sigmethods);
   }
   /*
    * Step 2: Assemble FieldInfo and MethodInfo structs for all of
    * fields and methods in the class we are generating.
    */
    //方法中加入构造方法,这个构造方法只有一个,就是一个带有InvocationHandler接口的构造方法
    //这个才是真正给class文件,也就是代理类加入方法了,不过还没真正处理,只是先加进来等待循环,构造方法在class文件中的名称描述是<init>
 try {
   methods.add(generateConstructor());
   for (List<ProxyMethod> sigmethods : proxyMethods.values()) {
     for (ProxyMethod pm : sigmethods) {
//给每一个代理方法加一个Method类型的属性,数字10是class文件的标识符,代表这些属性都是private static的
       fields.add(new FieldInfo(pm.methodFieldName,
         "Ljava/lang/reflect/Method;",
          ACC_PRIVATE | ACC_STATIC));
       //将每一个代理方法都加到代理类的方法中
       methods.add(pm.generateMethod());
     }
   }
 //加入一个静态初始化块,将每一个属性都初始化,这里静态代码块也叫类构造方法,其实就是名称为<clinit>的方法,所以加到方法列表
     methods.add(generateStaticInitializer());
   } catch (IOException e) {
     throw new InternalError("unexpected I/O Exception");
   }
 //方法和属性个数都不能超过65535,包括之前的接口个数也是这样,
 //这是因为在class文件中,这些个数都是用4位16进制表示的,所以最大值是2的16次方-1
   if (methods.size() > 65535) {
     throw new IllegalArgumentException("method limit exceeded");
   }
   if (fields.size() > 65535) {
     throw new IllegalArgumentException("field limit exceeded");
   }
 //接下来就是写class文件的过程, 包括模数, 类名,常量池等一系列字节码的组成,就不一一细说了。需要的可以参考JVM虚拟机字节码的相关知识。
   cp.getClass(dotToSlash(className));
   cp.getClass(superclassName);
   for (int i = 0; i < interfaces.length; i++) {
     cp.getClass(dotToSlash(interfaces[i].getName()));
   }
   cp.setReadOnly();
   ByteArrayOutputStream bout = new ByteArrayOutputStream();
   DataOutputStream dout = new DataOutputStream(bout);
   try {
                   // u4 magic;
     dout.writeInt(0xCAFEBABE);
                   // u2 minor_version;
     dout.writeShort(CLASSFILE_MINOR_VERSION);
                   // u2 major_version;
     dout.writeShort(CLASSFILE_MAJOR_VERSION);
     cp.write(dout);       // (write constant pool)
                   // u2 access_flags;
     dout.writeShort(ACC_PUBLIC | ACC_FINAL | ACC_SUPER);
                   // u2 this_class;
     dout.writeShort(cp.getClass(dotToSlash(className)));
                   // u2 super_class;
     dout.writeShort(cp.getClass(superclassName));
                   // u2 interfaces_count;
     dout.writeShort(interfaces.length);
                   // u2 interfaces[interfaces_count];
     for (int i = 0; i < interfaces.length; i++) {
       dout.writeShort(cp.getClass(
         dotToSlash(interfaces[i].getName())));
     }
                   // u2 fields_count;
     dout.writeShort(fields.size());
                   // field_info fields[fields_count];
     for (FieldInfo f : fields) {
       f.write(dout);
     }
                   // u2 methods_count;
     dout.writeShort(methods.size());
                   // method_info methods[methods_count];
     for (MethodInfo m : methods) {
       m.write(dout);
     }
                    // u2 attributes_count;
     dout.writeShort(0); // (no ClassFile attributes for proxy classes)
   } catch (IOException e) {
     throw new InternalError("unexpected I/O Exception");
   }
   return bout.toByteArray();
 }
到此就结束了!cglib的笔者比较少用,暂时就不写先了!
感谢pastqing (源码分析的思路是参照他的,笔者很服气这个博主,给个赞!)还有这个博主陈善亮-BUPT(写的没前面的博主好,但好在有一些理解是很值得借鉴的)。
转载请注明出处,谢谢!


 110
110


 被折叠的 条评论
为什么被折叠?
被折叠的 条评论
为什么被折叠?
 到【灌水乐园】发言


