


有些时候,自己要在布局文件中重复书写大量的代码来定义一个布局。这是最基本的使用,当然要掌握;但是有些场景都去对应的布局里面写对应的属性,就显得很无力。会发现,系统自带的控件无法满足我们的要求,这个时候就要考虑自定义控件。自定义view的世界,也很浩瀚,个人需要学的地方还有很多很多。自定义view,会节省开发效率,很有必要学习其基本原理和方法。接下来就对自定义view,做一个初步的认识,一步步了解封装的重要性。但是,也仅仅是一个初步,因为它实在太灵活了。
有这么一种场景,看图:
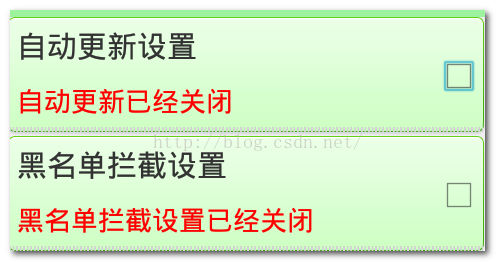
除了布局之外,还有一点。当用户点击的时候,会自动选中复选框,而且红色textview变为绿色。且改变了内容。
那就一点点的看看怎么通过自定义view和自定义属性来完成上述功能。
首先,它是显示在一个活动中的。这个活动,就定位为SettingCenterActivity,要在这个活动中加载上面的的布局。通过以前的方式来完成一下布局上的功能。就使用线性布局,冗余的代码写了出来:
定义一个activity_settingcenter.xml:
<?xml version="1.0" encoding="utf-8"?>
<LinearLayout xmlns:android="http://schemas.android.com/apk/res/android"
    android:layout_width="match_parent"
    android:layout_height="wrap_content"
    android:orientation="vertical" >

    <TextView
        style="@style/tv_title"
        android:text="设置中心" />

    <RelativeLayout
        android:layout_width="match_parent"
        android:layout_height="wrap_content" >

        <TextView
            android:id="@+id/tv_settingcenter_autoupdate_title"
            android:layout_width="wrap_content"
            android:layout_height="wrap_content"
            android:layout_margin="5dp"
            android:text="自动更新设置"
            android:textSize="22sp" />

        <TextView
            android:id="@+id/tv_settingcenter_autoupdate_content"
            android:layout_width="wrap_content"
            android:layout_height="wrap_content"
            android:layout_below="@id/tv_settingcenter_autoupdate_title"
            android:layout_margin="5dp"
            android:text="自动更新已经关闭"
            android:textSize="22sp" />

        <CheckBox
            android:id="@+id/cb_settingcenter_autoupdate_checked"
            android:layout_width="wrap_content"
            android:layout_height="wrap_content"
            android:layout_alignParentRight="true"
            android:layout_centerVertical="true" />

        <View
            android:layout_below="@id/tv_settingcenter_autoupdate_content"
            android:layout_width="wrap_content"
            android:layout_height="2dp"
            android:background="@drawable/list_devider" />
    </RelativeLayout>

</LinearLayout>
所以,做第一步封装:
把这个布局抽取成一个布局,item_settingcenterview.xml
<?xml version="1.0" encoding="utf-8"?>
<RelativeLayout xmlns:android="http://schemas.android.com/apk/res/android"
    android:layout_width="match_parent"
    android:layout_height="wrap_content" >

    <TextView
        android:id="@+id/tv_settingcenter_autoupdate_title"
        android:layout_width="wrap_content"
        android:layout_height="wrap_content"
        android:layout_margin="5dp"
        android:text="自动更新设置"
        android:textSize="22sp" />

    <TextView
        android:id="@+id/tv_settingcenter_autoupdate_content"
        android:layout_width="wrap_content"
        android:layout_height="wrap_content"
        android:layout_below="@id/tv_settingcenter_autoupdate_title"
        android:layout_margin="5dp"
        android:text="自动更新已经关闭"
        android:textSize="22sp" />

    <CheckBox
        android:id="@+id/cb_settingcenter_autoupdate_checked"
        android:layout_width="wrap_content"
        android:layout_height="wrap_content"
        android:layout_alignParentRight="true"
        android:layout_centerVertical="true" />

    <View
        android:layout_width="wrap_content"
        android:layout_height="2dp"
        android:layout_below="@id/tv_settingcenter_autoupdate_content"
        android:background="@drawable/list_devider" />

</RelativeLayout>
然后把第一个布局文件中的这一部分删掉,通过<include />引入进来item_settingcenterview.xml
<?xml version="1.0" encoding="utf-8"?>
<LinearLayout xmlns:android="http://schemas.android.com/apk/res/android"
    android:layout_width="match_parent"
    android:layout_height="wrap_content"
    android:orientation="vertical" >

    <TextView
        style="@style/tv_title"
        android:text="设置中心" />

    <include layout="@layout/item_settingcenter_view"/>
    <include layout="@layout/item_settingcenter_view"/>
    <include layout="@layout/item_settingcenter_view"/>

</LinearLayout>
这时发发现问题好像都解决了,一项接着一项,看似很完美。但是问题又来了,怎么修改每一项的属性值呢?好像无从下手。会想到,如果能把整个布局看成一个view,在
activity_settingcenter.xml中像类似引用textview一样就好了!其实,textview在代码中是一个类,继承自view才有了view的功能。那么我们就自己定义一个类,继承自某个容器类型的view,会不会有view的属性和功能了?答案是肯定的,因为子类使用父类功能,天经地义,子类都比父类要强大!能像使用LinearLayout一样使用自定义的view
继续改进(自定义view解决上面的一切问题)。
新建一个类SettingCenterItenView继承自LinearLayout类,加入如下功能:
package com.example.ydlmobileguard.views;

import android.content.Context;
import android.util.AttributeSet;
import android.widget.LinearLayout;

public class SettingCenterItemView extends LinearLayout {
       //通过配置文件中,反射实例化设置属性参数。配置文件引用该子view(SettingCenterItemView),调用这里的方法
	public SettingCenterItemView(Context context, AttributeSet attrs) {
		super(context, attrs);
		 initView();
	}

        //通过代码实例化调用该构造函数
	 public SettingCenterItemView(Context context) {
		 super(context);
		 initView();
	}

 	private void initView() {
		// TODO Auto-generated method stub

	}


}
但是,这个时候,好像自定义的SettingCenterItemView什么也不能做。接下来就在initView里面。加载一个布局文件,把这个布局文件转化为一个view组件,再把这个组件加载到容器view中(这里是LinearLayout)。如下:
package com.example.ydlmobileguard.views;

import com.example.ydlmobileguard.R;

import android.content.Context;
import android.util.AttributeSet;
import android.view.View;
import android.widget.LinearLayout;

public class SettingCenterItemView extends LinearLayout {

	public SettingCenterItemView(Context context, AttributeSet attrs) {
		super(context, attrs);
		initView();
	}


	public SettingCenterItemView(Context context) {
		super(context);
		initView();
	}

	private void initView() {
                 //把一个布局文件,转换成一个组件,把这儿组件加载到线性布局中。这里的SettingCenterItemView就有了LinearLayout的功能
               View view = View.inflate(getContext(), R.layout.item_settingcenter_view, null);
		addView(view);
	}


}
这时,基本的自定义view其实是完成了。去布局文件引用,就可以引用它了,但是注意:自定义的view,必须view名称要写全名。
<?xml version="1.0" encoding="utf-8"?>
<LinearLayout xmlns:android="http://schemas.android.com/apk/res/android"
    android:layout_width="match_parent"
    android:layout_height="wrap_content"
    android:orientation="vertical" >

    <TextView
        style="@style/tv_title"
        android:text="设置中心" />

    <com.example.ydlmobileguard.views.SettingCenterItemView
        android:layout_width="match_parent"
        android:layout_height="wrap_content" >
    </com.example.ydlmobileguard.views.SettingCenterItemView>

    <com.example.ydlmobileguard.views.SettingCenterItemView
        android:layout_width="match_parent"
        android:layout_height="wrap_content" >
    </com.example.ydlmobileguard.views.SettingCenterItemView>

</LinearLayout>
重新运行程序,会发现和引入布局显示的效果一样。我们可以使用linearlayout的所有的属性了。自定义view好像是完成了。能像在布局文件中使用LinearLayout一样使用我们自己的view(Settingcenteritemview)了。
还没结束。如果就这么结束了,就成了蒙你了。。。因为还是无法修改每一项的内容,场景还没解决。接下来,还要自定义属性对文字做一个动态修改。
在自定义属性前,先看一下系统的属性是怎么来设置的。
都会发现每一个配置文件中有一行命名空间:xmlns:android="http://schemas.android.com/apk/res/android" 这是系统自带的,它的原理是:通过命名空间的前缀android,找到包的信息(这里是最后一个名称android),通过包的信息,找到工程,找到工程后。就可以找到这个工程的资源信息(values----attrs属性配置文件),从attrs文件里找到属性配置的信息。先在 activity_settingcenter.xml里面加入自己供自定义view使用的命名空间前缀 如下:xmlns:itydl="http://schemas.android.com/apk/res/com.example.ydlmobileguard"
再参考一下系统的attrs文件怎么写的——
<resource>
        <declare-styleable name="ViewGroup">
              <!-- Defines whether changes in layout (caused by adding and removing items) should
               cause a LayoutTransition to run. When this flag is set to true, a default
               LayoutTransition object will be set on the ViewGroup container and default
               animations will run when these layout changes occur.-->
             <attr name="animateLayoutChanges" format="boolean" />
</resource>
比对之,定义自己的属性文件
新建attrs.xml文件,加入针对自定义view要添加的属性名和属性值
<?xml version="1.0" encoding="utf-8"?>
<resources>
    <declare-styleable name="SettingCenterItemView">
        <!-- 添加自己要在自定义view里 加入的属性名和类型 -->
        <attr name="title" format="string" />
        <attr name="content" format="string" />
    </declare-styleable>
</resources>
这个时候,就可以在自定义view配置文件里添加这里定义的属性名称了,是合法的。如下:
<com.example.ydlmobileguard.views.SettingCenterItemView
        itydl:title = "自定更新设置"
        itydl:content ="自动更新已经关闭"
        android:layout_width="match_parent"
        android:layout_height="wrap_content" >
    </com.example.ydlmobileguard.views.SettingCenterItemView>

    <com.example.ydlmobileguard.views.SettingCenterItemView
        itydl:title = "黑名单拦截设置"
        itydl:content ="黑名单拦截设置已经关闭"
        android:layout_width="match_parent"
        android:layout_height="wrap_content" >
    </com.example.ydlmobileguard.views.SettingCenterItemView>
这个时候运行程序,发现还是没有显示上边的文字信息。因为,自定义的属性值,在配置文件写上了,但是在组件里面(自定义SettingCenterItemView类)里面不知道,所以要在里面读取属性的配置信息,在构造方法的AttributeSet attrs里面,并且手动把值加到屏幕上显示(即,通过代码手动加入)。
在SettingCenterItemView类中完成代码如下:
package com.example.ydlmobileguard.views;

import com.example.ydlmobileguard.R;

import android.content.Context;
import android.util.AttributeSet;
import android.view.View;
import android.widget.CheckBox;
import android.widget.LinearLayout;
import android.widget.TextView;

public class SettingCenterItemView extends LinearLayout {
	private TextView tv_title;
	private TextView tv_content;
	private CheckBox cb_checkBox;
	/**
	 * 代码实例化,调用构造函数。引用这个自定义view,就会自动调用这里的构造函数
	 * @param context
	 * @param attrs
	 */
	public SettingCenterItemView(Context context, AttributeSet attrs) {
		super(context, attrs);
		initView();
		/**
		 * namespace :The namespace of the attribute to get the value from.
           name :The name of the attribute to get the value from.
		 */
		//根据参数一:命名空间/参数二:属性文件中的属性名。这样就在自定义组件activity_settingcenter.xml文件中得到值
		String title =attrs.getAttributeValue("http://schemas.android.com/apk/res/com.example.ydlmobileguard", "title");
		String content = attrs.getAttributeValue("http://schemas.android.com/apk/res/com.example.ydlmobileguard", "content");
		//把获取到的值,加载到view上显示
		tv_title.setText(title);
		tv_content.setText(content);
	}


	public SettingCenterItemView(Context context) {
		super(context);
		initView();
	}
	/**
	 * 初始化LinearLayout子组件
	 */
	private void initView() {
		//给LinearLayout加上子组件
		View view = View.inflate(getContext(), R.layout.item_settingcenter_view, null);
		//每一项的标题
		tv_title = (TextView) view.findViewById(R.id.tv_settingcenter_autoupdate_title);
		//每一项内容
		tv_content = (TextView) view.findViewById(R.id.tv_settingcenter_autoupdate_content);
		//每一项的复选框
		cb_checkBox = (CheckBox) view.findViewById(R.id.cb_settingcenter_autoupdate_checked);
		addView(view);//Adds a child view.
	}


}
此时运行程序,屏幕截图如下:
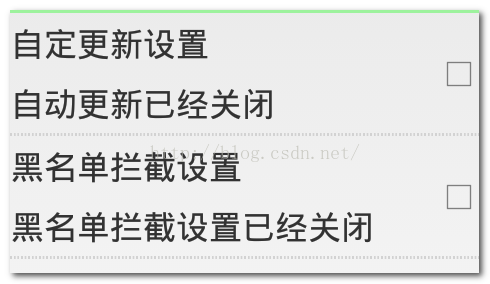
这个时候自定义view算是介绍完了。
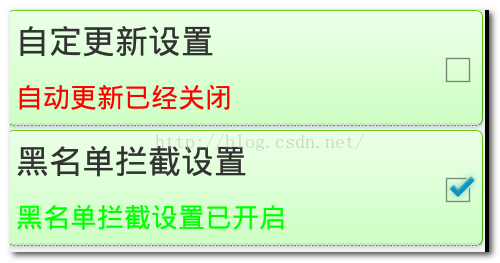
最后完成“”特效“,添加背景颜色,添加选择器,点击每一项,chackbox也跟着选中或者取消选中。完整代码在下面给出:
给item——settingcenterview整体加入状态选择器,设置可点击:
<RelativeLayout xmlns:android="http://schemas.android.com/apk/res/android"
    android:layout_width="match_parent"
    android:layout_height="65dip"
    android:clickable="true"
    android:background="@drawable/bts_selector">
checkbox的点击事件阉割掉,加入一行:
android:clickable="false" package com.example.ydlmobileguard.views;
import android.content.Context;
import android.graphics.Color;
import android.util.AttributeSet;
import android.view.View;
import android.widget.CheckBox;
import android.widget.CompoundButton;
import android.widget.CompoundButton.OnCheckedChangeListener;
import android.widget.LinearLayout;
import android.widget.TextView;
import com.example.ydlmobileguard.R;
public class SettingCenterItemView extends LinearLayout {
private TextView tv_title;
private TextView tv_content;
private CheckBox cb_checkBox;
private String[] contents;
private View item;
/**
* 代码实例化,调用构造函数。引用这个自定义view,就会自动调用这里的构造函数
* @param context
* @param attrs
*/
public SettingCenterItemView(Context context, AttributeSet attrs) {
super(context, attrs);
initView();//初始化组件界面
initEvent();//初始化组件事件
/**
* namespace :The namespace of the attribute to get the value from.
name :The name of the attribute to get the value from.
*/
//根据命名空间/属性文件中的属性值。在自定义组件xml文件中得到值
String title =attrs.getAttributeValue("http://schemas.android.com/apk/res/com.example.ydlmobileguard", "title");
String content = attrs.getAttributeValue("http://schemas.android.com/apk/res/com.example.ydlmobileguard", "content");
//把获取到的值,加载到view上显示
tv_title.setText(title);
//利用正则表达式,截取content内容。自动更新已经关闭-自动更新已经开启。其中,contents[0]=自动更新已经关闭;contents[1]=自动更新已经开启
contents = content.split("-");
}
/**
* chu shi hua fu xuan kuang zu jian
*/
private void initEvent() {
//item 我们自定义的相对布局。给整个item_view加入事件(它是自定义的一个view)。让checkbox随着它的点击事件变化
item.setOnClickListener(new OnClickListener() {
@Override
public void onClick(View v) {
cb_checkBox.setChecked(!cb_checkBox.isChecked());
}
});
cb_checkBox.setOnCheckedChangeListener(new OnCheckedChangeListener() {
@Override
public void onCheckedChanged(CompoundButton buttonView, boolean isChecked) {
if(isChecked){//clicked选中的颜色为绿色
tv_content.setTextColor(Color.GREEN);
tv_content.setText(contents[1]);
}else{//unclicked//未选中颜色为红色
tv_content.setTextColor(Color.RED);
tv_content.setText(contents[0]);
}
}
});
}
public SettingCenterItemView(Context context) {
super(context);
initView();
}
/**
* 初始化LinearLayout子组件
*/
private void initView() {
//给LinearLayout加上子组件。这个item指的就是item_settingcenter_view文件里的RelativeLayout
item = View.inflate(getContext(), R.layout.item_settingcenter_view, null);
//每一项的标题
tv_title = (TextView) item.findViewById(R.id.tv_settingcenter_autoupdate_title);
//每一项内容
tv_content = (TextView) item.findViewById(R.id.tv_settingcenter_autoupdate_content);
//每一项的复选框
cb_checkBox = (CheckBox) item.findViewById(R.id.cb_settingcenter_autoupdate_checked);
addView(item);//Adds a child view.
}
}
最后再总结一下自定义属性:
自定义属性
1,自定义命名空间
     xmlns:ittdl="http://schemas.android.com/apk/res/工程的包名"
2,创建attrs.xml文件
    <declare-styleable name="SettingCenterItemView">

    <!--
         Defines whether a child is limited to draw inside of its bounds or not.
         This is useful with animations that scale the size of the children to more
         than 100% for instance. In such a case, this property should be set to false
         to allow the children to draw outside of their bounds. The default value of
         this property is true.
    -->
    <attr name="title" format="string" />
    <attr name="content" format="string" />
</declare-styleable>
3,在自定义组件中使用自定义属性
   <com.itydl.mobileguard.view.SettingCenterItemView
    android:layout_width="fill_parent"
    android:layout_height="wrap_content"
    itheima:content="自动更新已经关闭-自动更新已经打开"
    itheima:title="自动更新设置" >
</com.itydl.mobileguard.view.SettingCenterItemView>
获取自定义属性数据
public SettingCenterItemView(Context context, AttributeSet attrs) {
        super(context, attrs);
        initView();
        initEvent();
        String content = attrs.getAttributeValue("http://schemas.android.com/apk/res/工程包名", "自定义属性名");

        String title = attrs.getAttributeValue("http://schemas.android.com/apk/res/com.itydl.mobileguard", "title");

        tv_title.setText(title);

        contents = content.split("-");

    }
这仅仅是一个简单的demo,还有更复杂的自定义view也会在以后继续讨论。


 158
158


 被折叠的 条评论
为什么被折叠?
被折叠的 条评论
为什么被折叠?
 到【灌水乐园】发言


