


ButterKnife的大名相信做Android开发的都应该知道,如果你还不知道那只能说明你平时都没关注过开源项目,优秀的开源项目对于开发来说帮助是巨大的,而学习优秀的开源项目对个人的提升帮助也是巨大的。ButterKnife通过注解的方式帮助我们处理诸如 findViewById()和setonclicktListener()等的重复性繁琐的工作,极大地减轻了程序员的工作量。ButterKnife的实现原理是通过定义编译时注解(RetentionPolicy.CLASS),并在注解处理器中对这些注解进行处理,最终生成 Java代码,我们只要简单地调用个bind() 方法就可以完成所有工作,非常的方便。而且它用的是编译时注解,和运行时注解相比对性能的影响是很小的。
简单介绍了ButterKnife,下面来开始来系统地学习ButterKnife是怎么实现的。写这文章是出于学习ButterKnife的实现原理为目的,我会从一个项目的搭建开始来逐渐实现ButterKnife的主要功能,整个设计思想还是遵循ButterKnife原本的设计思想。我是以自己的理解来说明ButterKnife为什么要这样设计,其中如果有偏差也欢迎帮忙指正。这开源项目也有很多关于注解和注解处理器的运用方法很值得借鉴学习,对于这方面的提升是个非常不错的学习材料。
搭建开发所需要的框架
在进行开发前,有必要先把整个开发框架搭起来,因为涉及到编译时对注解进行处理,所以和平时开发稍微有点不同,这边需要创建两个Java库,而不单单只是Android项目。如果对编译时注解开发不清楚的先看这里:自定义注解之编译时注解(RetentionPolicy.CLASS)(一),这里面已经写的很详细了,我这里就只做简单的说明,不清楚可以看那篇文章。
首先我们需要创建3个库,一个Android库和两个Java库,大体如下:
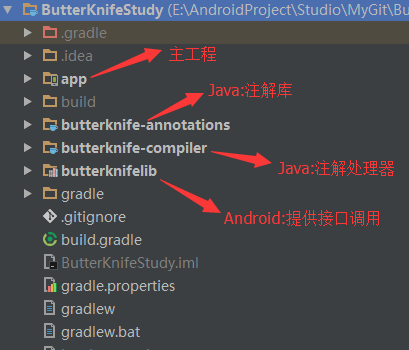
每个模块用来做什么上面已经标注的很清楚,我们来看下各个模块的 build.gradle 文件。
butterknife-annotations
- apply plugin: 'java'
- // 因为依赖 com.android.support:support-annotations 需要添加这几段话
- def logger = new com.android.build.gradle.internal.LoggerWrapper(project.logger)
- def sdkHandler = new com.android.build.gradle.internal.SdkHandler(project, logger)
- for (File file : sdkHandler.sdkLoader.repositories) {
- repositories.maven {
- url = file.toURI()
- }
- }
- dependencies {
- compile fileTree(include: ['*.jar'], dir: 'libs')
- sourceCompatibility = 1.7
- targetCompatibility = 1.7
- compile 'com.android.support:support-annotations:23.4.0'
- }
在这个注解库里依赖了一个android库:com.android.support:support-annotations,因为这个注解库是Java工程,要想依赖到这个库需要添加上面标识的那几段话。至于这几段话的具体作用,我还没有查到资料- -,我是从ButterKnife开源代码里copy出来的,如果有知道也麻烦告诉我下。那么为什么要依赖这个库呢?这是因为我们在定义注解时需要用到这里面的一些系统定义好的注解,如:@StringRes、@IdRes 这类限定注解,使我们定义的注解可以更好地工作。
butterknife-compiler
- apply plugin: 'java'
- // 因为 butterknife-annotations 依赖 com.android.support:support-annotations 需要添加这几段话
- def logger = new com.android.build.gradle.internal.LoggerWrapper(project.logger)
- def sdkHandler = new com.android.build.gradle.internal.SdkHandler(project, logger)
- for (File file : sdkHandler.sdkLoader.repositories) {
- repositories.maven {
- url = file.toURI()
- }
- }
- dependencies {
- compile fileTree(include: ['*.jar'], dir: 'libs')
- sourceCompatibility = 1.7
- targetCompatibility = 1.7
- compile project(':butterknife-annotations')
- compile 'com.google.auto.service:auto-service:1.0-rc2'
- compile 'com.squareup:javapoet:1.7.0'
- compile 'com.google.auto:auto-common:0.6'
- }
和 butterknife-annotations 一样,这里也需要添加那几段话,因为它也是个Java库并包含了注解库。除此之外,这里还依赖了另外3个库:auto-service、javapoet和 auto-common。其中前两个在之前的文章都有提到过,而最后一个库主要提供元素有效性的检测,这些用来帮助注解开发的库都很有用,极大地简化了开发工作,后面都会提到它们的用法。
butterknifelib
- apply plugin: 'com.android.library'
- android {
- compileSdkVersion 23
- buildToolsVersion "24.0.0 rc2"
- defaultConfig {
- minSdkVersion 14
- targetSdkVersion 23
- versionCode 1
- versionName "1.0"
- }
- buildTypes {
- release {
- minifyEnabled false
- proguardFiles getDefaultProguardFile('proguard-android.txt'), 'proguard-rules.pro'
- }
- }
- }
- dependencies {
- compile fileTree(include: ['*.jar'], dir: 'libs')
- testCompile 'junit:junit:4.12'
- compile 'com.android.support:appcompat-v7:23.4.0'
- compile project(':butterknife-annotations')
- }
这就是一个标准的Android库了,它需要依赖 butterknife-annotations 注解库,其它就没什么需要注意的了。
app主项目- apply plugin: 'com.android.application'
- apply plugin: 'com.neenbedankt.android-apt'
- android {
- compileSdkVersion 23
- buildToolsVersion "24.0.0 rc2"
- defaultConfig {
- applicationId "com.dl7.butterknife"
- minSdkVersion 14
- targetSdkVersion 23
- versionCode 1
- versionName "1.0"
- }
- buildTypes {
- release {
- minifyEnabled false
- proguardFiles getDefaultProguardFile('proguard-android.txt'), 'proguard-rules.pro'
- }
- }
- }
- dependencies {
- compile fileTree(include: ['*.jar'], dir: 'libs')
- testCompile 'junit:junit:4.12'
- compile 'com.android.support:appcompat-v7:23.4.0'
- compile 'com.android.support:support-annotations:23.4.0'
- apt project(':butterknife-compiler')
- compile project(':butterknifelib')
- }
这里依赖了 butterknifelib 库,并加入了 android-apt,关于 android-apt 具体设置请参考之前的文章,除了这边要设置外,主工程的 build.gradle 也要设置如下:
- buildscript {
- repositories {
- jcenter()
- mavenCentral()
- }
- dependencies {
- classpath 'com.android.tools.build:gradle:2.1.2'
- classpath 'com.neenbedankt.gradle.plugins:android-apt:1.8'
- // NOTE: Do not place your application dependencies here; they belong
- // in the individual module build.gradle files
- }
- }
这样整个开发框架就搭好了,下面就开始进行功能实现。
定义 butterknifelib 的接口我们需要在 butterknifelib 中提供接口供外部调用,来作为整个绑定操作的主入口方法,并在里面处理所有注入操作。
首先定义一个绑定接口,如下:
- /**
- * 绑定接口
- */
- public interface ViewBinder<T> {
- /**
- * 处理绑定操作
- * @param finder 这个用来统一处理Activity、View、Dialog等查找 View 和 Context 的方法
- * @param target 进行绑定的目标对象
- * @param source 所依附的对象,可能是 target 本身,如果它是 Activity、View、Dialog 的话
- */
- void bind(Finder finder, T target, Object source);
- }
为什么要定义个接口呢?因为后面我们通过处理注解生成的Java类都要实现这个接口,这样我们通过反射获取到对应类的时候就可以直接显示转换成这个接口,并调用里面的 bind() 方法来执行具体操作。至于这3个参数的意思如标注所示,Finder我们下面会讲,对于 source参数我举个例子:比如我们要进行绑定操作的 target 对象是个 Fragment 的话,它的 source 就是通过 LayoutInflater.inflate() 返回的View,它所绑定的视图都是和这个 View关联的,通过这个View 我们才能找到我们的其它视图资源。
我们来看下 Finder 的实现:- /**
- * 资源查找的处理类
- */
- @SuppressWarnings("UnusedDeclaration") // Used by generated code.
- public enum Finder {
- VIEW {
- @Override
- protected View findView(Object source, int id) {
- return ((View) source).findViewById(id);
- }
- @Override
- public Context getContext(Object source) {
- return ((View) source).getContext();
- }
- @Override
- protected String getResourceEntryName(Object source, int id) {
- final View view = (View) source;
- // In edit mode, getResourceEntryName() is unsupported due to use of BridgeResources
- if (view.isInEditMode()) {
- return "<unavailable while editing>";
- }
- return super.getResourceEntryName(source, id);
- }
- },
- ACTIVITY {
- @Override
- protected View findView(Object source, int id) {
- return ((Activity) source).findViewById(id);
- }
- @Override
- public Context getContext(Object source) {
- return (Activity) source;
- }
- },
- DIALOG {
- @Override
- protected View findView(Object source, int id) {
- return ((Dialog) source).findViewById(id);
- }
- @Override
- public Context getContext(Object source) {
- return ((Dialog) source).getContext();
- }
- };
- // 略...
- /**
- * findViewById
- * @param source
- * @param id
- * @return
- */
- protected abstract View findView(Object source, int id);
- /**
- * 获取Context
- * @param source
- * @return
- */
- public abstract Context getContext(Object source);
- }
这里我先省略了一些方法,只讲现在必要的东西。这个枚举类型中定义了3个不同的枚举对象,分别对应 Activity、View、Dialog等,并都实现了下面两个抽象方法。你仔细看它们的实现就可以看出来,这里把 findViewById(id)和getContext() 做了统一封装,这样我们后面调用的时候不用再去关心它对应的到底是哪种类型,直接调用方法就行了。
再来看下提供外部调用的接口类:- /**
- * 提供资源绑定接口的类
- */
- public class ButterKnife {
- static final Map<Class<?>, ViewBinder<Object>> BINDERS = new LinkedHashMap<>();
- private ButterKnife() {
- throw new AssertionError("No instances.");
- }
- /**
- * 绑定 Activity
- * @param target 目标为 Activity
- */
- public static void bind(@NonNull Activity target) {
- _bind(target, target, Finder.ACTIVITY);
- }
- /**
- * 绑定目标对象
- * @param target 目标为 Object
- * @param source 依附 Activity
- */
- public static void bind(@NonNull Object target, @NonNull Activity source) {
- _bind(target, source, Finder.ACTIVITY);
- }
- /**
- * 绑定 View
- * @param target 目标为 View
- */
- public static void bind(@NonNull View target) {
- _bind(target, target, Finder.VIEW);
- }
- /**
- * 绑定目标对象
- * @param target 目标为 Object
- * @param source 依附 View
- */
- public static void bind(@NonNull Object target, @NonNull View source) {
- _bind(target, source, Finder.VIEW);
- }
- /**
- * 绑定 Dialog
- * @param target 目标为 Dialog
- */
- public static void bind(@NonNull Dialog target) {
- _bind(target, target, Finder.DIALOG);
- }
- /**
- * 绑定目标对象
- * @param target 目标为 Object
- * @param source 依附 Dialog
- */
- public static void bind(@NonNull Object target, @NonNull Dialog source) {
- _bind(target, source, Finder.DIALOG);
- }
- /**
- * 资源绑定
- * @param target 目标
- * @param source 来源:activity、dialog 或 view
- * @param finder 辅助查找的工具,配合source使用
- */
- private static void _bind(@NonNull Object target, @NonNull Object source, @NonNull Finder finder) {
- Class<?> targetClass = target.getClass();
- try {
- ViewBinder<Object> viewBinder = _findViewBinderForClass(targetClass);
- if (viewBinder != null) {
- // 执行bind方法进行资源绑定
- viewBinder.bind(finder, target, source);
- }
- } catch (Exception e) {
- throw new RuntimeException("Unable to bind views for " + targetClass.getName(), e);
- }
- }
- /**
- * 通过目标Class找到对应的ViewBinder
- * @param cls Class
- * @return ViewBinder
- * @throws IllegalAccessException
- * @throws InstantiationException
- */
- private static ViewBinder<Object> _findViewBinderForClass(Class<?> cls)
- throws IllegalAccessException, InstantiationException {
- ViewBinder<Object> viewBinder = BINDERS.get(cls);
- if (viewBinder != null) {
- return viewBinder;
- }
- String clsName = cls.getName();
- if (clsName.startsWith("android.") || clsName.startsWith("java.")) {
- return null;
- }
- try {
- // 利用反射来生成对应 ViewBinder
- Class<?> viewBindingClass = Class.forName(clsName + "$$ViewBinder");
- viewBinder = (ViewBinder<Object>) viewBindingClass.newInstance();
- } catch (ClassNotFoundException e) {
- // 查找父类是否存在
- viewBinder = _findViewBinderForClass(cls.getSuperclass());
- }
- BINDERS.put(cls, viewBinder);
- return viewBinder;
- }
- }
这里重载了多个 bind() 方法对应不同的调用对象,在该方法里会通过反射去获取在编译时期生成的类(生成的类名统一规定为:target对象的className + "$$ViewBinder" 后缀),如果能创建对应的实例则调用实例的 bind() 方法。
这样 butterknifelib 的工作就大体处理好了,当然了,在实际开发中一般不太可能能一次性就先把这些东西都定义好,而是配合注解处理来做调整完善。
定义注解处理器
最后再定义一个注解处理器,整个开发框架就差不多了,我们后面的工作基本都是完善注解的处理。
- /**
- * 注解处理器
- */
- @AutoService(Processor.class)
- public class ButterKnifeProcessor extends AbstractProcessor {
- private Types typeUtils;
- private Elements elementUtils;
- private Filer filer;
- private Messager messager;
- @Override
- public synchronized void init(ProcessingEnvironment processingEnv) {
- super.init(processingEnv);
- typeUtils = processingEnv.getTypeUtils();
- elementUtils = processingEnv.getElementUtils();
- filer = processingEnv.getFiler();
- messager = processingEnv.getMessager();
- }
- @Override
- public boolean process(Set<? extends TypeElement> annotations, RoundEnvironment roundEnv) {
- return false;
- }
- @Override
- public Set<String> getSupportedAnnotationTypes() {
- Set<String> annotations = new LinkedHashSet<>();
- return annotations;
- }
- @Override
- public SourceVersion getSupportedSourceVersion() {
- return SourceVersion.latestSupported();
- }
- }
这样前期工作都处理完了,后面就开始真正的注解开发了。
项目代码:ButterKnifeStudy


 239
239


 被折叠的 条评论
为什么被折叠?
被折叠的 条评论
为什么被折叠?
 到【灌水乐园】发言


