


前言:
这里呢就是给自己的做的项目一些小功能做一个笔记。也希望能对大家能有帮助。
正文:
这里就简单的自定义了TextView 描边的效果。更多效果,
大家可以参照这个大神的:点击打开链接 以及这位大神:点击打开链接
我这里写的就不像上面两位大神功能那么强大了。
第一步:好现在就来开始我们的自定义的第一步吧!!!
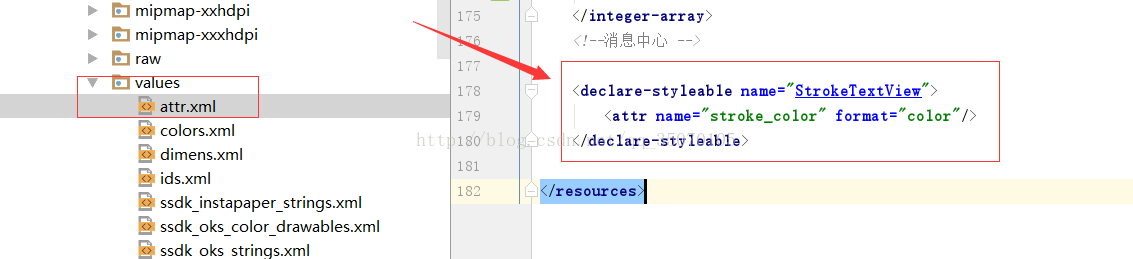
public class StrokeTextView extends android.support.v7.widget.AppCompatTextView { public TextView borderText;///用于描边的TextView private int colors; public StrokeTextView(Context context) { this(context,null); } public StrokeTextView(Context context, AttributeSet attrs) { this(context, attrs,0); } public StrokeTextView(Context context, AttributeSet attrs,int defStyle) { super(context, attrs, defStyle); borderText = new TextView(context,attrs); init(attrs); } public void init(AttributeSet attrs){ TypedArray ta = getContext().obtainStyledAttributes(attrs,R.styleable.StrokeTextView); colors = ta.getColor(R.styleable.StrokeTextView_stroke_color,0xFFFFFF); ta.recycle(); TextPaint tp1 = borderText.getPaint(); //new tp1.setStrokeWidth(4); //设置描边宽度 tp1.setStyle(Style.STROKE); //对文字只描边 borderText.setTextColor(colors); //设置描边颜色 borderText.setGravity(getGravity()); } @Override public void setLayoutParams (ViewGroup.LayoutParams params){ super.setLayoutParams(params); borderText.setLayoutParams(params); } /** * onMeasure通过父View传递过来的大小和模式, * 以及自身的背景图片的大小得出自身最终的大小, * 然后通过setMeasuredDimension()方法设置给mMeasuredWidth和mMeasuredHeight. * * @param widthMeasureSpec * @param heightMeasureSpec */ @Override protected void onMeasure(int widthMeasureSpec, int heightMeasureSpec) { CharSequence tt = borderText.getText(); //两个TextView上的文字必须一致 if(tt== null || !tt.equals(this.getText())){ borderText.setText(getText()); this.postInvalidate(); } super.onMeasure(widthMeasureSpec, heightMeasureSpec); borderText.measure(widthMeasureSpec, heightMeasureSpec); } /** * 该方法是View的放置方法,在View类实现。 * 调用该方法需要传入放置View的矩形空间左上角left、top值和右下角right、bottom值。 * 这四个值是相对于父控件而言的。 * * @param changed * @param left * @param top * @param right * @param bottom */ protected void onLayout (boolean changed, int left, int top, int right, int bottom){ super.onLayout(changed, left, top, right, bottom); borderText.layout(left, top, right, bottom); } @Override protected void onDraw(Canvas canvas) { borderText.draw(canvas); super.onDraw(canvas); } } 第二步:在Values资源文件中去定义自定义TextView 在xml布局中使用的属性
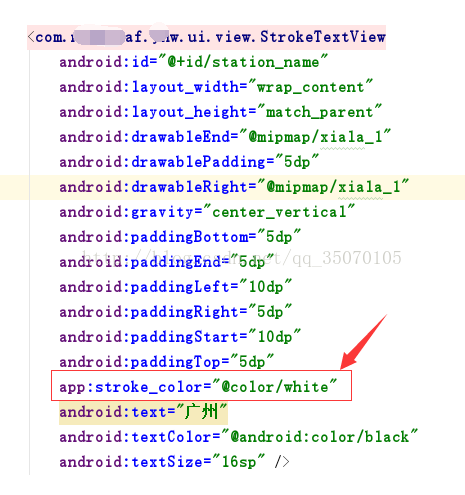
第三步:在xml布局中去使用自定义控件
注意:需要使用app:...自定义属性需要在根布局加上这句
xmlns:app="http://schemas.android.com/apk/res-auto"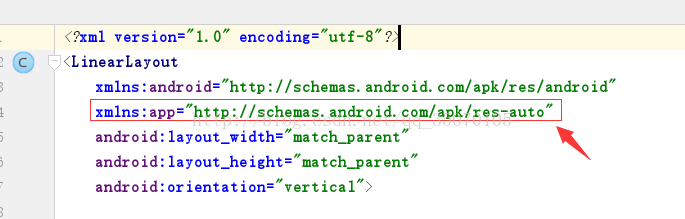
第四步:为了方便使用我在自定义文件中(StrokeTextView.java)
里面的 borderText 定义为了 public .这样就省了我再去定义一个方法
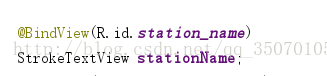
在代码中使用也是很方便的,使用Butterknife(黄油刀)去到到控件。
当然你也可以去findViewbyId去找到控件
接下来就直接使用就好了

就这样就好啦。好了到这里简单的自定义TextView描边就结束了


 2万+
2万+


 被折叠的 条评论
为什么被折叠?
被折叠的 条评论
为什么被折叠?
 到【灌水乐园】发言


