


一:srping的介绍
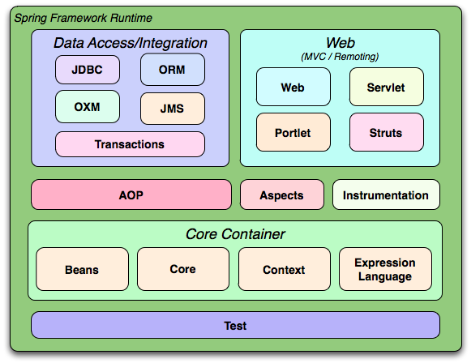
1.spring的体系结构
2.spring资源
a、spring-framework-3.2.0.RELEASE:Spring Framework的官方发行包
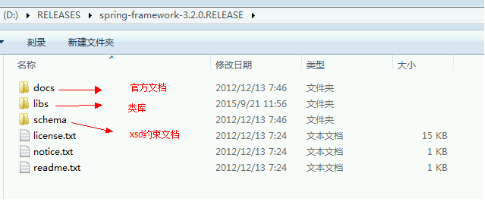
b、spring-framework-3.0.2.RELEASE-dependencies:依赖的第三方jar包
二:如何搭建spring的核心开发环境
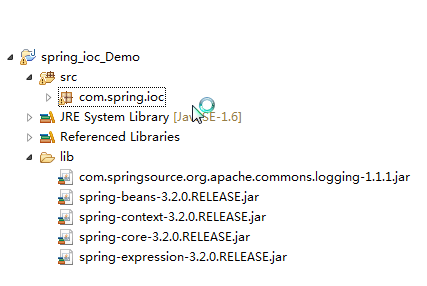
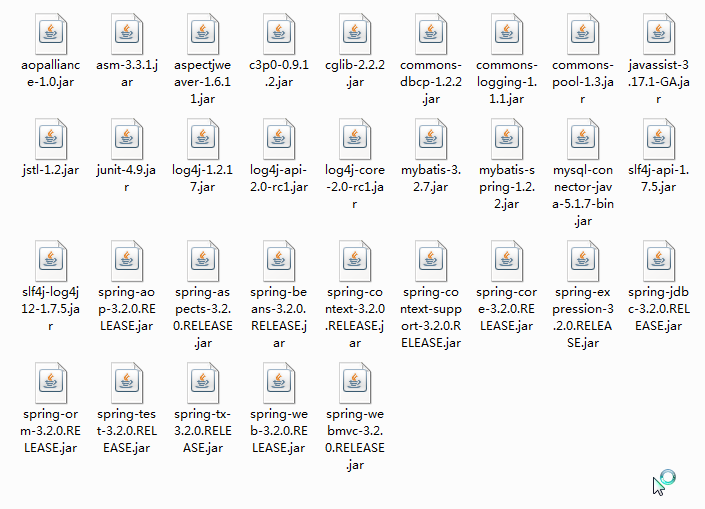
1.导入spring核心开发的jar包

位置: spring-framework-3.2.0.RELEASE\libs
jar包:

2.导入核心依赖的jar包(日志输出),可以使用 commons-logging或Log4J
a、jar包位置:
spring-framework-3.0.2.RELEASE-dependencies\org.apache.commons\com.springsource.org.apache.commons.logging\1.1.1
b、jar包

3.配置spring核心配置文件
三:spring中的IOC(控制反转)
1.入门程序
a、创建java工程,导入jar包
b、编写dao,service
- package com.spring.ioc;
- public interface IocDao {
- public void save();
- }
- package com.spring.ioc;
- public class IocDaoImpl implements IocDao {
- public void save() {
- System.out.println("save...");
- }
- }
- package com.spring.ioc;
- public interface IocService {
- public void save();
- }
- package com.spring.ioc;
- public class IocServiceImpl implements IocService {
- private IocDao iocDao;
- public void setIocDao(IocDao iocDao) {
- this.iocDao = iocDao;
- }
- public void save() {
- iocDao.save();
- }
- }
c、编写配置文件
- <?xml version="1.0" encoding="UTF-8"?>
- <beans xmlns="http://www.springframework.org/schema/beans"
- xmlns:xsi="http://www.w3.org/2001/XMLSchema-instance"
- xsi:schemaLocation="
- http://www.springframework.org/schema/beans
- http://www.springframework.org/schema/beans/spring-beans.xsd">
- <!-- 让spring容器实例化并管理bena
- 以下的操作相当于: IocDao iocDao = new IocDaoImpl();
- -->
- <bean id="iocDao" class="com.spring.ioc.IocDaoImpl"></bean>
- <bean id="iocService" class="com.spring.ioc.IocServiceImpl">
- <!-- 调用setter方法注入需要的资源 -->
- <property name="iocDao" ref="iocDao"></property>
- </bean>
- </beans>
d、spring容器的初始化和资源的获取
- package com.spring.ioc;
- import org.springframework.context.ApplicationContext;
- import org.springframework.context.support.ClassPathXmlApplicationContext;
- public class IocDemo {
- public static void main(String[] args) {
- //spring容器的初始化,参数为核心配置文件相对路径
- ApplicationContext ac = new ClassPathXmlApplicationContext("com/spring/ioc/bean.xml");
- //获取资源,参数为核心配置文件中<bean>标签id属性值
- IocService iocService = (IocService)ac.getBean("iocService");
- iocService.save();
- }
- }
四:springAPI的体系结构
1.体系结构图
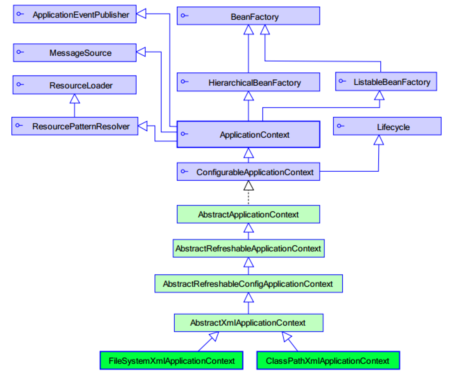
2.分析
a、两个实现类
b、BeanFactory和ApplicationContext的区别
一:springmvc+spring+mybatis整合
1.创建动态web项目,导入jar包
2.在web.xml中配置spring监听器以及springmvc核心控制器
- <?xml version="1.0" encoding="UTF-8"?>
- <web-app xmlns:xsi="http://www.w3.org/2001/XMLSchema-instance"
- xmlns="http://java.sun.com/xml/ns/javaee"
- xsi:schemaLocation="http://java.sun.com/xml/ns/javaee http://java.sun.com/xml/ns/javaee/web-app_2_5.xsd"
- id="WebApp_ID" version="2.5">
- <display-name>ssm-Demo</display-name>
- <welcome-file-list>
- <welcome-file>index.html</welcome-file>
- <welcome-file>index.htm</welcome-file>
- <welcome-file>index.jsp</welcome-file>
- <welcome-file>default.html</welcome-file>
- <welcome-file>default.htm</welcome-file>
- <welcome-file>default.jsp</welcome-file>
- </welcome-file-list>
- <!-- 初始化spring容器,配置spring核心配置文件位置 -->
- <context-param>
- <param-name>contextConfigLocation</param-name>
- <param-value>classpath:application-context.xml</param-value>
- </context-param>
- <listener>
- <listener-class>org.springframework.web.context.ContextLoaderListener</listener-class>
- </listener>
- <!-- 解决POST提交中文时的乱码问题 -->
- <filter>
- <filter-name>characterEncoding</filter-name>
- <filter-class>org.springframework.web.filter.CharacterEncodingFilter</filter-class>
- <init-param>
- <param-name>encoding</param-name>
- <param-value>UTF-8</param-value>
- </init-param>
- </filter>
- <filter-mapping>
- <filter-name>characterEncoding</filter-name>
- <url-pattern>*.do</url-pattern>
- </filter-mapping>
- <!-- 配置springmvc核心控制器 -->
- <servlet>
- <servlet-name>springmvc</servlet-name>
- <servlet-class>org.springframework.web.servlet.DispatcherServlet</servlet-class>
- <init-param>
- <param-name>contextConfigLocation</param-name>
- <param-value>classpath:springmvc-config.xml</param-value>
- </init-param>
- <!-- 配置使读取配置文件时实例化springmvc -->
- <load-on-startup>1</load-on-startup>
- </servlet>
- <servlet-mapping>
- <servlet-name>springmvc</servlet-name>
- <url-pattern>*.do</url-pattern>
- </servlet-mapping>
- </web-app>
3.创建包,配置其他配置文件
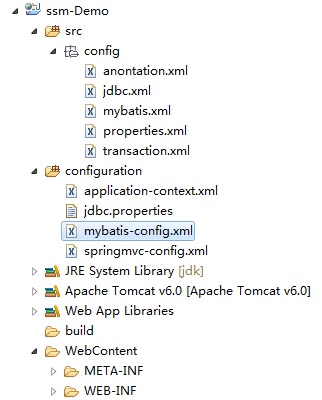
a、配置mybatis核心配置文件 -- mybatis-config.xml
- <?xml version="1.0" encoding="UTF-8"?>
- <!DOCTYPE configuration
- PUBLIC "-//mybatis.org//DTD Config 3.0//EN"
- "http://mybatis.org/dtd/mybatis-3-config.dtd">
- <configuration>
- <!-- 配置包下自动别名 -->
- <typeAliases>
- <package name="com.ssm.pojo"/>
- </typeAliases>
- </configuration>
b、配置springmvc核心配置文件 -- springmvc-config.xml
- <?xml version="1.0" encoding="UTF-8"?>
- <beans xmlns="http://www.springframework.org/schema/beans"
- xmlns:xsi="http://www.w3.org/2001/XMLSchema-instance" xmlns:mvc="http://www.springframework.org/schema/mvc"
- xmlns:context="http://www.springframework.org/schema/context"
- xmlns:aop="http://www.springframework.org/schema/aop"
- xmlns:tx="http://www.springframework.org/schema/tx"
- xmlns:task="http://www.springframework.org/schema/task"
- xsi:schemaLocation="http://www.springframework.org/schema/beans
- http://www.springframework.org/schema/beans/spring-beans-3.0.xsd
- http://www.springframework.org/schema/mvc
- http://www.springframework.org/schema/mvc/spring-mvc-3.0.xsd
- http://www.springframework.org/schema/context
- http://www.springframework.org/schema/context/spring-context-3.0.xsd
- http://www.springframework.org/schema/aop
- http://www.springframework.org/schema/aop/spring-aop-3.0.xsd
- http://www.springframework.org/schema/tx
- http://www.springframework.org/schema/tx/spring-tx-3.0.xsd
- http://www.springframework.org/schema/task
- http://www.springframework.org/schema/task/spring-task-3.0.xsd">
- <!-- 配置开启扫描注解 -->
- <context:component-scan base-package="com.ssm" use-default-filters="false">
- <!-- springmvc的配置文件,因此,配置为只扫描Controller中的注解 -->
- <context:include-filter type="annotation" expression="org.springframework.stereotype.Controller"/>
- </context:component-scan>
- <!-- 配置处理器映射器,处理器适配器,
- 使用该配置可以替代处理器适配器、处理器映射器的配置 -->
- <mvc:annotation-driven/>
- <!-- 配置处理器映射器,当使用上面的mvc标签时,可以不用配置处理器映射器和处理器适配器
- <bean class="org.springframework.web.servlet.mvc.method.annotation.RequestMappingHandlerMapping"></bean>
- -->
- <!-- 配置处理器适配器
- <bean class="org.springframework.web.servlet.mvc.method.annotation.RequestMappingHandlerAdapter"></bean>
- -->
- <!-- 配置视图解析器 -->
- <bean class="org.springframework.web.servlet.view.InternalResourceViewResolver">
- <!-- 前缀 -->
- <property name="prefix" value="/WEB-INF/jsp/items" />
- <!-- 后缀 -->
- <property name="suffix" value=".jsp" />
- </bean>
- </beans>
c、配置spring核心配置文件 -- application-context.xml
- <?xml version="1.0" encoding="UTF-8"?>
- <beans xmlns="http://www.springframework.org/schema/beans"
- xmlns:xsi="http://www.w3.org/2001/XMLSchema-instance" xmlns:mvc="http://www.springframework.org/schema/mvc"
- xmlns:context="http://www.springframework.org/schema/context"
- xmlns:aop="http://www.springframework.org/schema/aop"
- xmlns:tx="http://www.springframework.org/schema/tx"
- xmlns:task="http://www.springframework.org/schema/task"
- xsi:schemaLocation="http://www.springframework.org/schema/beans
- http://www.springframework.org/schema/beans/spring-beans-3.0.xsd
- http://www.springframework.org/schema/mvc
- http://www.springframework.org/schema/mvc/spring-mvc-3.0.xsd
- http://www.springframework.org/schema/context
- http://www.springframework.org/schema/context/spring-context-3.0.xsd
- http://www.springframework.org/schema/aop
- http://www.springframework.org/schema/aop/spring-aop-3.0.xsd
- http://www.springframework.org/schema/tx
- http://www.springframework.org/schema/tx/spring-tx-3.0.xsd
- http://www.springframework.org/schema/task
- http://www.springframework.org/schema/task/spring-task-3.0.xsd">
- <!-- 导入所有配置文件 -->
- <import resource="config/*.xml"/>
- </beans>
d、配置数据库连接属性 -- jdbc.properties
- driverClass=com.mysql.jdbc.Driver
- jdbcUrl=jdbc:mysql://localhost:3306/mybatis?characterEncoding=utf8
- user=root
- password=root
e、配置数据源、事务、注解、读取properties文件、mybatis工厂等
(1)、jdbc.xml
- <?xml version="1.0" encoding="UTF-8"?>
- <beans xmlns="http://www.springframework.org/schema/beans"
- xmlns:xsi="http://www.w3.org/2001/XMLSchema-instance" xmlns:mvc="http://www.springframework.org/schema/mvc"
- xmlns:context="http://www.springframework.org/schema/context"
- xmlns:aop="http://www.springframework.org/schema/aop"
- xmlns:tx="http://www.springframework.org/schema/tx"
- xmlns:task="http://www.springframework.org/schema/task"
- xsi:schemaLocation="http://www.springframework.org/schema/beans
- http://www.springframework.org/schema/beans/spring-beans-3.0.xsd
- http://www.springframework.org/schema/mvc
- http://www.springframework.org/schema/mvc/spring-mvc-3.0.xsd
- http://www.springframework.org/schema/context
- http://www.springframework.org/schema/context/spring-context-3.0.xsd
- http://www.springframework.org/schema/aop
- http://www.springframework.org/schema/aop/spring-aop-3.0.xsd
- http://www.springframework.org/schema/tx
- http://www.springframework.org/schema/tx/spring-tx-3.0.xsd
- http://www.springframework.org/schema/task
- http://www.springframework.org/schema/task/spring-task-3.0.xsd">
- <!-- 配置数据源 -->
- <bean id="dataSource" class="com.mchange.v2.c3p0.ComboPooledDataSource">
- <property name="driverClass" value="${driverClass}"/>
- <property name="jdbcUrl" value="${jdbcUrl}"/>
- <property name="user" value="${user}"/>
- <property name="password" value="${password}"/>
- </bean>
- </beans>
(2)、transaction.xml
- <?xml version="1.0" encoding="UTF-8"?>
- <beans xmlns="http://www.springframework.org/schema/beans"
- xmlns:xsi="http://www.w3.org/2001/XMLSchema-instance" xmlns:mvc="http://www.springframework.org/schema/mvc"
- xmlns:context="http://www.springframework.org/schema/context"
- xmlns:aop="http://www.springframework.org/schema/aop"
- xmlns:tx="http://www.springframework.org/schema/tx"
- xmlns:task="http://www.springframework.org/schema/task"
- xsi:schemaLocation="http://www.springframework.org/schema/beans
- http://www.springframework.org/schema/beans/spring-beans-3.0.xsd
- http://www.springframework.org/schema/mvc
- http://www.springframework.org/schema/mvc/spring-mvc-3.0.xsd
- http://www.springframework.org/schema/context
- http://www.springframework.org/schema/context/spring-context-3.0.xsd
- http://www.springframework.org/schema/aop
- http://www.springframework.org/schema/aop/spring-aop-3.0.xsd
- http://www.springframework.org/schema/tx
- http://www.springframework.org/schema/tx/spring-tx-3.0.xsd
- http://www.springframework.org/schema/task
- http://www.springframework.org/schema/task/spring-task-3.0.xsd">
- <!-- 配置数据源的事务,事务管理类 -->
- <bean id="transactionManager" class="org.springframework.jdbc.datasource.DataSourceTransactionManager">
- <!-- 注入数据源 -->
- <property name="dataSource" ref="dataSource"/>
- </bean>
- <!-- 开启扫描事务的注解 -->
- <tx:annotation-driven transaction-manager="transactionManager"/>
- </beans>
(3)、anontation.xml
- <?xml version="1.0" encoding="UTF-8"?>
- <beans xmlns="http://www.springframework.org/schema/beans"
- xmlns:xsi="http://www.w3.org/2001/XMLSchema-instance" xmlns:mvc="http://www.springframework.org/schema/mvc"
- xmlns:context="http://www.springframework.org/schema/context"
- xmlns:aop="http://www.springframework.org/schema/aop"
- xmlns:tx="http://www.springframework.org/schema/tx"
- xmlns:task="http://www.springframework.org/schema/task"
- xsi:schemaLocation="http://www.springframework.org/schema/beans
- http://www.springframework.org/schema/beans/spring-beans-3.0.xsd
- http://www.springframework.org/schema/mvc
- http://www.springframework.org/schema/mvc/spring-mvc-3.0.xsd
- http://www.springframework.org/schema/context
- http://www.springframework.org/schema/context/spring-context-3.0.xsd
- http://www.springframework.org/schema/aop
- http://www.springframework.org/schema/aop/spring-aop-3.0.xsd
- http://www.springframework.org/schema/tx
- http://www.springframework.org/schema/tx/spring-tx-3.0.xsd
- http://www.springframework.org/schema/task
- http://www.springframework.org/schema/task/spring-task-3.0.xsd">
- <!-- 配置开启扫描spring注解 -->
- <context:component-scan base-package="com.ssm">
- <!-- 选择过滤的注解,即 @Controller -->
- <context:exclude-filter type="annotation" expression="org.springframework.stereotype.Controller"/>
- </context:component-scan>
- </beans>
(4)、mybatis.xml
- <?xml version="1.0" encoding="UTF-8"?>
- <beans xmlns="http://www.springframework.org/schema/beans"
- xmlns:xsi="http://www.w3.org/2001/XMLSchema-instance" xmlns:mvc="http://www.springframework.org/schema/mvc"
- xmlns:context="http://www.springframework.org/schema/context"
- xmlns:aop="http://www.springframework.org/schema/aop"
- xmlns:tx="http://www.springframework.org/schema/tx"
- xmlns:task="http://www.springframework.org/schema/task"
- xsi:schemaLocation="http://www.springframework.org/schema/beans
- http://www.springframework.org/schema/beans/spring-beans-3.0.xsd
- http://www.springframework.org/schema/mvc
- http://www.springframework.org/schema/mvc/spring-mvc-3.0.xsd
- http://www.springframework.org/schema/context
- http://www.springframework.org/schema/context/spring-context-3.0.xsd
- http://www.springframework.org/schema/aop
- http://www.springframework.org/schema/aop/spring-aop-3.0.xsd
- http://www.springframework.org/schema/tx
- http://www.springframework.org/schema/tx/spring-tx-3.0.xsd
- http://www.springframework.org/schema/task
- http://www.springframework.org/schema/task/spring-task-3.0.xsd">
- <!-- 配置sqlSessionFactory工厂 -->
- <bean id="sqlSessionFactory" class="org.mybatis.spring.SqlSessionFactoryBean">
- <!-- 注入数据源 -->
- <property name="dataSource" ref="dataSource"/>
- <!-- 配置mybatis核心配置文件位置 -->
- <property name="configLocation" value="classpath:mybatis-config.xml"/>
- </bean>
- <!-- 配置扫描mapper的基本包 -->
- <bean class="org.mybatis.spring.mapper.MapperScannerConfigurer">
- <property name="basePackage" value="com.ssm.dao"/>
- </bean>
- </beans>
(5)、properties.xml
- <?xml version="1.0" encoding="UTF-8"?>
- <beans xmlns="http://www.springframework.org/schema/beans"
- xmlns:xsi="http://www.w3.org/2001/XMLSchema-instance" xmlns:mvc="http://www.springframework.org/schema/mvc"
- xmlns:context="http://www.springframework.org/schema/context"
- xmlns:aop="http://www.springframework.org/schema/aop"
- xmlns:tx="http://www.springframework.org/schema/tx"
- xmlns:task="http://www.springframework.org/schema/task"
- xsi:schemaLocation="http://www.springframework.org/schema/beans
- http://www.springframework.org/schema/beans/spring-beans-3.0.xsd
- http://www.springframework.org/schema/mvc
- http://www.springframework.org/schema/mvc/spring-mvc-3.0.xsd
- http://www.springframework.org/schema/context
- http://www.springframework.org/schema/context/spring-context-3.0.xsd
- http://www.springframework.org/schema/aop
- http://www.springframework.org/schema/aop/spring-aop-3.0.xsd
- http://www.springframework.org/schema/tx
- http://www.springframework.org/schema/tx/spring-tx-3.0.xsd
- http://www.springframework.org/schema/task
- http://www.springframework.org/schema/task/spring-task-3.0.xsd">
- <!-- 配置读取properties配置文件 -->
- <bean class="org.springframework.beans.factory.config.PropertyPlaceholderConfigurer">
- <property name="locations">
- <list>
- <value>classpath:jdbc.properties</value>
- </list>
- </property>
- </bean>
- </beans>
一:参数绑定
1.基础类型的参数绑定
要求:
@RequestParam标签的使用
当页面传递的字段name值和controller中方法中的参数名称不相同时,使用@RequestParam将页面上的字段值绑定到方法中的参数上,但是使用该注解时要求参数一定有值,如果想让其没有值时也可以,需加上:required=false,此时也可以设置传递的值为null时的默认值,使用defaultValue属性
- @RequestMapping(value="editItems.do")
- //@RequestParam注解将页面上name值为 pid 的字段的值绑定到id参数上
- public String edit(@RequestParam(value="pid",required=false,defaultValue="1") Integer id){
- return "toEdit";
- }
2.Boolean类型的参数绑定
后台传递 0 或者 false 则自动转为 false
后台传递 1 或者 true 则自动转为 true
3.参数类型为包装类
如果参数类型为包装类,即类A中有另一个类B为该类A的属性,则在页面中传递值时的写法为name="B.属性"
例如:
POJO
- public class QueryVo {
- private User user;
- private Boolean isDel;
- private Items items;
- @RequestMapping(value="/items/toEdit.do")
- public String toEdit(QueryVo vo, Model model){
- return "toEdit";
- }
jsp页面
- <tr>
- <td width="20%" class="pn-flabel pn-flabel-h">
- 商品生产日期:</td><td width="80%" class="pn-fcontent">
- <input type="text" class="required" name="items.createtime"
- value="<fmt:formatDate value="${items.createtime }" pattern="yyyy-MM-dd HH:mm:ss"/>" maxlength="80"/>
- </td>
- </tr>
- <tr>
- <td width="20%" class="pn-flabel pn-flabel-h">
- 商品描述:</td><td width="80%" class="pn-fcontent">
- <input type="text" class="required" name="items.detail" maxlength="80" value="${items.detail }" size="60"/>
- </td>
- </tr>
- <tr>
- <td width="20%" class="pn-flabel pn-flabel-h">
- 是否可用:</td><td width="80%" class="pn-fcontent">
- <input type="text" class="required" name="isDel" maxlength="80" size="60"/>
- </td>
- </tr>
4.参数类型为集合时
a、参数为Map
POJO
- public class QueryVo {
- private Map<String , String> map;
- <tr>
- <td width="20%" class="pn-flabel pn-flabel-h">
- 数组:</td><td width="80%" class="pn-fcontent">
- <input type="text" class="required" name="map['color']" maxlength="80" size="60"/>
- <input type="text" class="required" name="map['size']" maxlength="80" size="60"/>
- </td>
- </tr>
b、参数为List,泛型为String
POJO
- public class QueryVo {
- private List<String> list;
JSP
- <tr>
- <td width="20%" class="pn-flabel pn-flabel-h">
- list:</td><td width="80%" class="pn-fcontent">
- <input type="text" class="required" name="list" maxlength="80" size="60"/>
- <input type="text" class="required" name="list" maxlength="80" size="60"/>
- </td>
- </tr>
c、参数为List,泛型为类
POJO
- public class QueryVo {
- private List<User> users;
JSP
- <tr>
- <td width="20%" class="pn-flabel pn-flabel-h">
- list==User1:</td><td width="80%" class="pn-fcontent">
- <input type="text" class="required" name="users[0].username" maxlength="80" size="60"/>
- <input type="text" class="required" name="users[0].address" maxlength="80" size="60"/>
- </td>
- </tr>
- <tr>
- <td width="20%" class="pn-flabel pn-flabel-h">
- list==User2:</td><td width="80%" class="pn-fcontent">
- <input type="text" class="required" name="users[1].username" maxlength="80" size="60"/>
- <input type="text" class="required" name="users[1].address" maxlength="80" size="60"/>
- </td>
- </tr>
d、参数类型为日期
由于日期类型的格式不确定,因此在进行参数绑定之前需要使用转换器对日期的格式进行转换
(1)、编写转换器类
- package com.ssm.common.convertion;
- import java.text.SimpleDateFormat;
- import java.util.Date;
- import org.springframework.core.convert.converter.Converter;
- /**
- * 自定义日期转换类,实现Converter接口
- * Converter<S, T> 其中:S 是页面传递的参数类型 T 是需要转换为的类型
- * @author Administrator
- *
- */
- public class DateConvertor implements Converter<String, Date> {
- @Override
- public Date convert(String source) {
- try {
- if(source != null){
- return new SimpleDateFormat("yyyy-MM-dd HH-mm-ss").parse(source);
- }
- } catch (Exception e) {
- // TODO: handle exception
- }
- return null;
- }
- }
(2)、在springmvc核心配置文件中添加转换器
- <!-- 处理器映射器,处理器适配器
- 使用该配置可以替代处理器适配器和处理器映射器的配置-->
- <mvc:annotation-driven conversion-service="conversionService" />
- <!-- 配置自定义转换器 -->
- <bean id="conversionService" class="org.springframework.format.support.FormattingConversionServiceFactoryBean">
- <property name="converters">
- <list>
- <bean class="com.ssm.common.convertion.DateConvertor"></bean>
- </list>
- </property>
- </bean>
e、接收的参数类型为数组
springmvc默认会将具有同名框的一组值使用", "隔开,即使用逗号+空格进行分割放入数组中
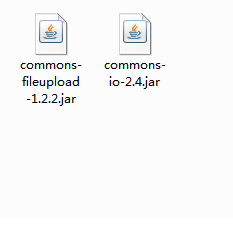
1.导入文件上传需要的jar包
2.分析当上传图片时,选中图片以后点击"打开"按钮触发的事件是什么?
onchange事件
a、编写jsp页面中的上传图片框
- <body>
- <div class="body-box" style="float: right">
- <form id="jvForm" action="edit.do" method="post">
- <tr>
- <td width="20%" class="pn-flabel pn-flabel-h">
- <span class="pn-frequired">*</span>
- 上传商品图片(90x150尺寸):
- </td>
- <td width="80%" class="pn-fcontent">注:该尺寸图片必须为90x150。
- </td>
- </tr>
- <tr>
- <td width="20%" class="pn-flabel pn-flabel-h">
- </td>
- <td width="80%" class="pn-fcontent">
- <img width="100" height="100" id="allUrl" src="/res/img/pic/ppp.jpg" />
- <input type="file" name="pic" onchange="uploadPic()" />
- </td>
- </tr>
- </form>
- </div>
- </body>
b、引入jquery.js和jquery.form.js插件
- <!-- 引入jquery.js和jquery.form.js插件 -->
- <script src="${pageContext.request.contextPath}/res/common/js/jquery.js" type="text/javascript"></script>
- <script src="${pageContext.request.contextPath}/res/common/js/jquery.form.js" type="text/javascript"></script>
c、编写上传的function
- <script type="text/javascript">
- //上传图片
- function uploadPic(){
- var options = {
- url : "${pageContext.request.contextPath}/upload/uploadPic.do",
- type : "post",
- dataType : "text",
- success : function(data){
- //图片的路径
- $("#allUrl").attr("src", data);
- }
- }
- //使用jquery.form.js插件模拟一个form进行提交
- $("#jvForm").ajaxSubmit(options);
- }
- </script>
d、JSP整体页面
- <%@ page language="java" contentType="text/html; charset=UTF-8"
- pageEncoding="UTF-8"%>
- <!DOCTYPE html PUBLIC "-//W3C//DTD HTML 4.01 Transitional//EN" "http://www.w3.org/TR/html4/loose.dtd">
- <html>
- <head>
- <meta http-equiv="Content-Type" content="text/html; charset=UTF-8">
- <title>上传图片</title>
- <link href="${pageContext.request.contextPath}/res/itcast/css/admin.css" rel="stylesheet" type="text/css"/>
- <link href="${pageContext.request.contextPath}/res/common/css/theme.css" rel="stylesheet" type="text/css"/>
- <link href="${pageContext.request.contextPath}/res/common/css/jquery.validate.css" rel="stylesheet" type="text/css"/>
- <link href="${pageContext.request.contextPath}/res/common/css/jquery.treeview.css" rel="stylesheet" type="text/css"/>
- <link href="${pageContext.request.contextPath}/res/common/css/jquery.ui.css" rel="stylesheet" type="text/css"/>
- <!-- 引入jquery.js和jquery.form.js插件 -->
- <script src="${pageContext.request.contextPath}/res/common/js/jquery.js" type="text/javascript"></script>
- <script src="${pageContext.request.contextPath}/res/common/js/jquery.form.js" type="text/javascript"></script>
- <script type="text/javascript">
- //上传图片
- function uploadPic(){
- var options = {
- url : "${pageContext.request.contextPath}/upload/uploadPic.do",
- type : "post",
- dataType : "text",
- success : function(data){
- //图片的路径
- $("#allUrl").attr("src", data);
- }
- }
- //使用jquery.form.js插件模拟一个form进行提交
- $("#jvForm").ajaxSubmit(options);
- }
- </script>
- </head>
- <body>
- <div class="body-box" style="float: right">
- <form id="jvForm" action="edit.do" method="post">
- <tr>
- <td width="20%" class="pn-flabel pn-flabel-h">
- <span class="pn-frequired">*</span>
- 上传商品图片(90x150尺寸):
- </td>
- <td width="80%" class="pn-fcontent">注:该尺寸图片必须为90x150。
- </td>
- </tr>
- <tr>
- <td width="20%" class="pn-flabel pn-flabel-h">
- </td>
- <td width="80%" class="pn-fcontent">
- <img width="100" height="100" id="allUrl" src="/res/img/pic/ppp.jpg" />
- <input type="file" name="pic" onchange="uploadPic()" />
- </td>
- </tr>
- </form>
- </div>
- </body>
- </html>
e、在springmvc的核心配置文件中配置上传图片
- <!-- 配置上传图片
- id 的名称必须为 multipartResolver : 通过此名称才能找到MultiparFile接口的实现类
- -->
- <bean id="multipartResolver" class="org.springframework.web.multipart.commons.CommonsMultipartResolver">
- <!-- 设置上传图片的大小 默认单位为 B -->
- <property name="maxUploadSize" value="1048576"/>
- </bean>
f、编写Controller类
- package com.ssm.controller;
- import java.io.File;
- import java.io.IOException;
- import java.text.DateFormat;
- import java.text.SimpleDateFormat;
- import java.util.Date;
- import java.util.Random;
- import javax.servlet.http.HttpServletRequest;
- import javax.servlet.http.HttpServletResponse;
- import org.apache.commons.io.FilenameUtils;
- import org.springframework.stereotype.Controller;
- import org.springframework.web.bind.annotation.RequestMapping;
- import org.springframework.web.bind.annotation.RequestParam;
- import org.springframework.web.multipart.MultipartFile;
- /**
- * 上传图片的Controller
- * @author Administrator
- *
- */
- @Controller
- @RequestMapping(value = "/upload")
- public class UploadController {
- //跳转到上传图片页面
- @RequestMapping(value="/upload.do")
- public String up(){
- return "upload";
- }
- //上传图片
- @RequestMapping(value = "/uploadPic.do")
- public void uploadPid(@RequestParam(required = false) MultipartFile pic, HttpServletRequest request
- ,HttpServletResponse response) throws Exception{
- System.out.println(pic.getOriginalFilename());
- //图片名称生成策略:精确到毫秒+3位随机数
- //生成时间
- DateFormat df = new SimpleDateFormat("yyyyMMddHHmmssSSS");
- String name = df.format(new Date());
- //生成三位随机数
- Random r = new Random();
- for (int i = 0; i < 3; i ++) {
- int a = r.nextInt(10);//生成10以内的随机数
- name += a;
- }
- //获取文件扩展名
- String extName = FilenameUtils.getExtension(pic.getOriginalFilename());
- //获取项目路径
- String url = request.getSession().getServletContext().getRealPath("/");
- //图片的相对与项目的路径
- String path = "/upload/" + name + "." + extName;
- //执行保存图片的方法,后面是文件夹
- pic.transferTo(new File(url + path));
- //图片显示的路径,需要在页面上图片的src属性使用
- String p = request.getContextPath() + path;
- response.setContentType("application/json;charset=UTF-8");
- response.getWriter().write(p);
- }
- }
二:JSON和对象之间的相互转化
1.导入json支持包

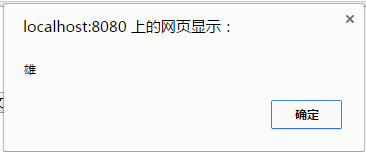
2. 编写jsp页面中的JavaScript,发送ajax数据,接收返回数据并显示
- <script type="text/javascript">
- //页面加载完成后执行的函数
- $(function(){
- var url = "${pageContext.request.contextPath}/json/text.do"
- var params = '{"username":"熊大","address":"森林"}';
- //post提交ajax
- $.ajax({
- url : url,
- type : "post",//提交方式
- contentType : "application/json;charset=UTF-8",//设置发送的数据类型为json格式,ajax默认发送key:value格式的数据
- dataType : "json",//设置接收的数据类型为json格式
- data : params,
- success : function(data){
- alert(data.sex);
- }
- });
- });
3.编写Controller层代码
- package com.ssm.controller;
- import org.springframework.stereotype.Controller;
- import org.springframework.web.bind.annotation.RequestBody;
- import org.springframework.web.bind.annotation.RequestMapping;
- import org.springframework.web.bind.annotation.ResponseBody;
- import com.ssm.pojo.User;
- /**
- * JSON和对象的相互转化
- * @author Administrator
- *
- */
- @Controller
- @RequestMapping(value = "/json")
- public class JsonController {
- /**
- * JSON与对象的相互转化需要用到两个标签
- * @RequestBody 将传入的JSON格式的字符串转化为对象
- * @ResponseBody 将传出的对象转化为JSON格式的字符串
- */
- @RequestMapping(value = "/text.do")
- public @ResponseBody User //将User转换成JSON字符串并传递到jsp页面
- jsonToObject(@RequestBody User user){//将页面传递的json字符串自动对应User中的属性封装到User中
- System.out.println(user);
- user.setSex("雄");
- return user;
- }
- }
4.控制台打印数据

5.jsp页面弹出数据
三:springmvc的校验
1.导入jar包
springmvc校验使用的是Hibernate的校验方式,因此需要导入hibernate的校验支持包

2.在springmvc核心配置文件中配置校验器
- <!-- 处理器映射器,处理器适配器
- 使用该配置可以替代处理器适配器和处理器映射器的配置-->
- <mvc:annotation-driven validator="validator" />
- <!-- 配置校验器 -->
- <bean id="validator" class="org.springframework.validation.beanvalidation.LocalValidatorFactoryBean">
- <!-- 使用hibernate的校验器 -->
- <property name="providerClass" value="org.hibernate.validator.HibernateValidator"/>
- <!-- 指定校验结果的中文存放的properties文件位置 -->
- <property name="validationMessageSource" ref="messageSource"/>
- </bean>
- <!-- 校验错误信息的配置文件 -->
- <bean id="messageSource" class="org.springframework.context.support.ReloadableResourceBundleMessageSource">
- <!-- 资源文件名 -->
- <property name="basenames">
- <list>
- <!-- 存放中文校验结果的properties文件 -->
- <value>classpath:message</value>
- </list>
- </property>
- <!-- 资源文件的编码格式 -->
- <property name="fileEncodings" value="utf-8" />
- <!-- 对资源文件内容的缓存时间,单位是 s -->
- <property name="cacheSeconds" value="120"/>
- </bean>
3.在需要校验的类的属性字段上添加校验条件 -- 此处以商品为例 Items
- public class Items {
- private Integer id;
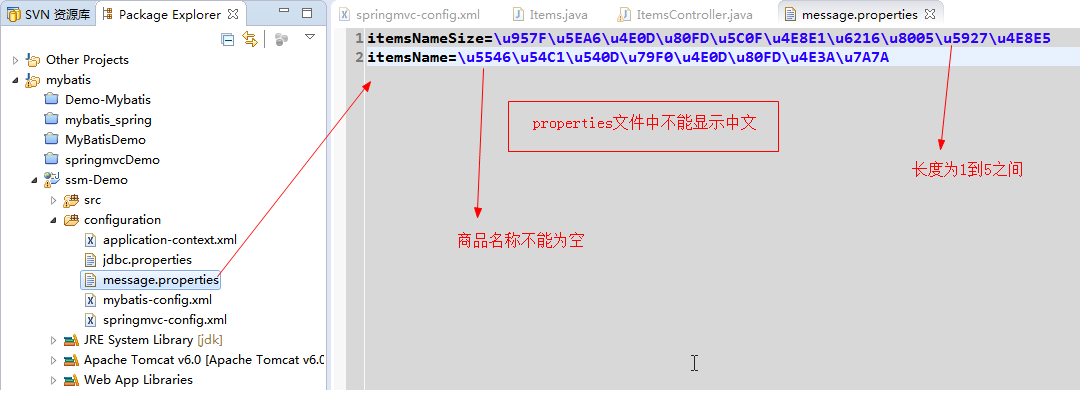
- @Size(min=1,max=5,message="{itemsNameSize}")//设置最小长度,最大长度以及错误提示
- @NotNull(message="{itemsName}")
- private String name;
- private Float price;
- private String pic;
4.编写properties文件存放错误信息
5.在controller层需要校验参数的前面加上@Validated注解,并且绑定结果
- @RequestMapping(value="/items/edit.do")
- public String toEdit(@Validated Items items,BindingResult result, Model model){//设置给Items进行校验,并且绑定结果
- //获取错误集
- List<ObjectError> allErrors = result.getAllErrors();
- for (ObjectError objectError : allErrors) {
- System.out.println(objectError.getDefaultMessage());
- }
- return "redirect:/items/list.do";
- }
四:全局异常处理
1.在springmvc核心配置文件中自定义异常处理类
- <!-- 自定义全局异常处理类 -->
- <bean class="com.ssm.common.exception.GlobalException"></bean>
2.编写自定义异常处理类
- package com.ssm.common.exception;
- import javax.servlet.http.HttpServletRequest;
- import javax.servlet.http.HttpServletResponse;
- import org.springframework.web.servlet.HandlerExceptionResolver;
- import org.springframework.web.servlet.ModelAndView;
- /**
- * 自定义全局异常处理类
- * @author Administrator
- *
- */
- public class GlobalException implements HandlerExceptionResolver {
- @Override
- public ModelAndView resolveException(HttpServletRequest request,
- HttpServletResponse response, Object obj, Exception exception) {
- ModelAndView modelAndView = new ModelAndView();
- modelAndView.addObject("error","异常");
- //设置错误跳转页面位置
- modelAndView.setViewName("error/error");
- return modelAndView;
- }
- }
3.在controller方法中必须要有异常throws
- @RequestMapping(value="items.do")
- public String listItems(Model model) throws Exception {
- int i = 1 / 0;
- List<Items> list = itemService.list();
- model.addAttribute("list", list);
- return "list";
- }
五:拦截器的使用
1.首先说明:配置多个拦截器时拦截器的执行顺序
preHandle按拦截器定义顺序调用 1 2
postHandler按拦截器定义逆序调用 2 1
afterCompletion按拦截器定义逆序调用 2 1
postHandler在拦截器链内所有拦截器返成功调用
afterCompletion只有preHandle返回true才调用
2.编写自定义拦截器的类
- package com.ssm.common.interceptor;
- import javax.servlet.http.HttpServletRequest;
- import javax.servlet.http.HttpServletResponse;
- import org.springframework.web.servlet.HandlerInterceptor;
- import org.springframework.web.servlet.ModelAndView;
- /**
- * 自定义拦截器类
- *
- * @author Administrator
- *
- */
- public class CustomInterceptor implements HandlerInterceptor {
- /**
- * 页面渲染之后执行的方法
- */
- @Override
- public void afterCompletion(HttpServletRequest arg0,
- HttpServletResponse arg1, Object arg2, Exception arg3)
- throws Exception {
- // TODO Auto-generated method stub
- }
- /**
- * 执行handler之后的方法
- */
- @Override
- public void postHandle(HttpServletRequest arg0, HttpServletResponse arg1,
- Object arg2, ModelAndView arg3) throws Exception {
- }
- /**
- * 执行Handler之前执行的方法
- */
- @Override
- public boolean preHandle(HttpServletRequest request,
- HttpServletResponse response, Object obj) throws Exception {
- // 设置路径为 /login.do的不拦截
- String uri = request.getRequestURI();
- if(uri.indexOf("login") != -1){
- return true;
- }else{
- //判断用户是否登录
- Object obje = request.getSession().getAttribute("USER_NAME");
- if(obje != null){
- return true;
- }else{
- //重定向到登录页面
- response.sendRedirect(request.getContextPath() + "/login.do");
- return false;
- }
- }
- }
- }
3.在springmvc核心配置文件中配置拦截器
- <!-- 配置springmvc拦截器 -->
- <mvc:interceptors>
- <!-- 可配置多个拦截器 -->
- <mvc:interceptor>
- <!-- 配置当前拦截器的拦截规则 /*/** 表示拦截WEB-INF下的所有文件下的所有扩展名的文件 -->
- <mvc:mapping path="/*/**"/>
- <!-- 执行拦截方法的类 -->
- <bean class="com.ssm.common.interceptor.CustomInterceptor"></bean>
- </mvc:interceptor>
- </mvc:interceptors>
4.编写登录的Controller层代码
- package com.ssm.controller;
- import javax.servlet.http.HttpServletRequest;
- import org.springframework.stereotype.Controller;
- import org.springframework.web.bind.annotation.RequestMapping;
- import org.springframework.web.bind.annotation.RequestMethod;
- /**
- * 登录控制层
- * @author Administrator
- *
- */
- @Controller
- public class LoginController {
- //去登录页面
- @RequestMapping(value = "/login.do", method = RequestMethod.GET)
- public String toLogin(){
- return "login";
- }
- //提交登录的方法
- @RequestMapping(value = "/login.do", method = RequestMethod.POST)
- public String login(HttpServletRequest request){
- request.getSession().setAttribute("USER_NAME", "已登录");
- return "redirect:/items.do";
- }
- }


 2395
2395

 被折叠的 条评论
为什么被折叠?
被折叠的 条评论
为什么被折叠?
 到【灌水乐园】发言


