本文包括以下三个部分:
- 模拟Struts2框架,了解基本原理。
- Struts2的开发步骤。
- Struts2的配置详解
一、模拟Struts2框架,了解基本原理
在学习Struts2框架以前,我们一直采用servlet进行网站的开发。最开始是一个功能使用一个servlet程序;后来创建BaseServlet进行简化,可以实现一个模块使用一个servlet程序;为了开发更加快捷,代码更加简洁,达到一个项目只使用一个servlet程序的目的,我们可以模拟一个简易的Struts2框架,并在此基础上了解Struts2的基本原理。
具体步骤如下:
1、创建一个模拟用户等录和注册的项目。
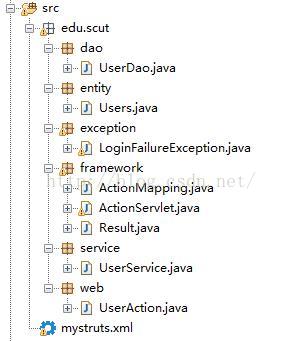
2、编写entity包代码。
User.Java
- package edu.scut.entity;
- //用户
- public class Users {
- private int id;
- private String name;
- private String password;
- public int getId() {
- return id;
- }
- public void setId(int id) {
- this.id = id;
- }
- public String getName() {
- return name;
- }
- public void setName(String name) {
- this.name = name;
- }
- public String getPassword() {
- return password;
- }
- public void setPassword(String password) {
- this.password = password;
- }
- public Users() {
- super();
- // TODO Auto-generated constructor stub
- }
- public Users(int id, String name, String password) {
- super();
- this.id = id;
- this.name = name;
- this.password = password;
- }
- @Override
- public String toString() {
- return "Users [id=" + id + ", name=" + name + ", password=" + password
- + "]";
- }
-
- }
3、编写dao层代码。
UserDao.java
- package edu.scut.dao;
- import edu.scut.entity.Users;
- public class UserDao {
-
- public Users findByName(String name){
- Users users = null;
-
- if("jack".equals(name)){
- users = new Users(1,"jack","666666");
- }
- return users;
- }
-
-
- public void addUser(Users users){
- System.out.println("注册成功! "+users);
- }
- }
4、编写service层代码。
UserService.java
- package edu.scut.service;
-
- import edu.scut.dao.UserDao;
- import edu.scut.entity.Users;
- import edu.scut.exception.LoginFailureException;
-
- public class UserService {
- UserDao userDao = new UserDao();
- //登录
- public Users Login(Users users) throws LoginFailureException{
- Users loginUsers = userDao.findByName(users.getName());
-
- //判断name
- if(loginUsers == null){
- throw new LoginFailureException("用户不存在!");
- }
-
- //判断密码
- if(!loginUsers.getPassword().equals(users.getPassword())){
- throw new LoginFailureException("密码错误!");
- }
-
- return loginUsers;
- }
-
- //注册
- public void Reg(Users users){
- userDao.addUser(users);
- }
- }
5、编写exception包代码。
LoginFailureException.java
- package edu.scut.exception;
-
- public class LoginFailureException extends Exception {
-
- public LoginFailureException() {
- super();
- // TODO Auto-generated constructor stub
- }
-
- public LoginFailureException(String message, Throwable cause) {
- super(message, cause);
- // TODO Auto-generated constructor stub
- }
-
- public LoginFailureException(String message) {
- super(message);
- // TODO Auto-generated constructor stub
- }
-
- public LoginFailureException(Throwable cause) {
- super(cause);
- // TODO Auto-generated constructor stub
- }
-
- }
6、编写web层代码。
UserAction.java
- package edu.scut.web;
-
- import java.io.IOException;
-
- import javax.servlet.ServletException;
- import javax.servlet.http.HttpServletRequest;
- import javax.servlet.http.HttpServletResponse;
-
- import edu.scut.entity.Users;
- import edu.scut.exception.LoginFailureException;
- import edu.scut.service.UserService;
-
-
- public class UserAction {
- UserService userService = new UserService();
-
- public String login(HttpServletRequest request, HttpServletResponse response)
- throws ServletException, IOException {
- String name = request.getParameter("name");
- String password = request.getParameter("password");
-
-
- Users users = new Users();
- users.setName(name);
- users.setPassword(password);
-
- try {
-
- Users loginUsers = userService.Login(users);
-
-
- request.getSession().setAttribute("loginInfo", loginUsers);
-
-
- return "success";
-
- } catch (LoginFailureException e) {
-
- request.setAttribute("msg", e.getMessage());
- return "fail";
- }
-
- }
-
-
- public String reg(HttpServletRequest request, HttpServletResponse response)
- throws ServletException, IOException {
-
- String name = request.getParameter("name");
- String password = request.getParameter("password");
-
-
- Users users = new Users();
- users.setName(name);
- users.setPassword(password);
-
-
- userService.Reg(users);
-
-
- request.setAttribute("regSuc", "注册成功,请登录!");
-
-
- return "success";
-
- }
- }
7、编写配置文件mystruts.xml。
mystruts.xml
- <?xml version="1.0" encoding="UTF-8"?>
- <struts>
-
- <!-- name:请求名称
- class:执行的操作类类名
- method:执行操作类的方法
- -->
- <action name="userLogin" className="edu.scut.web.UserAction" method="login">
- <result name="fail" type="dispatcher">/login.jsp</result>
- <result name="success" type="redirect">/index.jsp</result>
- </action>
-
-
- <action name="userReg" className="edu.scut.web.UserAction" method="reg" >
- <result name="success" type="dispatcher">/login.jsp</result>
- </action>
- </struts>
8、编写framework包代码。
8.1、编写Action的映射类即,ActionMapping.java
- package edu.scut.framework;
-
- import java.util.List;
-
-
- public class ActionMapping {
- private String name;
- private String className;
- private String method;
- private List<Result> results;
-
- public List<Result> getResults() {
- return results;
- }
- public void setResults(List<Result> results) {
- this.results = results;
- }
- public String getName() {
- return name;
- }
- public void setName(String name) {
- this.name = name;
- }
- public String getClassName() {
- return className;
- }
- public void setClassName(String className) {
- this.className = className;
- }
- public String getMethod() {
- return method;
- }
- public void setMethod(String method) {
- this.method = method;
- }
-
-
- }
8.2、创建结果视图的类,即Result.java
- package edu.scut.framework;
-
- public class Result {
- private String name;
- private String type;
- private String path;
- public String getName() {
- return name;
- }
- public void setName(String name) {
- this.name = name;
- }
- public String getType() {
- return type;
- }
- public void setType(String type) {
- this.type = type;
- }
- public String getPath() {
- return path;
- }
- public void setPath(String path) {
- this.path = path;
- }
- }
8.3、编写ActionServlet.java,读取配置文件:mystruts.xml,UserAction的访问,以及结果视图的跳转。
- package edu.scut.framework;
-
- import java.io.IOException;
- import java.io.PrintWriter;
- import java.lang.reflect.Method;
- import java.util.ArrayList;
- import java.util.HashMap;
- import java.util.List;
- import java.util.Map;
-
- import javax.management.RuntimeErrorException;
- import javax.servlet.ServletException;
- import javax.servlet.http.HttpServlet;
- import javax.servlet.http.HttpServletRequest;
- import javax.servlet.http.HttpServletResponse;
-
- import org.dom4j.Document;
- import org.dom4j.DocumentException;
- import org.dom4j.Element;
- import org.dom4j.io.SAXReader;
-
- import com.sun.org.apache.xml.internal.dtm.ref.sax2dtm.SAX2RTFDTM;
- import com.sun.org.apache.xml.internal.resolver.helpers.FileURL;
-
- import edu.scut.web.UserAction;
-
- public class ActionServlet extends HttpServlet {
-
-
- Map<String, ActionMapping> actionMappings = null;
- @Override
- public void init() throws ServletException {
-
- actionMappings = new HashMap<String, ActionMapping>();
-
- try {
-
- SAXReader reader = new SAXReader();
-
- Document doc = reader.read(ActionServlet.class.getResourceAsStream("/mystruts.xml"));
-
- Element root = doc.getRootElement();
-
- List<Element> actionElements = (List<Element>)root.selectNodes("//action");
-
-
- for (Element actionElement : actionElements) {
-
- String name = actionElement.attributeValue("name");
- String className = actionElement.attributeValue("className");
- String method = actionElement.attributeValue("method");
-
-
- ActionMapping actionMapping = new ActionMapping();
- actionMapping.setName(name);
- actionMapping.setClassName(className);
- actionMapping.setMethod(method);
-
-
- List<Element> resultElements = actionElement.elements("result");
-
-
- List<Result> resultList = new ArrayList<Result>();
-
-
- for (Element resultElement : resultElements) {
-
- String resName = resultElement.attributeValue("name");
- String resType = resultElement.attributeValue("type");
- String resPath = resultElement.getText();
-
-
- Result result = new Result();
- result.setName(resName);
- result.setType(resType);
- result.setPath(resPath);
-
-
- resultList.add(result);
- }
-
-
- actionMapping.setResults(resultList);
-
-
- actionMappings.put(name, actionMapping);
-
- System.out.println("mystruts.xml文件加载完毕!");
- }
-
- } catch (DocumentException e) {
-
- System.out.println("配置文件加载失败!");
- throw new RuntimeException("配置文件读取失败!");
- }
- }
-
- public void doGet(HttpServletRequest request, HttpServletResponse response)
- throws ServletException, IOException {
-
-
- String uri = request.getRequestURI();
-
-
- String pathName = uri.substring(uri.lastIndexOf("/")+1, uri.lastIndexOf(".action"));
-
-
- ActionMapping actionMapping = actionMappings.get(pathName);
-
-
- String FURL = null;
- try {
-
- String className = actionMapping.getClassName();
-
-
-
- Class clazz = Class.forName(className);
-
- Object actionClass = clazz.newInstance();
-
-
- String method = actionMapping.getMethod();
- Method m = clazz.getDeclaredMethod(method, HttpServletRequest.class,HttpServletResponse.class);
-
-
- FURL = (String) m.invoke(actionClass, request,response);
-
- } catch (Exception e) {
-
- e.printStackTrace();
- }
-
-
- List<Result> results = actionMapping.getResults();
-
- for (Result result : results) {
- if(FURL.equals(result.getName())){
-
- String type = result.getType();
-
- String path = result.getPath();
-
-
- if(type.equals("dispatcher")){
-
- request.getRequestDispatcher(path).forward(request, response);
- }else if(type.equals("redirect")){
-
- response.sendRedirect(request.getContextPath()+path);
- }
-
- }
- }
-
-
-
-
-
-
-
-
-
-
-
- }
-
-
- public void doPost(HttpServletRequest request, HttpServletResponse response)
- throws ServletException, IOException {
-
- doGet(request, response);
- }
-
- }
9、配置ActionServlet.java的访问路径。
web.xml
- <servlet>
- <servlet-name>ActionServlet</servlet-name>
- <servlet-class>edu.scut.framework.ActionServlet</servlet-class>
- </servlet>
- <servlet-mapping>
- <servlet-name>ActionServlet</servlet-name>
- <url-pattern>*.action</url-pattern>
- </servlet-mapping>
10、登录、注册和主页的jsp。
login.jsp:
- <body>
- <font color="red">${msg}</font>
- <form action="${pageContext.request.contextPath }/userLogin.action" method="post">
- <%--<form action="${pageContext.request.contextPath }/users?action=login" method="post">--%>
- 用户名:<input type="text" name="name"><br>
- 密码:<input type="password" name="password"><br>
- <input type="submit" value="登录"/>
- </form>
- </body>
reg.jsp:
- <body>
- <form action="${pageContext.request.contextPath }/userReg.action" method="post">
- <%-- <form action="${pageContext.request.contextPath }/users?action=reg" method="post">--%>
- 用户名:<input type="text" name="name"><br>
- 密码:<input type="password" name="password"><br>
- <input type="submit" value="注册"/>
- </form>
- </body>
index.jsp:
- <body>
- 欢迎您,用户名:${sessionScope.loginInfo.name }
- </body>
11、访问。
注册:http://localhost:8080/day27_01_mystruts2_test/reg.jsp
登录:http://localhost:8080/day27_01_mystruts2_test/login.jsp
访问之后的执行过程:
a. 创建ActionServlet实例;
b. 调用ActionServlet的init()方法;
c. 加载mystruts.xml配置文件,根据action的name找到对应的action,用反射的方式,创建UserAction的实例,再根据method的名称调用UserAction的同名方法;
d. 根据方法的返回值和result标签的name属性,找到result,实现页面跳转。
二、Struts2的开发步骤
1、导jar包。8个jar包。
2、配置struts2的核心过滤器。注意:在web.xml文件中配置,该核心过滤器用于处理项目的所有请求。
- <filter>
- <filter-name>struts2</filter-name>
- <filter-class>org.apache.struts2.dispatcher.ng.filter.StrutsPrepareAndExecuteFilter</filter-class>
- </filter>
- <filter-mapping>
- <filter-name>struts2</filter-name>
- <url-pattern>/*</url-pattern>
- </filter-mapping>
3、编写操作类。
- package edu.scut.web;
- //用户操作类,表现层
- public class UserAction {
- //构造方法
- public UserAction(){
- System.out.println("useraction对象创建了!");
- }
-
- //userLogin.action
- //登录方法
- public String login(){
- System.out.println("登录成功!");
- return "success";
- }
-
- //userReg.action
- public String reg(){
- System.out.println("注册成功!");
- return "success";
- }
-
- }
4、编写struts2的业务配置文件。 注意:名称一定为struts.xml,位置一定放在src目录下。
- <?xml version="1.0" encoding="UTF-8"?>
- <!DOCTYPE struts PUBLIC
- "-//Apache Software Foundation//DTD Struts Configuration 2.3//EN"
- "http://struts.apache.org/dtds/struts-2.3.dtd">
- <struts>
- <package name="user" extends="struts-default" namespace="/user">
-
- <action name="userLogin" class="edu.scut.web.UserAction" method="login">
- <result name="success" type="redirect">/index.jsp</result>
- </action>
-
- <action name="userReg" class="edu.scut.web.UserAction" method="reg">
- <result name="success">/index.jsp</result>
- </action>
- </package>
- </struts>
Struts2的执行过程:
a. 项目启动时:
1)加载web.xml文件,创建org.apache.struts2.dispatcher.ng.filter.StrutsPrepareAndExecuteFilter核心过滤器对象
2)调用核心过滤器中的init方法
2.1 读取default.properties 【struts2的默认常量文件】
(struts2-core.jar: /org/apache/struts2/default.properties)
2.2 读取struts-default.xml 【struts2的默认核心配置文件】
(struts2-core.jar:/struts-default.xml)
2.3 读取struts-plugin.xml 【struts2的插入配置文件】
(一般不会用到)
2.4 读取struts.xml 【struts2的业务配置文件,开发时经常修改】
(项目的src:struts.xml)
b. 发出请求:
1)根据请求名称,在struts.xml文件中对应的action标签(根据action的name属性值)
2)查找结果
失败:
如果没有匹配成功,则页面抛出There is no Action mapped 异常
成功:
2.1 根据action标签的class的字符串去创建一个Action(操作)类实例
2.2 根据action标签的method去调用Action类里面对应的方法
2.3 执行完操作方法后,返回一个视图标记的字符串
3)根据视图标记字符串在当前action标签中查找对应的result标签(根据result的name属性值)
4)找到对应的result,则跳转到对应的页面
三、Struts2的配置详解
1、struts-default.xml : struts2的核心默认配置文件
第一部分:创建struts2框架自身需要的对象
<bean class="com.opensymphony.xwork2.ObjectFactory" name="xwork" />
。。。。。。
第二部分:一个默认包
<package name="struts-default" abstract="true">
name: 包名称
abstract: 抽象包
1) 定义struts2支持的视图类型
<result-types>
<result-type name="chain" class="com.opensymphony.xwork2.ActionChainResult"/>
。。。。。
常用的视图类型:
dispatcher: 转发到页面 (默认类型) (可以通过request带数据)
redirect:重定向到页面
chain:转发到其他Action (可以通过request带数据)
redirectAction:重定向到其他Action
stream: 以流的形式进行输出 (用于文件下载)
plainText:以纯文本方法进行输出 (ajax技术)
2) 定义了struts2的支持的拦截器
<interceptors>
<interceptor name="alias" class="com.opensymphony.xwork2.interceptor.AliasInterceptor"/>
。。。。。。
struts2除了基本功能以外,还提供了如下实用功能:
传递页面参数数据
文件上传
国际化
数据共享
类型转换
表单数据校验
....
拦截器只能拦截action
过滤器可以拦截任何请求
3)定义了默认的拦截器栈
<interceptor-stack name="basicStack">
拦截栈中包含多个拦截器
4)定义当前包使用的默认拦截器
<default-interceptor-ref name="defaultStack"/>
当前包下的所有action都可以使用该拦截器栈下的所有拦截器
5)定义当前包的默认操作类
<default-class-ref class="com.opensymphony.xwork2.ActionSupport" />
当前包下的action如果不写class就使用默认类
2、 struts.xml: 业务配置文件
<package>:区分不用的action
name:包名。通常不同的包使用不同的名称(如果同名则报错)
extends:当前包的父包的包名。通常为struts-default默认包,继承了struts-default默认包就可以使用该包下定义的元素。
namespace: 名称空间(命名空间),为了区分不同包的访问路径。
注意:
有了namespace后,action的访问路径必须带上namespace。
<action> : 操作配置
name(必须): 请求名称,通常同一个包下不要出现同名的action。
class(可选): 操作类的全名(包+类名),默认类:com.opensymphony.xwork2.ActionSupport。
method(可选): 执行的操作方法,默认方法:execute。
<result> : 视图
name: 视图名称。跟操作方法返回的字符串匹配, 默认值:success。(其他名称都需要写)
type:视图类型, 默认值:dispatcher。
内容:跳转路径,如果是页面必须带斜杠,如果是action不需要。(没有默认值)


 751
751


 被折叠的 条评论
为什么被折叠?
被折叠的 条评论
为什么被折叠?
 到【灌水乐园】发言


