笔者介绍:姜雪伟,IT公司技术合伙人,IT高级讲师,CSDN社区专家,特邀编辑,畅销书作者,国家专利发明人;
已出版书籍:《手把手教你架构3D游戏引擎》电子工业出版社 和《Unity3D实战核心技术详解》电子工业出版社等。
3D核心模块是Cocos2D-x引擎中非常重要的,并且是与开发者交互最多的模块,游戏大部分逻辑的编写都与3D模块有关。先把该3D核心模块的架构展示如下图:
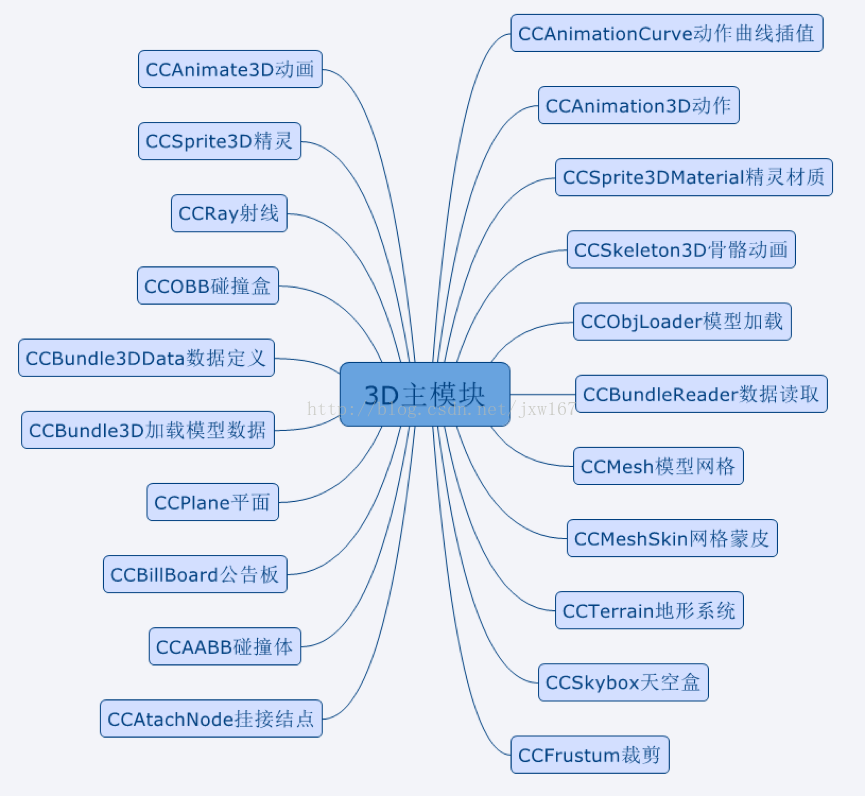
图中列出了3D核心模块的各个子模块组成,接下来把游戏编写逻辑经常使用的子模块给读者介绍,文中没有介绍到的子模块开发者可自行学习。
游戏中常用的天空盒一般分为三类:立方体、半球体、以及动态生成的天空盒,对于程序实现的难易度来说,立方体天空盒实现起来最容易,而Cocos2D-x引擎实现的就是立方体天空盒。CCSkybox子模块的实现原理是:使用六张贴图围成一个立方体盒子,官方提供了实现立方体天空盒的Demo,这六张贴图在Cocos2D-x引擎的Resources文件下有个sky文件夹,在其中有六张贴图,六张贴图之间是无缝拼接的,它的制作可以通过PhotoShop工具实现的,下面通过代码介绍它的实现过程,引擎创建天空盒函数如下所示:
- Skybox* Skybox::create(const std::string& positive_x, const std::string& negative_x,
- const std::string& positive_y, const std::string& negative_y,
- const std::string& positive_z, const std::string& negative_z)
- {
- auto ret = new (std::nothrow) Skybox();
- ret->init(positive_x, negative_x, positive_y, negative_y, positive_z, negative_z);
-
- ret->autorelease();
- return ret;
- }
开发者写逻辑时只需要调用该函数即可,在函数中设置了六个字符串参数用于加载六副贴图的路径,函数首先做的事情是初始化六张贴图,函数调用了Skybox类的init函数初始化,为了弄清楚它的实现,继续深入代码查看,init函数实现如下所示:
- bool Skybox::init(const std::string& positive_x, const std::string& negative_x,
- const std::string& positive_y, const std::string& negative_y,
- const std::string& positive_z, const std::string& negative_z)
- {
- auto texture = TextureCube::create(positive_x, negative_x, positive_y, negative_y, positive_z, negative_z);
- if (texture == nullptr)
- return false;
-
- init();
- setTexture(texture);
- return true;
- }
在init函数中调用了TextureCube类的Create函数用于生成立方体纹理,创建立方体天空盒。再进入到TextureCube类的内部函数实现如下所示:
- TextureCube* TextureCube::create(const std::string& positive_x, const std::string& negative_x,const std::string& positive_y, const std::string& negative_y,
- const std::string& positive_z, conststd::string& negative_z)
- {
- auto ret = new (std::nothrow) TextureCube();
- if (ret && ret->init(positive_x, negative_x, positive_y, negative_y, positive_z, negative_z))
- {
- ret->autorelease();
- return ret;
- }
- CC_SAFE_DELETE(ret);
- return nullptr;
- }
在create函数中继续调用init函数进行初始化,在这里也是告诉读者,引擎各个模块类的代码实现方式是类似的,这需要制定一个架构供引擎开发者按照这个框架模式编写代码,而不是每个人根据自己的想法随意搞一套,导致引擎的代码不利于维护,继续分析init函数内容如下所示。
- bool TextureCube::init(const std::string& positive_x, const std::string& negative_x,
- const std::string& positive_y, const std::string& negative_y,
- const std::string& positive_z, const std::string& negative_z)
- {
- _imgPath[0] = positive_x;
- _imgPath[1] = negative_x;
- _imgPath[2] = positive_y;
- _imgPath[3] = negative_y;
- _imgPath[4] = positive_z;
- _imgPath[5] = negative_z;
-
- std::vector<Image*> images(6);
-
- images[0] = createImage(positive_x);
- images[1] = createImage(negative_x);
- images[2] = createImage(positive_y);
- images[3] = createImage(negative_y);
- images[4] = createImage(positive_z);
- images[5] = createImage(negative_z);
-
- GLuint handle;
- glGenTextures(1, &handle);
-
- GL::bindTextureN(0, handle, GL_TEXTURE_CUBE_MAP);
-
- for (int i = 0; i <6; i++)
- {
- Image* img = images[i];
-
- Texture2D::PixelFormat ePixelFmt;
- unsigned char* pData = getImageData(img, ePixelFmt);
- if (ePixelFmt == Texture2D::PixelFormat::RGBA8888 || ePixelFmt == Texture2D::PixelFormat::DEFAULT)
- {
- glTexImage2D(GL_TEXTURE_CUBE_MAP_POSITIVE_X + i,
- 0,
- GL_RGBA,
- img->getWidth(),
- img->getHeight(),
- 0,
- GL_RGBA,
- GL_UNSIGNED_BYTE,
- pData);
- }
- else if (ePixelFmt == Texture2D::PixelFormat::RGB888)
- {
- glTexImage2D(GL_TEXTURE_CUBE_MAP_POSITIVE_X + i,
- 0,
- GL_RGB,
- img->getWidth(),
- img->getHeight(),
- 0,
- GL_RGB,
- GL_UNSIGNED_BYTE,
- pData);
- }
-
- if (pData != img->getData())
- delete[] pData;
- }
-
- glTexParameteri(GL_TEXTURE_CUBE_MAP, GL_TEXTURE_MAG_FILTER, GL_LINEAR);
- glTexParameteri(GL_TEXTURE_CUBE_MAP, GL_TEXTURE_MIN_FILTER, GL_LINEAR);
- glTexParameteri(GL_TEXTURE_CUBE_MAP, GL_TEXTURE_WRAP_S, GL_CLAMP_TO_EDGE);
- glTexParameteri(GL_TEXTURE_CUBE_MAP, GL_TEXTURE_WRAP_T, GL_CLAMP_TO_EDGE);
-
- _name = handle;
-
- GL::bindTextureN(0, 0, GL_TEXTURE_CUBE_MAP);
-
- for (auto img: images)
- {
- CC_SAFE_RELEASE(img);
- }
-
- return true;
- }
函数的实现是将加载到的六张贴图通过OpenGL将它们拼接并绘制出来。在绘制天空盒时,需要设置贴图格式,从而避免贴图之间有较大的缝隙。
函数是在引擎内部实现的天空盒绘制,除了C++的编写,还需要在Shader中对顶点着色器和片段着色器的编写。在实际逻辑编写时,可充分利用Shader编程实现天空盒,在Cocos2d-x引擎中有顶点着色器和片段着色器用于天空盒的创建。以下是引擎实现天空盒的Shader代码,首先介绍天空盒的顶点着色器。文件cube_map.vert是天空盒顶点着色器,内容如下所示:
- attribute vec4 a_position;
- attribute vec3 a_normal;
-
- varying vec3 v_reflect;
-
- void main(void)
- {
- gl_Position = CC_MVPMatrix * a_position;
-
-
- vec4 positionWorldViewSpace = CC_MVMatrix * a_position;;
- vec3 vEyeVertex = normalize(positionWorldViewSpace.xyz);
-
- vec3 v_normalVector = CC_NormalMatrix * a_normal;
- v_reflect = normalize(reflect(-vEyeVertex, v_normalVector));
- }
顶点着色器主要是对天空盒立方体点的变换,将天空盒立方体的点通过模型、视口、投影矩阵将它们转换到投影空间,还需要计算摄像机朝向天空盒的方向,以及计算它们的反射,对于计算得到的反射参数,会传递给片段着色器文件中。文件cube_map.frag
是天空盒的片段着色器,内容如下所示:
- #ifdef GL_ES
- precision mediump float;
- #endif
-
- varying vec3 v_reflect;
- uniform samplerCube u_cubeTex;
- uniform vec4 u_color;
-
- void main(void)
- {
- gl_FragColor = textureCube(u_cubeTex, v_reflect) * u_color;
- }
着色器通过textureCube函数计算获取颜色值,它的计算使用了v_reflect参数,它是通过顶点着色器传递过来的。以上两个Shader文件实现了天空盒的顶点着色器和片段着色器代码,接下来告诉读者如何在编写逻辑时调用该Shader代码,以下代码块是创建天空盒代码如下所示。
-
-
- auto shader = GLProgram::createWithFilenames("Sprite3DTest/cube_map.vert",
- "Sprite3DTest/cube_map.frag");
- auto state = GLProgramState::create(shader);
-
-
- _textureCube = TextureCube::create("Sprite3DTest/skybox/left.jpg",
- "Sprite3DTest/skybox/right.jpg",
- "Sprite3DTest/skybox/top.jpg",
- "Sprite3DTest/skybox/bottom.jpg",
- "Sprite3DTest/skybox/front.jpg",
- "Sprite3DTest/skybox/back.jpg");
-
- Texture2D::TexParams tRepeatParams;
- tRepeatParams.magFilter = GL_LINEAR;
- tRepeatParams.minFilter = GL_LINEAR;
- tRepeatParams.wrapS = GL_MIRRORED_REPEAT;
- tRepeatParams.wrapT = GL_MIRRORED_REPEAT;
- _textureCube->setTexParameters(tRepeatParams);
-
-
- state->setUniformTexture("u_cubeTex", _textureCube);
-
-
- _skyBox = Skybox::create();
- _skyBox->setCameraMask(s_CM[LAYER_BACKGROUND]);
- _skyBox->setTexture(_textureCube);
- _skyBox->setScale(700.f);
实现思路:先加载天空盒的渲染
Shader
文件,再加载天空盒的六张贴图,并将其赋值给
_textureCube
传递给片段着色器中功能,为了方便其他程序调用,可将上述代码块封装在一个函数中专用于天空盒的创建实现,下面给读者展示官方提供的天空盒丝线效果
图:

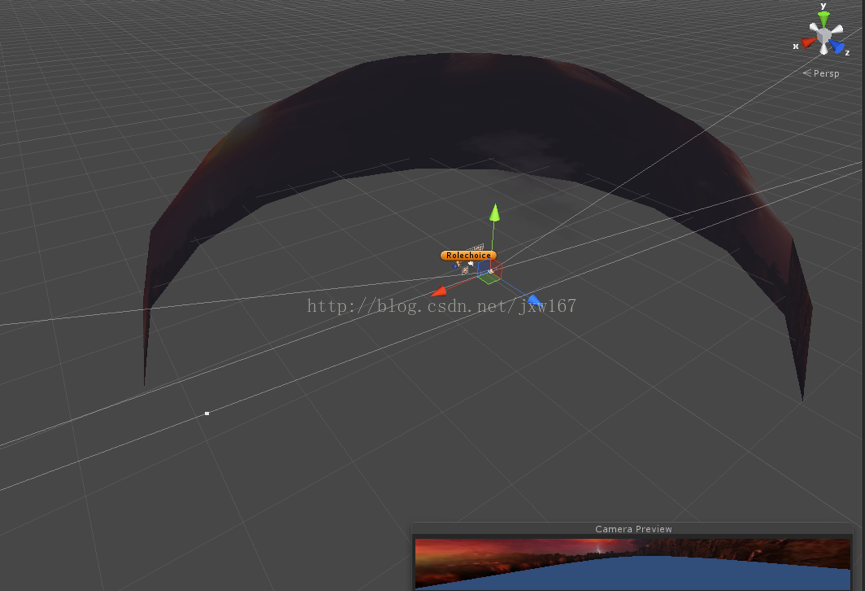
接下来再介绍创建球状天空盒,相对立方体天空盒来说比较繁琐,通常的做法是美术制作一个半球状天空盒,当然也可以通过程序实现,在这里把实现的效果给读者展示如下图
以上是关于天空盒的分享,希望对你有所帮助。
本文转自~http://blog.csdn.net/jxw167/article/details/54173055


 835
835


 被折叠的 条评论
为什么被折叠?
被折叠的 条评论
为什么被折叠?
 到【灌水乐园】发言


