


Windows GUI采用基于事件驱动的编程模型,事实上几乎所有的界面库都是这样做的。在纯粹的Window32 SDK编程时代,人们还可以搞懂整个Windows窗体创建和消息的流通过程,但是在现在各种框架的包装下很多在Window32 SDK下很明显易懂的东西显得不是那么简单了。本文力图去繁求简,教你看懂所有框架的基本构造,而事实上对于了解这一切的人来说,这些界面框架的设计都是如出一辙的,希望看完本文,再去看常见的MFC/WTL等框架时,不会再觉得有任何的不适。
C程序的处理办法
1.基本原理
先说古老的Win32 SDK的做法,他们很明显,这里还是先贴上代码,为了缩减篇幅很多地方我就省略了
- int WINAPI WinMain (HINSTANCE hInstance, HINSTANCE hPrevInstance, PSTR szCmdLine, int iCmdShow)
- {
- static TCHAR szAppName[] = TEXT ("TestClass");
- HWND hwnd;
- MSG msg;
- WNDCLASSEX wndclassex = {0};
- //1.设计窗口类
- wndclassex.cbSize = sizeof(WNDCLASSEX);
- wndclassex.style = CS_HREDRAW | CS_VREDRAW;
- wndclassex.lpfnWndProc = WndProc ...
- //2.注册窗口类
- if (!RegisterClassEx (&wndclassex))
- {
- MessageBox (NULL, TEXT ("RegisterClassEx failed!"), szAppName, MB_ICONERROR);
- return 0;
- }
- //3.创建窗口
- hwnd = CreateWindowEx (WS_EX_OVERLAPPEDWINDOW,
- szAppName,
- ...
- //4.显示窗口
- ShowWindow (hwnd, iCmdShow);
- UpdateWindow (hwnd);
- //5.开始消息循环,又称消息泵
- while (GetMessage (&msg, NULL, 0, 0))
- {
- TranslateMessage (&msg);
- DispatchMessage (&msg);
- }
- return msg.wParam;
- }
- //回调函数中做消息分发
- LRESULT CALLBACK WndProc (HWND hwnd, UINT message, WPARAM wParam, LPARAM lParam)
- {
- HDC hdc;
- PAINTSTRUCT ps;
- //分发
- switch (message)
- {
- case WM_CREATE:
- return (0);
- case WM_PAINT:
- ...
- return (0);
- case WM_DESTROY:
- PostQuitMessage (0);
- return (0);
- }
- //默认处理函数
- return DefWindowProc (hwnd, message, wParam, lParam);
- }
int WINAPI WinMain (HINSTANCE hInstance, HINSTANCE hPrevInstance, PSTR szCmdLine, int iCmdShow)
{
    static TCHAR szAppName[] = TEXT ("TestClass");
    HWND         hwnd;
    MSG          msg;
    WNDCLASSEX   wndclassex = {0};

	//1.设计窗口类
    wndclassex.cbSize        = sizeof(WNDCLASSEX);
    wndclassex.style         = CS_HREDRAW | CS_VREDRAW;
    wndclassex.lpfnWndProc   = WndProc ...

	//2.注册窗口类
    if (!RegisterClassEx (&wndclassex))
    {
        MessageBox (NULL, TEXT ("RegisterClassEx failed!"), szAppName, MB_ICONERROR);
        return 0;
    }

	//3.创建窗口
    hwnd = CreateWindowEx (WS_EX_OVERLAPPEDWINDOW,
		                  szAppName,
        		          ...

	//4.显示窗口
    ShowWindow (hwnd, iCmdShow);
    UpdateWindow (hwnd);

	//5.开始消息循环,又称消息泵
    while (GetMessage (&msg, NULL, 0, 0))
    {
        TranslateMessage (&msg);
        DispatchMessage (&msg);
    }
    return msg.wParam;
}

//回调函数中做消息分发
LRESULT CALLBACK WndProc (HWND hwnd, UINT message, WPARAM wParam, LPARAM lParam)
{
    HDC hdc;
    PAINTSTRUCT ps;

	//分发
    switch (message)
    {
    case WM_CREATE:
        return (0);

    case WM_PAINT:
        ...
        return (0);

    case WM_DESTROY:
        PostQuitMessage (0);
        return (0);
    }

	//默认处理函数
    return DefWindowProc (hwnd, message, wParam, lParam);
}
创建一个窗口和显示可称为InitInstance,即初始化一个Windows 应用实例所需要做的工作,对每个窗体来说这都是唯一的,可做定制化修改。
开启消息泵可称为Run,一单消息泵开启,意味着一个程序开始接受消息和分发消息,整个应用程序算是开始运行了。
在WndProc中做的是判断对应的消息,然后做对应的处理工作。
2.改进窗口创建
可以看到,最原始的Win32 SDK编程完全是面向过程编程创建,比较繁琐,为了简化编写,可在VS2008里面打开新建一个Win32 程序可以看到代码如下:
- // 1.设计和注册消息类
- ...
- MyRegisterClass(hInstance);
- // 2.执行应用程序初始化:
- if (!InitInstance (hInstance, nCmdShow))
- {
- return FALSE;
- }
- hAccelTable = LoadAccelerators(hInstance, MAKEINTRESOURCE(IDC_WIN321));
- // 3.主消息循环:
- while (GetMessage(&msg, NULL, 0, 0))
- {
- if (!TranslateAccelerator(msg.hwnd, hAccelTable, &msg))
- {
- TranslateMessage(&msg);
- DispatchMessage(&msg);
- }
- }
- return (int) msg.wParam;
	// 1.设计和注册消息类
	...
	MyRegisterClass(hInstance);

	// 2.执行应用程序初始化:
	if (!InitInstance (hInstance, nCmdShow))
	{
		return FALSE;
	}

	hAccelTable = LoadAccelerators(hInstance, MAKEINTRESOURCE(IDC_WIN321));

	// 3.主消息循环:
	while (GetMessage(&msg, NULL, 0, 0))
	{
		if (!TranslateAccelerator(msg.hwnd, hAccelTable, &msg))
		{
			TranslateMessage(&msg);
			DispatchMessage(&msg);
		}
	}

	return (int) msg.wParam;
可以看到按照在基本原理中讲的,这里微软的做法也一样, 按照三大部分封装到函数中,简化操作,InitApplication命名成了MyRegisterClass而已。
3.改进消息分发
前面讲了改进窗口创建,但是消息分发仍然是一团乱麻,所有的消息响应都塞在switch case中,这里我们自然想到和窗口创建一样,对应的处理分发到函数中。而事实上微软也确实是这么做的,微软提供了头文件WindowsX.h来帮助我们分发消息,具体如下:
- LRESULT CALLBACK WndProc(HWND hWnd, UINT message, WPARAM wParam, LPARAM lParam)
- {
- switch (message)
- {
- HANDLE_MSG(hWnd, WM_PAINT, Cls_OnPaint);
- HANDLE_MSG(hWnd, WM_DESTROY, Cls_OnDestroy);
- }
- return DefWindowProc(hWnd, message, wParam, lParam);
- }
- void Cls_OnPaint(HWND hwnd)
- {
- HDC hdc;
- PAINTSTRUCT ps;
- hdc = BeginPaint(hwnd, &ps);
- //...
- EndPaint(hwnd, &ps);
- }
- void Cls_OnDestroy(HWND hwnd)
- {
- PostQuitMessage(0);
- }
LRESULT CALLBACK WndProc(HWND hWnd, UINT message, WPARAM wParam, LPARAM lParam)
{
	switch (message)
	{
		HANDLE_MSG(hWnd, WM_PAINT, Cls_OnPaint);
		HANDLE_MSG(hWnd, WM_DESTROY, Cls_OnDestroy);
	}

	return DefWindowProc(hWnd, message, wParam, lParam);
}

void Cls_OnPaint(HWND hwnd)
{
	HDC hdc;
	PAINTSTRUCT ps;

	hdc = BeginPaint(hwnd, &ps);
	//...
	EndPaint(hwnd, &ps);
}

void Cls_OnDestroy(HWND hwnd)
{
	PostQuitMessage(0);
}- #define HANDLE_MSG(hwnd, message, fn) \
- case (message): return HANDLE_##message((hwnd), (wParam), (lParam), (fn))
#define HANDLE_MSG(hwnd, message, fn)    \
case (message): return HANDLE_##message((hwnd), (wParam), (lParam), (fn))可看到这里 借助宏来减少switch case代码的编写量,但实际代码内容是一样的。
实际上对话框的处理略有不同,如下:
- #define chHANDLE_DLGMSG(hwnd, message, fn) case (message): \
- return (SetDlgMsgResult(hwnd, uMsg, HANDLE_##message((hwnd), (wParam), (lParam), (fn))))
- INT_PTR CALLBACK Dlg_Proc(HWND hDlg, UINT message, WPARAM wParam, LPARAM lParam)
- {
- UNREFERENCED_PARAMETER(lParam);
- switch (message)
- {
- chHANDLE_DLGMSG(hwnd, WM_INITDIALOG, Dlg_OnInitDialog);
- chHANDLE_DLGMSG(hwnd, WM_COMMAND, Dlg_OnCommand);
- }
- return (INT_PTR)FALSE;
- }
#define chHANDLE_DLGMSG(hwnd, message, fn) case (message): \
	return (SetDlgMsgResult(hwnd, uMsg, HANDLE_##message((hwnd), (wParam), (lParam), (fn))))

INT_PTR CALLBACK Dlg_Proc(HWND hDlg, UINT message, WPARAM wParam, LPARAM lParam)
{
	UNREFERENCED_PARAMETER(lParam);
	switch (message)
	{
		chHANDLE_DLGMSG(hwnd, WM_INITDIALOG, Dlg_OnInitDialog);
		chHANDLE_DLGMSG(hwnd, WM_COMMAND,    Dlg_OnCommand);
	}

	return (INT_PTR)FALSE;
}C++程序的处理办法
在C++时代,人们提倡面向对象编程,对于窗口的创建和消息的分发响应都是窗口的行为,所以几乎所有的框架都是想办法把这两者封装在一起,这也是我们讲解的重点。对于C++程序我们先讲大框架,再讲窗口类封装。
1.MFC大框架
盗用侯捷先生一张图,MFC的基本层次结构如下:
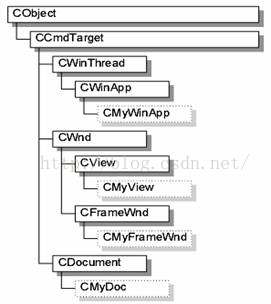
MFC将开启消息循环放到CWinThread中,将窗口注册、创建、消息分发响应均放到CWnd中处理,这样所有和窗口处理相关的都是由同一个类来完成,符合C++的封装特性,也便于使用。
VS安装完目录VC\atlmfc\src\mfc下有部分mfc源码,我们直接看微软的实现。
首先,入口文件appmodul.cpp中定义入口如下:
- extern "C" int WINAPI _tWinMain(HINSTANCE hInstance, HINSTANCE hPrevInstance, _In_ LPTSTR lpCmdLine, int nCmdShow)
- #pragma warning(suppress: 4985)
- {
- // call shared/exported WinMain
- return AfxWinMain(hInstance, hPrevInstance, lpCmdLine, nCmdShow);
- }
extern "C" int WINAPI _tWinMain(HINSTANCE hInstance, HINSTANCE hPrevInstance, _In_ LPTSTR lpCmdLine, int nCmdShow)
#pragma warning(suppress: 4985)
{
	// call shared/exported WinMain
	return AfxWinMain(hInstance, hPrevInstance, lpCmdLine, nCmdShow);
}
然后,在winmain.cpp查看定义AfxWinMain如下
- int AFXAPI AfxWinMain(HINSTANCE hInstance, HINSTANCE hPrevInstance, _In_ LPTSTR lpCmdLine, int nCmdShow)
- {
- ...
- // AFX internal initialization
- if (!AfxWinInit(hInstance, hPrevInstance, lpCmdLine, nCmdShow))
- goto InitFailure;
- // App global initializations (rare)
- if (pApp != NULL && !pApp->InitApplication())
- goto InitFailure;
- // Perform specific initializations
- if (!pThread->InitInstance())
- {
- ...
- }
- nReturnCode = pThread->Run();
- ...
- }
int AFXAPI AfxWinMain(HINSTANCE hInstance, HINSTANCE hPrevInstance, _In_ LPTSTR lpCmdLine, int nCmdShow)
{
	...

	// AFX internal initialization
	if (!AfxWinInit(hInstance, hPrevInstance, lpCmdLine, nCmdShow))
		goto InitFailure;

	// App global initializations (rare)
	if (pApp != NULL && !pApp->InitApplication())
		goto InitFailure;

	// Perform specific initializations
	if (!pThread->InitInstance())
	{
		...
	}
	nReturnCode = pThread->Run();

    ...
}
所以还是InitApplication、InitInstance、Run三大块,AfxWinInit用于做一些框架的初始化工作。
CWinApp::InitApplication在appcore.cpp中,和C程序略有不同,这里的工作主要是Doc模板管理器的初始化工作。
CThread::InitInstance虚函数会被用户改写,在这当中调用CWnd完成窗口的注册和创建,这个在之后一起讲
CThread::Run在thrdcore.cpp中,Run-》PumpMessage-》AfxInternalPumpMessage完成消息泵的开启,如下:
- BOOL AFXAPI AfxInternalPumpMessage()
- {
- _AFX_THREAD_STATE *pState = AfxGetThreadState();
- if (!::GetMessage(&(pState->m_msgCur), NULL, NULL, NULL))
- {
- ...
- return FALSE;
- }
- ...
- if (pState->m_msgCur.message != WM_KICKIDLE && !AfxPreTranslateMessage(&(pState->m_msgCur)))
- {
- ::TranslateMessage(&(pState->m_msgCur));
- ::DispatchMessage(&(pState->m_msgCur));
- }
- return TRUE;
- }
BOOL AFXAPI AfxInternalPumpMessage()
{
	_AFX_THREAD_STATE *pState = AfxGetThreadState();

	if (!::GetMessage(&(pState->m_msgCur), NULL, NULL, NULL))
	{
...
		return FALSE;
	}

...

	if (pState->m_msgCur.message != WM_KICKIDLE && !AfxPreTranslateMessage(&(pState->m_msgCur)))
	{
		::TranslateMessage(&(pState->m_msgCur));
		::DispatchMessage(&(pState->m_msgCur));
	}
  return TRUE;
}
2.MFC封装窗口创建和消息分发
利用C++面向对象的特征,将窗口创建和消息分发、响应分装在一个类中,这样一个窗口类对应一个实际窗口,非常简单直观。
首先我们思考下,把窗口创建和消息分发封装在一起有哪些难点?
1.怎么将不同的窗口过程勾到一起
历史经验告诉我们,专制往往有时候好办事。如果每个窗口都有自己的窗口过程,那样处理起来就比较麻烦,最好的做法是所有的窗口在同一个窗口过程中控制分发。
2.同一窗口过程中怎样将不同的hwnd消息分发给对应的CWnd类去处理响应
因为窗口回调函数的限制,回调函数不能拥有对应CWnd类的this指针,也就是说来了窗口消息,怎样才能辨别对应的hwnd对应的CWnd,把消息分发给CWnd去处理呢?
3.最后,如果CWnd拿到了消息,怎样去简单有效的去处理和响应呢
我们说过消息的响应也是在Cwnd中处理,怎样将拿到的消息对应成具体的类成员函数呢?
这些问题串通后,MFC的做法,我们画一张消息流通图如下:
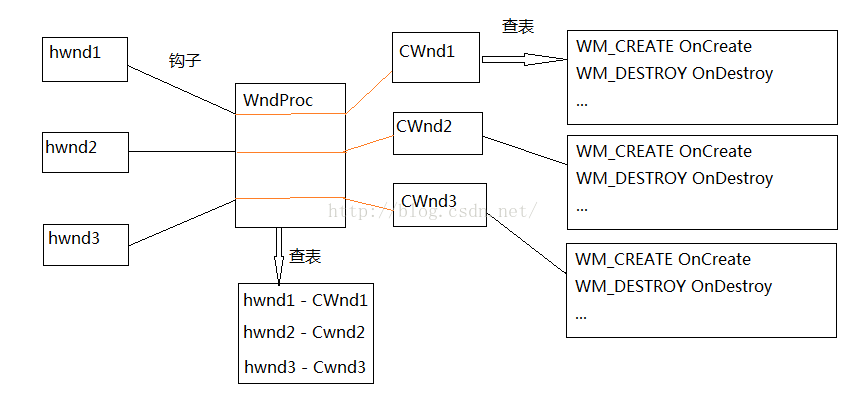
a).窗口创建
同样我们拿源码来解释,
在MFC中我们自定义的窗口类继承关系如下:
CWnd->CFrameWnd->CMyFrameWnd
winfrm.cpp中CFrameWnd::LoadFrame
首先,调用GetIconWndClass->AfxRegisterWndClass完成窗口类设计和注册,
然后,调用CFrameWnd::Create->CWnd::CreateEx完成窗口创建,如下:
- BOOL CFrameWnd::LoadFrame(UINT nIDResource, DWORD dwDefaultStyle, CWnd* pParentWnd, CCreateContext* pContext)
- {
- ...
- LPCTSTR lpszClass = GetIconWndClass(dwDefaultStyle, nIDResource);
- CString strTitle = m_strTitle;
- if (!Create(lpszClass, strTitle, dwDefaultStyle, rectDefault, pParentWnd, ATL_MAKEINTRESOURCE(nIDResource), 0L, pContext))
- {
- return FALSE; // will self destruct on failure normally
- }
- ...
- }
BOOL CFrameWnd::LoadFrame(UINT nIDResource, DWORD dwDefaultStyle, CWnd* pParentWnd, CCreateContext* pContext)
{
...
	LPCTSTR lpszClass = GetIconWndClass(dwDefaultStyle, nIDResource);
	CString strTitle = m_strTitle;
	if (!Create(lpszClass, strTitle, dwDefaultStyle, rectDefault, pParentWnd, ATL_MAKEINTRESOURCE(nIDResource), 0L, pContext))
	{
		return FALSE;   // will self destruct on failure normally
	}

...
}- LPCTSTR CFrameWnd::GetIconWndClass(DWORD dwDefaultStyle, UINT nIDResource)
- {
- ...
- if (hIcon != NULL)
- {
- ...
- {
- // register a very similar WNDCLASS
- return AfxRegisterWndClass(wndcls.style, wndcls.hCursor, wndcls.hbrBackground, hIcon);
- }
- }
- return NULL; // just use the default
- }
LPCTSTR CFrameWnd::GetIconWndClass(DWORD dwDefaultStyle, UINT nIDResource)
{
...
	if (hIcon != NULL)
	{
...
		{
			// register a very similar WNDCLASS
			return AfxRegisterWndClass(wndcls.style, wndcls.hCursor, wndcls.hbrBackground, hIcon);
		}
	}
	return NULL;        // just use the default
}
在wincore.cpp的CWnd::CreateEx中, 创建窗口
- BOOL CWnd::CreateEx(...)
- {
- ...
- // allow modification of several common create parameters
- CREATESTRUCT cs;
- cs.dwExStyle = dwExStyle;
- cs.lpszClass = lpszClassName;
- cs.lpszName = lpszWindowName;
- cs.style = dwStyle;
- cs.x = x;
- cs.y = y;
- cs.cx = nWidth;
- cs.cy = nHeight;
- cs.hwndParent = hWndParent;
- cs.hMenu = nIDorHMenu;
- cs.hInstance = AfxGetInstanceHandle();
- cs.lpCreateParams = lpParam;
- ...
- AfxHookWindowCreate(this);
- HWND hWnd = ::AfxCtxCreateWindowEx(cs.dwExStyle, cs.lpszClass,
- cs.lpszName, cs.style, cs.x, cs.y, cs.cx, cs.cy,
- cs.hwndParent, cs.hMenu, cs.hInstance, cs.lpCreateParams);
- ...
- }
BOOL CWnd::CreateEx(...)
{
...
	// allow modification of several common create parameters
	CREATESTRUCT cs;
	cs.dwExStyle = dwExStyle;
	cs.lpszClass = lpszClassName;
	cs.lpszName = lpszWindowName;
	cs.style = dwStyle;
	cs.x = x;
	cs.y = y;
	cs.cx = nWidth;
	cs.cy = nHeight;
	cs.hwndParent = hWndParent;
	cs.hMenu = nIDorHMenu;
	cs.hInstance = AfxGetInstanceHandle();
	cs.lpCreateParams = lpParam;

	...

	AfxHookWindowCreate(this);
	HWND hWnd = ::AfxCtxCreateWindowEx(cs.dwExStyle, cs.lpszClass,
			cs.lpszName, cs.style, cs.x, cs.y, cs.cx, cs.cy,
			cs.hwndParent, cs.hMenu, cs.hInstance, cs.lpCreateParams);

    ...
}- void AFXAPI AfxHookWindowCreate(CWnd* pWnd)
- {
- ...
- pThreadState->m_hHookOldCbtFilter = ::SetWindowsHookEx(WH_CBT, _AfxCbtFilterHook, NULL, ::GetCurrentThreadId());
- ...
- }
void AFXAPI AfxHookWindowCreate(CWnd* pWnd)
{
...
		pThreadState->m_hHookOldCbtFilter = ::SetWindowsHookEx(WH_CBT, _AfxCbtFilterHook, NULL, ::GetCurrentThreadId());
	...
}- LRESULT CALLBACK _AfxCbtFilterHook(int code, WPARAM wParam, LPARAM lParam)
- {
- ...
- if (pWndInit != NULL)
- {
- AFX_MANAGE_STATE(pWndInit->m_pModuleState);
- // the window should not be in the permanent map at this time
- ASSERT(CWnd::FromHandlePermanent(hWnd) == NULL);
- // connect the HWND to pWndInit...
- pWndInit->Attach(hWnd);
- // allow other subclassing to occur first
- pWndInit->PreSubclassWindow();
- WNDPROC *pOldWndProc = pWndInit->GetSuperWndProcAddr();
- ASSERT(pOldWndProc != NULL);
- // subclass the window with standard AfxWndProc
- WNDPROC afxWndProc = AfxGetAfxWndProc();
- oldWndProc = (WNDPROC)SetWindowLongPtr(hWnd, GWLP_WNDPROC,
- (DWORD_PTR)afxWndProc);
- ASSERT(oldWndProc != NULL);
- if (oldWndProc != afxWndProc)
- *pOldWndProc = oldWndProc;
- ...
- }
LRESULT CALLBACK _AfxCbtFilterHook(int code, WPARAM wParam, LPARAM lParam)
{
...
		if (pWndInit != NULL)
		{
			AFX_MANAGE_STATE(pWndInit->m_pModuleState);

			// the window should not be in the permanent map at this time
			ASSERT(CWnd::FromHandlePermanent(hWnd) == NULL);

			// connect the HWND to pWndInit...
			pWndInit->Attach(hWnd);
			// allow other subclassing to occur first
			pWndInit->PreSubclassWindow();

			WNDPROC *pOldWndProc = pWndInit->GetSuperWndProcAddr();
			ASSERT(pOldWndProc != NULL);

			// subclass the window with standard AfxWndProc
			WNDPROC afxWndProc = AfxGetAfxWndProc();
			oldWndProc = (WNDPROC)SetWindowLongPtr(hWnd, GWLP_WNDPROC,
				(DWORD_PTR)afxWndProc);
			ASSERT(oldWndProc != NULL);
			if (oldWndProc != afxWndProc)
				*pOldWndProc = oldWndProc;

		...
}SetWindowLongPtr使所有的窗口响应都走AfxWndProc中,在AfxWndProc中完成消息分发到对应的Cwnd中。
b).消息的分发和响应
- LRESULT CALLBACK AfxWndProc(HWND hWnd, UINT nMsg, WPARAM wParam, LPARAM lParam)
- {
- ...
- // all other messages route through message map
- CWnd* pWnd = CWnd::FromHandlePermanent(hWnd);
- ...
- return AfxCallWndProc(pWnd, hWnd, nMsg, wParam, lParam);
- }
LRESULT CALLBACK AfxWndProc(HWND hWnd, UINT nMsg, WPARAM wParam, LPARAM lParam)
{
...
	// all other messages route through message map
	CWnd* pWnd = CWnd::FromHandlePermanent(hWnd);
	...
	return AfxCallWndProc(pWnd, hWnd, nMsg, wParam, lParam);
}- LRESULT AFXAPI AfxCallWndProc(CWnd* pWnd, HWND hWnd, UINT nMsg, WPARAM wParam = 0, LPARAM lParam = 0)
- {
- ...
- // delegate to object's WindowProc
- lResult = pWnd->WindowProc(nMsg, wParam, lParam);
- ...
- }
LRESULT AFXAPI AfxCallWndProc(CWnd* pWnd, HWND hWnd, UINT nMsg, WPARAM wParam = 0, LPARAM lParam = 0)
{
...

		// delegate to object's WindowProc
		lResult = pWnd->WindowProc(nMsg, wParam, lParam);
...
}
在这里开始 调用CWnd成员响应函数,终于又回到CWnd中了,接着往下看
- LRESULT CWnd::WindowProc(UINT message, WPARAM wParam, LPARAM lParam)
- {
- ...
- if (!OnWndMsg(message, wParam, lParam, &lResult))
- ...
- }
LRESULT CWnd::WindowProc(UINT message, WPARAM wParam, LPARAM lParam)
{
...
	if (!OnWndMsg(message, wParam, lParam, &lResult))
		...
}
在OnWndMsg中做了什么呢?看下面代码
- BOOL CWnd::OnWndMsg(UINT message, WPARAM wParam, LPARAM lParam, LRESULT* pResult)
- {
- ...
- //WM_COMMAND特殊处理
- if (message == WM_COMMAND)
- {
- if (OnCommand(wParam, lParam))
- {
- lResult = 1;
- goto LReturnTrue;
- }
- return FALSE;
- }
- ...
- //找到当前的CWnd类的MessageMap表,查表得到对应响应函数并处理
- const AFX_MSGMAP* pMessageMap; pMessageMap = GetMessageMap();
- ...
- for (/* pMessageMap already init'ed */; pMessageMap->pfnGetBaseMap != NULL;
- pMessageMap = (*pMessageMap->pfnGetBaseMap)())
- {
- ...
- }
- ...
- }
BOOL CWnd::OnWndMsg(UINT message, WPARAM wParam, LPARAM lParam, LRESULT* pResult)
{
...
    //WM_COMMAND特殊处理
	if (message == WM_COMMAND)
	{
		if (OnCommand(wParam, lParam))
		{
			lResult = 1;
			goto LReturnTrue;
		}
		return FALSE;
	}
...

    //找到当前的CWnd类的MessageMap表,查表得到对应响应函数并处理
	const AFX_MSGMAP* pMessageMap; pMessageMap = GetMessageMap();
	...

		for (/* pMessageMap already init'ed */; pMessageMap->pfnGetBaseMap != NULL;
			pMessageMap = (*pMessageMap->pfnGetBaseMap)())
		{
			...
		}

...
}
可以看到,到此 完成了CWnd中的查表调用消息对应的处理函数,至于具体的OnCommand消息处理和具体响应函数调用过程,恕不详述。
但是等等,还有一个问题没有解决,那就是CWnd中的消息-处理函数表怎么来的,这就是我们常见的如下结构
- BEGIN_MESSAGE_MAP(CMainFrame, ...)
- ON_WM_CREATE()
- ON_WM_SETFOCUS()
- ...
- END_MESSAGE_MAP()
BEGIN_MESSAGE_MAP(CMainFrame, ...)
	ON_WM_CREATE()
	ON_WM_SETFOCUS()
...
END_MESSAGE_MAP()- #define DECLARE_MESSAGE_MAP() \
- protected: \
- static const AFX_MSGMAP* PASCAL GetThisMessageMap(); \
- virtual const AFX_MSGMAP* GetMessageMap() const; \
#define DECLARE_MESSAGE_MAP() \
protected: \
	static const AFX_MSGMAP* PASCAL GetThisMessageMap(); \
	virtual const AFX_MSGMAP* GetMessageMap() const; \
BEGIN_MESSAGE_MAP结构展开如下
- #define BEGIN_MESSAGE_MAP(theClass, baseClass) \
- PTM_WARNING_DISABLE \
- const AFX_MSGMAP* theClass::GetMessageMap() const \
- { return GetThisMessageMap(); } \
- const AFX_MSGMAP* PASCAL theClass::GetThisMessageMap() \
- { \
- typedef theClass ThisClass; \
- typedef baseClass TheBaseClass; \
- static const AFX_MSGMAP_ENTRY _messageEntries[] = \
- {
#define BEGIN_MESSAGE_MAP(theClass, baseClass) \
	PTM_WARNING_DISABLE \
	const AFX_MSGMAP* theClass::GetMessageMap() const \
		{ return GetThisMessageMap(); } \
	const AFX_MSGMAP* PASCAL theClass::GetThisMessageMap() \
	{ \
		typedef theClass ThisClass;						   \
		typedef baseClass TheBaseClass;					   \
		static const AFX_MSGMAP_ENTRY _messageEntries[] =  \
{- #define ON_WM_CREATE() \
- { WM_CREATE, 0, 0, 0, AfxSig_is, \
- (AFX_PMSG) (AFX_PMSGW) \
- (static_cast< int (AFX_MSG_CALL CWnd::*)(LPCREATESTRUCT) > ( &ThisClass :: OnCreate)) },
#define ON_WM_CREATE() \
	{ WM_CREATE, 0, 0, 0, AfxSig_is, \
		(AFX_PMSG) (AFX_PMSGW) \
		(static_cast< int (AFX_MSG_CALL CWnd::*)(LPCREATESTRUCT) > ( &ThisClass :: OnCreate)) },
至此,窗口类的封装过程尽在眼前,可能你觉得过程比较繁琐,那么我把它概括如下:
1.Create窗口时完成两件事:(1)窗口过程勾到一起处理(2)hwnd和对应的CWnd*绑定
2.CWnd中利用BEGIN_MESSAGE_MAP结构定义【消息-响应函数】的路由表
3.响应函数中根据传入的hwnd查表得到CWnd*,调用CWnd->GetMassageMap获取【消息-响应函数】表,查对应消息的响应函数,调用完成响应
现在再返回去看,是不是清晰明朗了?
3.ATL大框架
MFC出现在C++尚未完善时,没有采用c++的高级特性,基本上都是继承和虚函数、查表,类的层次过多,显得比较臃肿。相比而言,ATL就好多了,采用模板技术简化了设计,也没有那么多的层次结构,非常轻量,在此基础上上封装的WTL界面库被越来越多的人使用。WTL虽然是在ATL上封装的,但是窗口的创建和消息分发原理并没有变,所以我们仍然以ATL来讲解整个过程。
ATL的框架基本上是自己搭建起来的,自己编写_tWinMain函数,期间可借助CMessageLoop完成消息泵的开启,如下:
- int WINAPI _tWinMain(HINSTANCE hInstance, HINSTANCE /*hPrevInstance*/, LPTSTR lpstrCmdLine, int nCmdShow)
- {
- ...
- int nRet = Run(lpstrCmdLine, nCmdShow);
- ...
- }
- int Run(LPTSTR /*lpstrCmdLine*/ = NULL, int nCmdShow = SW_SHOWDEFAULT)
- {
- CMessageLoop theLoop;
- _Module.AddMessageLoop(&theLoop);
- CMainFrame wndMain;
- if(wndMain.CreateEx() == NULL)
- {
- ATLTRACE(_T("Main window creation failed!\n"));
- return 0;
- }
- wndMain.ShowWindow(nCmdShow);
- int nRet = theLoop.Run();
- _Module.RemoveMessageLoop();
- return nRet;
- }
int WINAPI _tWinMain(HINSTANCE hInstance, HINSTANCE /*hPrevInstance*/, LPTSTR lpstrCmdLine, int nCmdShow)
{
...
	int nRet = Run(lpstrCmdLine, nCmdShow);
...
}


int Run(LPTSTR /*lpstrCmdLine*/ = NULL, int nCmdShow = SW_SHOWDEFAULT)
{
	CMessageLoop theLoop;
	_Module.AddMessageLoop(&theLoop);

	CMainFrame wndMain;

	if(wndMain.CreateEx() == NULL)
	{
		ATLTRACE(_T("Main window creation failed!\n"));
		return 0;
	}

	wndMain.ShowWindow(nCmdShow);

	int nRet = theLoop.Run();

	_Module.RemoveMessageLoop();
	return nRet;
}
可知CMainFrame::CreateEx完成窗口创建,atlapp.h中CMessageLoop完成消息泵开启,代码如下:
- // message loop
- int Run()
- {
- ...
- for(;;)
- {
- ...
- bRet = ::GetMessage(&m_msg, NULL, 0, 0);
- ...
- if(!PreTranslateMessage(&m_msg))
- {
- ::TranslateMessage(&m_msg);
- ::DispatchMessage(&m_msg);
- }
- ...
- }
- return (int)m_msg.wParam;
- }
// message loop
	int Run()
	{
...

		for(;;)
		{
...

			bRet = ::GetMessage(&m_msg, NULL, 0, 0);
...
			if(!PreTranslateMessage(&m_msg))
			{
				::TranslateMessage(&m_msg);
				::DispatchMessage(&m_msg);
			}
...
		}
		return (int)m_msg.wParam;
	}
整个大框架和Win32 SDK很像,没什么封装,唯一不同的是所有的窗口创建和消息分发都封装到窗口类中了,这个接下来重点说说。
4.ATL封装窗口创建和消息分发
和MFC封装窗口类一样,这里同样需要考虑之前说的三个问题,重要的事情说三遍,我就再贴一次之前的话。1.怎么将不同的窗口过程勾到一起
2.同一窗口过程中怎样将不同的hwnd消息分发给对应的CWnd类去处理响应
3.最后,如果CWnd拿到了消息,怎样去简单有效的去处理和响应呢
1.所有的窗体窗口过程函数一样,保证统一处理
2.hwnd和对应窗口类是通过汇编强制粘连起来的
3.CWnd拿到消息后类似前面的C语言通过一组宏简化switch case结构调用对应的消息响应函数
同样我们从源码开始入手:
所有的窗体类都继承于CWndImpl,我们关注这个类即可
a).窗口创建
atlwin.app中CWindowImpl::Create中如下,取得窗口信息,注册窗口类
- HWND Create(HWND hWndParent, _U_RECT rect = NULL, LPCTSTR szWindowName = NULL,
- DWORD dwStyle = 0, DWORD dwExStyle = 0,
- _U_MENUorID MenuOrID = 0U, LPVOID lpCreateParam = NULL)
- {
- if (T::GetWndClassInfo().m_lpszOrigName == NULL)
- T::GetWndClassInfo().m_lpszOrigName = GetWndClassName();
- ATOM atom = T::GetWndClassInfo().Register(&m_pfnSuperWindowProc);
- dwStyle = T::GetWndStyle(dwStyle);
- dwExStyle = T::GetWndExStyle(dwExStyle);
- ...
- return CWindowImplBaseT< TBase, TWinTraits >::Create(hWndParent, rect, szWindowName,
- dwStyle, dwExStyle, MenuOrID, atom, lpCreateParam);
- }
HWND Create(HWND hWndParent, _U_RECT rect = NULL, LPCTSTR szWindowName = NULL,
            DWORD dwStyle = 0, DWORD dwExStyle = 0,
            _U_MENUorID MenuOrID = 0U, LPVOID lpCreateParam = NULL)
{
    if (T::GetWndClassInfo().m_lpszOrigName == NULL)
        T::GetWndClassInfo().m_lpszOrigName = GetWndClassName();
    ATOM atom = T::GetWndClassInfo().Register(&m_pfnSuperWindowProc);

    dwStyle = T::GetWndStyle(dwStyle);
    dwExStyle = T::GetWndExStyle(dwExStyle);

    ...

    return CWindowImplBaseT< TBase, TWinTraits >::Create(hWndParent, rect, szWindowName,
                                                         dwStyle, dwExStyle, MenuOrID, atom, lpCreateParam);
}
可以看到调用 GetWndClassInfo.Register注册窗口类,每个类中使用DECLARE_WND_CLASS等宏来填充对应信息。
DECLARE_WND_CLASS展开如下:
- #define DECLARE_WND_CLASS(WndClassName) \
- static ATL::CWndClassInfo& GetWndClassInfo() \
- { \
- static ATL::CWndClassInfo wc = \
- { \
- { sizeof(WNDCLASSEX), CS_HREDRAW | CS_VREDRAW | CS_DBLCLKS, StartWindowProc, \
- 0, 0, NULL, NULL, NULL, (HBRUSH)(COLOR_WINDOW + 1), NULL, WndClassName, NULL }, \
- NULL, NULL, IDC_ARROW, TRUE, 0, _T("") \
- }; \
- return wc; \
- }
#define DECLARE_WND_CLASS(WndClassName) \
static ATL::CWndClassInfo& GetWndClassInfo() \
{ \
	static ATL::CWndClassInfo wc = \
	{ \
		{ sizeof(WNDCLASSEX), CS_HREDRAW | CS_VREDRAW | CS_DBLCLKS, StartWindowProc, \
		  0, 0, NULL, NULL, NULL, (HBRUSH)(COLOR_WINDOW + 1), NULL, WndClassName, NULL }, \
		NULL, NULL, IDC_ARROW, TRUE, 0, _T("") \
	}; \
	return wc; \
}实际的 窗口创建函数如下:
- template <class TBase, class TWinTraits>
- HWND CWindowImplBaseT< TBase, TWinTraits >::Create(...)
- {
- BOOL result;
- ATLASSUME(m_hWnd == NULL);
- // 初始化Thunk结构体
- result = m_thunk.Init(NULL,NULL);
- ...
- //保存当前窗口类指针到全局
- _AtlWinModule.AddCreateWndData(&m_thunk.cd, this);
- //创建窗口
- HWND hWnd = ::CreateWindowEx(dwExStyle, MAKEINTATOM(atom), szWindowName,
- dwStyle, rect.m_lpRect->left, rect.m_lpRect->top, rect.m_lpRect->right - rect.m_lpRect->left,
- rect.m_lpRect->bottom - rect.m_lpRect->top, hWndParent, MenuOrID.m_hMenu,
- _AtlBaseModule.GetModuleInstance(), lpCreateParam);
- ...
- }
template <class TBase, class TWinTraits>
HWND CWindowImplBaseT< TBase, TWinTraits >::Create(...)
{
	BOOL result;
	ATLASSUME(m_hWnd == NULL);

	// 初始化Thunk结构体
	result = m_thunk.Init(NULL,NULL);
...

    //保存当前窗口类指针到全局
	_AtlWinModule.AddCreateWndData(&m_thunk.cd, this);

	//创建窗口
	HWND hWnd = ::CreateWindowEx(dwExStyle, MAKEINTATOM(atom), szWindowName,
		dwStyle, rect.m_lpRect->left, rect.m_lpRect->top, rect.m_lpRect->right - rect.m_lpRect->left,
		rect.m_lpRect->bottom - rect.m_lpRect->top, hWndParent, MenuOrID.m_hMenu,
		_AtlBaseModule.GetModuleInstance(), lpCreateParam);
...
}
这里的Thunk和保存指针到全局之后再说。
至此创建过程完成。
b).消息分发和响应
前面说了,所有的窗口类的响应函数都是在StartWndProc中,如下:
- template <class TBase, class TWinTraits>
- LRESULT CALLBACK CWindowImplBaseT< TBase, TWinTraits >::StartWindowProc(HWND hWnd, UINT uMsg, WPARAM wParam, LPARAM lParam)
- {
- CWindowImplBaseT< TBase, TWinTraits >* pThis = (CWindowImplBaseT< TBase, TWinTraits >*)_AtlWinModule.ExtractCreateWndData();
- ...
- pThis->m_thunk.Init(pThis->GetWindowProc(), pThis);
- WNDPROC pProc = pThis->m_thunk.GetWNDPROC();
- WNDPROC pOldProc = (WNDPROC)::SetWindowLongPtr(hWnd, GWLP_WNDPROC, (LONG_PTR)pProc);
- ...
- return pProc(hWnd, uMsg, wParam, lParam);
- }
template <class TBase, class TWinTraits>
LRESULT CALLBACK CWindowImplBaseT< TBase, TWinTraits >::StartWindowProc(HWND hWnd, UINT uMsg, WPARAM wParam, LPARAM lParam)
{
	CWindowImplBaseT< TBase, TWinTraits >* pThis = (CWindowImplBaseT< TBase, TWinTraits >*)_AtlWinModule.ExtractCreateWndData();
	...
	pThis->m_thunk.Init(pThis->GetWindowProc(), pThis);
	WNDPROC pProc = pThis->m_thunk.GetWNDPROC();
	WNDPROC pOldProc = (WNDPROC)::SetWindowLongPtr(hWnd, GWLP_WNDPROC, (LONG_PTR)pProc);
	...
	return pProc(hWnd, uMsg, wParam, lParam);
}
这里用到了Thunk转换技术,所谓Thunk就是转换的意思,这里的基本思想是替换掉传统的WndProc的第一个句柄参数hwnd,让这里的hwnd实际上是对应的CWndImpl的指针,这样完成了hwnd到窗体类的映射。具体的实现在atlstdthunk.h中,如下:
- #pragma pack(push,1)
- struct _stdcallthunk
- {
- DWORD m_mov; // 替换hwnd参数为对应CWndImpl指针 mov dword ptr [esp+0x4], pThis (esp+0x4 is hWnd)
- DWORD m_this; //
- BYTE m_jmp; // 跳转到WndProc
- DWORD m_relproc; // relative jmp
- BOOL Init(DWORD_PTR proc, void* pThis)
- {
- m_mov = 0x042444C7; //C7 44 24 0C
- m_this = PtrToUlong(pThis);
- m_jmp = 0xe9;
- m_relproc = DWORD((INT_PTR)proc - ((INT_PTR)this+sizeof(_stdcallthunk))); // write block from data cache and
- FlushInstructionCache(GetCurrentProcess(), this, sizeof(_stdcallthunk)); // flush from instruction cache
- return TRUE;
- }
- ...
- };
- #pragma pack(pop)
#pragma pack(push,1)
struct _stdcallthunk
{
	DWORD   m_mov;          // 替换hwnd参数为对应CWndImpl指针 mov dword ptr [esp+0x4], pThis (esp+0x4 is hWnd)
	DWORD   m_this;         //
	BYTE    m_jmp;          // 跳转到WndProc
	DWORD   m_relproc;      // relative jmp
	BOOL Init(DWORD_PTR proc, void* pThis)
	{
		m_mov = 0x042444C7;  //C7 44 24 0C
		m_this = PtrToUlong(pThis);
		m_jmp = 0xe9;
		m_relproc = DWORD((INT_PTR)proc - ((INT_PTR)this+sizeof(_stdcallthunk)));   // write block from data cache and
		FlushInstructionCache(GetCurrentProcess(), this, sizeof(_stdcallthunk));    //  flush from instruction cache
		return TRUE;
	}
...
};
#pragma pack(pop)
WindowProc处理如下:
- template <class TBase, class TWinTraits>
- LRESULT CALLBACK CWindowImplBaseT< TBase, TWinTraits >::WindowProc(HWND hWnd, UINT uMsg, WPARAM wParam, LPARAM lParam)
- {
- CWindowImplBaseT< TBase, TWinTraits >* pThis = (CWindowImplBaseT< TBase, TWinTraits >*)hWnd;//hwnd转换成CWindowImplBaseT指针
- ...
- BOOL bRet = pThis->ProcessWindowMessage(pThis->m_hWnd, uMsg, wParam, lParam, lRes, 0);//调用对应的窗体类的ProcessWindowMessage处理函数
- ...
- }
template <class TBase, class TWinTraits>
LRESULT CALLBACK CWindowImplBaseT< TBase, TWinTraits >::WindowProc(HWND hWnd, UINT uMsg, WPARAM wParam, LPARAM lParam)
{
	CWindowImplBaseT< TBase, TWinTraits >* pThis = (CWindowImplBaseT< TBase, TWinTraits >*)hWnd;//hwnd转换成CWindowImplBaseT指针
	...
	BOOL bRet = pThis->ProcessWindowMessage(pThis->m_hWnd, uMsg, wParam, lParam, lRes, 0);//调用对应的窗体类的ProcessWindowMessage处理函数
	...
}每个窗体类都有ProcessWindowMessage函数,它使用一组宏定义如下:
- BEGIN_MSG_MAP(CMainFrame)
- MESSAGE_HANDLER(WM_CREATE, OnCreate)
- ...
- END_MSG_MAP()
BEGIN_MSG_MAP(CMainFrame)
    MESSAGE_HANDLER(WM_CREATE, OnCreate)
    ...
END_MSG_MAP()
展开显示如下:
- #define BEGIN_MSG_MAP(theClass) \
- public: \
- BOOL ProcessWindowMessage(HWND hWnd, UINT uMsg, WPARAM wParam, LPARAM lParam, LRESULT& lResult, DWORD dwMsgMapID = 0) \
- { \
- BOOL bHandled = TRUE; \
- (hWnd); \
- (uMsg); \
- (wParam); \
- (lParam); \
- (lResult); \
- (bHandled); \
- switch(dwMsgMapID) \
- { \
- case 0:
- #define MESSAGE_HANDLER(msg, func) \
- if(uMsg == msg) \
- { \
- bHandled = TRUE; \
- lResult = func(uMsg, wParam, lParam, bHandled); \
- if(bHandled) \
- return TRUE; \
- }
#define BEGIN_MSG_MAP(theClass) \
public: \
	BOOL ProcessWindowMessage(HWND hWnd, UINT uMsg, WPARAM wParam, LPARAM lParam, LRESULT& lResult, DWORD dwMsgMapID = 0) \
	{ \
		BOOL bHandled = TRUE; \
		(hWnd); \
		(uMsg); \
		(wParam); \
		(lParam); \
		(lResult); \
		(bHandled); \
		switch(dwMsgMapID) \
		{ \
		case 0:

#define MESSAGE_HANDLER(msg, func) \
	if(uMsg == msg) \
	{ \
		bHandled = TRUE; \
		lResult = func(uMsg, wParam, lParam, bHandled); \
		if(bHandled) \
			return TRUE; \
}至此整个过程如下:
1.Create中指定统一的窗口过程StartWindowProc
2.StartWindowProc第一次响应时完成hwnd和CWndImpl的映射绑定,设置响应函数为WindowProc
3.WindowProc中转hwnd为CWndImpl*,调用对应类的ProcessWindowMessage分发处理消息
4.BEGIN_MSG_MAP简化switch case结构,在每个窗口类中分发处理
总之封装窗口类需要考虑之前说的三点,搞懂了这三点其他的问题也就迎刃而解了。最后不要嫌我烦,再贴一遍我一直强调的重点,牢记这三点,看相应的框架封装过程大同小异:
1.怎么将不同的窗口过程勾到一起
2.同一窗口过程中怎样将不同的hwnd消息分发给对应的CWnd类去处理响应
3.最后,如果CWnd拿到了消息,怎样去简单有效的去处理和响应呢
原创,转载请注明来自http://blog.csdn.net/wenzhou1219


 6103
6103


 被折叠的 条评论
为什么被折叠?
被折叠的 条评论
为什么被折叠?
 到【灌水乐园】发言


