


作者:张华 发表于:2015-07-23
版权声明:可以任意转载,转载时请务必以超链接形式标明文章原始出处和作者信息及本版权声明
( http://blog.csdn.net/quqi99)
OpenContrail是juniper以$176 million高价收购的一个SDN产品。研究了架构,感觉还真是不错。
Neutron和OpenContrail的思想很相近,但OpenContrail感觉比Neutron要牛逼地多,当然,Neutron现在也正在完善,很多特性也都跟上来了。
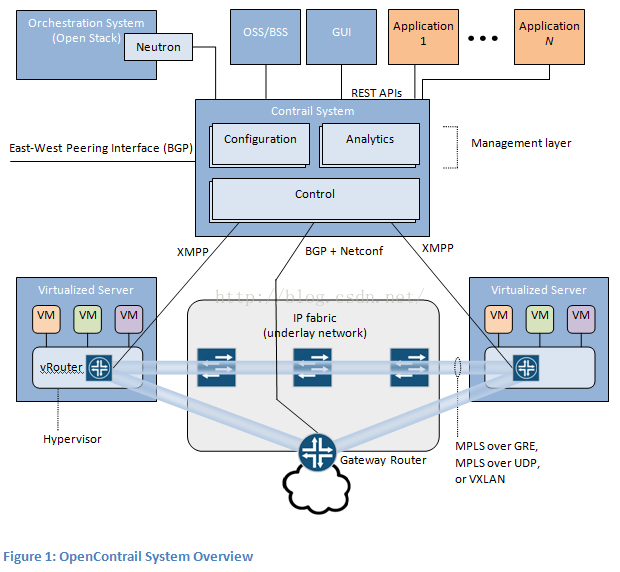
OpenContrail的虚拟路由器相当于Neutron dvr agent,是将三层打通了的,更像是DragonFlow,更牛叉的是,在虚拟overlay层面,它不仅可以运行VxLAN,还能运行MPLS over GRE/UDP,控制器与控制器之间通过iBGP对接,多个数据中心之间通过BGP或XMPP协议分发MPLS标签对接,这是类似Google B4直接在广域网上打通三层功能的节奏啊。DragonFlow急需结合Quagga也做到这一层次。
OpenContrail的服务链也做的比Neutron要完善的多,如深度包检测(DPI),入侵检测(IDP),入侵防护(IPS),广域网优化和负载均衡等。
OpenContrail使用的协议都很标准,例如:从控制器到vRouter的南向高层数据模型(虚拟网络,连接策略或者安全策略等)是基于XMPP协议;从vRouter到控制器的南向低层数据模型(例如BGP的路由标记(RT)或者VXLAN的网络标识或者流量工程TE-LSP等)采用了可信的IF-MAP协议;今后也会考虑使用YANG作为模型化语言;
OpenContrail是一个使用了Java,C等各种编程语言的大杂烩,在vRouter中也使用Intel dpdk实现了类似于snabb switch的用户态网络栈,性能应该也是可以期待的。
不过在安装过程中,由于文档都比较过时,坑比较多,还没有安装起来,待续。安装起来之后,我相信产品稳定性还是可期待的。
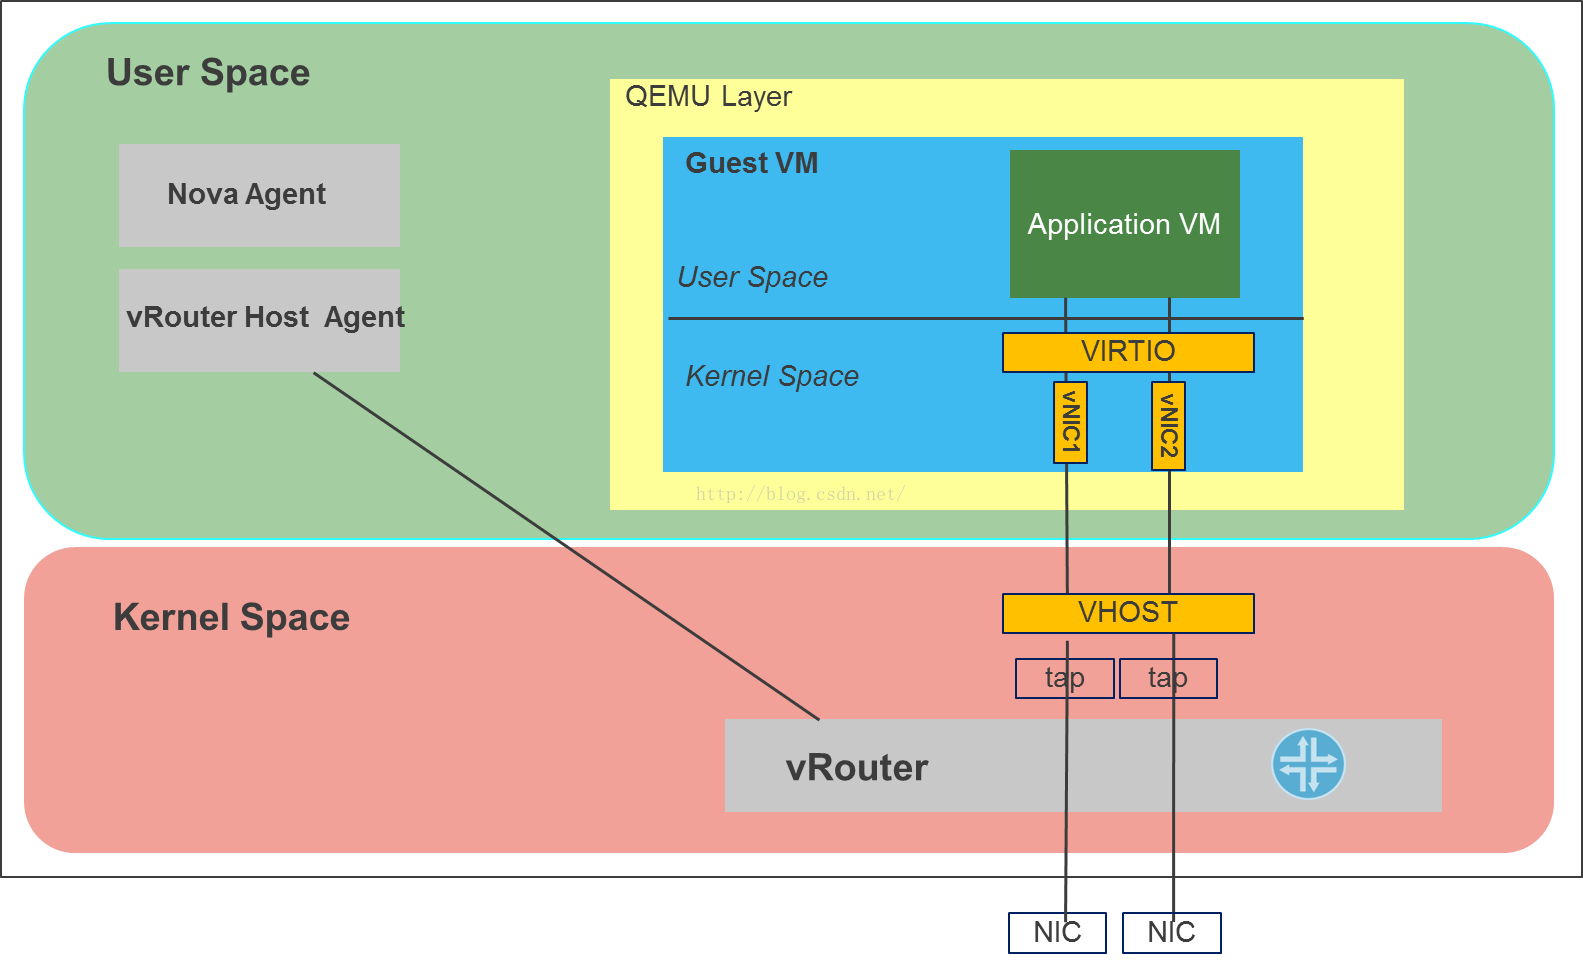
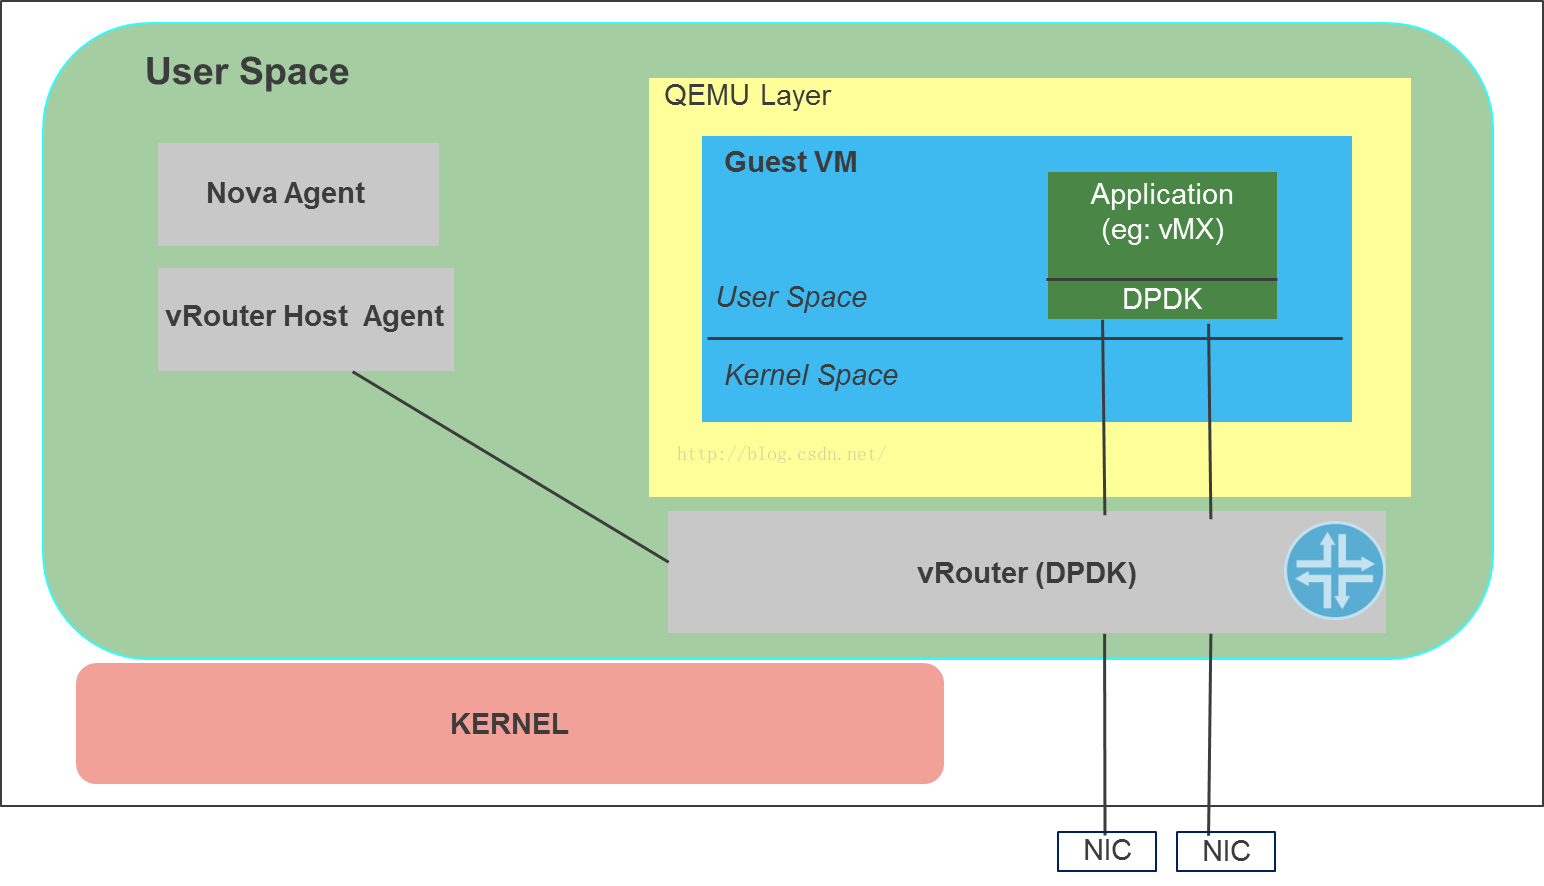
下图vRouter运行在内核空间与通过DPDK运行在用户空间的比较,DPDK is a set of libraries and drivers that perform fast packet processing by allowing NICs to DMA packets directly into an application’s address space and having the application poll for packets, thereby avoiding the overhead of interrupts from the NIC.

OpenContrail里的node是逻辑概念并不需要与物理机一一对应。
DB node: This node runs Cassandra database and Zookeeper.
Configuration Node: This node runs Neutron server, configuration API server, IF-MAP server, discovery server and configuration related services.
Analytics Node: This node runs the analytics data collector, operational and analytics API server and Query engine.
Web UI: This node runs the web-server and web job-server
Control node: This node runs BGP speaker, DNS server and named
Compute node: This node runs the vRouter a kernel loadable module and a user space vRouter agent, along with Openstack compute services.
OpenCotrail自身的安装概貌可参见:
https://github.com/Juniper/contrail-controller/wiki/Install-and-Configure-OpenContrail-1.06
https://github.com/Juniper/contrail-controller/wiki/OpenContrail-bring-up-and-provisioning
1, 一般在配置节点上安装:Cassandra(127.0.0.1:9160), Zookeerper, RabbitMQ, IP-MAP Server, Configuration API Server, Schema Transformer, Service Monitor, Discovery, contrail-config
a, 验证Configuration API Server: curl http://127.0.0.1:8082/projects | python -mjson.tool
b, 验证Discovey服务: curl http://127.0.0.1:5998/services && curl http://127.0.0.1:5998/clients
2, 一般在分析节点上安装:contrail-analytics
a, 主要配置/etc/contrail/contrail-collector.conf.
[DISCOVERY]
port=5998
server=127.0.0.1
[REDIS]
port=6381
server=127.0.0.1
b, 主要配置/etc/contrail/contrail-query-engine.conf.
[DISCOVERY]
port=5998
server=127.0.0.1
[REDIS]
port=6381
server=127.0.0.1
c,主要配置/etc/contrail/contrail-analytics-api.conf
[REDIS]
server=127.0.0.1
redis_server_port=6381
redis_query_port=6381
d, 验证anlytics API server, curl http://127.0.0.1:8081/analytics/generators | python -mjson.tool
e, 验证,contrail-logs
3, 一般在控制节点(BGP)上安装:contrail-control
a, 主要配置/etc/contrail/control-node.conf.
[DISCOVERY]
port=5998
server=127.0.0.1 # discovery_server IP address
[IFMAP]
password=control
user=control
b, 验证xmpp-server是否被发现, curl http://127.0.0.1:5998/services
c, 验证,curl http://127.0.0.1:8081/analytics/uves/generators | python -mjson.tool
4, 一般在计算节点上安装:contrail-vrouter-agent,vrouter内核模块,及vhost0
a, 主要配置 /etc/contrail/contrail-vrouter-agent.conf.
# IP address of discovery server
server=10.8.1.10
[VIRTUAL-HOST-INTERFACE]
# Everything in this section is mandatory
# name of virtual host interface
name=vhost0
# IP address and prefix in ip/prefix_len format
ip=10.8.1.11/24
# Gateway IP address for virtual host
gateway=10.8.1.254
# Physical interface name to which virtual host interface maps to
physical_interface=eth1
b, 主要配置/etc/network/interfaces.
auto eth1
iface eth1 inet static
address 0.0.0.0
up ifconfig $IFACE up
down ifconfig $IFACE down
auto vhost0
iface vhost0 inet static
pre-up vif --create vhost0 --mac $(cat /sys/class/net/eth1/address)
pre-up vif --add vhost0 --mac $(cat /sys/class/net/eth1/address) --vrf 0 --mode x --type vhost
pre-up vif --add eth1 --mac $(cat /sys/class/net/eth1/address) --vrf 0 --mode x --type physical
address 10.8.1.11
netmask 255.255.255.0
#network 10.8.1.0
#broadcast 10.8.1.255
#gateway 10.8.1.254
# dns-* options are implemented by the resolvconf package, if installed
dns-nameservers 8.8.8.8
c, 加载内核模块,sudo modprobe vrouter
d, 验证vRouter agent,sudo netstat -anp |grep 8085
采用contrail-installer安装除计算节点以外的所有组件(http://fosshelp.blogspot.kr/2015/02/openstack-and-opencontrail-in-separate.html)
git clone https://github.com/Juniper/contrail-installer.git
cd contrail-installer
cp samples/localrc-all localrc
vim localrc
# IP of OpenContrail Service Host
SERVICE_HOST=172.16.2.122
# IP of OpenStack Keystone Service Endpoint
OPENSTACK_IP=172.16.2.1
PHYSICAL_INTERFACE=eth1
CONTRAIL_DEFAULT_INSTALL=False
vim contrail.sh
sudo -E add-apt-repository -y cloud-archive:icehouse
rm -rf /bak/openstack/contrail-installer/.stage.txt
添加公钥(ssh-keygen -t rsa), https://github.com/settings/ssh
git config --global user.email "you@example.com"
git config --global user.name "Your Name"
repo init -u git@github.com:Juniper/contrail-vnc #need pass the GFW, http://juniper.github.io/contrail-vnc/README.html
repo sync
#./contrail.sh build
#./contrail.sh install
#./contrail.sh configure
#./contrail.sh start
执行上述start命令之后可以通过screen -X contrail来查看每个组件的错误,错误可能如下:
1, 如果cassandra因为内存小了跑不起来的话,可以修改/etc/cassandra/cassandra-env.sh将内存调小一点
#MAX_HEAP_SIZE="4G"
#HEAP_NEWSIZE="800M"
MAX_HEAP_SIZE="1G"
HEAP_NEWSIZE="200M"
2, contrail-api起不了,看到if-map组件报错没正常启动,可能是通过源码安装失败,对这个组件改为二进制安装sudo apt-get install ifmap-server后正常
3, 访问GUI界面(http://172.16.2.122:8080)时登录不了,在ui-webs组件处看到连接的keystone的ip不对,可在这个文件(/opt/stack/contrail/contrail-web-core/config/config.global.js )中修改:config.identityManager.ip = '172.16.2.1';
4, vif --list
安装计算节点
如何使用devstack安装见:http://fosshelp.blogspot.kr/2015/04/openstack-devstack-opencontrail-localrc.html
如何与OpenStack集成,OpenContrail可以照如上的方法单独安装,OpenStack只需要知道OpenContrail的APISERVER_IP。
1, 先下载原生devstack, git clone https://github.com/openstack-dev/devstack.git
2, 将opencontrial插件(https://github.com/Juniper/contrail-installer/blob/master/devstack/lib/neutron_plugins/opencontrail)移到devstack/lib/neutron_plugins/目录,
cp -r ./contrail-installer/devstack/lib/neutron_plugins/opencontrail ./devstack/lib/neutron_plugins/
3, localrc添加:
ENABLED_SERVICES=n-cpu,rabbit,neutron
NOVA_VIF_DRIVER=nova_contrail_vif.contrailvif.VRouterVIFDriver
APISERVER_IP=172.16.2.122
Q_HOST=172.16.2.1
HOST_IP=172.16.2.122
SERVICE_HOST=172.16.2.1
4, 注释stack.sh中的create_neutron_initial_network
5, 进程nova-compute
/usr/local/bin/nova-compute --config-file /etc/nova/nova.conf
/opt/stack/contrail/build/production/vnsw/agent/contrail/contrail-vrouter-agent --config_file=/etc/contrail/contrail-vrouter-agent.conf --DEFAULT.log_file=/var/log/vrouter.log
与Neutron的集成
/usr/local/bin/neutron-server --config-file /etc/neutron/neutron.conf --config-file /etc/neutron/plugins/opencontrail/ContrailPlugin.ini
vim /etc/neutron/neutron.conf
core_plugin = neutron_plugin_contrail.plugins.opencontrail.contrail_plugin_v3.NeutronPluginContrailCoreV3
api_extensions_path = extensions:/usr/local/lib/python2.7/dist-packages/neutron_plugin_contrail/extensions
cat /etc/neutron/plugins/opencontrail/ContrailPlugin.ini
[CONTRAIL]
api_server_ip = 172.16.2.122
api_server_port = 8082
multi_tenancy = False
网关的原理及如何创建网络见:https://github.com/Juniper/contrail-controller/wiki/How-to-setup-floating-ip-with-Neutron , 计算节点上可以针对该节点上的子网有简单网关vgw,vgw再通过路由将流量转给opencontrail fabric overlay网络(有点类似于fan,只不过这里是mpls over udp, 它有mpls的RD, RT, VRF这些概念(http://blog.csdn.net/quqi99/article/details/9203563), 它相当于在fan的flat的基础上再为每一个路由实例添加路由唯一标记符,从而区分不同的tenant,省掉了namespace)
opencontrail里面根本没有用到openflow,它和fan反而更类似, 但fan没有加唯一标记符,所以fan仅支持flat网络。
这样,neutron里的router数据模型在opencontrail里也用不上吧.
只需要对应neutron的network, subnet, port三个概念就行了。 每一个network会有一个或多个路由实例,每个路由实例会有一个唯一的路由标志符。 虚机可以对应多个虚拟网关,虚拟网关到vhost0接口的流量由路由控制(这样路由也将这些虚拟网关的流量限制在了一台主机里,也就避免了一台物理机出现相同子网网关的情况), vhost0出去的时候带上路由标志符从而省掉了namespace
还有一个快递部署opencontrail的方法,也是推荐的,那就是juju, 直接下载contrail-deployer之后照着里面的README安装,略。
bzr branch lp:~sdn-charmers/+junk/contrail-deployer
计算节点与控制节点同时具有如下路由, 无iptables规则,
ubuntu@juju-zhhuabj-machine-12:~$ route -n
Kernel IP routing table
Destination Gateway Genmask Flags Metric Ref Use Iface
0.0.0.0 10.1.1.1 0.0.0.0 UG 0 0 0 vhost0
192.168.1.0 0.0.0.0 255.255.255.0 U 0 0 0 vgw
10.1.1.0 0.0.0.0 255.255.0.0 U 0 0 0 vhost0
169.254.0.4 0.0.0.0 255.255.255.255 UH 0 0 0 vhost0
物理机的IP在vhost0上(10.1.1.X/24),虚机网段为192.168.1.0/24, eth0及其他所有的包括虚机的tap虚拟网卡均无IP。
网关接口vgw(上面没有IP)负责在路由实例default-domain:admin:net1与FABRIC之间提供连接性。
路由0.0.0.0/0 => vgw保证虚机流量经vgw发到vRouter, vRouter中的路由192.168.1.0/24 => vhost0保证到虚机的流量经vgw转给路由实例default-domain:admin:net1。
接口可使用vif --list命令查看,如下:
https://github.com/Juniper/contrail-controller/wiki/Simple-Gateway
+-------------------------------------------------------------------+
|                  Host-OS Networking Stack                         |
|                  0.0.0.0/24 => 10.1.1.254                         |
|                  192.168.1.253/24 => vgw*                         |
|                                              10.1.1.1/24          |
+----+---------------------------------------------+----------------+
     |vgw                                          |vhost0
     |                                             |
     |                                             |
+----+---------------------------------------------+----------------+
|    | VRF: default-domain:admin:net1:net1         | VRF: FABRIC    |
|+---+--------------------------+       +----------+-------------+  |
|| 192.168.1.253/32 => tap0     |       |10.1.1.1/32 => vhost0   |  |
|| 192.168.1.0/24 => drop       |       |192.168.1.0/24 => vhost0|  |
|| 0.0.0.0/0 => vgw             |       |                        |  |
||                              |       |                        |  |
|+---------+--------------------+       +------------------------+  |
|          |                  VROUTER                               |
+----------+---------------------------------------+----------------+
           |tap0                                   |eth0
+---+------+----------+                            |
|  192.168.1.253/24   |                 -----------+------------
|                     |                             Fabric-Network
|   VM-1              |
+---------------------+
Routes marked with (*) are added by Simple Gateway feature.
ubuntu@juju-zhhuabj-machine-12:~$ vif --list
vif0/0 OS: eth0
Type:Physical HWaddr:fa:16:3e:ed:bc:0f IPaddr:0
Vrf:0 Flags:TcL3 MTU:1514 Ref:13
RX packets:399801 bytes:323364709 errors:21
TX packets:277135 bytes:92902982 errors:0
vif0/1 OS: vhost0
Type:Host HWaddr:fa:16:3e:ed:bc:0f IPaddr:0
Vrf:0 Flags:L3 MTU:1514 Ref:3
RX packets:272893 bytes:92745836 errors:0
TX packets:396953 bytes:323264307 errors:0
vif0/2 OS: pkt0
Type:Agent HWaddr:00:00:5e:00:01:00 IPaddr:0
Vrf:65535 Flags:L3 MTU:1514 Ref:2
RX packets:1972 bytes:145306 errors:0
TX packets:3968 bytes:290006 errors:0
vif0/3 OS: vgw
Type:Gateway HWaddr:00:01:00:5e:00:00 IPaddr:0
Vrf:1 Flags:L3 MTU:1514 Ref:2
RX packets:259 bytes:24751 errors:0
TX packets:195 bytes:25191 errors:0
vif0/4 OS: tap4889b01e-0b
Type:Virtual HWaddr:00:00:5e:00:01:00 IPaddr:0
Vrf:2 Flags:PL3L2D MTU:9160 Ref:6
RX packets:475 bytes:50322 errors:0
TX packets:454 bytes:48360 errors:0
vif0/4351 OS: pkt1
Type:Stats HWaddr:00:00:00:00:00:00 IPaddr:0
Vrf:65535 Flags:L3L2 MTU:9136 Ref:1
RX packets:0 bytes:0 errors:0
TX packets:0 bytes:0 errors:0
附录一:
1, Get tap device name of VM
virsh list
virsh domiflist <tap-id>

2, Get vif assocaiated with tap device
docker exec -it <contrail-vrouter-container-id>
(vrouter-agent)[root@compute-8 /]$ vif --list | grep "tapb5b3506a-7d"
vif0/11     OS: tapb5b3506a-7d
(vrouter-agent)[root@compute-8 /]$ vif --get 11
...
vif0/11     OS: tapb5b3506a-7d
Vrf:10 Mcast Vrf:10 Flags:PL3L2DEr QOS:-1 Ref:6

3, Determing routes/nexthop/flows for vif

#get routing table assocaited with vif-11 (vrf 10)
(vrouter-agent)[root@compute-8 /]$ rt --dump 10

#Get next hop for a IP address in the routing table (gateway 13)
(vrouter-agent)[root@compute-8 /]$ rt --dump 10 | grep "10.2.0.252"
10.2.0.252/32          32           LP         22             55        2:6e:1a:85:34:bf(64004)

#List the next hops
#nh --list
...
Id:13         Type:Encap          Fmly: AF_INET  Rid:0  Ref_cnt:29         Vrf:-1
              Flags:Valid, Policy, Etree Root,
              EncapFmly:0806 Oif:2 Len:14
              Encap Data: 00 00 00 00 00 01 00 00 5e 00 01 00 08 00

#Query the next hop table for ID 13 (encaputlation of the packet) OIF tells us the VIF next hop (2)
(vrouter-agent)[root@compute-8 /]$ nh --get 13
Id:13         Type:Encap          Fmly: AF_INET  Rid:0  Ref_cnt:29         Vrf:-1
              Flags:Valid, Policy, Etree Root,
              EncapFmly:0806 Oif:2 Len:14
              Encap Data: 00 00 00 00 00 01 00 00 5e 00 01 00 08 00
(vrouter-agent)[root@compute-8 /]$ vif --get 2
...
vif0/2      OS: pkt0
            Vrf:65535 Mcast Vrf:65535 Flags:L3Er QOS:-1 Ref:3

#Description of agent talking to the vrouter via pkt0
https://github.com/Juniper/contrail-controller/wiki/Flow-processing
[1], http://blog.163.com/s_zhchluo/blog/static/15014708201411144244468/
[2], http://www.opencontrail.org/opencontrail-architecture-documentation/
[3], http://www.opencontrail.org/opencontrail-and-devstack/
[4], https://github.com/Juniper/contrail-controller/wiki/OpenContrail-bring-up-and-provisioning


 6684
6684


 被折叠的 条评论
为什么被折叠?
被折叠的 条评论
为什么被折叠?
 到【灌水乐园】发言


