


iOS 多线程详解
Slogan : 可能是最通俗易懂的 iOS多线程 详细解析文章
1. 基础概念
1.1 进程
进程是计算机中已运行程序的实体,是线程的容器维基百科-进程。每个进程之间是相互独立的,每个进程均运行在器专用且收保护的内存空间内。
把工厂作为一个系统,进程类似于车间。
1.2 线程
线程是操作系统能够进行运算调度的最小单位维基百科-线程。一个进程的所有任务都在线程中执行。一个线程中执行的任务是串行的,同一时间内1个线程只能执行一个任务。
把工厂作为一个系统,线程类似于车间里干活的工人。
1.3 进程和线程之间关系
- 线程是CPU调用的最小单位
- 进程手机CPU分配资源的最小单位
- 一个进程中至少有一个线程
- 同一个进程内的线程共享进程的资源
1.4 多线程
一个进程可以开启多条线程,每条线程可以同时执行不同的任务,多线程技术可以提高程序的执行效率。同一时间内,CPU只能处理1条线程,只有1条线程在工作,多线程并发执行,其实是CPU快速的在多条线程之间调度,如果CPU调度线程的时间足够快,就造成了多线程并发执行的假象。CPU在多条线程之间调度会消耗大量的CPU资源,同时每条线程被调度的频次会降低,因此我们只开辟3-5条线程。
1.5 多线程优缺点
优点:1、能适当提高程序的执行效率;2、能适当提高资源利用率(CPU,内存利用率)
缺点: 1、创建线程的开销,在iOS中,内核数据结构(大约1kb)、栈空间(子线程512kb,主线程1MB)创建线程大约需要90毫秒的创建时间,如果开启大量线程会降低程序性能,线程越多,CPU在调度线程上的开销就越大。
1.6 线程的状态
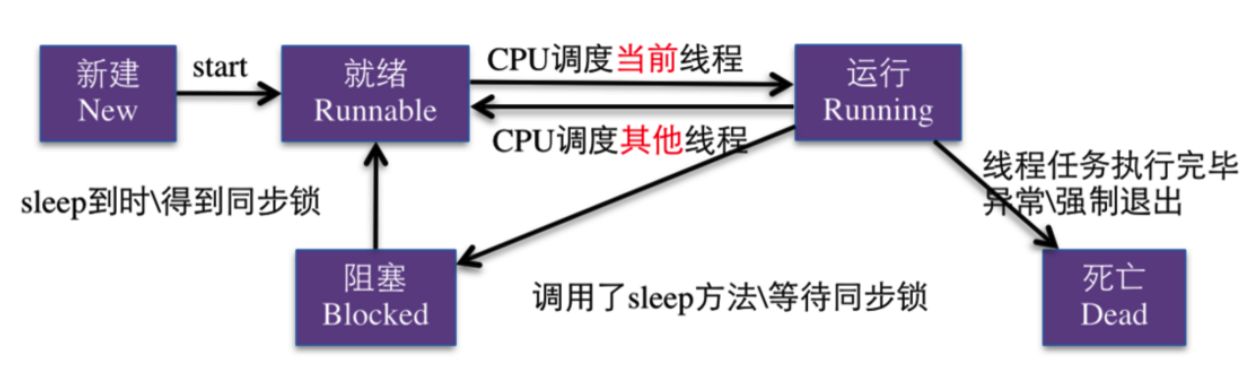
- 创建:实例化对象
- 就绪:向线程对象发送start消息,线程对象被加入 “可调度线程池”,等待CPU调度,detach 方法 和 performSelectorInBackground 方法会直接实例化一个线程对象并加入 “可调度线程池”
- 运行:CPU 负责调度 “可调度线程池”中线程的执行,线程执行完成之前,状态可能会在 “就绪” 和 “运行” 之间来回切换,此过程CPU控制。
- 阻塞:当满足某个预定条件时,可以使用休眠或锁阻塞线程执行,影响的方法有:sleepForTimeInterval, sleepUntilDate, @synchronized(self) 线程锁。线程对象进入阻塞状态后,会被“可调度线程池” 中移除,CPU不再调度。
- 死亡:死亡后线程对象的 isFinished 属性为YES;如果发送cancel消息,线程对象的 isCanceled 属性为YES;死亡后 stackSize == 0, 内存空间被释放。
1.7 线程锁的几种方案
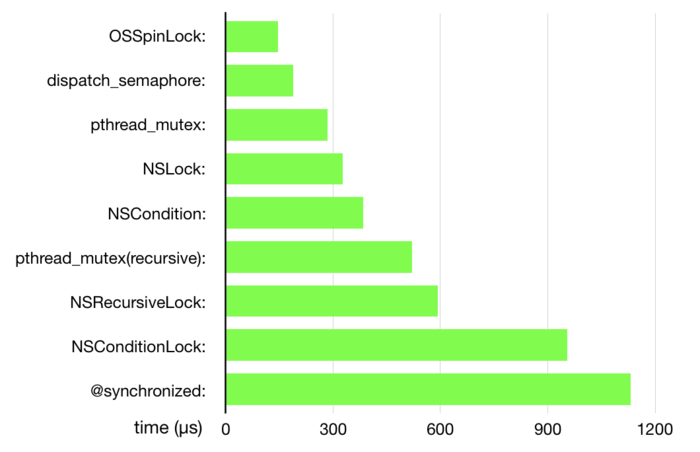
加解锁速度不表示锁的效率,只表示加解锁操作在执行时的复杂程度。
1.7.1 互斥锁
@synchronized(锁对象) {
    // 需要锁定的代码
}
使用互斥锁,在同一个时间,只允许一条线程执行锁中的代码。因为互斥锁的代价非常昂贵,所以锁定的代码范围应该尽可能小,只要锁住资源读写部分的代码即可。使用互斥锁也会影响并发的目的。
1.7.2 NSLock
- (void)testNSLock {
    NSLock *lock = [[NSLock alloc] init];
    [lock lock];
    // 需要锁定的代码
    [lock unlock];
}
1.7.3 atomic 原子属性
OC在定义属性时有nonatomic和atomic两种选择。
atomic:原子属性,为setter方法加锁(默认就是atomic)
nonatomic:非原子属性,不会为setter方法加锁。
atomic加锁原理:
 @property (assign, atomic) int age;
 - (void)setAge:(int)age
 {
     @synchronized(self) {
        _age = age;
     }
 }
atomic:线程安全,需要消耗大量的资源
nonatomic:非线程安全,适合内存小的移动设备=
iOS开发的建议:
(1)所有属性都声明为nonatomic
(2)尽量避免多线程抢夺同一块资源
(3)尽量将加锁、资源抢夺的业务逻辑交给服务器端处理,减小移动客户端的压力
1.7.4 dispatch_semaphore_t 信号量
- (void)testSemaphone {
    dispatch_semaphore_t semaphore_t = dispatch_semaphore_create(1);
    /// 线程1
    dispatch_async(dispatch_get_global_queue(DISPATCH_QUEUE_PRIORITY_DEFAULT, 0), ^{
        /// 进入等待状态!
        dispatch_semaphore_wait(semaphore_t, DISPATCH_TIME_FOREVER);
        sleep(7);
        dispatch_semaphore_signal(semaphore_t);
    });
}
其他的不常用的加锁操作不再赘述。
线程锁相关参考文章:
深入理解iOS开发中的锁
iOS 中几种常用的锁总结
iOS多线程-各种线程锁的简单介绍
1.8 线程间通信
//在主线程上执行操作,例如给UIImageVIew设置图片
- (void)performSelectorOnMainThread:(SEL)aSelector withObject:(id)arg waitUntilDone:(BOOL)wait
//在指定线程上执行操作
- (void)performSelector:(SEL)aSelector onThread:(NSThread *)thread withObject:(id)arg waitUntilDone:(BOOL)wait
2. 多线程实现方案
2.1 NSThread
- (void)testNSThread {
    /// 获取当前线程
    NSThread *currentThread = [NSThread currentThread];

    /// 创建需要自己启动的线程
    NSThread *creatThread = [[NSThread alloc] initWithTarget:self selector:@selector(runMethod) object:nil];
    [creatThread start];

    /// 创建自动启动的线程
    [NSThread detachNewThreadSelector:@selector(runMethod2) toTarget:self withObject:nil];
}
- (void)runMethod {
    NSLog(@"runMethod ++ %@",[NSThread currentThread]);
}
- (void)runMethod2 {
    NSLog(@"runMethod2 ++ %@",[NSThread currentThread]);
}
// 获取当前线程
+ (NSThread *)currentThread;
// 创建启动线程
+ (void)detachNewThreadSelector:(SEL)selector toTarget:(id)target withObject:(id)argument;
// 判断是否是多线程
+ (BOOL)isMultiThreaded;
// 线程休眠 NSDate 休眠到什么时候
+ (void)sleepUntilDate:(NSDate *)date;
// 线程休眠时间
+ (void)sleepForTimeInterval:(NSTimeInterval)ti;
// 结束/退出当前线程
+ (void)exit;
// 获取当前线程优先级
+ (double)threadPriority;
// 设置线程优先级 默认为0.5 取值范围为0.0 - 1.0
// 1.0优先级最高
// 设置优先级
+ (BOOL)setThreadPriority:(double)p;
// 获取指定线程的优先级
- (double)threadPriority NS_AVAILABLE(10_6, 4_0);
- (void)setThreadPriority:(double)p NS_AVAILABLE(10_6, 4_0);
// 设置线程的名字
- (void)setName:(NSString *)n NS_AVAILABLE(10_5, 2_0);
- (NSString *)name NS_AVAILABLE(10_5, 2_0);
// 判断指定的线程是否是 主线程
- (BOOL)isMainThread NS_AVAILABLE(10_5, 2_0);
// 判断当前线程是否是主线程
+ (BOOL)isMainThread NS_AVAILABLE(10_5, 2_0); // reports whether current thread is main
// 获取主线程
+ (NSThread *)mainThread NS_AVAILABLE(10_5, 2_0);
- (id)init NS_AVAILABLE(10_5, 2_0); // designated initializer
// 创建线程
- (id)initWithTarget:(id)target selector:(SEL)selector object:(id)argument NS_AVAILABLE(10_5, 2_0);
// 指定线程是否在执行
- (BOOL)isExecuting NS_AVAILABLE(10_5, 2_0);
// 线程是否完成
- (BOOL)isFinished NS_AVAILABLE(10_5, 2_0);
// 线程是否被取消 (是否给当前线程发过取消信号)
- (BOOL)isCancelled NS_AVAILABLE(10_5, 2_0);
// 发送线程取消信号的 最终线程是否结束 由 线程本身决定
- (void)cancel NS_AVAILABLE(10_5, 2_0);
// 启动线程
- (void)start NS_AVAILABLE(10_5, 2_0);
// 线程主函数 在线程中执行的函数 都要在-main函数中调用,自定义线程中重写-main方法
- (void)main NS_AVAILABLE(10_5, 2_0); // thread body metho2.2 GCD 实现多线程
首先关于同步,异步,并行,串行,一张图便可说清楚。

文字版:
dispatch :派遣/调度
queue:队列
    用来存放任务的先进先出(FIFO)的容器
sync:同步
    只是在当前线程中执行任务,不具备开启新线程的能力
async:异步
    可以在新的线程中执行任务,具备开启新线程的能力
concurrent:并发
    多个任务并发(同时)执行
串行:
    一个任务执行完毕后,再执行下一个任务
2.2.1 任务
 - queue:队列
 - block:任务
// 1.用同步的方式执行任务
dispatch_sync(dispatch_queue_t queue, dispatch_block_t block);

// 2.用异步的方式执行任务
dispatch_async(dispatch_queue_t queue, dispatch_block_t block);

// 3.GCD中还有个用来执行任务的函数
// 在前面的任务执行结束后它才执行,而且它后面的任务等它执行完成之后才会执行
dispatch_barrier_async(dispatch_queue_t queue, dispatch_block_t block);
2.2.2 队列
- 串行队列:串行队列一次只调度一个任务,一个任务完成后再调度下一个任务。
// 1.使用dispatch_queue_create函数创建串行队列
// 创建串行队列(队列类型传递NULL或者DISPATCH_QUEUE_SERIAL)
dispatch_queue_t queue = dispatch_queue_create("队列名称", NULL);

// 2.使用dispatch_get_main_queue()获得主队列
dispatch_queue_t queue = dispatch_get_main_queue();
注意:主队列是GCD自带的一种特殊的串行队列,放在主队列中的任务,都会放到主线程中执行。- 并发队列:并发队列可以同时调度多个任务,调度任务的方式,取决于执行任务的函数;并发功能只有在异步的(dispatch_async)函数下才有效;异步状态下,开启的线程上线由GCD底层决定。
// 1.使用dispatch_queue_create函数创建队列
dispatch_queue_t

//参数一: 队列名称,该名称可以协助开发调试以及崩溃分析报告
//参数二: 队列的类型
dispatch_queue_create(const char * _Nullable label, dispatch_queue_attr_t  _Nullable attr);

// 2.创建并发队列
dispatch_queue_t queue = dispatch_queue_create("queue", DISPATCH_QUEUE_CONCURRENT);

// 线程中通讯常用:
dispatch_async(dispatch_get_global_queue(0, 0), ^{
    // 耗时操作
    // ...
    //放回主线程的函数
    dispatch_async(dispatch_get_main_queue(), ^{
        // 在主线程更新 UI
    });
});- 全局并发队列
//使用dispatch_get_global_queue函数获得全局的并发队列
dispatch_queue_t dispatch_get_global_queue(dispatch_queue_priority_t priority, unsigned long flags);
// dispatch_queue_priority_t priority(队列的优先级 )
// unsigned long flags( 此参数暂时无用,用0即可 )

//获得全局并发队列
dispatch_queue_t queue = dispatch_get_global_queue(DISPATCH_QUEUE_PRIORITY_DEFAULT, 0);
全局并发队列的优先级:
//全局并发队列的优先级
#define DISPATCH_QUEUE_PRIORITY_HIGH 2 // 高优先级
#define DISPATCH_QUEUE_PRIORITY_DEFAULT 0 // 默认(中)优先级
//注意,自定义队列的优先级都是默认优先级
#define DISPATCH_QUEUE_PRIORITY_LOW (-2) // 低优先级
#define DISPATCH_QUEUE_PRIORITY_BACKGROUND INT16_MIN // 后台优先级
2.2.3 GCD 的其他用法
- 延时执行
dispatch_after(3.0, dispatch_get_main_queue(), ^{
   /// 延时3秒执行的操作!
});- 一次性执行
// 使用dispatch_once函数能保证某段代码在程序运行过程中只被执行1次
static dispatch_once_t onceToken;
dispatch_once(&onceToken, ^{
    // 只执行1次的代码(这里面默认是线程安全的)
});- 调度组(队列组)
//创建调度组
dispatch_group_t group = dispatch_group_create();
//将调度组添加到队列,执行 block 任务
dispatch_group_async(group, queue, block);
//当调度组中的所有任务执行结束后,获得通知,统一做后续操作
dispatch_group_notify(group, dispatch_get_main_queue(), block);
例如:
// 分别异步执行2个耗时的操作、2个异步操作都执行完毕后,再回到主线程执行操作
dispatch_group_t group =  dispatch_group_create();
dispatch_group_async(group, dispatch_get_global_queue(DISPATCH_QUEUE_PRIORITY_DEFAULT, 0), ^{
    // 执行1个耗时的异步操作
});
dispatch_group_async(group, dispatch_get_global_queue(DISPATCH_QUEUE_PRIORITY_DEFAULT, 0), ^{
    // 执行1个耗时的异步操作
});
dispatch_group_notify(group, dispatch_get_main_queue(), ^{
    // 等前面的异步操作都执行完毕后,回到主线程...
});- GCD 定时器
dispatch_source_t source = dispatch_source_create(DISPATCH_SOURCE_TYPE_TIMER,0, 0, DISPATCH_TARGET_QUEUE_DEFAULT);
dispatch_source_set_event_handler(source, ^(){
     NSLog(@"Time flies.");
});
dispatch_time_t start
dispatch_source_set_timer(source, DISPATCH_TIME_NOW, 5ull * NSEC_PER_SEC,100ull * NSEC_PER_MSEC);
self.source = source;
dispatch_resume(self.source);
2.2.4 GCD 自定义封装工具类
//
//  XWGCDManager.h
//  XWGCDManager
//
//  Created by 邱学伟 on 2017/3/3.
//  Copyright © 2017年 邱学伟. All rights reserved.
//

#import <Foundation/Foundation.h>
#import "XWGCDGroup.h"
@interface XWGCDManager : NSObject
/// 主线程执行
+ (void)executeInMainQueue:(dispatch_block_t)block;
/// 默认异步线程执行
+ (void)executeInGlobalQueue:(dispatch_block_t)block;
/// 高优先级异步线程执行
+ (void)executeInHighPriorityGlobalQueue:(dispatch_block_t)block;
/// 低优先级异步线程执行
+ (void)executeInLowPriorityGlobalQueue:(dispatch_block_t)block;
/// 后台优先级异步线程执行
+ (void)executeInBackgroundPriorityGlobalQueue:(dispatch_block_t)block;
/// 主线程延时执行
+ (void)executeInMainQueue:(dispatch_block_t)block afterDelaySecs:(NSTimeInterval)sec;
/// 默认异步线程延时执行
+ (void)executeInGlobalQueue:(dispatch_block_t)block afterDelaySecs:(NSTimeInterval)sec;
/// 高优先级异步线程延时执行
+ (void)executeInHighPriorityGlobalQueue:(dispatch_block_t)block afterDelaySecs:(NSTimeInterval)sec;
/// 低优先级异步线程延时执行
+ (void)executeInLowPriorityGlobalQueue:(dispatch_block_t)block afterDelaySecs:(NSTimeInterval)sec;
/// 后台优先级异步线程延时执行
+ (void)executeInBackgroundPriorityGlobalQueue:(dispatch_block_t)block afterDelaySecs:(NSTimeInterval)sec;
/// 当前是否在主线程
+ (BOOL)isMainQueue;
/// 在线程组添加异步任务
- (void)execute:(dispatch_block_t)block inGroup:(XWGCDGroup *)group;
/// 监听某异步线程组中操作完成执行任务
- (void)notify:(dispatch_block_t)block inGroup:(XWGCDGroup *)group;

+ (XWGCDManager *)mainQueue;
+ (XWGCDManager *)globalQueue;
+ (XWGCDManager *)highPriorityGlobalQueue;
+ (XWGCDManager *)lowPriorityGlobalQueue;
+ (XWGCDManager *)backgroundPriorityGlobalQueue;
@end
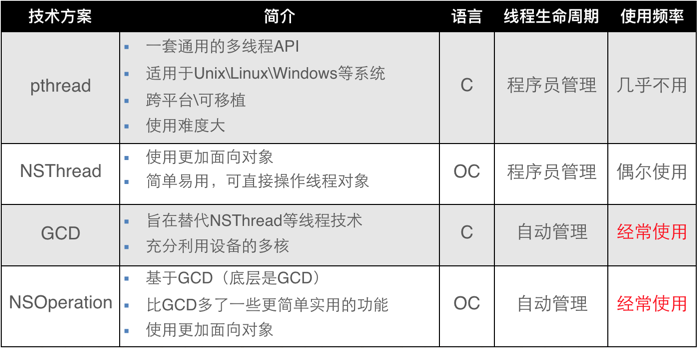
2.3 NSOperation 实现多线程
NSOperation是基于GCD的面向对象的使用OC语言的封装。相比GCD,NSOperation的使用更加简单。NSOperation 是一个抽象类,也就是说它并不能直接使用,而是应该使用它的子类。使用它的子类的方法有三种,使用苹果为我们提供的两个子类 NSInvocationOperation, NSBlockOperation 和自定义继承自NSOperation的子类。
NSOperation的使用常常是配合NSOperationQueue来进行的。只要是使用 NSOperation 的子类创建的实例就能添加到 NSOperationQueue 操作队列之中,一旦添加到队列,操作就会自动异步执行(注意是异步)。如果没有添加到队列,而是使用 start 方法,则会在当前线程执行。
我们知道,线程间的通信主要是主线程与分线程之间进行的。主线程到分线程,NSOperation子类也有相应带参数的方法;而分线程到主线程,比如更新UI,它也有很方便的获取主队列(被添加到主队列的操作默认会在主线程执行)的方法:[NSOperationQueue mainQueue]。
2.3.1 NSInvocationOperation
在当前线程中运行:
- (void)testNSOperation {
    NSInvocationOperation *operation1 = [[NSInvocationOperation alloc] initWithTarget:self selector:@selector(downloadMethod1:) object:@"url"];
    [operation1 start];
}
- (void)downloadMethod1:(id)obj {
    NSLog(@"object: %@ ++ 当前线程: %@",obj,[NSThread currentThread]);
}
运行结果:
(lldb) po [obj class]
__NSCFConstantString

2018-05-15 10:45:09.827562+0800 XWThreadDemo[3148:59049] object: url ++ 当前线程: <NSThread: 0x608000072600>{number = 1, name = main}
在异步线程中运行:
- (void)testNSOperation {
    NSInvocationOperation *operation1 = [[NSInvocationOperation alloc] initWithTarget:self selector:@selector(downloadMethod1:) object:@"url"];
    NSOperationQueue *queue1 = [[NSOperationQueue alloc] init];
    [queue1 addOperation:operation1];
}
- (void)downloadMethod1:(id)obj {
    NSLog(@"object: %@ ++ 当前线程: %@",obj,[NSThread currentThread]);
}
运行结果:
2018-05-15 10:47:15.889087+0800 XWThreadDemo[3226:62634] object: url ++ 当前线程: <NSThread: 0x60800027cb80>{number = 3, name = (null)}2.3.2 NSBlockOperation
在不同异步线程添加多个执行方法
- (void)testNSOperation1 {
    NSLog(@"开始");
    /// 创建操作队列
    NSOperationQueue *queue = [[NSOperationQueue alloc] init];
    for (int i = 0; i < 10; i++) {
        /// 异步操作
        NSBlockOperation *blockOperation = [NSBlockOperation blockOperationWithBlock:^{
            NSLog(@"线程:%@,  index: %d",[NSThread currentThread],i);
        }];
        /// 添加到队列中自动异步执行
        [queue addOperation:blockOperation];
    }
    NSLog(@"结束");
}
运行结果:
2018-05-15 10:52:09.662844+0800 XWThreadDemo[3368:69422] 开始
2018-05-15 10:52:09.663440+0800 XWThreadDemo[3368:69536] 线程:<NSThread: 0x604000478f80>{number = 4, name = (null)},  index: 2
2018-05-15 10:52:09.663441+0800 XWThreadDemo[3368:69540] 线程:<NSThread: 0x600000269a80>{number = 3, name = (null)},  index: 0
2018-05-15 10:52:09.663450+0800 XWThreadDemo[3368:69422] 结束
2018-05-15 10:52:09.663468+0800 XWThreadDemo[3368:69535] 线程:<NSThread: 0x60c00007f980>{number = 5, name = (null)},  index: 3
2018-05-15 10:52:09.663470+0800 XWThreadDemo[3368:69534] 线程:<NSThread: 0x604000479040>{number = 6, name = (null)},  index: 1
2018-05-15 10:52:09.663514+0800 XWThreadDemo[3368:69533] 线程:<NSThread: 0x600000269ac0>{number = 7, name = (null)},  index: 4
2018-05-15 10:52:09.663534+0800 XWThreadDemo[3368:69548] 线程:<NSThread: 0x600000269a40>{number = 8, name = (null)},  index: 5
2018-05-15 10:52:09.663547+0800 XWThreadDemo[3368:69549] 线程:<NSThread: 0x604000479000>{number = 9, name = (null)},  index: 6
2018-05-15 10:52:09.663566+0800 XWThreadDemo[3368:69550] 线程:<NSThread: 0x600000269a00>{number = 10, name = (null)},  index: 7
2018-05-15 10:52:09.663613+0800 XWThreadDemo[3368:69551] 线程:<NSThread: 0x608000272900>{number = 11, name = (null)},  index: 8
2018-05-15 10:52:09.663616+0800 XWThreadDemo[3368:69552Test Case '-[XWThreadDemoTests testNSOperation1]' passed (0.002 seconds).
] 线程:<NSThread: 0x600000269b80>{number = 12, name = (null)}, index: 9- 使用NSBlockOperation的语法糖
- (void)testNSOperation2 {
    NSOperationQueue *queue = [[NSOperationQueue alloc] init];
    [queue addOperationWithBlock:^{
        NSLog(@"异步执行");
    }];
}- 线程中通信:
- (void)testNSOperation3 {
    NSOperationQueue *queue = [[NSOperationQueue alloc] init];
    [queue addOperationWithBlock:^{
        NSLog(@"异步执行");
        [[NSOperationQueue mainQueue] addOperationWithBlock:^{
            NSLog(@"回到主线程中执行!");
        }];
    }];
}
2.3.3 NSOperationQueue 的一些高级操作
1. 最大并发数
queue.maxConcurrentOperationCount = 2;2. 添加线程依赖
- (void)testNSOperationDepend {
    /// 定义三个异步操作
    NSBlockOperation *operation1 = [NSBlockOperation blockOperationWithBlock:^{
        sleep(1);
        NSLog(@"operation1 - 当前线程:%@",[NSThread currentThread]);
    }];
    NSBlockOperation *operation2 = [NSBlockOperation blockOperationWithBlock:^{
        sleep(5);
        NSLog(@"operation2 - 当前线程:%@",[NSThread currentThread]);
    }];
    NSBlockOperation *operation3 = [NSBlockOperation blockOperationWithBlock:^{
        sleep(3);
        NSLog(@"operation3 - 当前线程:%@",[NSThread currentThread]);
    }];
    /// 定义主线程更新UI操作
    NSBlockOperation *operationMain = [NSBlockOperation blockOperationWithBlock:^{
        NSLog(@"operationMain - 更新UI - 当前线程:%@",[NSThread currentThread]);
    }];

    /// 添加依赖
    [operation1 addDependency:operation3];
    [operation1 addDependency:operation2];
    [operationMain addDependency:operation3];

    /// 异步线程添加异步队列
    NSOperationQueue *queue = [[NSOperationQueue alloc] init];
    [queue addOperations:@[operation1,operation2,operation3] waitUntilFinished:YES];

    /// 刷新UI添加主线程队列
    [[NSOperationQueue mainQueue] addOperation:operationMain];
}
输出:
Test Case '-[XWThreadDemoTests testNSOperationDepend]' started.
2018-05-15 11:10:44.389619+0800 XWThreadDemo[3825:89159] operation3 - 当前线程:<NSThread: 0x608000265f00>{number = 3, name = (null)}
2018-05-15 11:10:46.386336+0800 XWThreadDemo[3825:89156] operation2 - 当前线程:<NSThread: 0x60400026a840>{number = 4, name = (null)}
2018-05-15 11:10:47.389426+0800 XWThreadDemo[3825:89156] operation1 - 当前线程:<NSThread: 0x60400026a840>{number = 4, name = (null)}
2018-05-15 11:10:47.394948+0800 XWThreadDemo[3825:89109] operationMain - 更新UI - 当前线程:<NSThread: 0x60c0000796c0>{number = 1, name = main}
3. 线程挂起
- (void)testNSOperationSuspended {
    //判断操作的数量,当前队列里面是不是有操作?
    NSOperationQueue *queue = [[NSOperationQueue alloc] init];
    if (queue.operationCount == 0) {
        NSLog(@"当前队列没有操作");
        return;
    }

    queue.suspended = !queue.isSuspended;
    if (queue.suspended) {
        NSLog(@"暂停");

    }else{
        NSLog(@"继续");
    }
}
暂停继续(对队列的暂停和继续),挂起的是队列,不会影响已经在执行的操作
4. 取消队列中所有操作
- (void)testNSOperationCancel {
    //只能取消所有队列的里面的操作,正在执行的无法取消
    //取消操作并不会影响队列的挂起状态
    NSOperationQueue *queue = [[NSOperationQueue alloc] init];
    [queue cancelAllOperations];
    NSLog(@"取消队列里所有的操作");
    //取消队列的挂起状态
    //(只要是取消了队列的操作,我们就把队列处于不挂起状态,以便于后续的开始)
    queue.suspended = NO;
}
取消所有队列的里面的操作,正在执行的无法取消
3 多线程实战
3.1 输出一百万个数字中最大值和最小值
- pthread
//
//  main.m
//  XWThreadDemo
//
//  Created by 邱学伟 on 2018/5/14.
//  Copyright © 2018年 邱学伟. All rights reserved.
//

#import <UIKit/UIKit.h>
#import "AppDelegate.h"
#import <pthread.h>

struct threadInfo {
    uint32_t * inputValues;
    size_t count;
};

struct threadResult {
    uint32_t min;
    uint32_t max;
};

void * findMinAndMax(void *arg) {
    struct threadInfo const * const info = (struct threadInfo *) arg;
    uint32_t min = UINT32_MAX;
    uint32_t max = 0;
    for (size_t i = 0; i < info -> count; i++) {
        uint32_t value = info -> inputValues[i];
        min = MIN(min, value);
        max = MAX(max, value);
    }
    free(arg);
    struct threadResult * const result = (struct threadResult *) malloc(sizeof( * result));
    result -> min = min;
    result -> max = max;
    return result;
}

int main(int argc, char * argv[]) {
        size_t const count = 100000;
        uint32_t inputValues[count];
        // 填充随机数字
        for (size_t i = 0; i < count; i++) {
            inputValues[i] = arc4random();
        }

        // 开启4个寻找最大最小值的线程
        size_t threadCount = 4;
        pthread_t threads[threadCount];
        for (size_t i = 0; i < threadCount; i++) {
            struct threadInfo * const info = (struct threadInfo *)malloc(sizeof(*info));
            size_t offset = (count / threadCount) * i;
            info -> inputValues = inputValues + offset;
            info -> count = MIN(count - offset, count / threadCount);
            int error = pthread_create(threads + i, NULL, &findMinAndMax, info);
            NSCAssert(error == 0, @"pthread_create() failed: %d", error);
        }

        // 等待线程退出
        struct threadResult * results[threadCount];
        for (size_t i = 0; i < threadCount; i++) {
            int error = pthread_join(threads[i], (void **) &(results[i]));
            NSCAssert(error == 0, @"pthread_join() failed: %d", error);
        }

        // 寻找min 和 max
        uint32_t min = UINT32_MAX;
        uint32_t max = 0;
        for (size_t i = 0; i < threadCount; i++) {
            min = MIN(min, results[i] -> min);
            max = MAX(max, results[i] -> max);
            free(results[i]);
            results[i] = NULL;
        }
        NSLog(@"最小值: %u",min);
        NSLog(@"最大值: %u",max);
    return 0;
}
输出:
2018-05-15 14:04:54.347292+0800 XWThreadDemo[8078:249234] 最小值: 30715
2018-05-15 14:04:54.348308+0800 XWThreadDemo[8078:249234] 最大值: 4294961465- NSThread
//
//  ViewController.m
//  XWThreadDemo
//
//  Created by 邱学伟 on 2018/5/14.
//  Copyright © 2018年 邱学伟. All rights reserved.
//

#import "ViewController.h"

@interface XWFindMinAndMaxThread : NSThread
@property (nonatomic, assign) NSUInteger min;
@property (nonatomic, assign) NSUInteger max;
- (instancetype)initWithNumbers:(NSArray <NSNumber *>*)numbers;
@end
@implementation XWFindMinAndMaxThread {
    NSArray <NSNumber *> *_numbers;
}
- (instancetype)initWithNumbers:(NSArray *)numbers {
    if (self = [super init]) {
        _numbers = numbers;
        [self work];
    }
    return self;
}
- (void)work {
    NSUInteger max = 0;
    NSUInteger min = NSUIntegerMax;
    for (NSNumber *number in _numbers) {
        max = MAX(max, number.unsignedIntegerValue);
        min = MIN(min, number.unsignedIntegerValue);
    }
    self.min = min;
    self.max = max;
}
@end

@implementation ViewController

- (void)viewDidLoad {

    NSMutableArray *numberArrayM = [NSMutableArray array];
    NSUInteger count = 100000;
    /// 模拟10000个随机数
    for (NSUInteger i = 0; i < count; i++) {
        [numberArrayM addObject:[NSNumber numberWithUnsignedInteger:arc4random()]];
    }

    NSMutableArray <XWFindMinAndMaxThread *> *threads = [NSMutableArray array];
    NSUInteger threadCount = 4;
    NSUInteger numberCount = numberArrayM.count;

    for (NSUInteger i = 0; i < threadCount; i++) {
        NSUInteger offset = (numberCount / threadCount) * i;
        NSUInteger count = MIN(numberCount - offset, numberCount / threadCount);
        NSRange range = NSMakeRange(offset, count);
        NSArray *subSet = [numberArrayM subarrayWithRange:range];
        XWFindMinAndMaxThread *findThread = [[XWFindMinAndMaxThread alloc] initWithNumbers:subSet];
        [threads addObject:findThread];
        [findThread start];
    }

    NSUInteger max = 0;
    NSUInteger min = NSUIntegerMax;
    for (NSUInteger i = 0; i < threadCount; i++) {
        max = MAX(max, threads[i].max);
        min = MIN(min, threads[i].min);
    }

    NSLog(@"最小值: %lu",(unsigned long)min);
    NSLog(@"最大值: %lu",(unsigned long)max);
}
@end
输出:
2018-05-15 14:50:51.106993+0800 XWThreadDemo[9540:301745] 最小值: 13300
2018-05-15 14:50:51.107075+0800 XWThreadDemo[9540:301745] 最大值: 4294951952
3.2 使用 Dispatch Barrier 解决多线程并发读写同一个资源发生死锁
- (void)testBarrierSetCount:(NSUInteger)count forKey:(NSString *)key {
    key = [key copy];
    dispatch_queue_t queue = dispatch_queue_create([@"BarrierQueue" UTF8String], DISPATCH_QUEUE_CONCURRENT);
    dispatch_barrier_async(queue, ^{
        if (count == 0) {
            [self.dictM removeObjectForKey:key];
        }else{
            [self.dictM setObject:@(count) forKey:key];
        }
    });
}
3.3 使用 dispatch_apply 实现效率更高的for循环
- 普通 for 循环
- (void)testCommonFor {
    NSLog(@"普通for循环开启");
    NSUInteger max = 10000;
    for (NSUInteger i = 0; i < max; i++) {
        for (NSUInteger j = 0; j < max; j++) {
            /// 执行某操作
        }
    }
    NSLog(@"普通for循环结束");
}
执行时间:21.762 秒
Test Case '-[XWThreadDemoTests testCommonFor]' started.
2018-05-15 17:14:20.215454+0800 XWThreadDemo[23816:496201] 普通for循环开启
2018-05-15 17:14:41.976168+0800 XWThreadDemo[23816:496201] 普通for循环结束
Test Case '-[XWThreadDemoTests testCommonFor]' passed (21.762 seconds).- 循环
- (void)testApplyFor {
    NSLog(@" dispatch_apply 循环开启");
    size_t max = 100000;
    dispatch_queue_t queue = dispatch_queue_create([@"dispatch_apply" UTF8String], DISPATCH_QUEUE_CONCURRENT);
    dispatch_apply(max, queue, ^(size_t i) {
        dispatch_apply(max, queue, ^(size_t j) {
            /// 执行某操作
        });
    });
    NSLog(@" dispatch_apply 循环结束");
}
执行时间:7.832 秒
Test Case '-[XWThreadDemoTests testApplyFor]' started.
2018-05-15 17:15:51.990662+0800 XWThreadDemo[23881:498546]  dispatch_apply 循环开启
2018-05-15 17:15:59.821032+0800 XWThreadDemo[23881:498546]  dispatch_apply 循环结束
Test Case '-[XWThreadDemoTests testApplyFor]' passed (7.832 seconds).
dispatch_apply 实现的for循环有更高的效率!
3.4 使用 dispatch_group_t 追踪不同队列中的不同任务
- (void)testGCDGroup {
    NSArray *urls = @[@"https://raw.githubusercontent.com/qxuewei/XWCSDNDemos/master/Images/sleepForTimeInterval.png",@"https://raw.githubusercontent.com/qxuewei/XWResources/master/images/threads.png",@"https://raw.githubusercontent.com/qxuewei/XWCSDNDemos/master/Images/sleepForTimeInterval.png"];
    [self downloadImage:urls completion:^(NSArray<UIImage *> *images) {
        NSLog(@"image数量:%lu - %@",(unsigned long)images.count,images);
    }];
}
- (void)downloadImage:(NSArray <NSString *>*)urls completion:(void(^)(NSArray <UIImage *> *images))completion {
    dispatch_async(dispatch_get_global_queue(DISPATCH_QUEUE_PRIORITY_DEFAULT, 0), ^{
        NSMutableArray *imagesM = [NSMutableArray array];
        dispatch_group_t group = dispatch_group_create();
        for (NSString *url in urls) {
            if (url.length == 0) {
                continue;
            }

            // 开启下载线程->
            dispatch_async(dispatch_get_global_queue(DISPATCH_QUEUE_PRIORITY_DEFAULT, 0), ^{
                //dispatch_group_enter是通知dispatch group任务开始了,dispatch_group_enter和dispatch_group_leave是成对调用,不然程序就崩溃了。
                dispatch_group_enter(group);
                NSData *imageData = [NSData dataWithContentsOfURL:[NSURL URLWithString:url]];
                UIImage *image = [UIImage imageWithData:imageData];
                if (image) {
                    [imagesM addObject:image];
                }
                NSLog(@"当前下载线程:%@",[NSThread currentThread]);
                // 保持和dispatch_group_enter配对。通知任务已经完成
                dispatch_group_leave(group);
            });
        }
        // 保持和dispatch_group_enter配对。通知任务已经完成
        dispatch_group_wait(group, DISPATCH_TIME_FOREVER);
        // 这里可以保证所有图片任务都完成,然后在main queue里加入完成后要处理的闭包,会在main queue里执行。
        dispatch_async(dispatch_get_main_queue(), ^{
            if (completion) {
                completion(imagesM.copy);
            }
        });
    });
}
运行结果:
2018-05-15 17:34:47.265197+0800 XWThreadDemo[24470:522115] 当前下载线程:<NSThread: 0x600000270300>{number = 4, name = (null)}
2018-05-15 17:34:48.738196+0800 XWThreadDemo[24470:522114] 当前下载线程:<NSThread: 0x608000269440>{number = 5, name = (null)}
2018-05-15 17:34:49.446782+0800 XWThreadDemo[24470:522111] 当前下载线程:<NSThread: 0x604000072c40>{number = 3, name = (null)}
2018-05-15 17:34:59.357622+0800 XWThreadDemo[24470:522022] image数量:3 - (
    "<UIImage: 0x6040000b70a0>, {1260, 388}",
    "<UIImage: 0x6080000b3320>, {1260, 388}",
    "<UIImage: 0x6040000b7220>, {698, 348}"
)
Demo2
- (void)testGCDGroup2 {
    dispatch_group_t group = dispatch_group_create();
    dispatch_queue_t queue = dispatch_get_global_queue(0, 0);
    __block NSMutableArray <UIImage *> *images = [NSMutableArray array];

    dispatch_group_async(group, queue, ^(){
        // 会处理一会
        [images addObject:[self imageWithUrl:@"https://raw.githubusercontent.com/qxuewei/XWCSDNDemos/master/Images/sleepForTimeInterval.png"]];
        NSLog(@"图片1线程 - %@",[NSThread currentThread]);
    });
    dispatch_group_async(group, queue, ^(){
        // 处理一会儿
        [images addObject:[self imageWithUrl:@"https://raw.githubusercontent.com/qxuewei/XWResources/master/images/threads.png"]];
        NSLog(@"图片2线程 - %@",[NSThread currentThread]);
    });

    // 上面的都搞定后这里会执行一次
    dispatch_group_notify(group, dispatch_get_main_queue(), ^(){
        NSLog(@"image数量:%lu - %@",(unsigned long)images.count,images);
    });
}
运行结果:
2018-05-15 17:48:36.616813+0800 XWThreadDemo[26394:540836] 图片2线程 - <NSThread: 0x600000273340>{number = 4, name = (null)}
2018-05-15 17:48:38.395960+0800 XWThreadDemo[26394:540833] 图片1线程 - <NSThread: 0x6040002772c0>{number = 5, name = (null)}
2018-05-15 17:48:38.396442+0800 XWThreadDemo[26394:540711] image数量:2 - (
    "<UIImage: 0x6080002a6a80>, {698, 348}",
    "<UIImage: 0x6040002a38a0>, {1260, 388}"
)
3.5 drawRect在后台绘制
drawRect:方法会影响性能,所以可以放到后台执行。
//使用UIGraphicsBeginImageContextWithOptions取代UIGraphicsGetCurrentContext:方法
UIGraphicsBeginImageContextWithOptions(size, NO, 0);
// drawing code here
UIImage *i = UIGraphicsGetImageFromCurrentImageContext();
UIGraphicsEndImageContext();


 134
134


 被折叠的 条评论
为什么被折叠?
被折叠的 条评论
为什么被折叠?
 到【灌水乐园】发言


