


Android Volley完全解析(一),初识Volley的基本用法
转载请注明出处:http://blog.csdn.net/guolin_blog/article/details/17482095
1. Volley简介
我们平时在开发Android应用的时候不可避免地都需要用到网络技术,而多数情况下应用程序都会使用HTTP协议来发送和接收网络数据。Android系统中主要提供了两种方式来进行HTTP通信,HttpURLConnection和HttpClient,几乎在任何项目的代码中我们都能看到这两个类的身影,使用率非常高。
不过HttpURLConnection和HttpClient的用法还是稍微有些复杂的,如果不进行适当封装的话,很容易就会写出不少重复代码。于是乎,一些Android网络通信框架也就应运而生,比如说AsyncHttpClient,它把HTTP所有的通信细节全部封装在了内部,我们只需要简单调用几行代码就可以完成通信操作了。再比如Universal-Image-Loader,它使得在界面上显示网络图片的操作变得极度简单,开发者不用关心如何从网络上获取图片,也不用关心开启线程、回收图片资源等细节,Universal-Image-Loader已经把一切都做好了。
Android开发团队也是意识到了有必要将HTTP的通信操作再进行简单化,于是在2013年Google I/O大会上推出了一个新的网络通信框架——Volley。Volley可是说是把AsyncHttpClient和Universal-Image-Loader的优点集于了一身,既可以像AsyncHttpClient一样非常简单地进行HTTP通信,也可以像Universal-Image-Loader一样轻松加载网络上的图片。除了简单易用之外,Volley在性能方面也进行了大幅度的调整,它的设计目标就是非常适合去进行数据量不大,但通信频繁的网络操作,而对于大数据量的网络操作,比如说下载文件等,Volley的表现就会非常糟糕。
下图所示的这些应用都是属于数据量不大,但网络通信频繁的,因此非常适合使用Volley。

2. 下载Volley
介绍了这么多理论的东西,下面我们就准备开始进行实战了,首先需要将Volley的jar包准备好,如果你的电脑上装有Git,可以使用如下命令下载Volley的源码:
- git clone https://android.googlesource.com/platform/frameworks/volley
新建一个Android项目,将volley.jar文件复制到libs目录下,这样准备工作就算是做好了。
3. StringRequest的用法
前面已经说过,Volley的用法非常简单,那么我们就从最基本的HTTP通信开始学习吧,即发起一条HTTP请求,然后接收HTTP响应。首先需要获取到一个RequestQueue对象,可以调用如下方法获取到:
- RequestQueue mQueue = Volley.newRequestQueue(context);
接下来为了要发出一条HTTP请求,我们还需要创建一个StringRequest对象,如下所示:
- StringRequest stringRequest = new StringRequest("http://www.baidu.com",
- new Response.Listener<String>() {
- @Override
- public void onResponse(String response) {
- Log.d("TAG", response);
- }
- }, new Response.ErrorListener() {
- @Override
- public void onErrorResponse(VolleyError error) {
- Log.e("TAG", error.getMessage(), error);
- }
- });
最后,将这个StringRequest对象添加到RequestQueue里面就可以了,如下所示:
- mQueue.add(stringRequest);
另外,由于Volley是要访问网络的,因此不要忘记在你的AndroidManifest.xml中添加如下权限:
- <uses-permission android:name="android.permission.INTERNET" />
好了,就是这么简单,如果你现在运行一下程序,并发出这样一条HTTP请求,就会看到LogCat中会打印出如下图所示的数据。
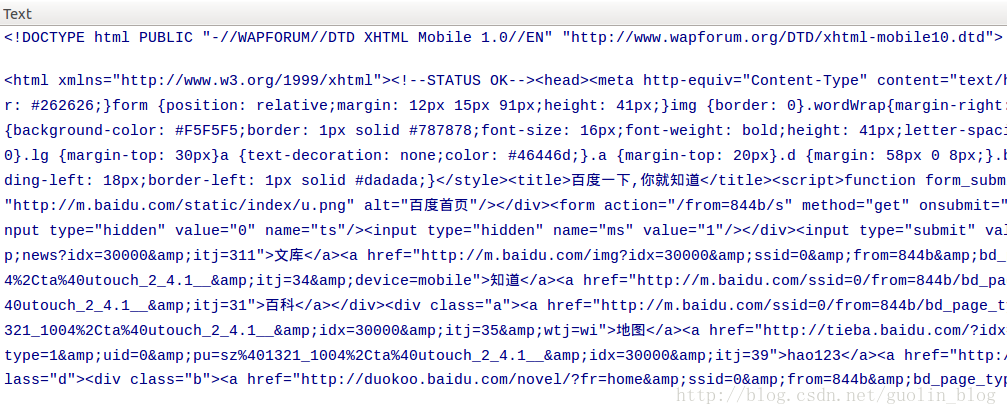
没错,百度返回给我们的就是这样一长串的HTML代码,虽然我们看起来会有些吃力,但是浏览器却可以轻松地对这段HTML代码进行解析,然后将百度的首页展现出来。
这样的话,一个最基本的HTTP发送与响应的功能就完成了。你会发现根本还没写几行代码就轻易实现了这个功能,主要就是进行了以下三步操作:
1. 创建一个RequestQueue对象。
2. 创建一个StringRequest对象。
3. 将StringRequest对象添加到RequestQueue里面。
不过大家都知道,HTTP的请求类型通常有两种,GET和POST,刚才我们使用的明显是一个GET请求,那么如果想要发出一条POST请求应该怎么做呢?StringRequest中还提供了另外一种四个参数的构造函数,其中第一个参数就是指定请求类型的,我们可以使用如下方式进行指定:
- StringRequest stringRequest = new StringRequest(Method.POST, url, listener, errorListener);
- StringRequest stringRequest = new StringRequest(Method.POST, url, listener, errorListener) {
- @Override
- protected Map<String, String> getParams() throws AuthFailureError {
- Map<String, String> map = new HashMap<String, String>();
- map.put("params1", "value1");
- map.put("params2", "value2");
- return map;
- }
- };
4. JsonRequest的用法
学完了最基本的StringRequest的用法,我们再来进阶学习一下JsonRequest的用法。类似于StringRequest,JsonRequest也是继承自Request类的,不过由于JsonRequest是一个抽象类,因此我们无法直接创建它的实例,那么只能从它的子类入手了。JsonRequest有两个直接的子类,JsonObjectRequest和JsonArrayRequest,从名字上你应该能就看出它们的区别了吧?一个是用于请求一段JSON数据的,一个是用于请求一段JSON数组的。
至于它们的用法也基本上没有什么特殊之处,先new出一个JsonObjectRequest对象,如下所示:
- JsonObjectRequest jsonObjectRequest = new JsonObjectRequest("http://m.weather.com.cn/data/101010100.html", null,
- new Response.Listener<JSONObject>() {
- @Override
- public void onResponse(JSONObject response) {
- Log.d("TAG", response.toString());
- }
- }, new Response.ErrorListener() {
- @Override
- public void onErrorResponse(VolleyError error) {
- Log.e("TAG", error.getMessage(), error);
- }
- });
最后再将这个JsonObjectRequest对象添加到RequestQueue里就可以了,如下所示:
- mQueue.add(jsonObjectRequest);
由此可以看出,服务器返回给我们的数据确实是JSON格式的,并且onResponse()方法中携带的参数也正是一个JSONObject对象,之后只需要从JSONObject对象取出我们想要得到的那部分数据就可以了。
你应该发现了吧,JsonObjectRequest的用法和StringRequest的用法基本上是完全一样的,Volley的易用之处也在这里体现出来了,会了一种就可以让你举一反三,因此关于JsonArrayRequest的用法相信已经不需要我再去讲解了吧。
好了,关于Volley的基本用法就讲到这里,下篇文章中我会带领大家继续探究Volley。
Android Volley完全解析(二),使用Volley加载网络图片
转载请注明出处:http://blog.csdn.net/guolin_blog/article/details/17482165
在上一篇文章中,我们了解了Volley到底是什么,以及它的基本用法。本篇文章中我们即将学习关于Volley更加高级的用法,如何你还没有看过我的上一篇文章的话,建议先去阅读Android Volley完全解析(一),初识Volley的基本用法。
在上篇文章中有提到过,Volley是将AsyncHttpClient和Universal-Image-Loader的优点集成于一身的一个框架。我们都知道,Universal-Image-Loader具备非常强大的加载网络图片的功能,而使用Volley,我们也可以实现基本类似的效果,并且在性能上也豪不逊色于Universal-Image-Loader,下面我们就来具体学习一下吧。
1. ImageRequest的用法
前面我们已经学习过了StringRequest和JsonRequest的用法,并且总结出了它们的用法都是非常类似的,基本就是进行以下三步操作即可:
1. 创建一个RequestQueue对象。
2. 创建一个Request对象。
3. 将Request对象添加到RequestQueue里面。
其中,StringRequest和JsonRequest都是继承自Request的,所以它们的用法才会如此类似。那么不用多说,今天我们要学习的ImageRequest,相信你从名字上就已经猜出来了,它也是继承自Request的,因此它的用法也是基本相同的,首先需要获取到一个RequestQueue对象,可以调用如下方法获取到:
- RequestQueue mQueue = Volley.newRequestQueue(context);
- ImageRequest imageRequest = new ImageRequest(
- "http://developer.android.com/images/home/aw_dac.png",
- new Response.Listener<Bitmap>() {
- @Override
- public void onResponse(Bitmap response) {
- imageView.setImageBitmap(response);
- }
- }, 0, 0, Config.RGB_565, new Response.ErrorListener() {
- @Override
- public void onErrorResponse(VolleyError error) {
- imageView.setImageResource(R.drawable.default_image);
- }
- });
最后将这个ImageRequest对象添加到RequestQueue里就可以了,如下所示:
- mQueue.add(imageRequest);

2. ImageLoader的用法
如果你觉得ImageRequest已经非常好用了,那我只能说你太容易满足了 ^_^。实际上,Volley在请求网络图片方面可以做到的还远远不止这些,而ImageLoader就是一个很好的例子。ImageLoader也可以用于加载网络上的图片,并且它的内部也是使用ImageRequest来实现的,不过ImageLoader明显要比ImageRequest更加高效,因为它不仅可以帮我们对图片进行缓存,还可以过滤掉重复的链接,避免重复发送请求。
由于ImageLoader已经不是继承自Request的了,所以它的用法也和我们之前学到的内容有所不同,总结起来大致可以分为以下四步:
1. 创建一个RequestQueue对象。
2. 创建一个ImageLoader对象。
3. 获取一个ImageListener对象。
4. 调用ImageLoader的get()方法加载网络上的图片。
下面我们就来按照这个步骤,学习一下ImageLoader的用法吧。首先第一步的创建RequestQueue对象我们已经写过很多遍了,相信已经不用再重复介绍了,那么就从第二步开始学习吧,新建一个ImageLoader对象,代码如下所示:
- ImageLoader imageLoader = new ImageLoader(mQueue, new ImageCache() {
- @Override
- public void putBitmap(String url, Bitmap bitmap) {
- }
- @Override
- public Bitmap getBitmap(String url) {
- return null;
- }
- });
接下来需要获取一个ImageListener对象,代码如下所示:
- ImageListener listener = ImageLoader.getImageListener(imageView,
- R.drawable.default_image, R.drawable.failed_image);
最后,调用ImageLoader的get()方法来加载图片,代码如下所示:
- imageLoader.get("https://img-my.csdn.net/uploads/201404/13/1397393290_5765.jpeg", listener);
get()方法接收两个参数,第一个参数就是图片的URL地址,第二个参数则是刚刚获取到的ImageListener对象。当然,如果你想对图片的大小进行限制,也可以使用get()方法的重载,指定图片允许的最大宽度和高度,如下所示:
- imageLoader.get("https://img-my.csdn.net/uploads/201404/13/1397393290_5765.jpeg",
- listener, 200, 200);
现在运行一下程序并开始加载图片,你将看到ImageView中会先显示一张默认的图片,等到网络上的图片加载完成后,ImageView则会自动显示该图,效果如下图所示。

虽然现在我们已经掌握了ImageLoader的用法,但是刚才介绍的ImageLoader的优点却还没有使用到。为什么呢?因为这里创建的ImageCache对象是一个空的实现,完全没能起到图片缓存的作用。其实写一个ImageCache也非常简单,但是如果想要写一个性能非常好的ImageCache,最好就要借助Android提供的LruCache功能了,如果你对LruCache还不了解,可以参考我之前的一篇博客Android高效加载大图、多图解决方案,有效避免程序OOM。
这里我们新建一个BitmapCache并实现了ImageCache接口,如下所示:
- public class BitmapCache implements ImageCache {
- private LruCache<String, Bitmap> mCache;
- public BitmapCache() {
- int maxSize = 10 * 1024 * 1024;
- mCache = new LruCache<String, Bitmap>(maxSize) {
- @Override
- protected int sizeOf(String key, Bitmap bitmap) {
- return bitmap.getRowBytes() * bitmap.getHeight();
- }
- };
- }
- @Override
- public Bitmap getBitmap(String url) {
- return mCache.get(url);
- }
- @Override
- public void putBitmap(String url, Bitmap bitmap) {
- mCache.put(url, bitmap);
- }
- }
- ImageLoader imageLoader = new ImageLoader(mQueue, new BitmapCache());
3. NetworkImageView的用法
除了以上两种方式之外,Volley还提供了第三种方式来加载网络图片,即使用NetworkImageView。不同于以上两种方式,NetworkImageView是一个自定义控制,它是继承自ImageView的,具备ImageView控件的所有功能,并且在原生的基础之上加入了加载网络图片的功能。NetworkImageView控件的用法要比前两种方式更加简单,大致可以分为以下五步:
1. 创建一个RequestQueue对象。
2. 创建一个ImageLoader对象。
3. 在布局文件中添加一个NetworkImageView控件。4. 在代码中获取该控件的实例。
5. 设置要加载的图片地址。
其中,第一第二步和ImageLoader的用法是完全一样的,因此这里我们就从第三步开始学习了。首先修改布局文件中的代码,在里面加入NetworkImageView控件,如下所示:
- <LinearLayout xmlns:android="http://schemas.android.com/apk/res/android"
- android:layout_width="fill_parent"
- android:layout_height="fill_parent"
- android:orientation="vertical" >
- <Button
- android:id="@+id/button"
- android:layout_width="wrap_content"
- android:layout_height="wrap_content"
- android:text="Send Request" />
- <com.android.volley.toolbox.NetworkImageView
- android:id="@+id/network_image_view"
- android:layout_width="200dp"
- android:layout_height="200dp"
- android:layout_gravity="center_horizontal"
- />
- </LinearLayout>
- networkImageView = (NetworkImageView) findViewById(R.id.network_image_view);
- networkImageView.setDefaultImageResId(R.drawable.default_image);
- networkImageView.setErrorImageResId(R.drawable.failed_image);
- networkImageView.setImageUrl("https://img-my.csdn.net/uploads/201404/13/1397393290_5765.jpeg",
- imageLoader);
好了,就是这么简单,现在重新运行一下程序,你将看到和使用ImageLoader来加载图片一模一样的效果,这里我就不再截图了。
这时有的朋友可能就会问了,使用ImageRequest和ImageLoader这两种方式来加载网络图片,都可以传入一个最大宽度和高度的参数来对图片进行压缩,而NetworkImageView中则完全没有提供设置最大宽度和高度的方法,那么是不是使用NetworkImageView来加载的图片都不会进行压缩呢?
其实并不是这样的,NetworkImageView并不需要提供任何设置最大宽高的方法也能够对加载的图片进行压缩。这是由于NetworkImageView是一个控件,在加载图片的时候它会自动获取自身的宽高,然后对比网络图片的宽度,再决定是否需要对图片进行压缩。也就是说,压缩过程是在内部完全自动化的,并不需要我们关心,NetworkImageView会始终呈现给我们一张大小刚刚好的网络图片,不会多占用任何一点内存,这也是NetworkImageView最简单好用的一点吧。
当然了,如果你不想对图片进行压缩的话,其实也很简单,只需要在布局文件中把NetworkImageView的layout_width和layout_height都设置成wrap_content就可以了,这样NetworkImageView就会将该图片的原始大小展示出来,不会进行任何压缩。
这样我们就把使用Volley来加载网络图片的用法都学习完了,今天的讲解也就到此为止,下一篇文章中我会带大家继续探究Volley的更多功能。
Android Volley完全解析(三),定制自己的Request
转载请注明出处:http://blog.csdn.net/guolin_blog/article/details/17612763
经过前面两篇文章的学习,我们已经掌握了Volley各种Request的使用方法,包括StringRequest、JsonRequest、ImageRequest等。其中StringRequest用于请求一条普通的文本数据,JsonRequest(JsonObjectRequest、JsonArrayRequest)用于请求一条JSON格式的数据,ImageRequest则是用于请求网络上的一张图片。
可是Volley提供给我们的Request类型就只有这么多,而我们都知道,在网络上传输的数据通常有两种格式,JSON和XML,那么如果想要请求一条XML格式的数据该怎么办呢?其实很简单,Volley提供了非常强的扩展机制,使得我们可以很轻松地定制出任意类型的Request,这也就是本篇文章的主题了。
在开始之前还是友情提醒一下,如果你还没有阅读过我前面两篇关于Volley的文章,建议先去阅读一下Android Volley完全解析(一),初识Volley的基本用法和Android Volley完全解析(二),使用Volley加载网络图片。
1. 自定义XMLRequest
下面我们准备自定义一个XMLRequest,用于请求一条XML格式的数据。那么该从哪里开始入手呢?额,好像是有些无从下手。遇到这种情况,我们应该去参考一下Volley的源码,看一看StringRequest是怎么实现的,然后就可以模仿着写出XMLRequest了。首先看下StringRequest的源码,如下所示:
- /**
- * A canned request for retrieving the response body at a given URL as a String.
- */
- public class StringRequest extends Request<String> {
- private final Listener<String> mListener;
- /**
- * Creates a new request with the given method.
- *
- * @param method the request {@link Method} to use
- * @param url URL to fetch the string at
- * @param listener Listener to receive the String response
- * @param errorListener Error listener, or null to ignore errors
- */
- public StringRequest(int method, String url, Listener<String> listener,
- ErrorListener errorListener) {
- super(method, url, errorListener);
- mListener = listener;
- }
- /**
- * Creates a new GET request.
- *
- * @param url URL to fetch the string at
- * @param listener Listener to receive the String response
- * @param errorListener Error listener, or null to ignore errors
- */
- public StringRequest(String url, Listener<String> listener, ErrorListener errorListener) {
- this(Method.GET, url, listener, errorListener);
- }
- @Override
- protected void deliverResponse(String response) {
- mListener.onResponse(response);
- }
- @Override
- protected Response<String> parseNetworkResponse(NetworkResponse response) {
- String parsed;
- try {
- parsed = new String(response.data, HttpHeaderParser.parseCharset(response.headers));
- } catch (UnsupportedEncodingException e) {
- parsed = new String(response.data);
- }
- return Response.success(parsed, HttpHeaderParser.parseCacheHeaders(response));
- }
- }
可以看到,StringRequest的源码很简练,根本就没几行代码,我们一起来分析下。首先StringRequest是继承自Request类的,Request可以指定一个泛型类,这里指定的当然就是String了,接下来StringRequest中提供了两个有参的构造函数,参数包括请求类型,请求地址,以及响应回调等,由于我们已经很熟悉StringRequest的用法了,相信这几个参数的作用都不用再解释了吧。但需要注意的是,在构造函数中一定要调用super()方法将这几个参数传给父类,因为HTTP的请求和响应都是在父类中自动处理的。
另外,由于Request类中的deliverResponse()和parseNetworkResponse()是两个抽象方法,因此StringRequest中需要对这两个方法进行实现。deliverResponse()方法中的实现很简单,仅仅是调用了mListener中的onResponse()方法,并将response内容传入即可,这样就可以将服务器响应的数据进行回调了。parseNetworkResponse()方法中则应该对服务器响应的数据进行解析,其中数据是以字节的形式存放在NetworkResponse的data变量中的,这里将数据取出然后组装成一个String,并传入Response的success()方法中即可。
了解了StringRequest的实现原理,下面我们就可以动手来尝试实现一下XMLRequest了,代码如下所示:
- public class XMLRequest extends Request<XmlPullParser> {
- private final Listener<XmlPullParser> mListener;
- public XMLRequest(int method, String url, Listener<XmlPullParser> listener,
- ErrorListener errorListener) {
- super(method, url, errorListener);
- mListener = listener;
- }
- public XMLRequest(String url, Listener<XmlPullParser> listener, ErrorListener errorListener) {
- this(Method.GET, url, listener, errorListener);
- }
- @Override
- protected Response<XmlPullParser> parseNetworkResponse(NetworkResponse response) {
- try {
- String xmlString = new String(response.data,
- HttpHeaderParser.parseCharset(response.headers));
- XmlPullParserFactory factory = XmlPullParserFactory.newInstance();
- XmlPullParser xmlPullParser = factory.newPullParser();
- xmlPullParser.setInput(new StringReader(xmlString));
- return Response.success(xmlPullParser, HttpHeaderParser.parseCacheHeaders(response));
- } catch (UnsupportedEncodingException e) {
- return Response.error(new ParseError(e));
- } catch (XmlPullParserException e) {
- return Response.error(new ParseError(e));
- }
- }
- @Override
- protected void deliverResponse(XmlPullParser response) {
- mListener.onResponse(response);
- }
- }
可以看到,其实并没有什么太多的逻辑,基本都是仿照StringRequest写下来的,XMLRequest也是继承自Request类的,只不过这里指定的泛型类是XmlPullParser,说明我们准备使用Pull解析的方式来解析XML。在parseNetworkResponse()方法中,先是将服务器响应的数据解析成一个字符串,然后设置到XmlPullParser对象中,在deliverResponse()方法中则是将XmlPullParser对象进行回调。
好了,就是这么简单,下面我们尝试使用这个XMLRequest来请求一段XML格式的数据。http://flash.weather.com.cn/wmaps/xml/china.xml这个接口会将中国所有的省份数据以XML格式进行返回,如下所示:
- <china dn="day" slick-uniqueid="3">
- <city quName="黑龙江" pyName="heilongjiang" cityname="哈尔滨" state1="0" state2="0" stateDetailed="晴" tem1="18" tem2="6" windState="西北风3-4级转西风小于3级"/>
- <city quName="吉林" pyName="jilin" cityname="长春" state1="0" state2="0" stateDetailed="晴" tem1="19" tem2="6" windState="西北风3-4级转小于3级"/>
- <city quName="辽宁" pyName="liaoning" cityname="沈阳" state1="0" state2="0" stateDetailed="晴" tem1="21" tem2="7" windState="东北风3-4级"/>
- <city quName="海南" pyName="hainan" cityname="海口" state1="1" state2="1" stateDetailed="多云" tem1="30" tem2="24" windState="微风"/>
- <city quName="内蒙古" pyName="neimenggu" cityname="呼和浩特" state1="0" state2="0" stateDetailed="晴" tem1="19" tem2="5" windState="东风3-4级"/>
- <city quName="新疆" pyName="xinjiang" cityname="乌鲁木齐" state1="0" state2="0" stateDetailed="晴" tem1="22" tem2="10" windState="微风转东南风小于3级"/>
- <city quName="西藏" pyName="xizang" cityname="拉萨" state1="1" state2="7" stateDetailed="多云转小雨" tem1="18" tem2="4" windState="微风"/>
- <city quName="青海" pyName="qinghai" cityname="西宁" state1="0" state2="1" stateDetailed="晴转多云" tem1="18" tem2="2" windState="微风"/>
- <city quName="宁夏" pyName="ningxia" cityname="银川" state1="0" state2="0" stateDetailed="晴" tem1="19" tem2="8" windState="微风"/>
- <city quName="甘肃" pyName="gansu" cityname="兰州" state1="0" state2="0" stateDetailed="晴" tem1="21" tem2="6" windState="微风"/>
- <city quName="河北" pyName="hebei" cityname="石家庄" state1="0" state2="0" stateDetailed="晴" tem1="25" tem2="12" windState="北风小于3级"/>
- <city quName="河南" pyName="henan" cityname="郑州" state1="0" state2="0" stateDetailed="晴" tem1="24" tem2="13" windState="微风"/>
- <city quName="湖北" pyName="hubei" cityname="武汉" state1="0" state2="0" stateDetailed="晴" tem1="24" tem2="12" windState="微风"/>
- <city quName="湖南" pyName="hunan" cityname="长沙" state1="2" state2="1" stateDetailed="阴转多云" tem1="20" tem2="15" windState="北风小于3级"/>
- <city quName="山东" pyName="shandong" cityname="济南" state1="1" state2="1" stateDetailed="多云" tem1="20" tem2="10" windState="北风3-4级转小于3级"/>
- <city quName="江苏" pyName="jiangsu" cityname="南京" state1="2" state2="2" stateDetailed="阴" tem1="19" tem2="13" windState="西北风4-5级转3-4级"/>
- <city quName="安徽" pyName="anhui" cityname="合肥" state1="2" state2="1" stateDetailed="阴转多云" tem1="20" tem2="12" windState="西北风转北风3-4级"/>
- <city quName="山西" pyName="shanxi" cityname="太原" state1="0" state2="0" stateDetailed="晴" tem1="22" tem2="8" windState="微风"/>
- <city quName="陕西" pyName="sanxi" cityname="西安" state1="1" state2="0" stateDetailed="多云转晴" tem1="21" tem2="9" windState="东北风小于3级"/>
- <city quName="四川" pyName="sichuan" cityname="成都" state1="1" state2="1" stateDetailed="多云" tem1="26" tem2="15" windState="南风小于3级"/>
- <city quName="云南" pyName="yunnan" cityname="昆明" state1="7" state2="7" stateDetailed="小雨" tem1="21" tem2="13" windState="微风"/>
- <city quName="贵州" pyName="guizhou" cityname="贵阳" state1="1" state2="3" stateDetailed="多云转阵雨" tem1="21" tem2="11" windState="东风小于3级"/>
- <city quName="浙江" pyName="zhejiang" cityname="杭州" state1="3" state2="1" stateDetailed="阵雨转多云" tem1="22" tem2="14" windState="微风"/>
- <city quName="福建" pyName="fujian" cityname="福州" state1="1" state2="2" stateDetailed="多云转阴" tem1="28" tem2="18" windState="微风"/>
- <city quName="江西" pyName="jiangxi" cityname="南昌" state1="2" state2="1" stateDetailed="阴转多云" tem1="23" tem2="15" windState="北风3-4级转微风"/>
- <city quName="广东" pyName="guangdong" cityname="广州" state1="3" state2="2" stateDetailed="阵雨转阴" tem1="26" tem2="20" windState="微风"/>
- <city quName="广西" pyName="guangxi" cityname="南宁" state1="3" state2="3" stateDetailed="阵雨" tem1="23" tem2="19" windState="东北风小于3级"/>
- <city quName="北京" pyName="beijing" cityname="北京" state1="0" state2="0" stateDetailed="晴" tem1="26" tem2="10" windState="微风"/>
- <city quName="天津" pyName="tianjin" cityname="天津" state1="1" state2="0" stateDetailed="多云转晴" tem1="22" tem2="13" windState="东北风3-4级转小于3级"/>
- <city quName="上海" pyName="shanghai" cityname="上海" state1="7" state2="1" stateDetailed="小雨转多云" tem1="20" tem2="16" windState="西北风3-4级"/>
- <city quName="重庆" pyName="chongqing" cityname="重庆" state1="1" state2="3" stateDetailed="多云转阵雨" tem1="21" tem2="14" windState="微风"/>
- <city quName="香港" pyName="xianggang" cityname="香港" state1="3" state2="1" stateDetailed="阵雨转多云" tem1="26" tem2="22" windState="微风"/>
- <city quName="澳门" pyName="aomen" cityname="澳门" state1="3" state2="1" stateDetailed="阵雨转多云" tem1="27" tem2="22" windState="东北风3-4级转微风"/>
- <city quName="台湾" pyName="taiwan" cityname="台北" state1="9" state2="7" stateDetailed="大雨转小雨" tem1="28" tem2="21" windState="微风"/>
- <city quName="西沙" pyName="xisha" cityname="西沙" state1="3" state2="3" stateDetailed="阵雨" tem1="30" tem2="26" windState="东北风4-5级"/>
- <city quName="南沙" pyName="nanshadao" cityname="南沙" state1="1" state2="1" stateDetailed="多云" tem1="32" tem2="27" windState="东风4-5级"/>
- <city quName="钓鱼岛" pyName="diaoyudao" cityname="钓鱼岛" state1="7" state2="1" stateDetailed="小雨转多云" tem1="23" tem2="19" windState="西南风3-4级转北风5-6级"/>
- </china>
- XMLRequest xmlRequest = new XMLRequest(
- "http://flash.weather.com.cn/wmaps/xml/china.xml",
- new Response.Listener<XmlPullParser>() {
- @Override
- public void onResponse(XmlPullParser response) {
- try {
- int eventType = response.getEventType();
- while (eventType != XmlPullParser.END_DOCUMENT) {
- switch (eventType) {
- case XmlPullParser.START_TAG:
- String nodeName = response.getName();
- if ("city".equals(nodeName)) {
- String pName = response.getAttributeValue(0);
- Log.d("TAG", "pName is " + pName);
- }
- break;
- }
- eventType = response.next();
- }
- } catch (XmlPullParserException e) {
- e.printStackTrace();
- } catch (IOException e) {
- e.printStackTrace();
- }
- }
- }, new Response.ErrorListener() {
- @Override
- public void onErrorResponse(VolleyError error) {
- Log.e("TAG", error.getMessage(), error);
- }
- });
- mQueue.add(xmlRequest);
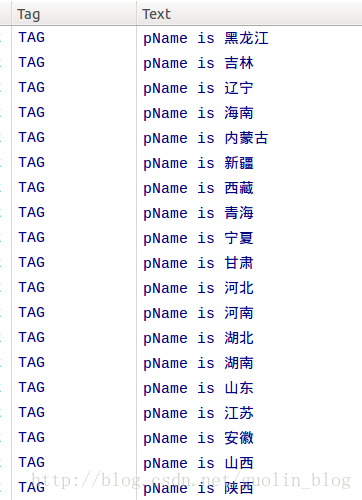
现在运行一下代码,观察控制台日志,就可以看到每个省的名字都从XML中解析出来了,如下图所示。
2. 自定义GsonRequest
JsonRequest的数据解析是利用Android本身自带的JSONObject和JSONArray来实现的,配合使用JSONObject和JSONArray就可以解析出任意格式的JSON数据。不过也许你会觉得使用JSONObject还是太麻烦了,还有很多方法可以让JSON数据解析变得更加简单,比如说GSON。遗憾的是,Volley中默认并不支持使用自家的GSON来解析数据,不过没有关系,通过上面的学习,相信你已经知道了自定义一个Request是多么的简单,那么下面我们就来举一反三一下,自定义一个GsonRequest。
首先我们需要把gson的jar包添加到项目当中,jar包的下载地址是:https://code.google.com/p/google-gson/downloads/list 。
接着定义一个GsonRequest继承自Request,代码如下所示:
- public class GsonRequest<T> extends Request<T> {
- private final Listener<T> mListener;
- private Gson mGson;
- private Class<T> mClass;
- public GsonRequest(int method, String url, Class<T> clazz, Listener<T> listener,
- ErrorListener errorListener) {
- super(method, url, errorListener);
- mGson = new Gson();
- mClass = clazz;
- mListener = listener;
- }
- public GsonRequest(String url, Class<T> clazz, Listener<T> listener,
- ErrorListener errorListener) {
- this(Method.GET, url, clazz, listener, errorListener);
- }
- @Override
- protected Response<T> parseNetworkResponse(NetworkResponse response) {
- try {
- String jsonString = new String(response.data,
- HttpHeaderParser.parseCharset(response.headers));
- return Response.success(mGson.fromJson(jsonString, mClass),
- HttpHeaderParser.parseCacheHeaders(response));
- } catch (UnsupportedEncodingException e) {
- return Response.error(new ParseError(e));
- }
- }
- @Override
- protected void deliverResponse(T response) {
- mListener.onResponse(response);
- }
- }
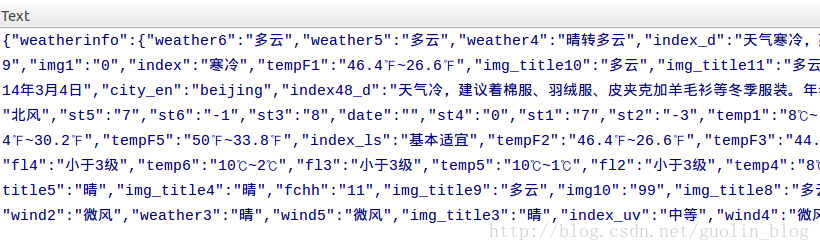
那么下面我们就来测试一下这个GsonRequest能不能够正常工作吧,调用http://www.weather.com.cn/data/sk/101010100.html这个接口可以得到一段JSON格式的天气数据,如下所示:
- {"weatherinfo":{"city":"北京","cityid":"101010100","temp":"19","WD":"南风","WS":"2级","SD":"43%","WSE":"2","time":"19:45","isRadar":"1","Radar":"JC_RADAR_AZ9010_JB"}}
- public class Weather {
- private WeatherInfo weatherinfo;
- public WeatherInfo getWeatherinfo() {
- return weatherinfo;
- }
- public void setWeatherinfo(WeatherInfo weatherinfo) {
- this.weatherinfo = weatherinfo;
- }
- }
- public class WeatherInfo {
- private String city;
- private String temp;
- private String time;
- public String getCity() {
- return city;
- }
- public void setCity(String city) {
- this.city = city;
- }
- public String getTemp() {
- return temp;
- }
- public void setTemp(String temp) {
- this.temp = temp;
- }
- public String getTime() {
- return time;
- }
- public void setTime(String time) {
- this.time = time;
- }
- }
- GsonRequest<Weather> gsonRequest = new GsonRequest<Weather>(
- "http://www.weather.com.cn/data/sk/101010100.html", Weather.class,
- new Response.Listener<Weather>() {
- @Override
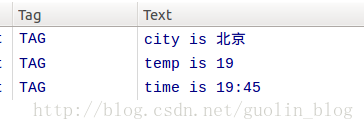
- public void onResponse(Weather weather) {
- WeatherInfo weatherInfo = weather.getWeatherinfo();
- Log.d("TAG", "city is " + weatherInfo.getCity());
- Log.d("TAG", "temp is " + weatherInfo.getTemp());
- Log.d("TAG", "time is " + weatherInfo.getTime());
- }
- }, new Response.ErrorListener() {
- @Override
- public void onErrorResponse(VolleyError error) {
- Log.e("TAG", error.getMessage(), error);
- }
- });
- mQueue.add(gsonRequest);
这样的话,XMLRequest和GsonRequest的功能就基本都实现了,我们也是借助这两个例子深刻地理解了自定义Request的方法,对Volley的认识也是更加深入了。好了,本篇文章就到此结束,下篇文章中我们将对Volley进行更深层次的研究
Android Volley完全解析(四),带你从源码的角度理解Volley
转载请注明出处:http://blog.csdn.net/guolin_blog/article/details/17656437
经过前三篇文章的学习,Volley的用法我们已经掌握的差不多了,但是对于Volley的工作原理,恐怕有很多朋友还不是很清楚。因此,本篇文章中我们就来一起阅读一下Volley的源码,将它的工作流程整体地梳理一遍。同时,这也是Volley系列的最后一篇文章了。
其实,Volley的官方文档中本身就附有了一张Volley的工作流程图,如下图所示。
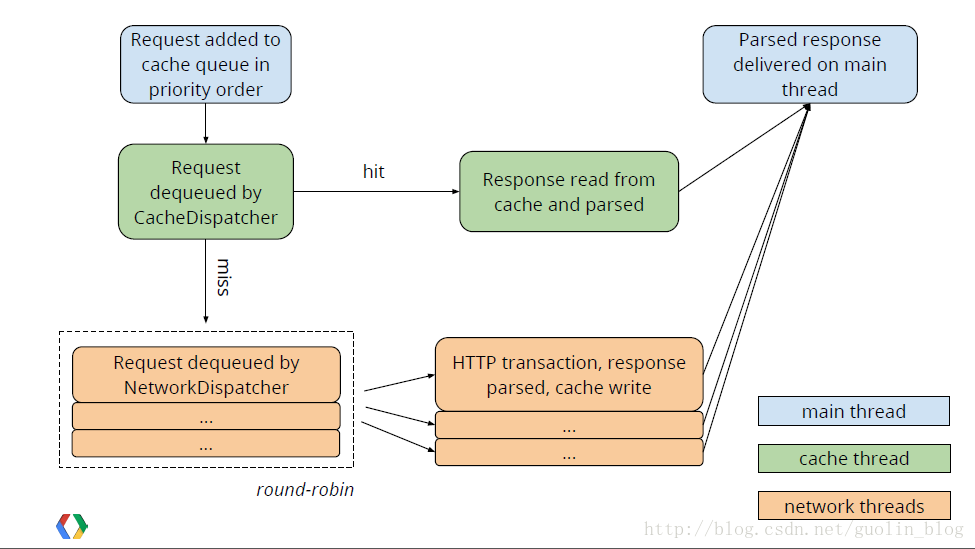
多数朋友突然看到一张这样的图,应该会和我一样,感觉一头雾水吧?没错,目前我们对Volley背后的工作原理还没有一个概念性的理解,直接就来看这张图自然会有些吃力。不过没关系,下面我们就去分析一下Volley的源码,之后再重新来看这张图就会好理解多了。
说起分析源码,那么应该从哪儿开始看起呢?这就要回顾一下Volley的用法了,还记得吗,使用Volley的第一步,首先要调用Volley.newRequestQueue(context)方法来获取一个RequestQueue对象,那么我们自然要从这个方法开始看起了,代码如下所示:
- public static RequestQueue newRequestQueue(Context context) {
- return newRequestQueue(context, null);
- }
- public static RequestQueue newRequestQueue(Context context, HttpStack stack) {
- File cacheDir = new File(context.getCacheDir(), DEFAULT_CACHE_DIR);
- String userAgent = "volley/0";
- try {
- String packageName = context.getPackageName();
- PackageInfo info = context.getPackageManager().getPackageInfo(packageName, 0);
- userAgent = packageName + "/" + info.versionCode;
- } catch (NameNotFoundException e) {
- }
- if (stack == null) {
- if (Build.VERSION.SDK_INT >= 9) {
- stack = new HurlStack();
- } else {
- stack = new HttpClientStack(AndroidHttpClient.newInstance(userAgent));
- }
- }
- Network network = new BasicNetwork(stack);
- RequestQueue queue = new RequestQueue(new DiskBasedCache(cacheDir), network);
- queue.start();
- return queue;
- }
创建好了HttpStack之后,接下来又创建了一个Network对象,它是用于根据传入的HttpStack对象来处理网络请求的,紧接着new出一个RequestQueue对象,并调用它的start()方法进行启动,然后将RequestQueue返回,这样newRequestQueue()的方法就执行结束了。
那么RequestQueue的start()方法内部到底执行了什么东西呢?我们跟进去瞧一瞧:
- public void start() {
- stop(); // Make sure any currently running dispatchers are stopped.
- // Create the cache dispatcher and start it.
- mCacheDispatcher = new CacheDispatcher(mCacheQueue, mNetworkQueue, mCache, mDelivery);
- mCacheDispatcher.start();
- // Create network dispatchers (and corresponding threads) up to the pool size.
- for (int i = 0; i < mDispatchers.length; i++) {
- NetworkDispatcher networkDispatcher = new NetworkDispatcher(mNetworkQueue, mNetwork,
- mCache, mDelivery);
- mDispatchers[i] = networkDispatcher;
- networkDispatcher.start();
- }
- }
得到了RequestQueue之后,我们只需要构建出相应的Request,然后调用RequestQueue的add()方法将Request传入就可以完成网络请求操作了,那么不用说,add()方法的内部肯定有着非常复杂的逻辑,我们来一起看一下:
- public <T> Request<T> add(Request<T> request) {
- // Tag the request as belonging to this queue and add it to the set of current requests.
- request.setRequestQueue(this);
- synchronized (mCurrentRequests) {
- mCurrentRequests.add(request);
- }
- // Process requests in the order they are added.
- request.setSequence(getSequenceNumber());
- request.addMarker("add-to-queue");
- // If the request is uncacheable, skip the cache queue and go straight to the network.
- if (!request.shouldCache()) {
- mNetworkQueue.add(request);
- return request;
- }
- // Insert request into stage if there's already a request with the same cache key in flight.
- synchronized (mWaitingRequests) {
- String cacheKey = request.getCacheKey();
- if (mWaitingRequests.containsKey(cacheKey)) {
- // There is already a request in flight. Queue up.
- Queue<Request<?>> stagedRequests = mWaitingRequests.get(cacheKey);
- if (stagedRequests == null) {
- stagedRequests = new LinkedList<Request<?>>();
- }
- stagedRequests.add(request);
- mWaitingRequests.put(cacheKey, stagedRequests);
- if (VolleyLog.DEBUG) {
- VolleyLog.v("Request for cacheKey=%s is in flight, putting on hold.", cacheKey);
- }
- } else {
- // Insert 'null' queue for this cacheKey, indicating there is now a request in
- // flight.
- mWaitingRequests.put(cacheKey, null);
- mCacheQueue.add(request);
- }
- return request;
- }
- }
OK,那么既然默认每条请求都是可以缓存的,自然就被添加到了缓存队列中,于是一直在后台等待的缓存线程就要开始运行起来了,我们看下CacheDispatcher中的run()方法,代码如下所示:
- public class CacheDispatcher extends Thread {
- ……
- @Override
- public void run() {
- if (DEBUG) VolleyLog.v("start new dispatcher");
- Process.setThreadPriority(Process.THREAD_PRIORITY_BACKGROUND);
- // Make a blocking call to initialize the cache.
- mCache.initialize();
- while (true) {
- try {
- // Get a request from the cache triage queue, blocking until
- // at least one is available.
- final Request<?> request = mCacheQueue.take();
- request.addMarker("cache-queue-take");
- // If the request has been canceled, don't bother dispatching it.
- if (request.isCanceled()) {
- request.finish("cache-discard-canceled");
- continue;
- }
- // Attempt to retrieve this item from cache.
- Cache.Entry entry = mCache.get(request.getCacheKey());
- if (entry == null) {
- request.addMarker("cache-miss");
- // Cache miss; send off to the network dispatcher.
- mNetworkQueue.put(request);
- continue;
- }
- // If it is completely expired, just send it to the network.
- if (entry.isExpired()) {
- request.addMarker("cache-hit-expired");
- request.setCacheEntry(entry);
- mNetworkQueue.put(request);
- continue;
- }
- // We have a cache hit; parse its data for delivery back to the request.
- request.addMarker("cache-hit");
- Response<?> response = request.parseNetworkResponse(
- new NetworkResponse(entry.data, entry.responseHeaders));
- request.addMarker("cache-hit-parsed");
- if (!entry.refreshNeeded()) {
- // Completely unexpired cache hit. Just deliver the response.
- mDelivery.postResponse(request, response);
- } else {
- // Soft-expired cache hit. We can deliver the cached response,
- // but we need to also send the request to the network for
- // refreshing.
- request.addMarker("cache-hit-refresh-needed");
- request.setCacheEntry(entry);
- // Mark the response as intermediate.
- response.intermediate = true;
- // Post the intermediate response back to the user and have
- // the delivery then forward the request along to the network.
- mDelivery.postResponse(request, response, new Runnable() {
- @Override
- public void run() {
- try {
- mNetworkQueue.put(request);
- } catch (InterruptedException e) {
- // Not much we can do about this.
- }
- }
- });
- }
- } catch (InterruptedException e) {
- // We may have been interrupted because it was time to quit.
- if (mQuit) {
- return;
- }
- continue;
- }
- }
- }
- }
- public class NetworkDispatcher extends Thread {
- ……
- @Override
- public void run() {
- Process.setThreadPriority(Process.THREAD_PRIORITY_BACKGROUND);
- Request<?> request;
- while (true) {
- try {
- // Take a request from the queue.
- request = mQueue.take();
- } catch (InterruptedException e) {
- // We may have been interrupted because it was time to quit.
- if (mQuit) {
- return;
- }
- continue;
- }
- try {
- request.addMarker("network-queue-take");
- // If the request was cancelled already, do not perform the
- // network request.
- if (request.isCanceled()) {
- request.finish("network-discard-cancelled");
- continue;
- }
- addTrafficStatsTag(request);
- // Perform the network request.
- NetworkResponse networkResponse = mNetwork.performRequest(request);
- request.addMarker("network-http-complete");
- // If the server returned 304 AND we delivered a response already,
- // we're done -- don't deliver a second identical response.
- if (networkResponse.notModified && request.hasHadResponseDelivered()) {
- request.finish("not-modified");
- continue;
- }
- // Parse the response here on the worker thread.
- Response<?> response = request.parseNetworkResponse(networkResponse);
- request.addMarker("network-parse-complete");
- // Write to cache if applicable.
- // TODO: Only update cache metadata instead of entire record for 304s.
- if (request.shouldCache() && response.cacheEntry != null) {
- mCache.put(request.getCacheKey(), response.cacheEntry);
- request.addMarker("network-cache-written");
- }
- // Post the response back.
- request.markDelivered();
- mDelivery.postResponse(request, response);
- } catch (VolleyError volleyError) {
- parseAndDeliverNetworkError(request, volleyError);
- } catch (Exception e) {
- VolleyLog.e(e, "Unhandled exception %s", e.toString());
- mDelivery.postError(request, new VolleyError(e));
- }
- }
- }
- }
- public class BasicNetwork implements Network {
- ……
- @Override
- public NetworkResponse performRequest(Request<?> request) throws VolleyError {
- long requestStart = SystemClock.elapsedRealtime();
- while (true) {
- HttpResponse httpResponse = null;
- byte[] responseContents = null;
- Map<String, String> responseHeaders = new HashMap<String, String>();
- try {
- // Gather headers.
- Map<String, String> headers = new HashMap<String, String>();
- addCacheHeaders(headers, request.getCacheEntry());
- httpResponse = mHttpStack.performRequest(request, headers);
- StatusLine statusLine = httpResponse.getStatusLine();
- int statusCode = statusLine.getStatusCode();
- responseHeaders = convertHeaders(httpResponse.getAllHeaders());
- // Handle cache validation.
- if (statusCode == HttpStatus.SC_NOT_MODIFIED) {
- return new NetworkResponse(HttpStatus.SC_NOT_MODIFIED,
- request.getCacheEntry() == null ? null : request.getCacheEntry().data,
- responseHeaders, true);
- }
- // Some responses such as 204s do not have content. We must check.
- if (httpResponse.getEntity() != null) {
- responseContents = entityToBytes(httpResponse.getEntity());
- } else {
- // Add 0 byte response as a way of honestly representing a
- // no-content request.
- responseContents = new byte[0];
- }
- // if the request is slow, log it.
- long requestLifetime = SystemClock.elapsedRealtime() - requestStart;
- logSlowRequests(requestLifetime, request, responseContents, statusLine);
- if (statusCode < 200 || statusCode > 299) {
- throw new IOException();
- }
- return new NetworkResponse(statusCode, responseContents, responseHeaders, false);
- } catch (Exception e) {
- ……
- }
- }
- }
- }
这段方法中大多都是一些网络请求细节方面的东西,我们并不需要太多关心,需要注意的是在第14行调用了HttpStack的performRequest()方法,这里的HttpStack就是在一开始调用newRequestQueue()方法是创建的实例,默认情况下如果系统版本号大于9就创建的HurlStack对象,否则创建HttpClientStack对象。前面已经说过,这两个对象的内部实际就是分别使用HttpURLConnection和HttpClient来发送网络请求的,我们就不再跟进去阅读了,之后会将服务器返回的数据组装成一个NetworkResponse对象进行返回。
在NetworkDispatcher中收到了NetworkResponse这个返回值后又会调用Request的parseNetworkResponse()方法来解析NetworkResponse中的数据,以及将数据写入到缓存,这个方法的实现是交给Request的子类来完成的,因为不同种类的Request解析的方式也肯定不同。还记得我们在上一篇文章中学习的自定义Request的方式吗?其中parseNetworkResponse()这个方法就是必须要重写的。
在解析完了NetworkResponse中的数据之后,又会调用ExecutorDelivery的postResponse()方法来回调解析出的数据,代码如下所示:
- public void postResponse(Request<?> request, Response<?> response, Runnable runnable) {
- request.markDelivered();
- request.addMarker("post-response");
- mResponsePoster.execute(new ResponseDeliveryRunnable(request, response, runnable));
- }
- private class ResponseDeliveryRunnable implements Runnable {
- private final Request mRequest;
- private final Response mResponse;
- private final Runnable mRunnable;
- public ResponseDeliveryRunnable(Request request, Response response, Runnable runnable) {
- mRequest = request;
- mResponse = response;
- mRunnable = runnable;
- }
- @SuppressWarnings("unchecked")
- @Override
- public void run() {
- // If this request has canceled, finish it and don't deliver.
- if (mRequest.isCanceled()) {
- mRequest.finish("canceled-at-delivery");
- return;
- }
- // Deliver a normal response or error, depending.
- if (mResponse.isSuccess()) {
- mRequest.deliverResponse(mResponse.result);
- } else {
- mRequest.deliverError(mResponse.error);
- }
- // If this is an intermediate response, add a marker, otherwise we're done
- // and the request can be finished.
- if (mResponse.intermediate) {
- mRequest.addMarker("intermediate-response");
- } else {
- mRequest.finish("done");
- }
- // If we have been provided a post-delivery runnable, run it.
- if (mRunnable != null) {
- mRunnable.run();
- }
- }
- }
代码虽然不多,但我们并不需要行行阅读,抓住重点看即可。其中在第22行调用了Request的deliverResponse()方法,有没有感觉很熟悉?没错,这个就是我们在自定义Request时需要重写的另外一个方法,每一条网络请求的响应都是回调到这个方法中,最后我们再在这个方法中将响应的数据回调到Response.Listener的onResponse()方法中就可以了。
好了,到这里我们就把Volley的完整执行流程全部梳理了一遍,你是不是已经感觉已经很清晰了呢?对了,还记得在文章一开始的那张流程图吗,刚才还不能理解,现在我们再来重新看下这张图:
其中蓝色部分代表主线程,绿色部分代表缓存线程,橙色部分代表网络线程。我们在主线程中调用RequestQueue的add()方法来添加一条网络请求,这条请求会先被加入到缓存队列当中,如果发现可以找到相应的缓存结果就直接读取缓存并解析,然后回调给主线程。如果在缓存中没有找到结果,则将这条请求加入到网络请求队列中,然后处理发送HTTP请求,解析响应结果,写入缓存,并回调主线程。
怎么样,是不是感觉现在理解这张图已经变得轻松简单了?好了,到此为止我们就把Volley的用法和源码全部学习完了,相信你已经对Volley非常熟悉并可以将它应用到实际项目当中了,那么Volley完全解析系列的文章到此结束,感谢大家有耐心看到最后。


 860
860


 被折叠的 条评论
为什么被折叠?
被折叠的 条评论
为什么被折叠?
 到【灌水乐园】发言


