


 本文介绍如何使用 Red Hat A-MQ 中的 Fabric 工具进行消息 Broker 的部署与管理,包括安装配置、创建使用者、启动服务、建立执行容器等步骤,并演示如何通过 Fabric 实现版本更新。
请到下面的JBoss网站下载我们这次会用到的A-MQ
http://www.jboss.org/products/amq.html
我们这次大概会有以下的动作,
1. 解压缩安装
2. 建立使用者
3. 启动A-MQ 伺服器
4. 建立 Fabric
5. 建立 A-MQ broker profile
6. 建立 执行容器(Container)
7. 建立新的Profile 版本,并且设定AMQP 通讯协定
8. Container 版本更新
9. 测试是否成功
安装也是解压缩jboss-a-mq-version.redhat-x.zip到你想要的路径下
启动A-MQ 之前,需要先设定使用者,
到$A-MQ_INSTALLATION_PATH/etc/users.properties
把前面admin=admin,admin的#拿掉
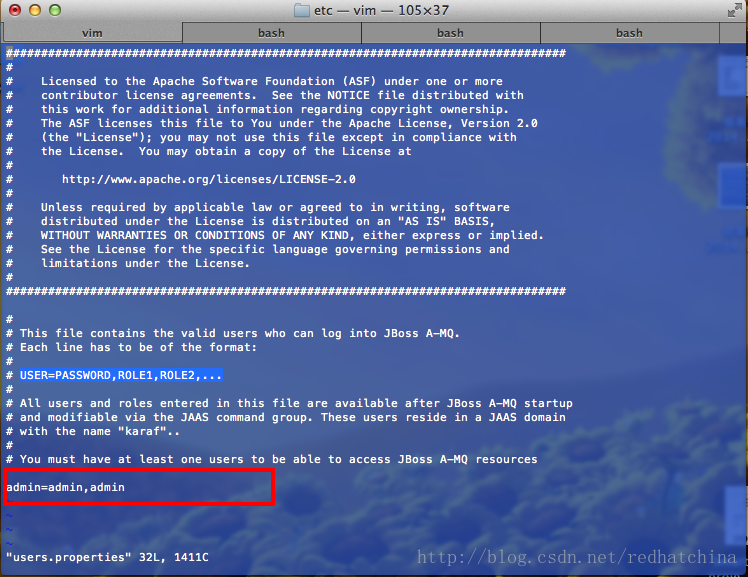
如果你不想用预设值的话,可以自己建ID,密码还有角色。
(USER=PASSWORD,ROLE1,ROLE2,...)
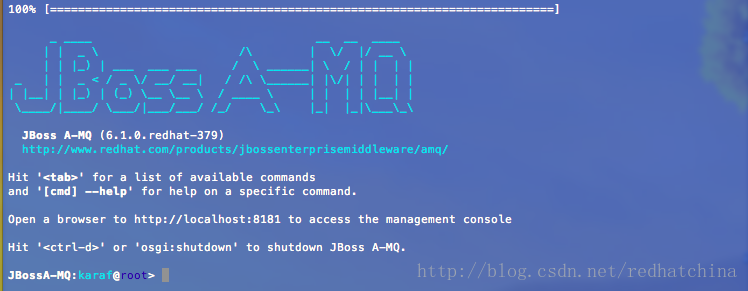
要启动A-MQ, 到$A-MQ_INSTALLATION_PATH/bin ,执行
Unix/Linux,
./amq
Windows,
amq.bat
因为我们要透过Fabric 去管理Broker, 所以要先透过下面的指令把Fabric 建起来,
fabric:create --wait-for-provisioning
建立MQ 的Broker 有两种方法,一种是使用Hawtio 图形用户界面设定,或是透过下指令,这次先用指令,有机会再抓图形..
建立一个A-MQ 属于demo 群组的Profile 叫做mybroker,
mq-create --group demo mybroker

打profile-list or profile-list | grep mybroker 就可以看到是否建立成功。
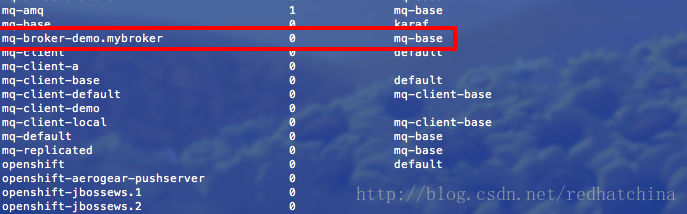
接下来我们要把broker 的设定档加入mq-broker-demo.mybroker 的profile里面,
profile-edit --resource broker.xml mq-broker-demo.mybroker
把下面的内容贴上,然后储存
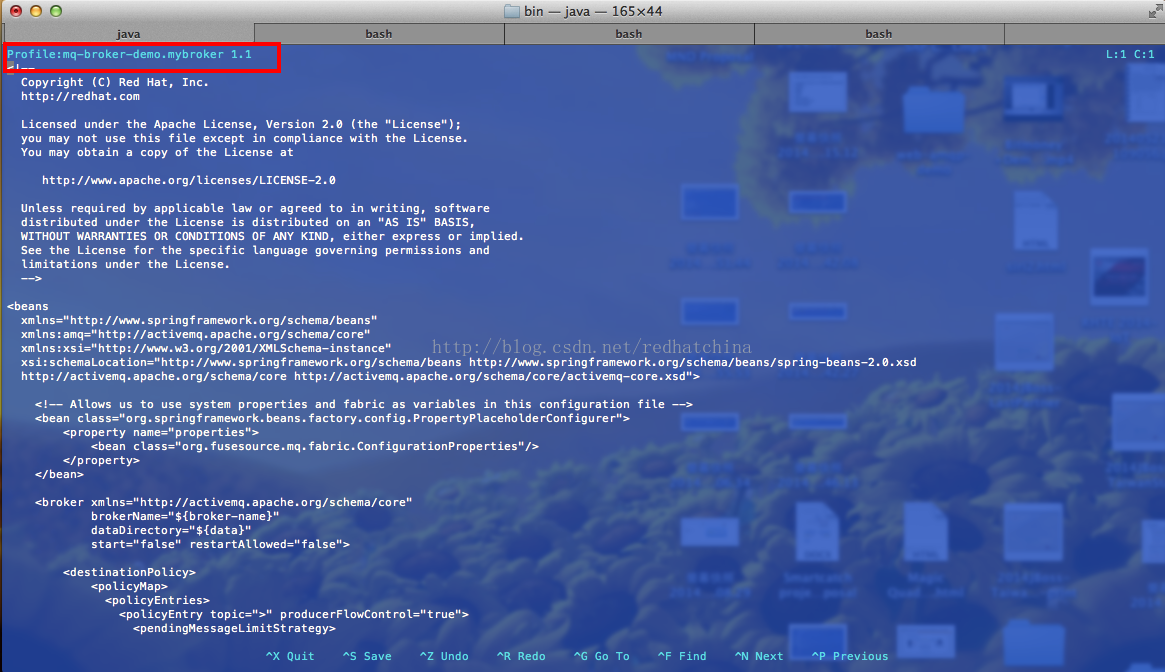
<!--

  Copyright (C) Red Hat, Inc.

  http://redhat.com


  Licensed under the Apache License, Version 2.0 (the "License");

  you may not use this file except in compliance with the License.

  You may obtain a copy of the License at


     http://www.apache.org/licenses/LICENSE-2.0


  Unless required by applicable law or agreed to in writing, software

  distributed under the License is distributed on an "AS IS" BASIS,

  WITHOUT WARRANTIES OR CONDITIONS OF ANY KIND, either express or implied.

  See the License for the specific language governing permissions and

  limitations under the License.

  -->


<beans xmlns:amq="http://activemq.apache.org/schema/core" xmlns:xsi="http://www.w3.org/2001/XMLSchema-instance" xmlns="http://www.springframework.org/schema/beans" xsi:schemalocation="http://www.springframework.org/schema/beans http://www.springframework.org/schema/beans/spring-beans-2.0.xsd

  http://activemq.apache.org/schema/core http://activemq.apache.org/schema/core/activemq-core.xsd">


    <!-- Allows us to use system properties and fabric as variables in this configuration file -->

    <bean class="org.springframework.beans.factory.config.PropertyPlaceholderConfigurer">

        <property name="properties">

            <bean class="org.fusesource.mq.fabric.ConfigurationProperties">

        </bean></property>

    </bean>


    <broker brokername="${broker-name}" datadirectory="${data}" restartallowed="false" start="false" xmlns="http://activemq.apache.org/schema/core">


        <destinationpolicy>

            <policymap>

              <policyentries>

                <policyentry producerflowcontrol="true" topic=">">

                  <pendingmessagelimitstrategy>

                    <constantpendingmessagelimitstrategy limit="1000">

                  </constantpendingmessagelimitstrategy></pendingmessagelimitstrategy>

                </policyentry>

                <policyentry memorylimit="1mb" producerflowcontrol="true" queue=">">

                </policyentry>

              </policyentries>

            </policymap>

        </destinationpolicy>


        <managementcontext>

            <managementcontext createconnector="false">

        </managementcontext>


        <persistenceadapter>

            <kahadb directory="${data}/kahadb">

        </kahadb></persistenceadapter>


        <plugins>

            <jaasauthenticationplugin configuration="karaf">

        </jaasauthenticationplugin></plugins>


        <systemusage>

            <systemusage>

                <memoryusage>

                    <memoryusage limit="64 mb">

                </memoryusage>

                <storeusage>

                    <storeusage limit="100 gb">

                </storeusage>

                <tempusage>

                    <tempusage limit="50 gb">

                </tempusage>

            </tempusage></storeusage></memoryusage></systemusage>

        </systemusage>


        <transportconnectors>

            <transportconnector name="openwire" uri="tcp://0.0.0.0:0?maximumConnections=1000">

        </transportconnector></transportconnectors>

    </managementcontext></broker>


</beans>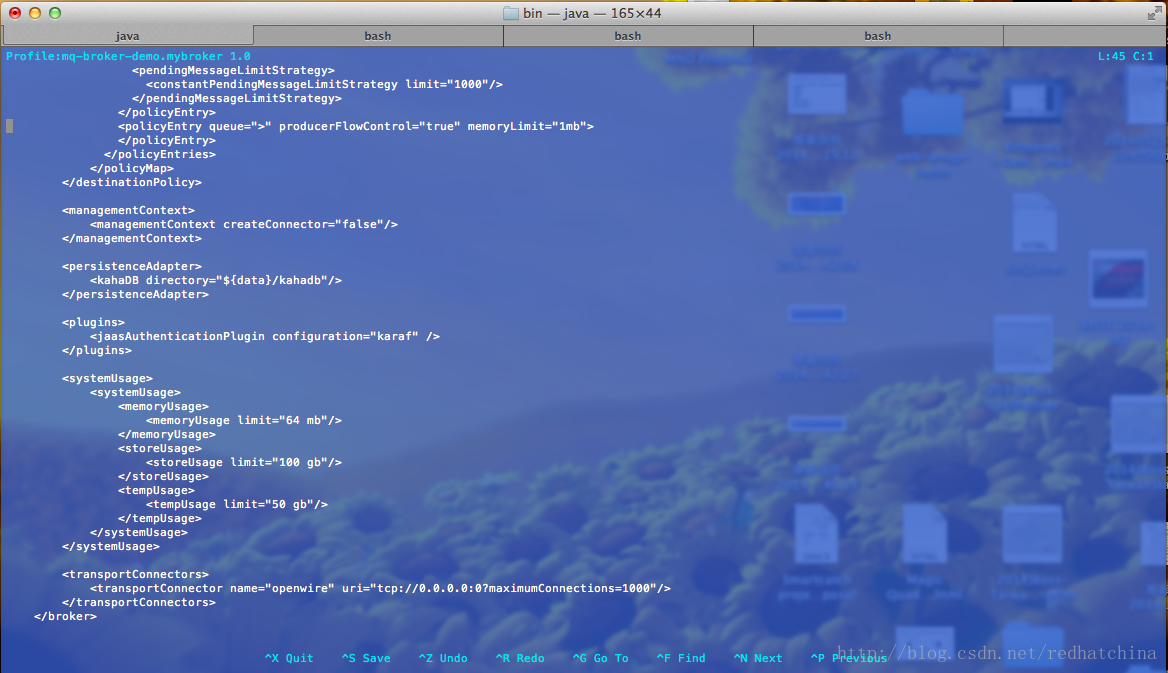
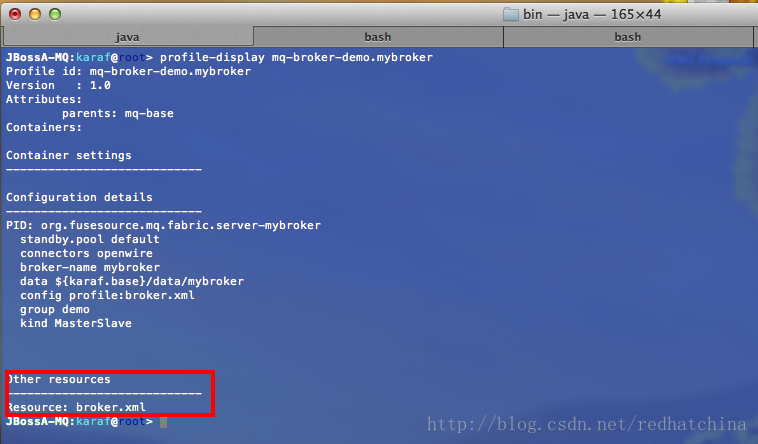
显示profile 内容的时候应该可以看到我们这次新增的设定。
profile-display mq-broker-demo.mybroker
现在Profile 已经设定好了,接下来,我们要建立三个容器,来执行刚刚设定好的profile.
container-create-child --profile mq-broker-demo.mybroker root demoContainer1
container-create-child --profile mq-broker-demo.mybroker root demoContainer2
container-create-child --profile mq-broker-demo.mybroker root demoContainer3

container-list
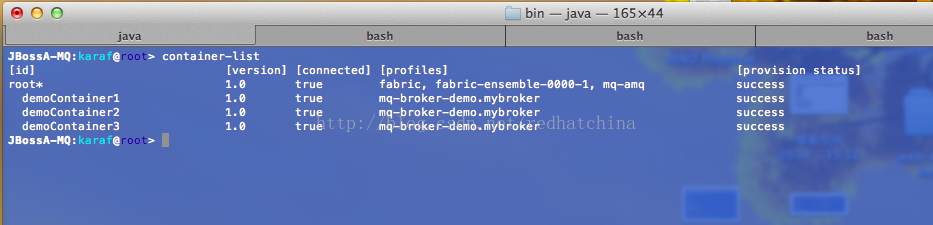
我们现在已经设定好了一个A-MQ broker 的主从式备份丛集,但是AMQP 的通讯协定尚未设定上去。
因为这次我想顺便给大家看一下,如何透过Fabric做版本更新,所以我们就把AMQP 的设定变成这次修改的内容,
建立版本1.1
fabric:version-create 1.1
修改刚刚建立的broker.xml 档案, 加入AMQP 的连接器。
profile-edit --resource broker.xml mq-broker-demo.mybroker 1.1
加入下方这一行到XML 的transportConnectors 段落中。
<transportConnector name="amqp" uri="amqp://0.0.0.0:5672"/>
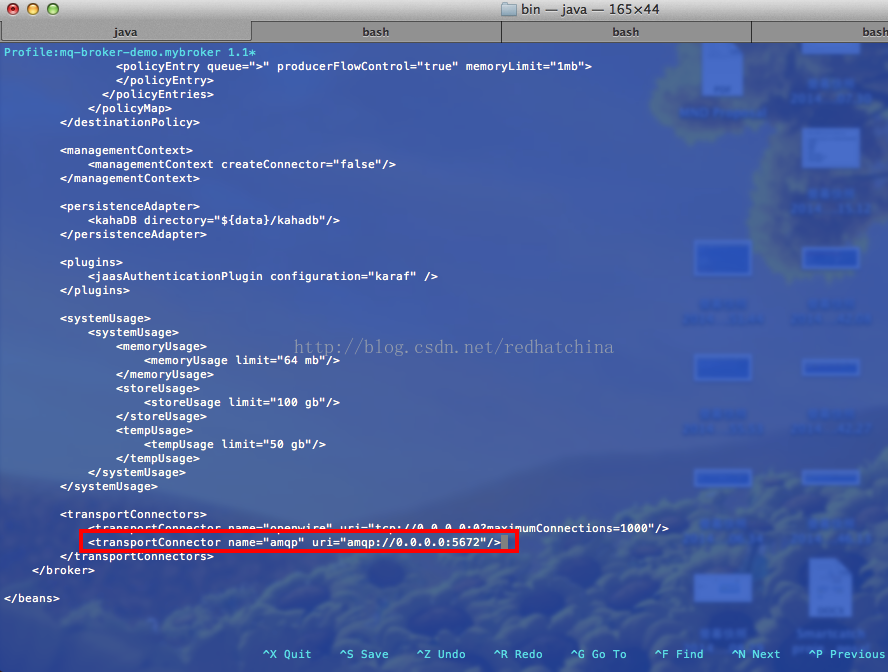
储存.
最后一个步骤,就是将每个执行容器的版本都更新到1.1
fabric:container-upgrade 1.1 demoContainer1
container-list
剩下的也要,
fabric:container-upgrade 1.1 demoContainer2
fabric:container-upgrade 1.1 demoContainer3
现在,开始测试,请执行(下载测试程式)
git clone https://github.com/FuseByExample/activemq-amqp-example.git
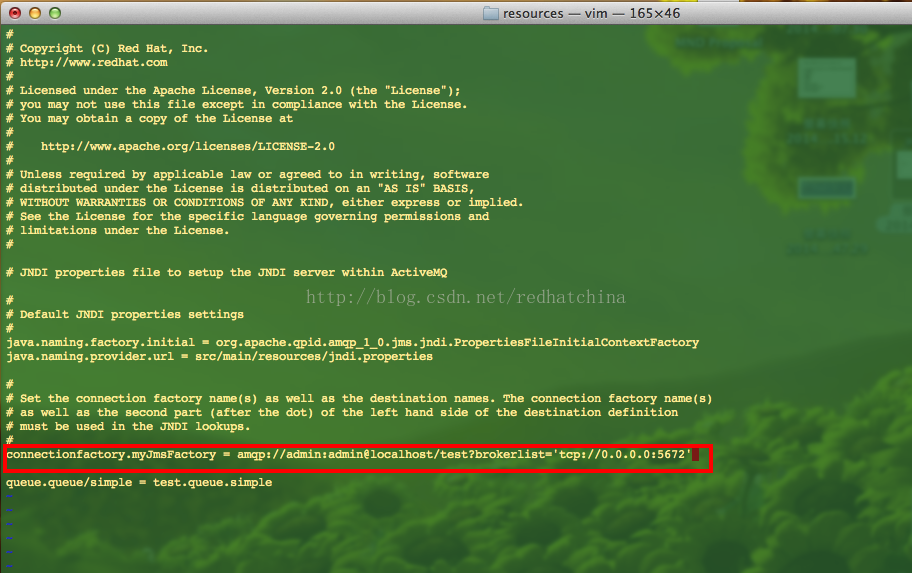
到 activemq-amqp-example/src/main/resources/jndi.properties 修改 connectionfactory.myJmsFactory 的设定到
amqp://admin:admin@localhost/test?brokerlist='tcp://0.0.0.0:5672
打开接收讯息的消费器,请到activemq-amqp-example/ 路径下执行,,
mvn -P consumer
启动讯息发送,
mvn -P producer
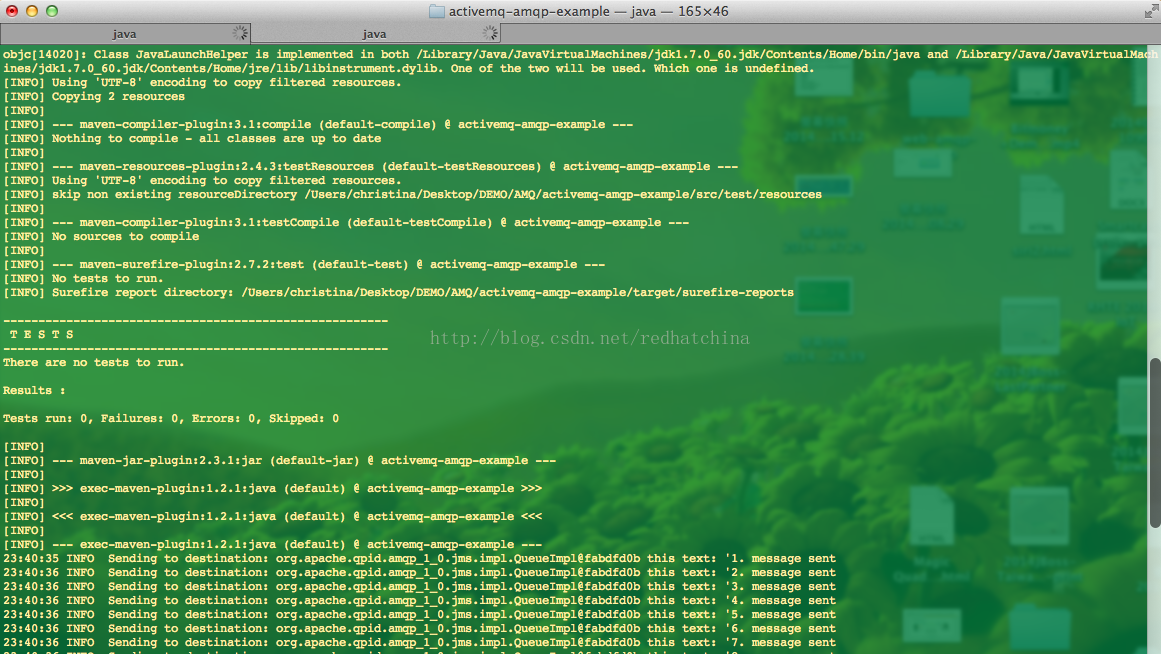
如果你看到接收器,接收讯息的日志,表示你已经成功地设定好了!
From 原站: Christina の J老闆


 9591
9591

 被折叠的 条评论
为什么被折叠?
被折叠的 条评论
为什么被折叠?
 到【灌水乐园】发言


