


Nutch1.8-bin部署及问题总结
说明:Nutch有两个主版本1.X和2.X,主要区别是2.X引入了存储抽象层,从而支持各种NoSQL数据库,如HBase、Cassandra等。本文介绍1.8版本。
环境准备:
Linux服务器,可以装在VMware虚拟机中。
下载Nutch1.8,有src和bin两种包,本文下载bin二进制包,官网链接为:
http://www.apache.org/dyn/closer.cgi/nutch/1.8/apache-nutch-1.8-bin.tar.gz
安装nutch:
解压apache-nutch-1.8-bin.tar.gz,生成apache-nutch-1.8,依次运行下列命令:
(1)修改名字:mv apache-nutch-1.8 nutch-1.8
(2)进入目录:cd nutch
(3)执行命令,验证安装:bin/nutch 或 bin/crawl
如果出现下图(1)或下图(2)表示安装成功:
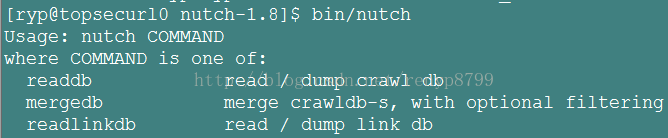
图(1)

图(2)
如果不成功,可以检查是否权限问题,为bin/nutch增加执行权限。配置nutch:
关于配置,有人直接修改conf/nutch-default.xml,也有人修改conf/nutch-site.xml
nutch-default.xml是nutch的默认配置,nutch-site.xml中的配置会覆盖掉它,所以最好不要改默认配置,如果修改也可以,如下,(官方不推荐)
(1)配置conf/nutch-default.xml
<configuration>和</configuration>之间输入以下内容
<property>
<name>http.agent.name</name>
<value>spider</value>
<description>HTTP 'User-Agent' request header. MUST NOT be empty -
please set this to a single word uniquely related to your organization.
NOTE: You should also check other related properties:
http.robots.agents
http.agent.description
http.agent.url
http.agent.email
http.agent.version
and set their values appropriately.
</description>
</property>
<property>
<name>http.robots.agents</name>
<value>spider,*</value>
<description>The agent strings we'll look for in robots.txt files,
comma-separated, in decreasing order of precedence. You should
put the value of http.agent.name as the first agent name, and keep the
default * at the end of the list. E.g.: BlurflDev,Blurfl,*
</description>
</property>
注意:
其中字段“http.agent.name”为你的crawler的名字(记得早期的版本可以不填的,现在的版本不填就报错),字段http.robots.agents,也可以不填,但是不填的话抓取的时候nutch会报:
错误信息:Fetcher: Your 'http.agent.name' value should be listed first in 'http.robots.agents' property.
此外注意http.robots.agents的value值。
最好只修改nutch-site.xml文件:
添加如下内容:
<property>
<name>http.agent.name</name>
<value>spider</value>
</property>
<property>
<name>http.agent.version</name>
<value>1.0</value>
</property>
<property>
<name>http.robots.agents</name>
<value>spider,*</value>
</property>
<property>
<name>searcher.dir</name>
<value>othoer-searcher</value>
<description>Path to root of crawl</description>
</property>
(2)创建urls种子
$touch urls_crawl.txt
$vim urls_crawl.txt
添加种子,以“http://nutch.apache.org”为例。
(3)编辑conf
将最后两行内容
# accept anything else
+.
替换为你以正则表达式匹配的你希望爬的地址。例如:
+^http://([a-z0-9]*\.)*nutch.apache.org/
这是用正则表达式来限制爬虫的范围仅限于nutch.apache.org这个域。
运行nutch:
说明:因为第一次用nutch,在网上搜集资料只找到1,X系列中1.8以下版本,命令行参数貌似有区别,1.8v提示如下:
Usage:crawl <seedDir> <crawlDir> <solrURL> <numberOfRounds>参数说明:seedDir:种子url的目录地址
crawlDir:保存爬取文件的目录
solrURL:solr的地址(没有则为空)
numberOfRounds:爬行至最深时,可获得的最大页数。
bin/crawl urls_crawl.txt crawls -depth 5 -topN 5
其中urls_crawl.txt为种子url,crawls为输出目录(可不写,默认为“crawl-“加当前日期和时间,depth为抓取深度,默认为5)
注意:如果运行如下命令,会出现错误

关于solrURL,需要与Solr集成。
安装Solr:cd solr-4.8.1
Java –jar start.jar
不知什么原因,程序跑起来了,但是卡在一处不动了,所以集成没成功,暂不考虑Solr。以后继续研究
(此处有些问题,需要进一步研究)
结果查看:
爬完后crawls下有三个文件夹:crawldb、linkdb、segmentsCrawldb:所有需要爬取的超链接
Linkdb:所有超链接及其每个连接的链入地址和锚文本
Segments:抓取的页面,以爬取的时间命名,个数不多于爬取的深度,nutch使用广度优先,每一层url生成一个文件夹。

crawl_generate : names a set of urls to be fetched(待爬取的url)
crawl_fetch : contains the status of fetching each url(爬取的url的状态)
content : contains the content of each url(页面内容)
parse_text : contains the parsed text of each url(网页的文本信息)
parse_data : contains outlinks and metadata parsed from each url(url解析出来的外链和元数据)
crawl_parse : contains the outlink urls, used to update the crawldb(更新crawldb的外链)
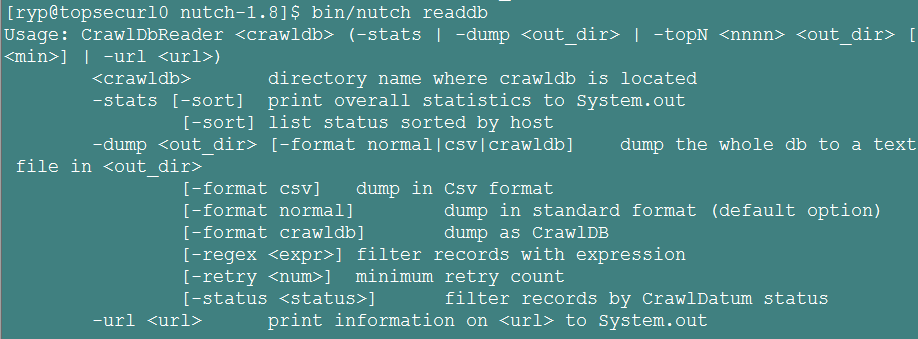
1> 查看url地址总数和它的状态及评分:bin/nutch readdb crawls/crawldb/ -stats
2> 导出每个url地址的详细内容:bin/nutch readdb crawls/crawldb/ -dump crawldb(导出的地址)
3> 查看链接情况:bin/nutch readlinkdb crawls/linkdb/ -url http://nutch.apache.org
4> 导出linkdb数据库文件:bin/nutch readlinkdb crawls /linkdb/ -dump linkdb(导出的地址)
5> bin/nutch readseg -list -dir crawls/segments/ 可以看到每一个segments的名称,产生的页面数,抓取的开始时间和结束时间,抓取数和解析数。
6> bin/nutch readseg -dump crawls/segments/ 20140523113557 segdb 导出segments,其中url/segments/ 20140523113557为一个segments文件夹,segdb为存放转换后的内容的文件夹.
7> 最后一个命令可能是最有用的,用于获得页面内容,一般会加上几个选项
bin/nutch readseg -dump crawls/segments/20140523113557/ segdb -nofetch -nogenerate -noparse -noparsedata -nocontent 这样得到的dump文件只包含网页的正文信息,没有标记。


 2358
2358


 被折叠的 条评论
为什么被折叠?
被折叠的 条评论
为什么被折叠?
 到【灌水乐园】发言


