


在i.MX6Q SabreLite上移植开发基于OpenCV2.4.9 + QT5.4.2程序。
首先需要做的是安装PC端和编译ARM端的QT5.4.2。
接下来编译PC端和ARM端的OpenCV2.4.9。
尤其注意操作系统的区别,特别注明本搭建基于Ubuntu14.04 64位系统。
在编译过程中,错误不断,为了加速编译时间,建议按照步骤进行,错误防不胜防啊!!!
出现的错误在文末给出。
参考:
http://blog.csdn.NET/imhml1987/article/details/49666359
http://blog.csdn.Net/wdjhzw/article/details/41849383
http://doc.qt.io/qt-5/embedded-Linux.html
一、前期准备
英蓓特i.MX6Q SabreLite 开发板。
element14 LCD8000-97C显示器。
Ubuntu 14.04 64位,尤其注意操作系统的差别。
(1)、下载timesys开发环境i.MX6QSABRELite-development-environment.sh,或者直接下载镜像http://www.embest-tech.cn/download/201308011110.html
可以去https://linuxlink.timesys.com/guest/作为来宾用户构建自己开发环境。
(2)、下载QT5.4.2源码包:http://download.qt.io/archive/qt/5.4/5.4.2/single/qt-everywhere-opensource-src-5.4.2.tar.gz
(3)、下载QT5.4.2 Linux 64位安装包:http://download.qt.io/archive/qt/5.4/5.4.2/qt-opensource-linux-x64-5.4.2.run
(4)、下载dbus-1.8.20源码包:https://dbus.freedesktop.org/releases/dbus/dbus-1.8.20.tar.gz
(5)、下载tslib-1.4源码包:http://download.csdn.net/detail/liuqiqi677/3177449
(6)、下载OpenCV-2.4.9.tar.gz,详见OpenCV官网
二:开发板系统安装及配置
(1)、开发环境搭建及所需库安装。
a、将i.MX6QSABRELite-development-environment.sh复制到Ubuntu /home/work/sabrelite目录中。
b、添加执行选项,并执行。
$ chmod a+x i.MX6QSABRELite-development-environment.sh

$ ./i.MX6QSABRELite-development-environment.sh
在 .bashrc添加环境变量。
$ gedit .bashrc  export PATH=/home/wps/timesys/i_MX6QSABRELite/toolchain/ccache:/home/wps/timesys/i_MX6QSABRELite/toolchain/bin:$PATH

$ source ~/.bashrc
c、编译dbus-1.8.20,进入源码目录。安装目录/usr/local/dbus-1.8.20_sabrelite
$./configure --host=arm-linux --prefix=/usr/local/dbus-1.8.20_sabrelite CC=/home/wps/timesys/i_MX6QSABRELite/toolchain/bin/armv7l-timesys-linux-gnueabi-gcc --without-x

$make

$sudo make installd、编译tslib-1.4,进入源码目录,创建configTslib14.sh,代码如下,并执行,安装目录/usr/local/tslib-1.4_sabrelite
 #!/bin/sh
 make clean && make distclean
 echo "ac_cv_func_malloc_0_nonnull=yes" >arm-linux.cache
 CC=/home/wps/timesys/i_MX6QSABRELite/toolchain/bin/armv7l-timesys-linux-gnueabi-gcc ./configure --host=arm-linux --prefix=/usr/local/tslib-1.4_sabrelite --cache-file=arm-linux.cache
sudo make && sudo make install
三、QT5.4.2的安装和编译,分为两个部分,PC端安装和ARM端编译。
(1)、PC端安装
首先编写QT程序需要QtCreater 开发工具,不推荐使用使用apt-get install 安装,直接下载对应QT版本的安装包即可。如本文的http://download.qt.io/archive/qt/5.4/5.4.2/qt-opensource-linux-x64-5.4.2.run。
指定安装目录:/home/wps/programs/qt/Qt5.4.2/x86。
安装完成即可。
(2)、ARM端编译
本文使用的是英蓓特公司提供的交叉编译工具链armv7l-timesys-linux-gnueabi-
首先解压下载的源码包qt-everywhere-opensource-src-5.4.2.tar.gz,解压至/home/wps/programs/qt
a、进入/home/wps/programs/qt/qt-everywhere-opensource-src-5.4.2/qtbase,键入一下命令,并编译,安装目录/home/wps/programs/qt/Qt5.4.2/qt-5.4.2_sabrelite,本文安装在home目录下,本打算安装到/usr/local目录下出错,下文介绍。
$./configure -v -opensource -confirm-license -no-pch -no-xcb -no-openssl -no-opengl -opengl es2 -dbus -qt-zlib -no-sse2 -no-iconv -tslib -make libs -device imx6 -device-option CROSS_COMPILE=/home/wps/timesys/i_MX6QSABRELite/toolchain/bin/armv7l-timesys-linux-gnueabi- -sysroot /home/wps/timesys/i_MX6QSABRELite/rfs/rootfs/ -no-gcc-sysroot -prefix /home/wps/programs/qt/Qt5.4.2/qt-5.4.2_sabrelite -make examples -nomake tools -nomake tests -fontconfig -qt-libpng -qt-libjpeg -plugin-sql-sqlite -widgets -qt-sql-sqlite -no-cups -no-nis  -no-openssl -no-accessibility -silent -qt-freetype -no-glib -strip -linuxfb -plugindir /usr/local/qt-5.4.2_sabrelite/plugins -I/usr/local/tslib-1.4_sabrelite/include -L/usr/local/tslib-1.4_sabrelite/lib

$make -j4

$sudo make install
b、Qt、Dbus、Tslib、放入指定的ARM端存放目录。 放入开发板
/usr/local/qt-5.4.2_sabrelite
/usr/local/tslib-1.4_sabrelite
/usr/local/dbus-1.8.20_sabrelite
复制 /home/wps/timesys/i_MX6QSABRELite/rfs/ home/wps/Qt5.4.2/ qt-5.4.2_sabrelite 中的文件到开发板/usr/local/ qt-5.4.2_sabrelite 中
当然打开QtCreater,配置Kits。
首先配置编译器目录。在交叉工具链中。
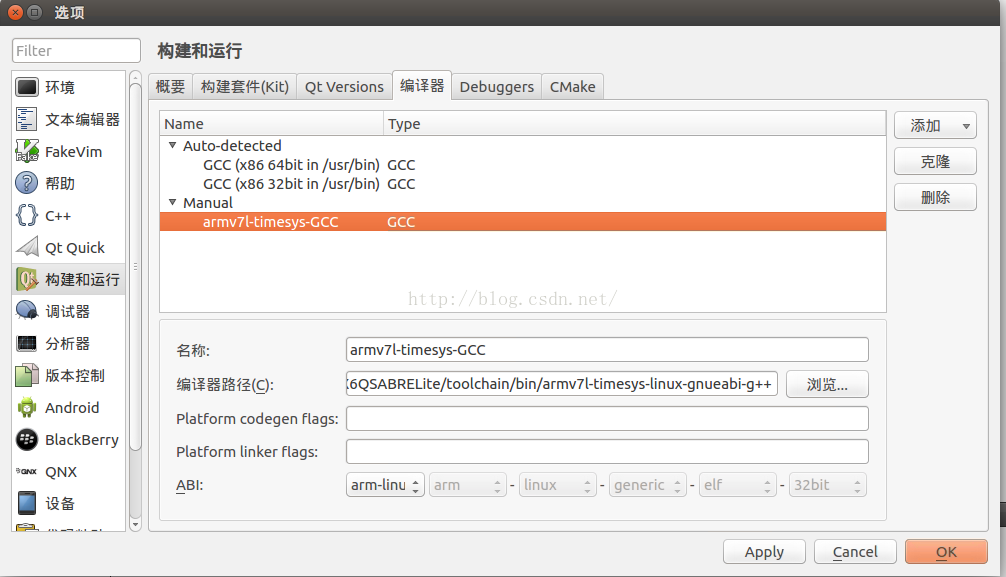
配置Qt版本
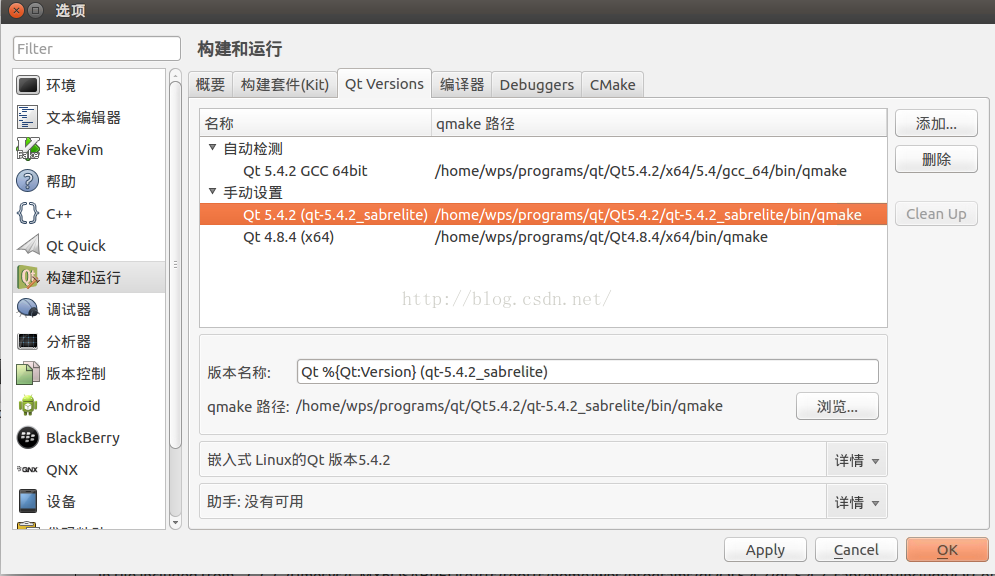
最后配置开发套件。
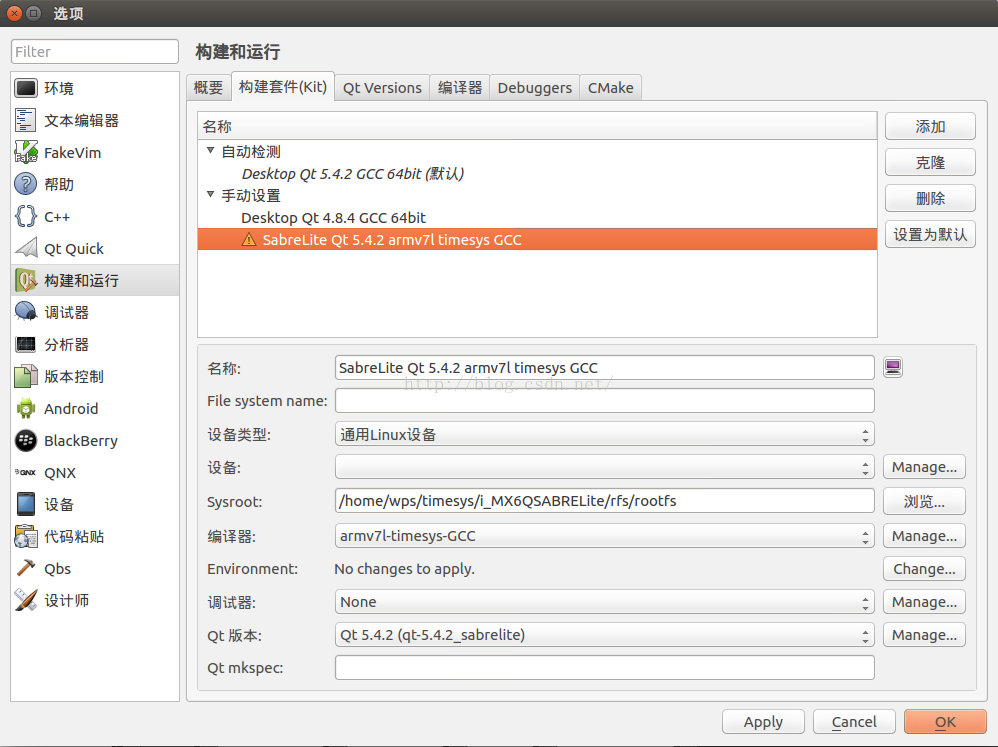
至此完成配置工作,新建QWidget项目。将/home/wps/nfs目录挂载到开发板/mnt目录下。详情参见他人教程。
将以下命令写入/etc/init.d/rcS文件中实现开机自动配置IP,挂载。
ifconfig eth0 192.168.0.199 netmask 255.255.255.0
route add default gw 192.168.0.253
mount -t nfs 192.168.0.190:/home/wps/nfs /mnt -o nolock
新建项目存放在/home/wps/nfs/qtdemo中,编译arm版本程序,使用minicom进入开发板/mnt/*知道执行文件目录,执行。
四、OpenCV2.4.9编译。
上文中已经完成Qt的编译,接下来需要进行OpenCV的编译。
(1)、首先编译PC端OpenCV。
参见这篇文章,PC端编译比较简单,出错较少,安装目录在/home/wps/programs/opencv/opencv2.4.9/x86
http://blog.csdn.net/romeolikejuliet/article/details/53223285
(2)、然后ARM端编译。
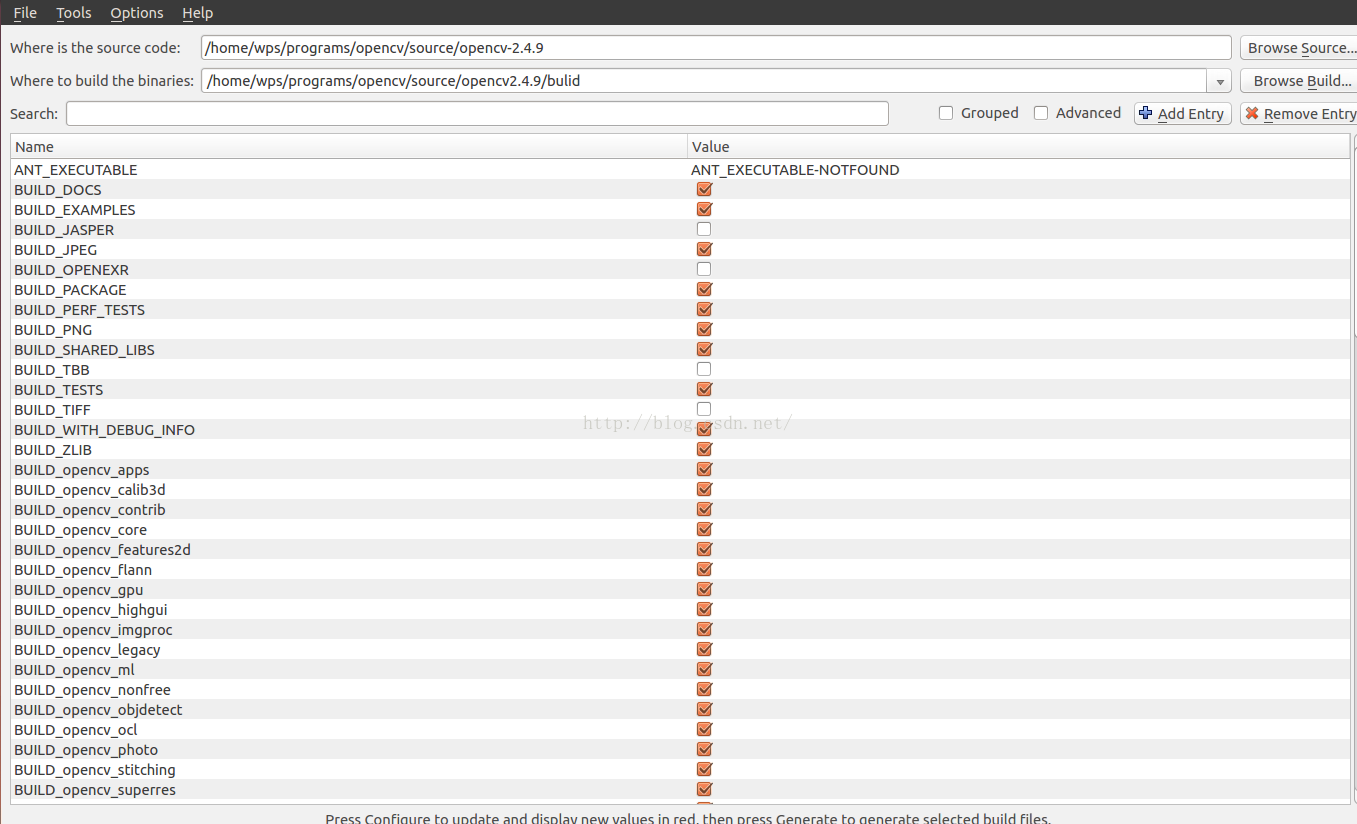
这里的编译需要使用CMAKE工具,同时出错较多。
配置信息
General configuration for OpenCV 2.4.9 =====================================
Version control: unknown
Platform:
Host: Linux 4.2.0-27-generic x86_64
Target: Linux
CMake: 2.8.12.2
CMake generator: Unix Makefiles
CMake build tool: /usr/bin/make
Configuration: Release
C/C++:
Built as dynamic libs?: YES
C++ Compiler: /home/wps/timesys/i_MX6QSABRELite/toolchain/bin/armv7l-timesys-linux-gnueabi-g++ (ver 4.7.3)
C++ flags (Release): -fsigned-char -W -Wall -Werror=return-type -Werror=address -Werror=sequence-point -Wformat -Werror=format-security -Wmissing-declarations -Wundef -Winit-self -Wpointer-arith -Wshadow -Wsign-promo -Wno-narrowing -Wno-delete-non-virtual-dtor -fdiagnostics-show-option -pthread -fomit-frame-pointer -ffunction-sections -O3 -DNDEBUG -DNDEBUG
C++ flags (Debug): -fsigned-char -W -Wall -Werror=return-type -Werror=address -Werror=sequence-point -Wformat -Werror=format-security -Wmissing-declarations -Wundef -Winit-self -Wpointer-arith -Wshadow -Wsign-promo -Wno-narrowing -Wno-delete-non-virtual-dtor -fdiagnostics-show-option -pthread -fomit-frame-pointer -ffunction-sections -g -O0 -DDEBUG -D_DEBUG
C Compiler: /home/wps/timesys/i_MX6QSABRELite/toolchain/bin/armv7l-timesys-linux-gnueabi-gcc
C flags (Release): -fsigned-char -W -Wall -Werror=return-type -Werror=address -Werror=sequence-point -Wformat -Werror=format-security -Wmissing-declarations -Wmissing-prototypes -Wstrict-prototypes -Wundef -Winit-self -Wpointer-arith -Wshadow -Wno-narrowing -fdiagnostics-show-option -pthread -fomit-frame-pointer -ffunction-sections -O3 -DNDEBUG -DNDEBUG
C flags (Debug): -fsigned-char -W -Wall -Werror=return-type -Werror=address -Werror=sequence-point -Wformat -Werror=format-security -Wmissing-declarations -Wmissing-prototypes -Wstrict-prototypes -Wundef -Winit-self -Wpointer-arith -Wshadow -Wno-narrowing -fdiagnostics-show-option -pthread -fomit-frame-pointer -ffunction-sections -g -O0 -DDEBUG -D_DEBUG
Linker flags (Release):
Linker flags (Debug):
Precompiled headers: YES
OpenCV modules:
To be built: core flann imgproc highgui features2d calib3d ml video legacy objdetect photo gpu ocl nonfree contrib stitching superres ts videostab
Disabled: world
Disabled by dependency: -
Unavailable: androidcamera dynamicuda java python viz
GUI:
QT: NO
GTK+ 2.x: NO
GThread : NO
GtkGlExt: NO
OpenGL support: NO
VTK support: NO
Media I/O:
ZLib: build (ver 1.2.7)
JPEG: build (ver 62)
PNG: build (ver 1.5.12)
TIFF: build (ver 42 - 4.0.2)
JPEG 2000: NO
OpenEXR: build (ver 1.7.1)
Video I/O:
DC1394 1.x: NO
DC1394 2.x: NO
FFMPEG: NO
codec: NO
format: NO
util: NO
swscale: NO
gentoo-style: NO
GStreamer: NO
OpenNI: NO
OpenNI PrimeSensor Modules: NO
PvAPI: NO
GigEVisionSDK: NO
UniCap: NO
UniCap ucil: NO
V4L/V4L2: NO/YES
XIMEA: NO
Xine: NO
Other third-party libraries:
Use IPP: NO
Use Eigen: NO
Use TBB: NO
Use OpenMP: NO
Use GCD NO
Use Concurrency NO
Use C=: NO
Use Cuda: NO
Use OpenCL: YES
OpenCL:
Version: dynamic
Include path: /home/wps/programs/opencv/source/opencv-2.4.9/3rdparty/include/opencl/1.2
Use AMD FFT: NO
Use AMD BLAS: NO
Python:
Interpreter: /usr/bin/python2 (ver 2.7.6)
Java:
ant: NO
JNI: NO
Java tests: NO
Documentation:
Build Documentation: NO
Sphinx: NO
PdfLaTeX compiler: NO
Tests and samples:
Tests: YES
Performance tests: YES
C/C++ Examples: YES
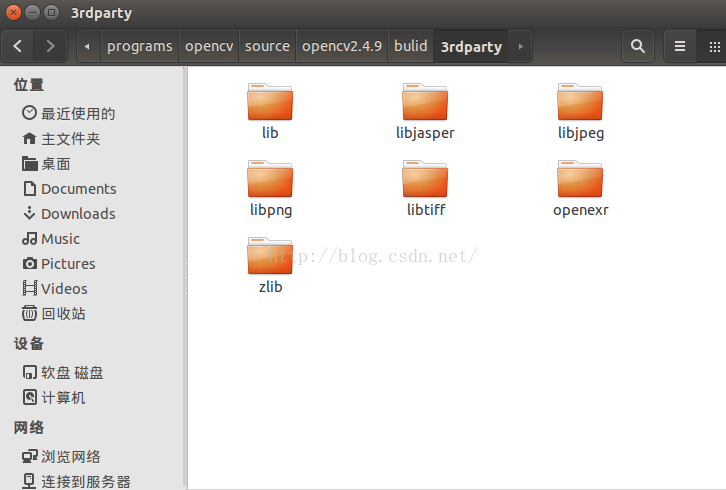
Install path: /home/wps/programs/opencv/opencv2.4.9/opencv-2.4.9_sabrelite
cvconfig.h is in: /home/wps/programs/opencv/source/opencv2.4.9/bulid
-----------------------------------------------------------------
Configuring done
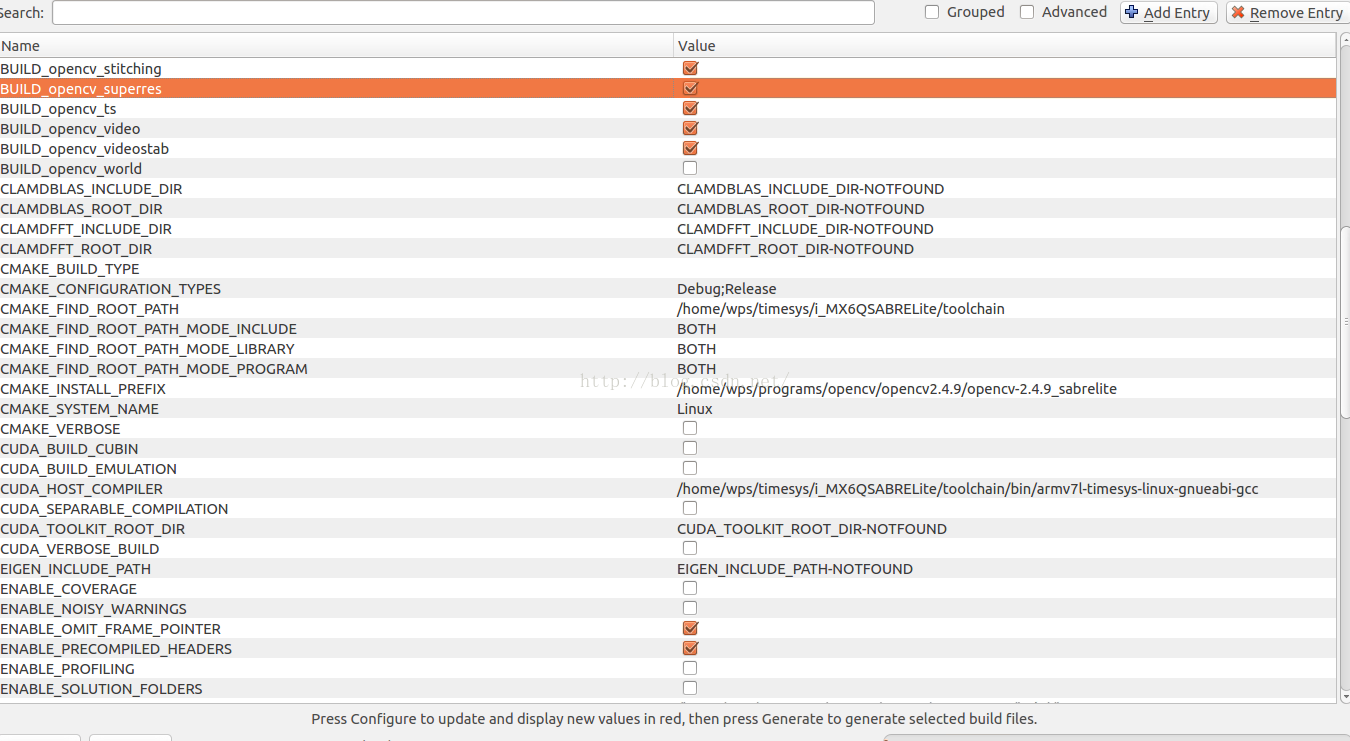
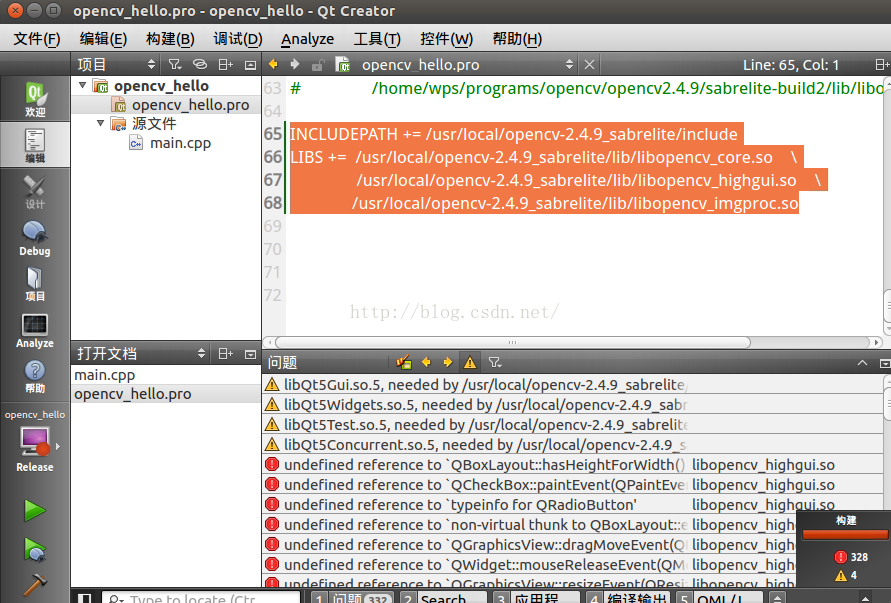
Generating done在这里强烈说明,我按照这个配置顺利编译,开始配置时勾选了WITH_QT,需要指定相关文件,指定的QtCore、QtGui等信息在源码包的qtbase/lib/cmake中或者安装路径qt_path/lib/cmake中,尤其是注意安装路径,可能是在/usr/local目录下没有开启相关权限或者路径添加错误,在编译时出现以下错误。
安装至/home目录下解决问题。
libQtGui.so.5,needed by libopencv_higui.so no find.
libQtWidgets.so.5,needed by libopencv_higui.so no find.
libQtTest.so.5,needed by libopencv_higui.so no find.
libQtConcurrent.so.5,needed by libopencv_higui.so no find.
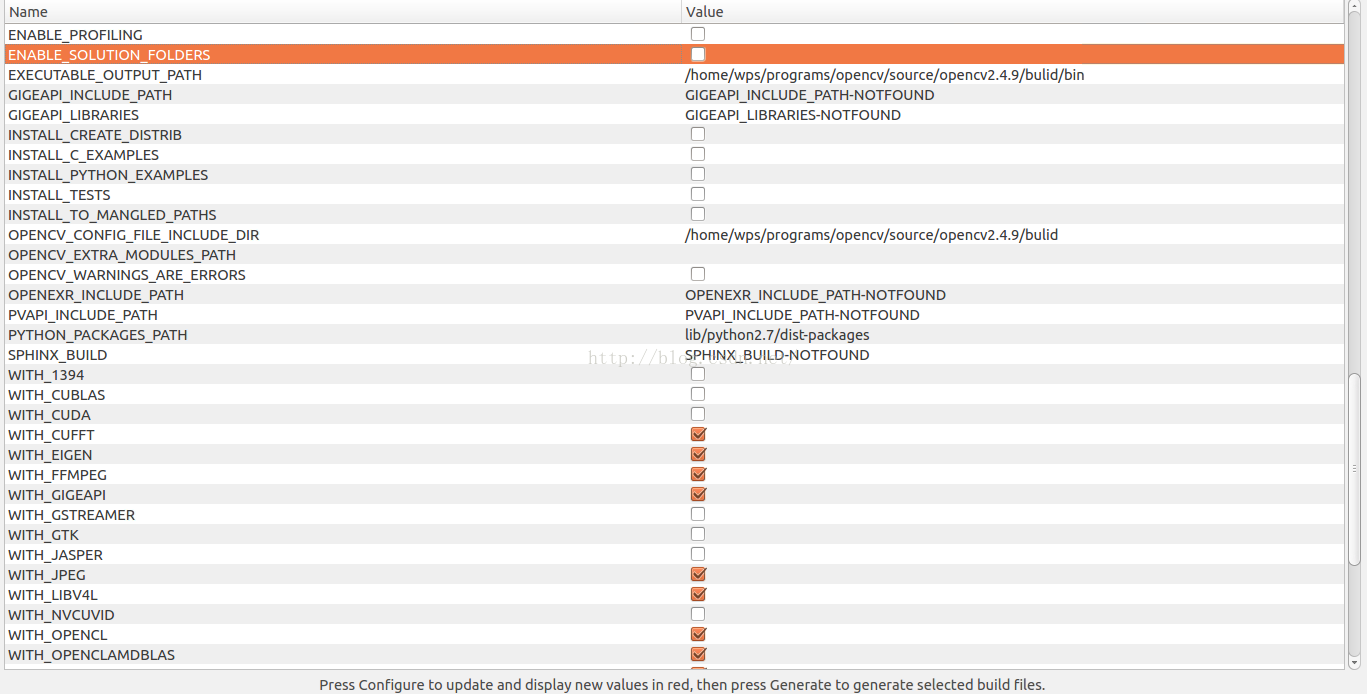
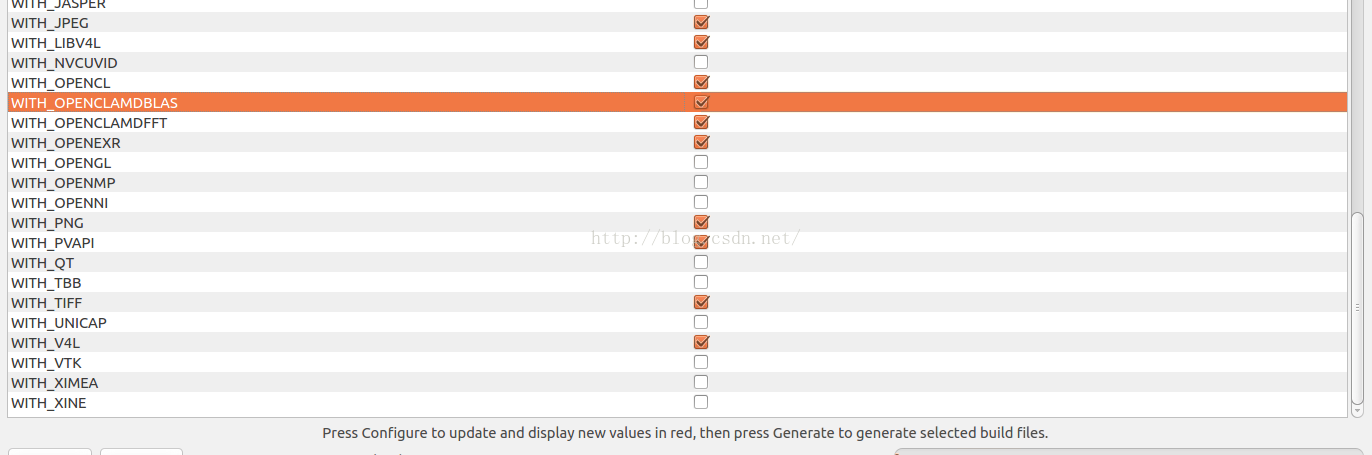
其他配置,可以自行尝试。
多次Configue,最后Generate。
之后进入/home/wps/programs/opencv/source/opencv2.4.9/build就可以make -j4 && make install了。
!!!等等!!!!
别慌,这是要犯错误的。
由于本文采用的是64位系统,
`a local symbol' can not be used when making a shared object; recompile with -fPIC
会出现这样的-PIC错误,
参见http://ask.csdn.net/questions/70191;
进入opencv目录下的3rdparty的对应目录CMakeFiles/ *.dir下,
打开flags.make,在C_FLAGS = 后添加-O3 -fPIC用来支持在64位机上编译
如../3rdparty/zlib/CMakeFiles/zlib.dir/flags.make
修改C_FLAGS = -W -Wall 为 C_FLAGS = -O3 -fPIC -W -Wall 和
修改CXX_FLAGS = -W -Wall 为 C_FLAGS = -O3 -fPIC -W -Wall
这里面都需要修改
如红笔所示

之后进入/build目录
$make -j4

$make install
将编译好的OpenCV安装到/home/wps/programs/opencv/opencv2.4.9/opencv-2.4.9 _ sabrelite目录中。
同时将目录中的文件复制到开发板/usr/local/opencv-2.4.9_sabrelite\中。
(3)、测试
又出错,摄像机插入不识别,大师兄工作做得好,他指出
USB摄像头支持UVC驱动,因此需要在SABRELite开发板提供的Linux内核中加入对UVC的支持。查看源码,make menuconfig或者直接查看源码根目录下的 .config 文件,找到 Multimedia 的USB Video Class,编译方式为 M(模块),实际在编译成 uImage 的时候,该模块是没有被集成进去的,需要将编译方式改为 Y(静态编译)。然后将生成的 uImage 烧写到 SABRELite 的SD卡中,系统可以在USB摄像头插入时检测到UVC camera设备。
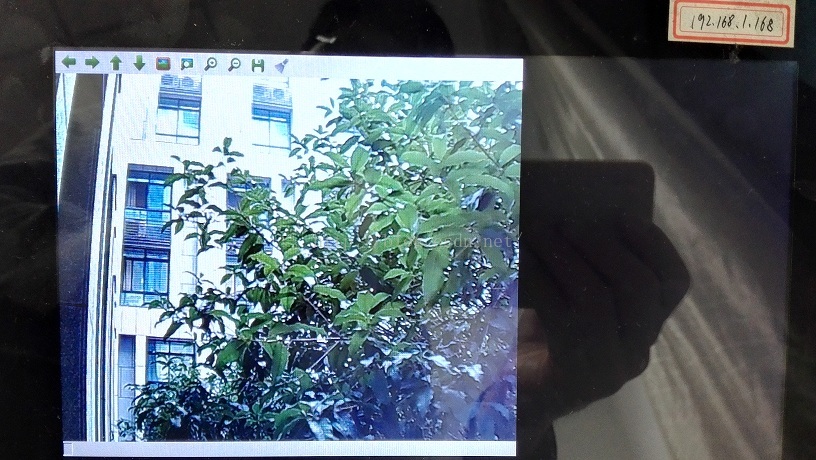
采集与显示的源码
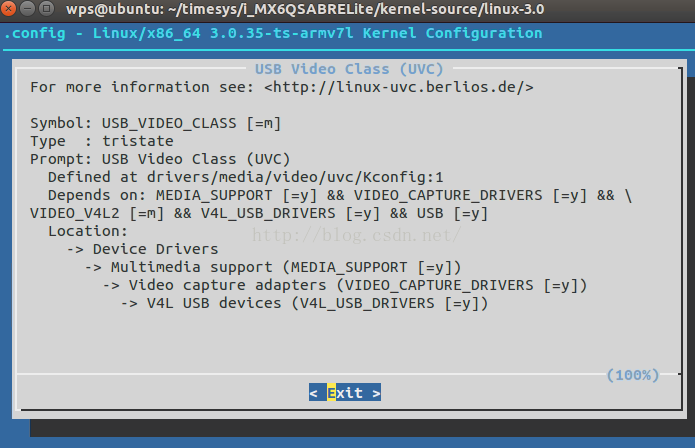
收先使用英蓓特公司提供的配置代码,在.config文件中查找USB_Video_Class = y保存后,编译。
接下来。。。
正常移植就好。
开机之后相关配置。
系统配置:
1、在uboot中输入命令如下:
setenv bootargs console=ttymxc1,115200 video=mxcfb0:dev=ldb,LDB-XGA,if=RGB666
最后记得 saveenv 再 bootm 启动kernel
2、删除/etc/init.d/S99-fluidlauncher,关闭开机自启动,或者复制到/home/sysbackup
3、触摸屏校正:第一次使用开发板开机后要使用 ts_calibrate 命令对触摸屏进行校正后再使用
4、设置开机启动项,自动挂载至主机
#---------------------------------------
#/etc/init.d/rcS 开机启动
ifconfig eth0 192.168.0.199 netmask 255.255.255.0
route add default gw 192.168.0.253
mount -t nfs 192.168.0.190:/home/wps/nfs /mnt -o nolock
5、复制相关包进入开发板,包括Qt5.4.2,OpenCV2.4.9, dbus-1.8.20,tslib-1.4
在/usr下建立local文件夹,
在local下分别建立,qt-5.4.2_sabrelite ,opencv-2.4.9_sabrelite,dbus-1.8.20_sabrelite,tslib-1.4_sabrelite,
将编译好的文件复制进去。
6、通过dbus-1.8.20获取machine-id
添加到/etc/machine-id中
7、配置
#/etc/profile

#Qt-5.4.2

export QTDIR=/usr/local/qt-5.4.2_sabrelite
export LD_LIBRARY_PATH=/lib:$QTDIR/lib:$LD_LIBRARY_PATH
export QT_QWS_FONTDIR=/lib/fonts:$QTDIR/lib/fonts
export QT_QPA_PLATFORM_PLUGIN_PATH=$QTDIR/plugins
export QT_QPA_PLATFORM=linuxfb:tty=/dev/fb0
export QT_QPA_GENERIC_PLUGINS=evdevtouch:/dev/input/event1
export QML2_IMPORT_PATH=$QTDIR/qml


#OpenCV-2.4.

export OPENCVDIR=/usr/local/opencv-2.4.9_sabrelite
export LD_LIBRARY_PATH=/lib:$OPENCVDIR/lib:$LD_LIBRARY_PATH


#Dbus-1.8.20
export DBUSDIR=/usr/local/dbus-1.8.20 _sabrelite
export LD_LIBRARY_PATH=/lib:$DBUSDIR/lib:$LD_LIBRARY_PATH

#Tslib-1.4
export TSLIBDIR=/usr/local/tslib-1.4_sabrelite
export LD_LIBRARY_PATH=/lib:$TSLIBDIR/lib:$LD_LIBRARY_PATH
至此系统搭建完成,在开始使用时出现字体无法显示情况,折腾半天,出了一些错,现将软件安装至系统目录下,将qt中的fonts文件夹复制进/lib目录中,并更新/etc/profile文件,目前来看成功了。。。。
如果还是出错,重新编过,注意总结就好。。。。
看我,今天下雨,天气不错,请忽视IP。。。。


 7951
7951


 被折叠的 条评论
为什么被折叠?
被折叠的 条评论
为什么被折叠?
 到【灌水乐园】发言


